
User Manual
Page 1
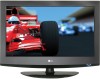
... model number and serial number of the set of power-saving guidelines issued by the U.S. A.,Inc. Retain it for energy efficiency. (Only 32LG3DC model) LCD TV OWNER'S MANUAL 26LG3DCH 32LG3DC 32LG3DCH Please read this information to your set. S. Environmental Protection Agency(EPA). See the label attached on the back cover and quote this...
... model number and serial number of the set of power-saving guidelines issued by the U.S. A.,Inc. Retain it for energy efficiency. (Only 32LG3DC model) LCD TV OWNER'S MANUAL 26LG3DCH 32LG3DC 32LG3DCH Please read this information to your set. S. Environmental Protection Agency(EPA). See the label attached on the back cover and quote this...

User Manual
Page 5
... install a separate circuit breaker. Pay particular attention to plugs, wall outlets, and the point where the cord exits the appliance. 11 Never touch this owner's manual to be certain. Servicing is required when the apparatus has been damaged in any objects to fall into the apparatus, the apparatus has exposed to...
... install a separate circuit breaker. Pay particular attention to plugs, wall outlets, and the point where the cord exits the appliance. 11 Never touch this owner's manual to be certain. Servicing is required when the apparatus has been damaged in any objects to fall into the apparatus, the apparatus has exposed to...

User Manual
Page 6
Picture Mode - Color Tone - Preset 45 Manual Picture Adjustment - Picture Mode - Black (Darkness) Level 49 Advanced Control - Channel Editing 39 Channel Label 40 Input List 41 PICTURE CONTROL Picture Size (Aspect Ratio) ... - Preset 44 - Real Cinema 51 Picture Reset 52 4 Eye Care 50 Advanced Control - Expert Control 47 Picture Improvement Technology 48 Advanced Control - Add / Delete Channel (Manual Tuning 38 - Auto Scan (Auto Tuning 37 -
Picture Mode - Color Tone - Preset 45 Manual Picture Adjustment - Picture Mode - Black (Darkness) Level 49 Advanced Control - Channel Editing 39 Channel Label 40 Input List 41 PICTURE CONTROL Picture Size (Aspect Ratio) ... - Preset 44 - Real Cinema 51 Picture Reset 52 4 Eye Care 50 Advanced Control - Expert Control 47 Picture Improvement Technology 48 Advanced Control - Add / Delete Channel (Manual Tuning 38 - Auto Scan (Auto Tuning 37 -

User Manual
Page 7
... Stereo/SAP Broadcasts Setup 61 Audio Language 62 On-Screen Menus Language Selection 63 Caption Mode - Analog Broadcasting System Captions 64 - Auto Clock Setup 67 Manual Clock Setup 68 Auto On/Off Time Setting 69 Sleep Timer Setting 70 Auto Shut-off Setting 71 PARENTAL CONTROL / RATINGS Set Password & Lock System...
... Stereo/SAP Broadcasts Setup 61 Audio Language 62 On-Screen Menus Language Selection 63 Caption Mode - Analog Broadcasting System Captions 64 - Auto Clock Setup 67 Manual Clock Setup 68 Auto On/Off Time Setting 69 Sleep Timer Setting 70 Auto Shut-off Setting 71 PARENTAL CONTROL / RATINGS Set Password & Lock System...

User Manual
Page 9
... available discoloration. for stand fixing (Refer to P.13) (only 32LG3DC model) Protection Cover (Refer to maintain standards compliance. 7 CD Manual PICTURE TV SOUND POWER 1 4 2 SAP INPUT RATIO 7 5 3 - 8 6 0 9 ADJUST ENTER VOL TIMER CC MUTE MENU CH RETURN FLASHBK 1.5V 1.5V Remote Control, Batteries (only 32LG3DC model) Power Cord x4 x4 Bolts for stand assembly...
... available discoloration. for stand fixing (Refer to P.13) (only 32LG3DC model) Protection Cover (Refer to maintain standards compliance. 7 CD Manual PICTURE TV SOUND POWER 1 4 2 SAP INPUT RATIO 7 5 3 - 8 6 0 9 ADJUST ENTER VOL TIMER CC MUTE MENU CH RETURN FLASHBK 1.5V 1.5V Remote Control, Batteries (only 32LG3DC model) Power Cord x4 x4 Bolts for stand assembly...

User Manual
Page 19
... plug in any power cords until you do receive digital signals from a digital set-top box or other digital external device, refer to the owner's manual for 32LG3DC model.
... plug in any power cords until you do receive digital signals from a digital set-top box or other digital external device, refer to the owner's manual for 32LG3DC model.

User Manual
Page 20
... EXTERNAL EQUIPMENT SETUP ( ) HDMI Connection 1. HDMI supports both audio and video. 2. How to use I Turn on the digital set-top box. (Refer to the owner's manual for the digital set -top box to connect 1 Connect the digital set -top box.) I Select HDMI/DVI input source with using the INPUT button on...
... EXTERNAL EQUIPMENT SETUP ( ) HDMI Connection 1. HDMI supports both audio and video. 2. How to use I Turn on the digital set-top box. (Refer to the owner's manual for the digital set -top box to connect 1 Connect the digital set -top box.) I Select HDMI/DVI input source with using the INPUT button on...

User Manual
Page 21
... the TV using the INPUT button on the TV. 2. How to connect 1 Connect the DVI output of the digital set-top box to the owner's manual for this connection. DVI doesn't support audio, so a separate audio connection is required for the digital set -top box to HDMI Connection 1.
... the TV using the INPUT button on the TV. 2. How to connect 1 Connect the DVI output of the digital set-top box to the owner's manual for this connection. DVI doesn't support audio, so a separate audio connection is required for the digital set -top box to HDMI Connection 1.
User Manual
Page 22
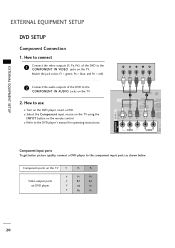
I Refer to the DVD player's manual for operating instructions. EXTERNAL EQUIPMENT SETUP EXTERNAL EQUIPMENT SETUP DVD SETUP Component Connection 1. I Select the Component input source on the TV using the INPUT button ...
I Refer to the DVD player's manual for operating instructions. EXTERNAL EQUIPMENT SETUP EXTERNAL EQUIPMENT SETUP DVD SETUP Component Connection 1. I Select the Component input source on the TV using the INPUT button ...

User Manual
Page 23
I Refer to the DVD player's manual for operating instructions. HDMI supports both audio and video. 2. I Select the A V 1 input source on the TV using the INPUT button on the TV. 2. How to ... the TV. 2 Connect the audio outputs of the DVD to the AUDIO input jacks on the remote control. HDMI Connection 1. How to the DVD player's manual for operating instructions. ( ) COMPONENT AAVV IN 1 EXTERNAL EQUIPMENT SETUP HDMI/DVI IN USB IN SERVUCE ONLY AUDIO (MONO) VIDEO S-VIDEO IN VIDEO 1 2 AUDIO ( ) S-VIDEO AUDIO...
I Refer to the DVD player's manual for operating instructions. HDMI supports both audio and video. 2. I Select the A V 1 input source on the TV using the INPUT button on the TV. 2. How to ... the TV. 2 Connect the audio outputs of the DVD to the AUDIO input jacks on the remote control. HDMI Connection 1. How to the DVD player's manual for operating instructions. ( ) COMPONENT AAVV IN 1 EXTERNAL EQUIPMENT SETUP HDMI/DVI IN USB IN SERVUCE ONLY AUDIO (MONO) VIDEO S-VIDEO IN VIDEO 1 2 AUDIO ( ) S-VIDEO AUDIO...

User Manual
Page 24
... the screen may remain visible on the TV. 2 Connect the antenna cable to the RF antenna in socket of the VCR to the VCR owner's manual.) 1 S-VIDEO VIDEO L R ANT OUT OUTPUT SWITCH ANT IN Wall Jack 2 ANTENNA IN M.P.I. Antenna ( ) 22 I Insert a video tape into the VCR and press PLAY on the...
... the screen may remain visible on the TV. 2 Connect the antenna cable to the RF antenna in socket of the VCR to the VCR owner's manual.) 1 S-VIDEO VIDEO L R ANT OUT OUTPUT SWITCH ANT IN Wall Jack 2 ANTENNA IN M.P.I. Antenna ( ) 22 I Insert a video tape into the VCR and press PLAY on the...

User Manual
Page 25
... PLAY on the VCR. (Refer to AV IN2, select AV2 input source on the TV. ! Use it when available. I If connected to the VCR owner's manual.) I Select the A V 1 input source on the TV using the INPUT button on the TV. 2. S-VIDEO COMPONENT AAVV INN11 AUDIO (MONO) VIDEO R VIDEO AUDIO 1 IN EXTERNAL... work. 23 Composite (RCA) Connection 1. How to use I Insert a video tape into the VCR and press PLAY on the VCR. (Refer to the VCR owner's manual.) I Select the A V 1 input source on the TV using the INPUT button on the TV. 2 Connect the audio outputs of the TV.
... PLAY on the VCR. (Refer to AV IN2, select AV2 input source on the TV. ! Use it when available. I If connected to the VCR owner's manual.) I Select the A V 1 input source on the TV using the INPUT button on the TV. 2. S-VIDEO COMPONENT AAVV INN11 AUDIO (MONO) VIDEO R VIDEO AUDIO 1 IN EXTERNAL... work. 23 Composite (RCA) Connection 1. How to use I Insert a video tape into the VCR and press PLAY on the VCR. (Refer to the VCR owner's manual.) I Select the A V 1 input source on the TV using the INPUT button on the TV. 2 Connect the audio outputs of the TV.

User Manual
Page 31
After adjustment, if the image is still not correct, try using the manual settings or a different resolution or refresh rate on the PC. G Position Size Phase Reset Move MENU Prev. To Set Yes No 1 MENU 2 ENTER 3 ENTER Select ...
After adjustment, if the image is still not correct, try using the manual settings or a different resolution or refresh rate on the PC. G Position Size Phase Reset Move MENU Prev. To Set Yes No 1 MENU 2 ENTER 3 ENTER Select ...

User Manual
Page 32
.... Select Screen (RGB-PC). The Size adjustment range is not clear after auto adjustment and especially if characters are still trembling, adjust the picture phase manually. I P h a s e: This function allows you prefer. Position G Size Phase Reset Move MENU Prev. Make appropriate adjustments. This feature operates only in RGB-PC mode. I Position: This...
.... Select Screen (RGB-PC). The Size adjustment range is not clear after auto adjustment and especially if characters are still trembling, adjust the picture phase manually. I P h a s e: This function allows you prefer. Position G Size Phase Reset Move MENU Prev. Make appropriate adjustments. This feature operates only in RGB-PC mode. I Position: This...

User Manual
Page 38
CHANNEL Auto Tuning Manual Tuning Channel Edit Channel Label Move Enter PICTURE Move Aspect Ratio : 16:9 Picture Mode : Standard • Backlight • Contrast • Brightness • Sharpness • Color &#... Rating Input Block WATCHING TV / CHANNEL CONTROL ON-SCREEN MENUS SELECTION Your TV's OSD (On Screen Display) may differ slightly from that shown in this manual.
CHANNEL Auto Tuning Manual Tuning Channel Edit Channel Label Move Enter PICTURE Move Aspect Ratio : 16:9 Picture Mode : Standard • Backlight • Contrast • Brightness • Sharpness • Color &#... Rating Input Block WATCHING TV / CHANNEL CONTROL ON-SCREEN MENUS SELECTION Your TV's OSD (On Screen Display) may differ slightly from that shown in this manual.

User Manual
Page 39
...) Automatically finds all channels available through antenna or cable inputs, and stores them in memory on . 37 CHANNEL Auto Tuning Manual Tuning Channel Edit Channel Label Move Enter CHANNEL Auto Tuning Manual Tuning Channel Edit Channel Label Move Enter Press 'Yes' button to Auto Tuning menu if the Lock System is required...
...) Automatically finds all channels available through antenna or cable inputs, and stores them in memory on . 37 CHANNEL Auto Tuning Manual Tuning Channel Edit Channel Label Move Enter CHANNEL Auto Tuning Manual Tuning Channel Edit Channel Label Move Enter Press 'Yes' button to Auto Tuning menu if the Lock System is required...

User Manual
Page 40
... F DIGITAL G Select channel type and RF-channel number. Channel F2 G DIGITAL 2-1 Bad Normal Good Delete Close 1 MENU Select CHANNEL. 2 ENTER Select Manual Tuning. 3 ENTER 4 5 Select DIGITAL or ANALOG. MENU Return to the previous menu. Select channel you can view the on . 38 I A password... is required to gain access to Manual Tuning menu if the Lock System is turned on -screen signal strength monitor to see the quality of the signal being received. ENTER Select A...
... F DIGITAL G Select channel type and RF-channel number. Channel F2 G DIGITAL 2-1 Bad Normal Good Delete Close 1 MENU Select CHANNEL. 2 ENTER Select Manual Tuning. 3 ENTER 4 5 Select DIGITAL or ANALOG. MENU Return to the previous menu. Select channel you can view the on . 38 I A password... is required to gain access to Manual Tuning menu if the Lock System is turned on -screen signal strength monitor to see the quality of the signal being received. ENTER Select A...

User Manual
Page 41
... / CHANNEL CONTROL Channel Editing A custom list can add or delete the channel by toggling each channel on or off with ENTER button. CHANNEL Auto Tuning Manual Tuning Channel Edit Channel Label Move Enter Add/Delete Move CH + Move Page RETURN Previous MENU Exit 1 MENU 2 ENTER Select CHANNEL. Select Channel Edit. 3 ENTER...
... / CHANNEL CONTROL Channel Editing A custom list can add or delete the channel by toggling each channel on or off with ENTER button. CHANNEL Auto Tuning Manual Tuning Channel Edit Channel Label Move Enter Add/Delete Move CH + Move Page RETURN Previous MENU Exit 1 MENU 2 ENTER Select CHANNEL. Select Channel Edit. 3 ENTER...

User Manual
Page 42
... menu if the Lock System is provided on . MENU Return to the previous menu. Select Channel Label. CHANNEL Auto Tuning Manual Tuning Channel Edit Channel Label Move Enter CHANNEL Auto Tuning Manual Tuning Channel Edit Channel Label Move Enter Channel DIGITAL 2-1 Logo F Disney G Close 1 MENU 2 ENTER 3 ENTER Select CHANNEL. WATCHING TV / CHANNEL...
... menu if the Lock System is provided on . MENU Return to the previous menu. Select Channel Label. CHANNEL Auto Tuning Manual Tuning Channel Edit Channel Label Move Enter CHANNEL Auto Tuning Manual Tuning Channel Edit Channel Label Move Enter Channel DIGITAL 2-1 Logo F Disney G Close 1 MENU 2 ENTER 3 ENTER Select CHANNEL. WATCHING TV / CHANNEL...

User Manual
Page 46
... optimum picture quality at the factory and are factory presets for picture settings available in the user menus. You can use a preset, change each setting manually. PICTURE Move Aspect Ratio : 16:9 Picture Mode : Standard • Backlight • Contrast • Brightness • Sharpness • Color • Tint E 80 90 50 60 60...
... optimum picture quality at the factory and are factory presets for picture settings available in the user menus. You can use a preset, change each setting manually. PICTURE Move Aspect Ratio : 16:9 Picture Mode : Standard • Backlight • Contrast • Brightness • Sharpness • Color • Tint E 80 90 50 60 60...


