Owner's Manual (English)
Page 2
... product. These limits are designed to Article 820-40 of the National Electric Code (U.S.A.). Consult the dealer or an experienced radio/TV technician for compliance could void the user's authority to persons. U.S.A. REGULATORY INFORMATION This equipment has been tested and found to comply...user's authority to the presence of the following measures: - Any changes or modifications not expressly approved by turning the equipment off and on a circuit different from LG Electronics Corporation. Warning Warning CAUTION RISK OF ELECTRIC SHOCK DO NOT OPEN WARNING: TO REDUCE THE RISK OF...
... product. These limits are designed to Article 820-40 of the National Electric Code (U.S.A.). Consult the dealer or an experienced radio/TV technician for compliance could void the user's authority to persons. U.S.A. REGULATORY INFORMATION This equipment has been tested and found to comply...user's authority to the presence of the following measures: - Any changes or modifications not expressly approved by turning the equipment off and on a circuit different from LG Electronics Corporation. Warning Warning CAUTION RISK OF ELECTRIC SHOCK DO NOT OPEN WARNING: TO REDUCE THE RISK OF...
Owner's Manual (English)
Page 4
...this owner's manual to the regulations of mercury. ing wrong with the apparatus. Avoid touching the LCD screen or holding your local authority. 4 Doing so may produce some temporary distortion effects on . For LCD TV Note - Some minute dot defects may be placed upon . Safety Instructions 12. Use only with ... combination to the touch, there may be certain. Protect the power cord from tip-over. 14. This is normal, there is turned on the screen. However, they be a small "flicker" when when it is noth- On Disposal a. Do not dispose of time. 15.
...this owner's manual to the regulations of mercury. ing wrong with the apparatus. Avoid touching the LCD screen or holding your local authority. 4 Doing so may produce some temporary distortion effects on . For LCD TV Note - Some minute dot defects may be placed upon . Safety Instructions 12. Use only with ... combination to the touch, there may be certain. Protect the power cord from tip-over. 14. This is normal, there is turned on the screen. However, they be a small "flicker" when when it is noth- On Disposal a. Do not dispose of time. 15.
Owner's Manual (English)
Page 5
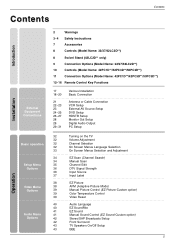
... Video Menu Options Audio Menu Options 2 Warnings 3~4 Safety Instructions 7 Accessories 8 Controls (Model Name: 32/37/42LC2D**) 8 Swivel Stand (42LC2D** only) 9 Connection Options (Model Name: 32/37/42LC2D**) 10 Controls (Model Name: 42PC1D**/42PC3D**/50PC3D**) 11 Connection Options (Model Name: 42PC1D**/...Setup External AV Source Setup DVD Setup HDSTB Setup Monitor Out Setup Digital Audio Output PC Setup 32 Turning on the TV 32 Volume Adjustment 32 Channel Selection 32 On Screen Menus Language Selection 33 On Screen Menus Selection and Adjustment 34 EZ Scan (Channel ...
... Video Menu Options Audio Menu Options 2 Warnings 3~4 Safety Instructions 7 Accessories 8 Controls (Model Name: 32/37/42LC2D**) 8 Swivel Stand (42LC2D** only) 9 Connection Options (Model Name: 32/37/42LC2D**) 10 Controls (Model Name: 42PC1D**/42PC3D**/50PC3D**) 11 Connection Options (Model Name: 42PC1D**/...Setup External AV Source Setup DVD Setup HDSTB Setup Monitor Out Setup Digital Audio Output PC Setup 32 Turning on the TV 32 Volume Adjustment 32 Channel Selection 32 On Screen Menus Language Selection 33 On Screen Menus Selection and Adjustment 34 EZ Scan (Channel ...
Owner's Manual (English)
Page 12
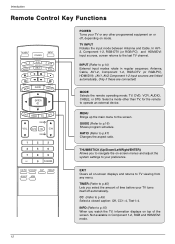
... returns to p.15) When you watch the TV, information displays on top of time before your TV turns itself off , depending on mode. INFO (Refer to TV viewing from any other than TV, for the remote to operate an external device. TV INPUT Rotates the input mode between Antenna and ... input modes rotate in Component 1-2, RGB and HDMI/DVI mode. 12 INPUT (Refer to p.47) Changes the aspect ratio. Introduction Remote Control Key Functions TV INPUT POWER TV AUDIO DVD MODE CABLE INPUT VCR STB DAY MENU GUIDE DAY+ RATIO ENTER EXIT TIMER CC INFO PAGE VOL MUTE FAV CH PAGE 1 2 3 4...
... returns to p.15) When you watch the TV, information displays on top of time before your TV turns itself off , depending on mode. INFO (Refer to TV viewing from any other than TV, for the remote to operate an external device. TV INPUT Rotates the input mode between Antenna and ... input modes rotate in Component 1-2, RGB and HDMI/DVI mode. 12 INPUT (Refer to p.47) Changes the aspect ratio. Introduction Remote Control Key Functions TV INPUT POWER TV AUDIO DVD MODE CABLE INPUT VCR STB DAY MENU GUIDE DAY+ RATIO ENTER EXIT TIMER CC INFO PAGE VOL MUTE FAV CH PAGE 1 2 3 4...
Owner's Manual (English)
Page 21
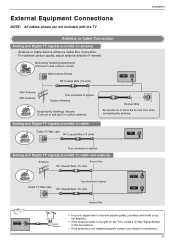
... AV IN 1 S-VIDEO RGB IN REMOTE CONTROL IN AUDIO (RGB/DVI) VIDEO AUDIO CORGMBP(POC/NDTEVN) T IN L/MONO R VIDEO Turn clockwise to tighten. Analog and Digital TV signals provided on cable and antenna Antenna Bronze Wire RF Coaxial Wire (75 ohm) AV OUT VIDEO ( ) AUDIO AV IN 1 S-...VIDEO CaVbIDlEeO TV WaAUlDlIOJack COMPONENT IN Turn clockwise to wall jack for assistance. 21 VIDEO AUDIO COMPONENT IN S-VIDEO R AUDIO L/MONO VIDEO AV IN 2 Multi-family Dwellings/...
... AV IN 1 S-VIDEO RGB IN REMOTE CONTROL IN AUDIO (RGB/DVI) VIDEO AUDIO CORGMBP(POC/NDTEVN) T IN L/MONO R VIDEO Turn clockwise to tighten. Analog and Digital TV signals provided on cable and antenna Antenna Bronze Wire RF Coaxial Wire (75 ohm) AV OUT VIDEO ( ) AUDIO AV IN 1 S-...VIDEO CaVbIDlEeO TV WaAUlDlIOJack COMPONENT IN Turn clockwise to wall jack for assistance. 21 VIDEO AUDIO COMPONENT IN S-VIDEO R AUDIO L/MONO VIDEO AV IN 2 Multi-family Dwellings/...
Owner's Manual (English)
Page 24
... player's manual for operating instructions. If connected to AV IN2, select AV 2 input source. 5 Refer to the AUDIO input jacks on the set. 3 Turn on the DVD player, insert a DVD. 4 Select AV1 input source with using the INPUT button on the remote control. - When connecting with using a ... resolution will be automatically set the output resolution appropriately. AV OUT 24( ) VIDEO AUDIO AV IN 1 S-VIDEO VIDEO AUDIO COMPONENT IN • TV can receive the video and audio signal simultaneously by using the INPUT button on the set. 2 Select HDMI/DVI input source with a HDMI cable ...
... player's manual for operating instructions. If connected to AV IN2, select AV 2 input source. 5 Refer to the AUDIO input jacks on the set. 3 Turn on the DVD player, insert a DVD. 4 Select AV1 input source with using the INPUT button on the remote control. - When connecting with using a ... resolution will be automatically set the output resolution appropriately. AV OUT 24( ) VIDEO AUDIO AV IN 1 S-VIDEO VIDEO AUDIO COMPONENT IN • TV can receive the video and audio signal simultaneously by using the INPUT button on the set. 2 Select HDMI/DVI input source with a HDMI cable ...
Owner's Manual (English)
Page 25
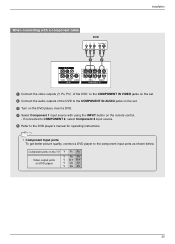
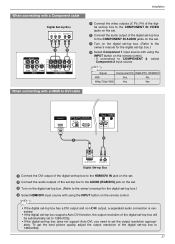
AV OUT • Component Input ports To get better picture quality, connect a DVD( p)layer to the COMPONENT IN AUDIO jacks on the set. 3 Turn on the DVD player, insert a DVD. 4 Select Component 1 input source with using the INPUT button on the remote control. - Installation When connecting with a component cable ... Component 2 input source. 5 Refer to the DVD player's manual for operating instructions. VIDEO AUDIO S-VIDEO VIDEO AUDIO AV IN 1 COMPONENT IN Component ports on the TV Y PB PR Video output ports on DVD player Y Pb Pr Y B-Y R-Y Y Cb Cr Y PB PR 25
AV OUT • Component Input ports To get better picture quality, connect a DVD( p)layer to the COMPONENT IN AUDIO jacks on the set. 3 Turn on the DVD player, insert a DVD. 4 Select Component 1 input source with using the INPUT button on the remote control. - Installation When connecting with a component cable ... Component 2 input source. 5 Refer to the DVD player's manual for operating instructions. VIDEO AUDIO S-VIDEO VIDEO AUDIO AV IN 1 COMPONENT IN Component ports on the TV Y PB PR Video output ports on DVD player Y Pb Pr Y B-Y R-Y Y Cb Cr Y PB PR 25
Owner's Manual (English)
Page 26
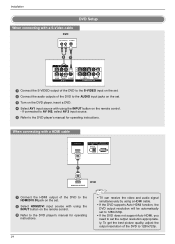
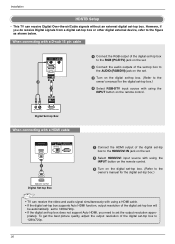
This TV can receive the video and audio signal simultaneously with using a HDMI cable. • If the digital set-... of the digital set-top box will be automatically set to the owner's manual for the digital set-top box.) • TV can receive Digital Over-the-air/Cable signals without an external digital set -top box to the figure as shown below. When ...HDMI/DVI IN jack on the set. 2 Select HDMI/DVI input source with using the INPUT button on the remote control. 3 Turn on the digital set-top box. (Refer to 1280x720p. • If the digital set-top box does not support Auto HDMI,...
This TV can receive the video and audio signal simultaneously with using a HDMI cable. • If the digital set-... of the digital set-top box will be automatically set to the owner's manual for the digital set-top box.) • TV can receive Digital Over-the-air/Cable signals without an external digital set -top box to the figure as shown below. When ...HDMI/DVI IN jack on the set. 2 Select HDMI/DVI input source with using the INPUT button on the remote control. 3 Turn on the digital set-top box. (Refer to 1280x720p. • If the digital set-top box does not support Auto HDMI,...
Owner's Manual (English)
Page 27
OPTICAL Turn on the digital set-top box. (Refer to the owner's manual for the digital RGB IN REMOTE CONTROL IN set-top box.) 4 Select HDMI/DVI ...
OPTICAL Turn on the digital set-top box. (Refer to the owner's manual for the digital RGB IN REMOTE CONTROL IN set-top box.) 4 Select HDMI/DVI ...
Owner's Manual (English)
Page 28
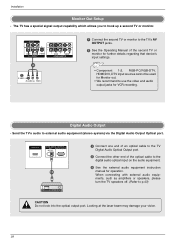
...cannot be used for Monitor out. • We recommend to external audio equipment (stereo system) via the Digital Audio Output Optical port. The TV has a special signal output capability which allows you to the digital audio optical input on the audio equipment. 3 See the external audio equipment... OUTPUT jacks. 2 See the Operating Manual of the optical cable to hook up a second TV or monitor. Digital Audio Output - When connecting with external audio equipments, such as amplifiers or speakers, please turn the TV speakers off. (Refer to p.43) CAUTION Do not look into the optical output port....
...cannot be used for Monitor out. • We recommend to external audio equipment (stereo system) via the Digital Audio Output Optical port. The TV has a special signal output capability which allows you to the digital audio optical input on the audio equipment. 3 See the external audio equipment... OUTPUT jacks. 2 See the Operating Manual of the optical cable to hook up a second TV or monitor. Digital Audio Output - When connecting with external audio equipments, such as amplifiers or speakers, please turn the TV speakers off. (Refer to p.43) CAUTION Do not look into the optical output port....
Owner's Manual (English)
Page 29
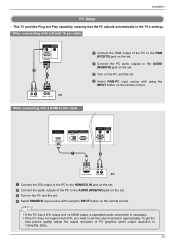
.... 4 Select RGB-PC input source with using the INPUT button on the set. 2 Connect the audio outputs of PC graphics card's output resolution to the TV's settings. AUDIO (RGB/DVI) RGB IN • If the PC (PC/DTV) has a DVI output anRdGB no (PC/DTV) HDMI output, a separated audio ...connection is necessary. • If the PC does not support Auto DVI, you need to the AUDIO (RGB/DVI) jack on the set. 3 Turn on the remote control. When connecting with a HDMI to DVI cable AUDIO RS-232C IN T (CONTROL & SERVICE) CAL AUDIO IN (RGB/DVI) REMOTE CONTROL RGB...
.... 4 Select RGB-PC input source with using the INPUT button on the set. 2 Connect the audio outputs of PC graphics card's output resolution to the TV's settings. AUDIO (RGB/DVI) RGB IN • If the PC (PC/DTV) has a DVI output anRdGB no (PC/DTV) HDMI output, a separated audio ...connection is necessary. • If the PC does not support Auto DVI, you need to the AUDIO (RGB/DVI) jack on the set. 3 Turn on the remote control. When connecting with a HDMI to DVI cable AUDIO RS-232C IN T (CONTROL & SERVICE) CAL AUDIO IN (RGB/DVI) REMOTE CONTROL RGB...
Owner's Manual (English)
Page 32
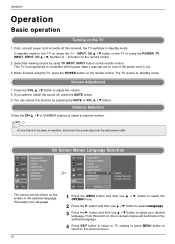
...selected language. Channel Selection Press the CH D / E or NUMBER buttons to select a channel number. • If you want to standby mode. First select your language. 32 1 Press the MENU button and then use D / E button to select the OPTION menu. 2 Press the G button and then use D / E button to select ... on, the on the screen in the selected language. 4 Press EXIT button to return to TV viewing or press MENU button to return to turn TV on, press the , INPUT, CH D / E button on the TV or press the POWER, TV INPUT, INPUT, CH D / E, Number (0 ~ 9) button on the remote control. The menus...
...selected language. Channel Selection Press the CH D / E or NUMBER buttons to select a channel number. • If you want to standby mode. First select your language. 32 1 Press the MENU button and then use D / E button to select the OPTION menu. 2 Press the G button and then use D / E button to select ... on, the on the screen in the selected language. 4 Press EXIT button to return to TV viewing or press MENU button to return to turn TV on, press the , INPUT, CH D / E button on the TV or press the POWER, TV INPUT, INPUT, CH D / E, Number (0 ~ 9) button on the remote control. The menus...
Owner's Manual (English)
Page 34
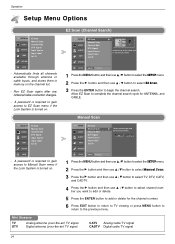
... Input Source Input Label Set ID OPTION LOCK - A password is required to gain access to EZ Scan menu if the Lock System is turned on. Run EZ Scan again after any Antenna/Cable connection changes. - Automatically finds all channels available through antenna or cable inputs, and stores... the channel list. - Manual Scan SETUP G VIDEO AUDIO TIME EZ Scan Manual Scan Channel Edit DTV Signal Input Source Input Label Set ID OPTION LOCK - TV 2 1 Press the MENU button and then use D / E button to select the SETUP menu. 2 Press the G button and then use D / E button to select ...
... Input Source Input Label Set ID OPTION LOCK - A password is required to gain access to EZ Scan menu if the Lock System is turned on. Run EZ Scan again after any Antenna/Cable connection changes. - Automatically finds all channels available through antenna or cable inputs, and stores... the channel list. - Manual Scan SETUP G VIDEO AUDIO TIME EZ Scan Manual Scan Channel Edit DTV Signal Input Source Input Label Set ID OPTION LOCK - TV 2 1 Press the MENU button and then use D / E button to select the SETUP menu. 2 Press the G button and then use D / E button to select ...
Owner's Manual (English)
Page 42
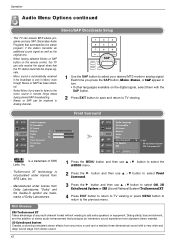
...EZ PIC EZ SOUND SAP FREEZE ADJUST APM 1 Use the SAP button to select your desired MTS mode in turn. • If other languages available on the remote control, this TV can receive MTS stereo programs and any SAP (Secondary Audio Program) that produces an immersive sound experience from standard... original one. - Front Surround SETUP Audio Language EZ SoundRite VIDEO EZ Sound Balance 0 L R AUDIO G Treble 50 TIME Bass 50 Front Surround OPTION TV Speaker BBE LOCK SETUP Audio Language EZ SoundRite VIDEO EZ Sound Balance AUDIO Treble Bass TIME Front Surround G OPTION...
...EZ PIC EZ SOUND SAP FREEZE ADJUST APM 1 Use the SAP button to select your desired MTS mode in turn. • If other languages available on the remote control, this TV can receive MTS stereo programs and any SAP (Secondary Audio Program) that produces an immersive sound experience from standard... original one. - Front Surround SETUP Audio Language EZ SoundRite VIDEO EZ Sound Balance 0 L R AUDIO G Treble 50 TIME Bass 50 Front Surround OPTION TV Speaker BBE LOCK SETUP Audio Language EZ SoundRite VIDEO EZ Sound Balance AUDIO Treble Bass TIME Front Surround G OPTION...
Owner's Manual (English)
Page 43
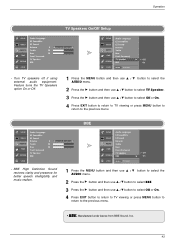
... On/Off Setup SETUP Audio Language EZ SoundRite VIDEO EZ Sound R Balance AUDIO Treble TIME Bass Front Surround OPTION TV Speaker BBE G Off On LOCK MENU Previous - Feature turns the TV Speakers option On or Off. 1 Press the MENU button and then use D / E button to select the AUDIO menu....D / E button to select Off or On. 4 Press EXIT button to return to TV viewing or press MENU button to return to the previous menu. BBE High Definition Sound restores clarity and presence for better speech intelligibility and music realism. Turn TV speakers off if using external audio equipment.
... On/Off Setup SETUP Audio Language EZ SoundRite VIDEO EZ Sound R Balance AUDIO Treble TIME Bass Front Surround OPTION TV Speaker BBE G Off On LOCK MENU Previous - Feature turns the TV Speakers option On or Off. 1 Press the MENU button and then use D / E button to select the AUDIO menu....D / E button to select Off or On. 4 Press EXIT button to return to TV viewing or press MENU button to return to the previous menu. BBE High Definition Sound restores clarity and presence for better speech intelligibility and music realism. Turn TV speakers off if using external audio equipment.
Owner's Manual (English)
Page 45
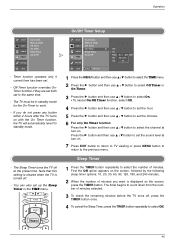
..., 60, 90, 120, 180, and 240 minutes. 2 When the number of minutes you do not press any button within 2 hours after the TV turns on . 7 Press EXIT button to return to TV viewing or press MENU button to return to the same time. - Press the G button and then use D / E button to select Off... the TIME menu. Operation SETUP VIDEO AUDIO TIME G Auto Clock Manual Clock Off Timer On Timer Sleep Timer Auto Off OPTION LOCK - The Sleep Timer turns the TV off . - DAY MENU GUIDE DAY+ RATIO ENTER On/Off Timer Setup SETUP VIDEO AUDIO TIME Auto Clock Manual Clock Off Timer On Timer Sleep...
..., 60, 90, 120, 180, and 240 minutes. 2 When the number of minutes you do not press any button within 2 hours after the TV turns on . 7 Press EXIT button to return to TV viewing or press MENU button to return to the same time. - Press the G button and then use D / E button to select Off... the TIME menu. Operation SETUP VIDEO AUDIO TIME G Auto Clock Manual Clock Off Timer On Timer Sleep Timer Auto Off OPTION LOCK - The Sleep Timer turns the TV off . - DAY MENU GUIDE DAY+ RATIO ENTER On/Off Timer Setup SETUP VIDEO AUDIO TIME Auto Clock Manual Clock Off Timer On Timer Sleep...

Owner's Manual (English)
Page 46
... or press MENU button to return to On and there is no input signal, the TV turns off automatically after 10 minutes. If the TV is on and there is no input signal, the TV turns off automatically after 10 minutes. Operation Time Menu Options continued Auto Off SETUP VIDEO AUDIO TIME G Auto Clock Manual...
... or press MENU button to return to On and there is no input signal, the TV turns off automatically after 10 minutes. If the TV is on and there is no input signal, the TV turns off automatically after 10 minutes. Operation Time Menu Options continued Auto Off SETUP VIDEO AUDIO TIME G Auto Clock Manual...
Owner's Manual (English)
Page 49
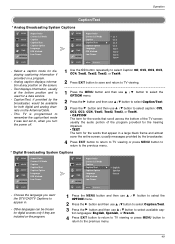
... or press MENU button to return to select available cap- This TV is used for digital sources only if they are included on the screen. - Other languages can be available for the words that appear in . - Choose the language you turn the power off. 1 Use the CC button repeatedly to select ...Caption Off, CC1, CC2, CC3, CC4, Text1, Text2, Text3, or Text4. 2 Press EXIT button to save and return to TV viewing. 1 Press the MENU button and then use D / E button ...
... or press MENU button to return to select available cap- This TV is used for digital sources only if they are included on the screen. - Other languages can be available for the words that appear in . - Choose the language you turn the power off. 1 Use the CC button repeatedly to select ...Caption Off, CC1, CC2, CC3, CC4, Text1, Text2, Text3, or Text4. 2 Press EXIT button to save and return to TV viewing. 1 Press the MENU button and then use D / E button ...
Owner's Manual (English)
Page 53
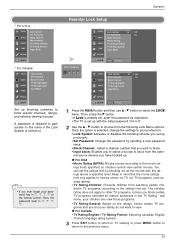
... source devices you block certain TV programs intended for mature audiences in '7', '7', '7', '7' on TV, not TV programs, such as requested. • The TV is selected, change the settings to view. Then, press the G button • If Lock is turned on the ratings, blocks certain TV programs that you set up... blocking schemes to the previous menu. 53 You can view those programs. • TV Rating-General: Based on . • If you ever forget your family...
... source devices you block certain TV programs intended for mature audiences in '7', '7', '7', '7' on TV, not TV programs, such as requested. • The TV is selected, change the settings to view. Then, press the G button • If Lock is turned on the ratings, blocks certain TV programs that you set up... blocking schemes to the previous menu. 53 You can view those programs. • TV Rating-General: Based on . • If you ever forget your family...
Owner's Manual (English)
Page 62
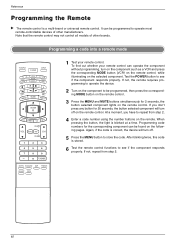
...TV INPUT POWER TV AUDIO DVD MODE CABLE INPUT VCR STB DAY MENU GUIDE DAY+ RATIO ENTER EXIT TIMER CC INFO PAGE VOL MUTE FAV CH PAGE 1 2 3 4 5 6 7 8 9 0 FLASHBK EZ PIC EZ SOUND SAP FREEZE ADJUST APM 1 Test your remote control can operate the component without programming, turn... MODE button on the remote control. 3 Press the MENU and MUTE buttons simultaneously for 20 seconds, the button selected component will turn off . 5 Press the MENU button to operate most remote-controllable devices of other manufacturers. Reference Programming the Remote G The remote...
...TV INPUT POWER TV AUDIO DVD MODE CABLE INPUT VCR STB DAY MENU GUIDE DAY+ RATIO ENTER EXIT TIMER CC INFO PAGE VOL MUTE FAV CH PAGE 1 2 3 4 5 6 7 8 9 0 FLASHBK EZ PIC EZ SOUND SAP FREEZE ADJUST APM 1 Test your remote control can operate the component without programming, turn... MODE button on the remote control. 3 Press the MENU and MUTE buttons simultaneously for 20 seconds, the button selected component will turn off . 5 Press the MENU button to operate most remote-controllable devices of other manufacturers. Reference Programming the Remote G The remote...


