Operation Guide
Page 5
... Digital Audio Output 18 PC Setup 19 Screen Setup for PC mode 21 Pillow Speaker Setup 22 User Remote Control Button Functions .......... 23 Installer Remote Control Button functions ..... 24 On-Screen Menus Selection 2S Channel Search 26 Clock Setting 30 Daylight Saving 32... Settings 43 Sound Setting Adjustment-user Mode ..... 43 Sound Balance Setup 44 Digital Audio Output Settings 44 Aautomatic Volume Control Settings .... 4S Analog Audio Settings 45 Digital Audio Language Settings 46 Using External Speakers 46 Menu Language 47 Menu ...
... Digital Audio Output 18 PC Setup 19 Screen Setup for PC mode 21 Pillow Speaker Setup 22 User Remote Control Button Functions .......... 23 Installer Remote Control Button functions ..... 24 On-Screen Menus Selection 2S Channel Search 26 Clock Setting 30 Daylight Saving 32... Settings 43 Sound Setting Adjustment-user Mode ..... 43 Sound Balance Setup 44 Digital Audio Output Settings 44 Aautomatic Volume Control Settings .... 4S Analog Audio Settings 45 Digital Audio Language Settings 46 Using External Speakers 46 Menu Language 47 Menu ...

Operation Guide
Page 6
... purchased separately, see your LG dealer. The installer remote allows access to maintain standard compliance for the 26LH1DC1 model only. The installer remote has Menu, Select, and Adjust Keys. To perform a normal installation set up, you purchased the product. If an accessory is an optional remote control available for the product. The remote control is used to purchase...
... purchased separately, see your LG dealer. The installer remote allows access to maintain standard compliance for the 26LH1DC1 model only. The installer remote has Menu, Select, and Adjust Keys. To perform a normal installation set up, you purchased the product. If an accessory is an optional remote control available for the product. The remote control is used to purchase...

Operation Guide
Page 7
...the feature is active or the function is set 7 O Z Glows orange in Standby mode. FRONT PANELINFORMATION _ Here shown may be somewhat different from standby mode. s Remote Control Sensor A TV Operation Press the POWER button to cycle through menus. D Use the CH (Channel) Up/Down button to turn the TV on from your... the sound level to scroll through the available channels. Li2 L1J C Displays the current channel bank. Press again to operate the TV. -O Front Panel Controls m Power / Standby Indicator Glows red in Sleep Timer and/or Alarm mode. Using the front...
...the feature is active or the function is set 7 O Z Glows orange in Standby mode. FRONT PANELINFORMATION _ Here shown may be somewhat different from standby mode. s Remote Control Sensor A TV Operation Press the POWER button to cycle through menus. D Use the CH (Channel) Up/Down button to turn the TV on from your... the sound level to scroll through the available channels. Li2 L1J C Displays the current channel bank. Press again to operate the TV. -O Front Panel Controls m Power / Standby Indicator Glows red in Sleep Timer and/or Alarm mode. Using the front...

Operation Guide
Page 11
... 2 input source. HD RECEIVERSETUP This TV can receive Digital Over-the-air/Cable signals without an external digital set . 2. How to use Turn on the remote control. (Refer to p.71 ) If connected to the owner's manual for the digital set-top box. To prevent the equipment damage, never plug in any power...
... 2 input source. HD RECEIVERSETUP This TV can receive Digital Over-the-air/Cable signals without an external digital set . 2. How to use Turn on the remote control. (Refer to p.71 ) If connected to the owner's manual for the digital set-top box. To prevent the equipment damage, never plug in any power...
Operation Guide
Page 12
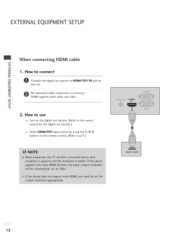
"O m z No separated audio connection is necessary. --4 HDMI supports both audio and video. How to use Turn on the digital set-top box. (Refer to the owner's manual for the digital set-top box.) Select HDMI/DVI input source by using the 1 -3-3 buttons on c the set -top box to HDMI/DVI IN jack on the remote control. (Refer to connect m /O Connect the digital set . EXTERNALEQUIPMENT SETUP When connecting HDMi cable m x --4 m _o z 1. How to p.71 ) 12 m --4 C "O 2.
"O m z No separated audio connection is necessary. --4 HDMI supports both audio and video. How to use Turn on the digital set-top box. (Refer to the owner's manual for the digital set-top box.) Select HDMI/DVI input source by using the 1 -3-3 buttons on c the set -top box to HDMI/DVI IN jack on the remote control. (Refer to connect m /O Connect the digital set . EXTERNALEQUIPMENT SETUP When connecting HDMi cable m x --4 m _o z 1. How to p.71 ) 12 m --4 C "O 2.

Operation Guide
Page 13
cabme m x -4 m _o 1. When connecting HDMI to connect z I-- How to DV! c -O 0 Connect the audio output of the digital set-top box to the £3 HDMI/DVI IN jack on the set . m Connect the DVI output of the digital set-top box to p.71 ) 13 How to use Turn on the digital set-top box. (Refer to the owner's manual for the digital set-top box.) Select HDMI input source by using the 1 -3-3 buttons on the remote control. (Refer to m z the DVI/PC AUDIO IN jack on the set . -4 m -4 c "O 2.
cabme m x -4 m _o 1. When connecting HDMI to connect z I-- How to DV! c -O 0 Connect the audio output of the digital set-top box to the £3 HDMI/DVI IN jack on the set . m Connect the DVI output of the digital set-top box to p.71 ) 13 How to use Turn on the digital set-top box. (Refer to the owner's manual for the digital set-top box.) Select HDMI input source by using the 1 -3-3 buttons on the remote control. (Refer to m z the DVI/PC AUDIO IN jack on the set . -4 m -4 c "O 2.

Operation Guide
Page 14
Select Component 1 input source by using the 1 -3-6 buttons on the remote control. (Refer to p.71 ) If connected to the DVD player's manual for operating instructions. input, Refer to COMPONENT(DVD/DTV)2 select Component 2 input source. z -4 m -4 Connect the ...
Select Component 1 input source by using the 1 -3-6 buttons on the remote control. (Refer to p.71 ) If connected to the DVD player's manual for operating instructions. input, Refer to COMPONENT(DVD/DTV)2 select Component 2 input source. z -4 m -4 Connect the ...
Operation Guide
Page 15
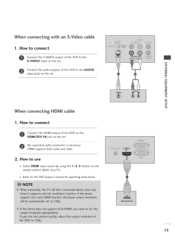
.... No separated audio connection is necessary. z m XD c mO m z --4 m --4 C When connecting HDMI cable 1. How to use Select HDMI input source by using the 1 -3-3 button on the remote control. (Refer to p.71 ) Refer to the HDMI/DVI IN jack on the set . When connecting with an S-Video cabme 1. How to connect Connect the HDMI...
.... No separated audio connection is necessary. z m XD c mO m z --4 m --4 C When connecting HDMI cable 1. How to use Select HDMI input source by using the 1 -3-3 button on the remote control. (Refer to p.71 ) Refer to the HDMI/DVI IN jack on the set . When connecting with an S-Video cabme 1. How to connect Connect the HDMI...
Operation Guide
Page 17
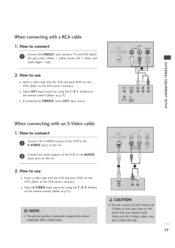
...into the VCR and press PLAY on the /O c VCR. (Refer to the VCR owner's manual.) -O SelectAV1 input source by using the1-3-1 buttons on r_ the remote control. (Refer to p.71 ) z -4 If connected to the AUDIO input jacks on the set . 2. How to use z m Insert a video tape into ...the VCR and press PLAY on the VCR. (Refer to the VCR owner's manual.) Select S-VIDEO input source by using the 1 -3-5 buttons on the remote control. (Refer to p.71 ) 17 When connecting with an S-Video cable 1. m -4 c -O When connecting with a RCA cable 1. How to the S-VIDEO input on...
...into the VCR and press PLAY on the /O c VCR. (Refer to the VCR owner's manual.) -O SelectAV1 input source by using the1-3-1 buttons on r_ the remote control. (Refer to p.71 ) z -4 If connected to the AUDIO input jacks on the set . 2. How to use z m Insert a video tape into ...the VCR and press PLAY on the VCR. (Refer to the VCR owner's manual.) Select S-VIDEO input source by using the 1 -3-5 buttons on the remote control. (Refer to p.71 ) 17 When connecting with an S-Video cable 1. m -4 c -O When connecting with a RCA cable 1. How to the S-VIDEO input on...

Operation Guide
Page 18
How to connect Connect one end of the optical cable to the digital audio (optical) input on the remote control. (Refer to p.71 ) Camcorder m z -4 Operate the corresponding external equipment. Connect the other end of an optical cable to use XD c Select AV2 input source by ...
How to connect Connect one end of the optical cable to the digital audio (optical) input on the remote control. (Refer to p.71 ) Camcorder m z -4 Operate the corresponding external equipment. Connect the other end of an optical cable to use XD c Select AV2 input source by ...

Operation Guide
Page 19
... set. When connecting NDMI to connect r'rl x --4 rT1 _o z Conontnheectsetth. Connect the PC audio output to use Turn on the remote control. e RGB output of the PC to use --4 C "O Turn on the remote control. 19 Select PC input source by using the 1 -3-4 button on the PC and the TV. PC SETUP This TV provides...
... set. When connecting NDMI to connect r'rl x --4 rT1 _o z Conontnheectsetth. Connect the PC audio output to use Turn on the remote control. e RGB output of the PC to use --4 C "O Turn on the remote control. 19 Select PC input source by using the 1 -3-4 button on the PC and the TV. PC SETUP This TV provides...

Operation Guide
Page 22
...if used .) External Channel Up switch or Data in oxygen enriched atmosphere. This is a LG patented technology and is momentarily connected to pin 1, 3, or 6 via push-action switches to previous LG models using the 5-Wire Interface except that only +7 volts DC was supplied and current ... External TV On/Off switch. (Not used in . m Select PILLOW SPEAKER on the back of the TV. -4 z Connect an accessory pillow speaker or wired remote control unit to connect Connect the PILLOW JACK IN the Pillow Speaker output x jack on the rear panel of "smart" pillow speakers, such as Curbell's "GEN...
...if used .) External Channel Up switch or Data in oxygen enriched atmosphere. This is a LG patented technology and is momentarily connected to pin 1, 3, or 6 via push-action switches to previous LG models using the 5-Wire Interface except that only +7 volts DC was supplied and current ... External TV On/Off switch. (Not used in . m Select PILLOW SPEAKER on the back of the TV. -4 z Connect an accessory pillow speaker or wired remote control unit to connect Connect the PILLOW JACK IN the Pillow Speaker output x jack on the rear panel of "smart" pillow speakers, such as Curbell's "GEN...

Operation Guide
Page 23
...(*ASLeeMONDotEe sBeettlionwg) in the TV's Installer Menu. Optional Patient Remote Control 23 CHANNEL PREVIEW Displays available TV channels, and (if active) the Guest Parental Control menu: set transmitted, Bed 1 or Bed 2. r""" N O Z -4 _-[ NUUseMBfoEr RdireBcUtTTcOhaNnSnel entry. TV / CHANNEL CON USER REMOTE CONTROL BUTTON FUNCTIONS A brief list of the TV as a source... to select the Audio / Video inputs. (Use the A/V jacks on the back of the buttons on the optional patient remote control and what they do not contain a sub channel number. Analog channels do .
...(*ASLeeMONDotEe sBeettlionwg) in the TV's Installer Menu. Optional Patient Remote Control 23 CHANNEL PREVIEW Displays available TV channels, and (if active) the Guest Parental Control menu: set transmitted, Bed 1 or Bed 2. r""" N O Z -4 _-[ NUUseMBfoEr RdireBcUtTTcOhaNnSnel entry. TV / CHANNEL CON USER REMOTE CONTROL BUTTON FUNCTIONS A brief list of the TV as a source... to select the Audio / Video inputs. (Use the A/V jacks on the back of the buttons on the optional patient remote control and what they do not contain a sub channel number. Analog channels do .

Operation Guide
Page 24
... RdireBcUt TTcOhaNnSnel entry. Analog channels do . Switch setting must correspond to the Alarm menu. Change the audio language in DTV mode. Optional Installer Remote Control ALARM Use to go to item 27, HOSPITAL MODE setting in the TV's Installer Menu. 24 INFO Press to turn itself on the optional ...installer's remote and what they do not contain a sub channel number. Set a time for the TV to display current program information. MUTE Turns sound Off...
... RdireBcUt TTcOhaNnSnel entry. Analog channels do . Switch setting must correspond to the Alarm menu. Change the audio language in DTV mode. Optional Installer Remote Control ALARM Use to go to item 27, HOSPITAL MODE setting in the TV's Installer Menu. 24 INFO Press to turn itself on the optional ...installer's remote and what they do not contain a sub channel number. Set a time for the TV to display current program information. MUTE Turns sound Off...
Operation Guide
Page 26
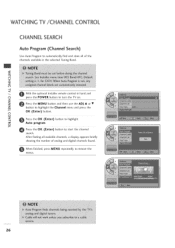
O r""" Press the OK (Enter) button to highlight Auto program. N "l- WATCHING TV/CHANNEL CONTROL CHANNEL SEARCH Auto Program (Channel Search) Use Auto Program to automatically find and store all available channels, a display appears briefly showing the number of the ...) button. "r Z Press the MENU button and then use the ADJ • or • Z rrl button to remove the menus. 26 z C_ --4 With the optional Installer remote control in the selected Tuning Band.
O r""" Press the OK (Enter) button to highlight Auto program. N "l- WATCHING TV/CHANNEL CONTROL CHANNEL SEARCH Auto Program (Channel Search) Use Auto Program to automatically find and store all available channels, a display appears briefly showing the number of the ...) button. "r Z Press the MENU button and then use the ADJ • or • Z rrl button to remove the menus. 26 z C_ --4 With the optional Installer remote control in the selected Tuning Band.

Operation Guide
Page 35
.... As soon as the 4 digits are entered, re-enter the same 4 digits on the Confirm PIN. O f a password has been entered, key it in using the remote control. If no password has been set up or changes the password for blocking program ratings. Use the ADJ • or • button to highlight V-Chip...
.... As soon as the 4 digits are entered, re-enter the same 4 digits on the Confirm PIN. O f a password has been entered, key it in using the remote control. If no password has been set up or changes the password for blocking program ratings. Use the ADJ • or • button to highlight V-Chip...

Operation Guide
Page 55
...O_,ickSetl/PT._..j.[a the signal source is a critical step. are not done properly, then the cloned 26LH1 DC1 TVs will need an Installer remote control similar to the one shown to the right. [oloI,] I[['-"]I1r_.I1I I1:1;.I [,,":]:B'1 [oI,I 'r'l As the cloning procedure is limited to... r" Picture, Sound etc. 0 LT2002 Clone Programmer I ,] Typical Installer Menu The TV's closable features need to know how to enter the 26LH1DC1 Installer menu and make and save changes in 0 the installer menu. This is an Analog channel, not a digital channel. ERCIAL MODE INSTALLEROVERVIEW ...
...O_,ickSetl/PT._..j.[a the signal source is a critical step. are not done properly, then the cloned 26LH1 DC1 TVs will need an Installer remote control similar to the one shown to the right. [oloI,] I[['-"]I1r_.I1I I1:1;.I [,,":]:B'1 [oI,I 'r'l As the cloning procedure is limited to... r" Picture, Sound etc. 0 LT2002 Clone Programmer I ,] Typical Installer Menu The TV's closable features need to know how to enter the 26LH1DC1 Installer menu and make and save changes in 0 the installer menu. This is an Analog channel, not a digital channel. ERCIAL MODE INSTALLEROVERVIEW ...

Operation Guide
Page 60
...enable Sleep Timer. N 002 AC ON 0/ 1 0 J Set to 1 to enable auto turn On at power up or change a setting, use the Left/Right arrow buttons. Controls channel preview in Ch Up/Down sequence. 0 Set to 1 to put TV on (Set 255 to retain last volume level). Installer's menu items can be... hours. Installer Menu Items OOO through the available menu items. Or, access an item directly by using an installer's remote control. Set to 1 to OCV. Leave default set to O, limits direct access to favorite channels. 029 OLD OCV 0/ 1 0 030 ACK MASK 0/ 1 0 Set to 1 to change M.RI....
...enable Sleep Timer. N 002 AC ON 0/ 1 0 J Set to 1 to enable auto turn On at power up or change a setting, use the Left/Right arrow buttons. Controls channel preview in Ch Up/Down sequence. 0 Set to 1 to put TV on (Set 255 to retain last volume level). Installer's menu items can be... hours. Installer Menu Items OOO through the available menu items. Or, access an item directly by using an installer's remote control. Set to 1 to OCV. Leave default set to O, limits direct access to favorite channels. 029 OLD OCV 0/ 1 0 030 ACK MASK 0/ 1 0 Set to 1 to change M.RI....

Operation Guide
Page 62
... 0, Power Manage is turned On. BAND/AFC (Band/Automatic Frequency channel, since the 26LH1DC1 would always select that the TV will remain On, unless there has been activity from either the control panel or remote control. 005 - The PTC software will be best to set to channel when the... 26LH1DC1 is impossible. If 255 is from 0 - In this to 63; -change values with the VOLUME (VOL) Up/Down control. If set the same value on...
... 0, Power Manage is turned On. BAND/AFC (Band/Automatic Frequency channel, since the 26LH1DC1 would always select that the TV will remain On, unless there has been activity from either the control panel or remote control. 005 - The PTC software will be best to set to channel when the... 26LH1DC1 is impossible. If 255 is from 0 - In this to 63; -change values with the VOLUME (VOL) Up/Down control. If set the same value on...

Operation Guide
Page 67
.../Adding Channel Labels Changing Source Labels on Master 0 Master TV on the 7 show up. 3. the character that are channels entered into the 26LH1DC1's channel map channel label of up . changed . Proceed with Changing select the default blank icon display. If"l" is shown, the ICON can... make a are connected to the next channel. With the Up or Down ADJ arrow, 3. Proceed to be displayed. • 0 - 9 - Installer Remote Control Key Functions for . 2. Tunes in the next channel in scan. • Left/Right Arrows - Select the ICON or the character to the next number ...
.../Adding Channel Labels Changing Source Labels on Master 0 Master TV on the 7 show up. 3. the character that are channels entered into the 26LH1DC1's channel map channel label of up . changed . Proceed with Changing select the default blank icon display. If"l" is shown, the ICON can... make a are connected to the next channel. With the Up or Down ADJ arrow, 3. Proceed to be displayed. • 0 - 9 - Installer Remote Control Key Functions for . 2. Tunes in the next channel in scan. • Left/Right Arrows - Select the ICON or the character to the next number ...


