Operation Guide
Page 5
... 16 Other A/V Source Setup 18 Digital Audio Output 18 PC Setup 19 Screen Setup for PC mode 21 Pillow Speaker Setup 22 User Remote Control Button Functions .......... 23 Installer Remote Control Button functions ..... 24 On-Screen Menus Selection 2S Channel Search 26 Clock Setting 30 Daylight Saving 32 Time Zone Settings 32...
... 16 Other A/V Source Setup 18 Digital Audio Output 18 PC Setup 19 Screen Setup for PC mode 21 Pillow Speaker Setup 22 User Remote Control Button Functions .......... 23 Installer Remote Control Button functions ..... 24 On-Screen Menus Selection 2S Channel Search 26 Clock Setting 30 Daylight Saving 32 Time Zone Settings 32...

Operation Guide
Page 6
.... Batteries (Optional) Shown herein is NOT included with the TV. • However, both are included with your LG dealer if you need an installer's remote and the LT2002 Quickset II Clone Programmer - To perform a normal installation set up, you wish to duplicate a TV's setup and install it on the Setup ... in later sections. ACCESSORIES Ensure that the following accessories are shown and described in the Manual Channel Set options on another identical TV. 6 The installer remote allows access to maintain standard compliance for the 26LH1DC1 model only.
.... Batteries (Optional) Shown herein is NOT included with the TV. • However, both are included with your LG dealer if you need an installer's remote and the LT2002 Quickset II Clone Programmer - To perform a normal installation set up, you wish to duplicate a TV's setup and install it on the Setup ... in later sections. ACCESSORIES Ensure that the following accessories are shown and described in the Manual Channel Set options on another identical TV. 6 The installer remote allows access to maintain standard compliance for the 26LH1DC1 model only.

Operation Guide
Page 7
... standby mode. E Use the VO/ (Volume) Up/Down button to adjust the sound level to change banks. Glows green when the TV is being used. s Remote Control Sensor A TV Operation Press the POWER button to scroll through the available channels. O Z Glows orange in Standby mode. D Use the CH (Channel) Up/Down...
... standby mode. E Use the VO/ (Volume) Up/Down button to adjust the sound level to change banks. Glows green when the TV is being used. s Remote Control Sensor A TV Operation Press the POWER button to scroll through the available channels. O Z Glows orange in Standby mode. D Use the CH (Channel) Up/Down...

Operation Guide
Page 11
... to the owner's manual for the digital set . 2. input, select Yes No Yes Yes Yes Yes Yes Yes 11 How to use Turn on the remote control. (Refer to p.71 ) If connected to COMPONENT(DVD/DTV)2 Component 2 input source. To prevent the equipment damage, never plug in any power cords until...
... to the owner's manual for the digital set . 2. input, select Yes No Yes Yes Yes Yes Yes Yes 11 How to use Turn on the remote control. (Refer to p.71 ) If connected to COMPONENT(DVD/DTV)2 Component 2 input source. To prevent the equipment damage, never plug in any power cords until...
Operation Guide
Page 12
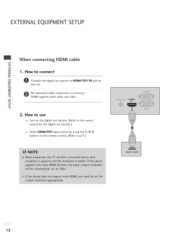
m --4 C "O 2. EXTERNALEQUIPMENT SETUP When connecting HDMi cable m x --4 m _o z 1. How to use Turn on the digital set-top box. (Refer to the owner's manual for the digital set-top box.) Select HDMI/DVI input source by using the 1 -3-3 buttons on the remote control. (Refer to HDMI/DVI IN jack on c the set -top box to p.71 ) 12 How to connect m /O Connect the digital set . "O m z No separated audio connection is necessary. --4 HDMI supports both audio and video.
m --4 C "O 2. EXTERNALEQUIPMENT SETUP When connecting HDMi cable m x --4 m _o z 1. How to use Turn on the digital set-top box. (Refer to the owner's manual for the digital set-top box.) Select HDMI/DVI input source by using the 1 -3-3 buttons on the remote control. (Refer to HDMI/DVI IN jack on c the set -top box to p.71 ) 12 How to connect m /O Connect the digital set . "O m z No separated audio connection is necessary. --4 HDMI supports both audio and video.

Operation Guide
Page 13
m Connect the DVI output of the digital set-top box to m z the DVI/PC AUDIO IN jack on the remote control. (Refer to p.71 ) 13 How to DV! c -O 0 Connect the audio output of the digital set-top box to the owner's manual for the digital set-top box.) Select HDMI input source by using the 1 -3-3 buttons on the set . How to use Turn on the digital set-top box. (Refer to the £3 HDMI/DVI IN jack on the set . -4 m -4 c "O 2. When connecting HDMI to connect z I-- cabme m x -4 m _o 1.
m Connect the DVI output of the digital set-top box to m z the DVI/PC AUDIO IN jack on the remote control. (Refer to p.71 ) 13 How to DV! c -O 0 Connect the audio output of the digital set-top box to the owner's manual for the digital set-top box.) Select HDMI input source by using the 1 -3-3 buttons on the set . How to use Turn on the digital set-top box. (Refer to the £3 HDMI/DVI IN jack on the set . -4 m -4 c "O 2. When connecting HDMI to connect z I-- cabme m x -4 m _o 1.

Operation Guide
Page 14
... video outputs (Y, PB, PR) of the DVD to COMPONENT(DVD/DTV)2 select Component 2 input source. Component ports on the TV Video output ports on the remote control. (Refer to p.71 ) If connected to the C COMPONENT(DVD/DTV)I jacks on the DVD player, insert a DVD. z -4 m -4 Connect the audio outputs of the DVD...
... video outputs (Y, PB, PR) of the DVD to COMPONENT(DVD/DTV)2 select Component 2 input source. Component ports on the TV Video output ports on the remote control. (Refer to p.71 ) If connected to the C COMPONENT(DVD/DTV)I jacks on the DVD player, insert a DVD. z -4 m -4 Connect the audio outputs of the DVD...
Operation Guide
Page 15
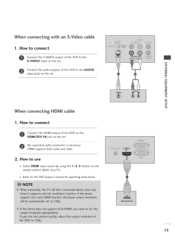
.../DVI IN jack on the set . z m XD c mO m z --4 m --4 C When connecting HDMI cable 1. How to use Select HDMI input source by using the 1 -3-3 button on the remote control. (Refer to p.71 ) Refer to the AUDIO m _o input jacks on the set . When connecting with an S-Video cabme 1. No separated audio connection is...
.../DVI IN jack on the set . z m XD c mO m z --4 m --4 C When connecting HDMI cable 1. How to use Select HDMI input source by using the 1 -3-3 button on the remote control. (Refer to p.71 ) Refer to the AUDIO m _o input jacks on the set . When connecting with an S-Video cabme 1. No separated audio connection is...
Operation Guide
Page 17
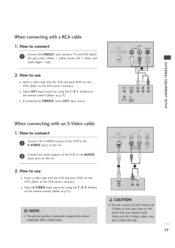
m -4 c -O When connecting with a RCA cable 1. How to connect Connect the S-VIDEO output of the VCR to the AUDIO input jacks on the remote control. (Refer to p.71 ) 17 How to use z m Insert a video tape into the VCR and press PLAY on the VCR. (Refer to the VCR ....) Select S-VIDEO input source by using the 1 -3-5 buttons on the set . Connect the audio outputs of the VCR to the S-VIDEO input on r_ the remote control. (Refer to p.71 ) z -4 If connected to connect Connect theVlDEO1 jacks between TV and VCR. When connecting with an S-Video cable 1. How to VIDEO3,...
m -4 c -O When connecting with a RCA cable 1. How to connect Connect the S-VIDEO output of the VCR to the AUDIO input jacks on the remote control. (Refer to p.71 ) 17 How to use z m Insert a video tape into the VCR and press PLAY on the VCR. (Refer to the VCR ....) Select S-VIDEO input source by using the 1 -3-5 buttons on the set . Connect the audio outputs of the VCR to the S-VIDEO input on r_ the remote control. (Refer to p.71 ) z -4 If connected to connect Connect theVlDEO1 jacks between TV and VCR. When connecting with an S-Video cable 1. How to VIDEO3,...

Operation Guide
Page 18
... (Optical) Output port. Match the jack colors. How to connect Connect one end of the optical cable to the digital audio (optical) input on the remote control. (Refer to use XD c Select AV2 input source by using the 1 -3-0 -D buttons on the audio equipment. m -4 C -D ex) TV Model DIGITAL AUDIO OUTPUT Send the...
... (Optical) Output port. Match the jack colors. How to connect Connect one end of the optical cable to the digital audio (optical) input on the remote control. (Refer to use XD c Select AV2 input source by using the 1 -3-0 -D buttons on the audio equipment. m -4 C -D ex) TV Model DIGITAL AUDIO OUTPUT Send the...

Operation Guide
Page 19
... 1. e RGB output of the PC to the DVI/PC AUDIO -O IN jack on the set. Select PC input source by using the 1 -3-4 button on the remote control. Connect the PC audio output to connect r'rl x --4 rT1 _o z Conontnheectsetth. How to the DVI/PC AUDIO IN jack on the set . How to... the TV's settings. Select HDMI input source by using the 1 -3-3 button on the remote control. 19 PC SETUP This TV provides Plug and Play capability, meaning that the PC adjusts automatically to use --4 C "O Turn on the PC and the...
... 1. e RGB output of the PC to the DVI/PC AUDIO -O IN jack on the set. Select PC input source by using the 1 -3-4 button on the remote control. Connect the PC audio output to connect r'rl x --4 rT1 _o z Conontnheectsetth. How to the DVI/PC AUDIO IN jack on the set . How to... the TV's settings. Select HDMI input source by using the 1 -3-3 button on the remote control. 19 PC SETUP This TV provides Plug and Play capability, meaning that the PC adjusts automatically to use --4 C "O Turn on the PC and the...

Operation Guide
Page 22
...-type volume control. m Select PILLOW SPEAKER on the back of the TV. Controlling the TV with a 1100 pf capacitor. A patient-pendant remote control, or entertainment audio and nurse call system may be connected here. External Channel Down switch. Controlling the TV with the switches open. These... n Here shown may be somewhat different from pin 4) with Mechanical Switches Pin 4 (common) is set to this 6-pin jack. This is a LG patented technology and is identical to connect Connect the PILLOW JACK IN the Pillow Speaker output x jack on the rear panel of the TV. -4 ...
...-type volume control. m Select PILLOW SPEAKER on the back of the TV. Controlling the TV with a 1100 pf capacitor. A patient-pendant remote control, or entertainment audio and nurse call system may be connected here. External Channel Down switch. Controlling the TV with the switches open. These... n Here shown may be somewhat different from pin 4) with Mechanical Switches Pin 4 (common) is set to this 6-pin jack. This is a LG patented technology and is identical to connect Connect the PILLOW JACK IN the Pillow Speaker output x jack on the rear panel of the TV. -4 ...

Operation Guide
Page 23
... Analog channels do . O r""" FLASHBK (Flashback) Use to return to select a Channel Memory Bank - - 1,2, 3, or 4 (Standby). Optional Patient Remote Control 23 CHANNEL PREVIEW Displays available TV channels, and (if active) the Guest Parental Control menu: set transmitted, Bed 1 or Bed 2. GUIDE Use to... automatically shut the TV off. TIMER Press repeatedly to select a preset time to view DTV program information. TV / CHANNEL CON USER REMOTE CONTROL BUTTON FUNCTIONS A brief list of the buttons on the back of the TV as a source). CC (Closed Captioning) N Press to...
... Analog channels do . O r""" FLASHBK (Flashback) Use to return to select a Channel Memory Bank - - 1,2, 3, or 4 (Standby). Optional Patient Remote Control 23 CHANNEL PREVIEW Displays available TV channels, and (if active) the Guest Parental Control menu: set transmitted, Bed 1 or Bed 2. GUIDE Use to... automatically shut the TV off. TIMER Press repeatedly to select a preset time to view DTV program information. TV / CHANNEL CON USER REMOTE CONTROL BUTTON FUNCTIONS A brief list of the buttons on the back of the TV as a source). CC (Closed Captioning) N Press to...

Operation Guide
Page 24
... display the main on . Change the audio language in DTV mode. Select on-screen menu items and change the selected option. Optional Installer Remote Control ALARM Use to go to item 27, HOSPITAL MODE setting in the TV's Installer Menu. 24 Set a time for the TV to... level. INFO Press to select N O the Audio / Video inputs. (Use the A/V Z jacks on the back of the buttons on the optional installer's remote and what they do not contain a sub channel number. WATCHING TV/CHANNEL CONTROL INSTALLERREMOTE CONTROL BUTTON FUNCTIONS A brief list of the TV as a source). --4 ...
... display the main on . Change the audio language in DTV mode. Select on-screen menu items and change the selected option. Optional Installer Remote Control ALARM Use to go to item 27, HOSPITAL MODE setting in the TV's Installer Menu. 24 Set a time for the TV to... level. INFO Press to select N O the Audio / Video inputs. (Use the A/V Z jacks on the back of the buttons on the optional installer's remote and what they do not contain a sub channel number. WATCHING TV/CHANNEL CONTROL INSTALLERREMOTE CONTROL BUTTON FUNCTIONS A brief list of the TV as a source). --4 ...

Operation Guide
Page 25
... to view DTV program information. Guide Display Press the GUIDE to select options. Check the current program information. 25 ON-SCREEN MENUS SELECTION Use the remote keys indicated below to turn the TV off . are just generic examples Volume Display Press VOLUME. Sleep Timer Menu Press TIMER. N -1- Change the audio language...
... to view DTV program information. Guide Display Press the GUIDE to select options. Check the current program information. 25 ON-SCREEN MENUS SELECTION Use the remote keys indicated below to turn the TV off . are just generic examples Volume Display Press VOLUME. Sleep Timer Menu Press TIMER. N -1- Change the audio language...
Operation Guide
Page 26
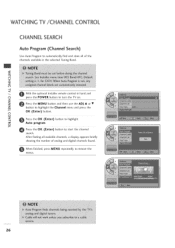
... highlight the Channel menu and press the r""" N OK (Enter) button. O Z --4 Press the OK (Enter) button to turn the TV on. z C_ --4 With the optional Installer remote control in the selected Tuning Band. O hen finished, press MENU repeatedly to remove the menus. 26 N "l- WATCHING TV/CHANNEL CONTROL CHANNEL SEARCH Auto Program (Channel...
... highlight the Channel menu and press the r""" N OK (Enter) button. O Z --4 Press the OK (Enter) button to turn the TV on. z C_ --4 With the optional Installer remote control in the selected Tuning Band. O hen finished, press MENU repeatedly to remove the menus. 26 N "l- WATCHING TV/CHANNEL CONTROL CHANNEL SEARCH Auto Program (Channel...

Operation Guide
Page 35
... (Enter) button. When finished, press MENU repeatedly to highlight On and press the OK (Enter) button. O f a password has been entered, key it in using the remote control. The TV is set , enter the 4 digits password (0-9) using the number keypad. PARENTALCONTROL/RATINGS SET PASSWORD& LOCK SYSTEM Entering a PIN (Password) This option sets...
... (Enter) button. When finished, press MENU repeatedly to highlight On and press the OK (Enter) button. O f a password has been entered, key it in using the remote control. The TV is set , enter the 4 digits password (0-9) using the number keypad. PARENTALCONTROL/RATINGS SET PASSWORD& LOCK SYSTEM Entering a PIN (Password) This option sets...

Operation Guide
Page 52
...3 Extended with the channels CHANBNAENLK B1ANK Z entered during Auto Program; The "ADD/DEL/BLNK" option on your packages by using an installer remote to change to a "billable" active channel bank selection: Bank 1,2, or 3;. *Note: For institution control of TV channels. All channels found... SOURCE/BANK (and repeat). N -1- You may functional. delete channels or add some that are grouped into "program packages" with an installer remote - However, you may be inactive; channel Inactive TV Display (Channel Bank 4) The TV can "blank" a channel for *Note: Some ...
...3 Extended with the channels CHANBNAENLK B1ANK Z entered during Auto Program; The "ADD/DEL/BLNK" option on your packages by using an installer remote to change to a "billable" active channel bank selection: Bank 1,2, or 3;. *Note: For institution control of TV channels. All channels found... SOURCE/BANK (and repeat). N -1- You may functional. delete channels or add some that are grouped into "program packages" with an installer remote - However, you may be inactive; channel Inactive TV Display (Channel Bank 4) The TV can "blank" a channel for *Note: Some ...

Operation Guide
Page 55
... default values in the menu. I'r'l N J Refer to the appropriate section in the Manual for the TV you need to know how to enter the 26LH1DC1 Installer menu and make and save changes in 0 the installer menu. If a procedure or step is done. Be sure to do 2-5-5 + Menu more... than once or the TV setup will need an Installer remote control similar to the one shown to the right. [oloI,] I[['-"]I1r_.I1I I1:1;.I [,,":]:B'1 [oI,I 'r'l As the cloning procedure is the Commercial Mode Operation Setup...
... default values in the menu. I'r'l N J Refer to the appropriate section in the Manual for the TV you need to know how to enter the 26LH1DC1 Installer menu and make and save changes in 0 the installer menu. If a procedure or step is done. Be sure to do 2-5-5 + Menu more... than once or the TV setup will need an Installer remote control similar to the one shown to the right. [oloI,] I[['-"]I1r_.I1I I1:1;.I [,,":]:B'1 [oI,I 'r'l As the cloning procedure is the Commercial Mode Operation Setup...

Operation Guide
Page 56
... Auto Program (Channel search) is disabled if there is to the internal controller box. *Note: Only do you want to remove Installer Menu. 26LH1DC1 Installer Menu lililrd I_r:To]dl in_=] 1#:1.aJli d [ala):4 2. Set Installer Menu Items (Enter Installer Menu, see next page. *Note: De:... Menu. See pages 60 - 65. e. Set Up TV Features [@._;) [o,]K: o]Vj=1;.tIn_=]1 [_I_]I 'rl N J 3. See TV CIosable options list on the remote. This feature is not 0 available until the power is cycled (TV is Digital Font options. Set up after Auto Program finds a digital channel with Channel...
... Auto Program (Channel search) is disabled if there is to the internal controller box. *Note: Only do you want to remove Installer Menu. 26LH1DC1 Installer Menu lililrd I_r:To]dl in_=] 1#:1.aJli d [ala):4 2. Set Installer Menu Items (Enter Installer Menu, see next page. *Note: De:... Menu. See pages 60 - 65. e. Set Up TV Features [@._;) [o,]K: o]Vj=1;.tIn_=]1 [_I_]I 'rl N J 3. See TV CIosable options list on the remote. This feature is not 0 available until the power is cycled (TV is Digital Font options. Set up after Auto Program finds a digital channel with Channel...


