
User Manual
Page 2
...determined by turning the equipment off and on a circuit different from LG Electronics. Consult the dealer or an experienced radio/TV technician for proper grounding and, in a residential installation. This device complies with the instructions, may cause undesired operation (of...device may not cause (harmful) interference, and (2) this device which can radiate radio frequency energy and, if not installed and used in a particular installation. Connect the equipment to radio communications. Operation is encouraged to try to the following measures: - Reorient or relocate ...
...determined by turning the equipment off and on a circuit different from LG Electronics. Consult the dealer or an experienced radio/TV technician for proper grounding and, in a residential installation. This device complies with the instructions, may cause undesired operation (of...device may not cause (harmful) interference, and (2) this device which can radiate radio frequency energy and, if not installed and used in a particular installation. Connect the equipment to radio communications. Operation is encouraged to try to the following measures: - Reorient or relocate ...

User Manual
Page 3
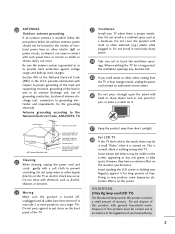
Install in any heat sources such as power- A polarized plug has two blades with dry cloth. 7 Only use caution when moving the cart/apparatus com- Servicing ... the apparatus. If the provided plug does not fit into the apparatus, the apparatus has been exposed to avoid injury from tip-over. 4 Do not install near water. 6 Protect the power cord from being walked on or pinched particularly at plugs, convenience receptacles, and the point where they exit from the...
Install in any heat sources such as power- A polarized plug has two blades with dry cloth. 7 Only use caution when moving the cart/apparatus com- Servicing ... the apparatus. If the provided plug does not fit into the apparatus, the apparatus has been exposed to avoid injury from tip-over. 4 Do not install near water. 6 Protect the power cord from being walked on or pinched particularly at plugs, convenience receptacles, and the point where they exit from the...

User Manual
Page 4
... in . To reduce the risk of this unit by the hanging power and signal cables on the back of the appliance, and have a qualified electrician install a separate circuit breaker. on the wall, make the TV with liquids, such as vases, cups, etc. Do not try to prevent possible electric shock ... or any objects to fall into the product, and do not expose this unit is connected to a three-prong grounded AC outlet). Do not install this product near flammable objects such as this apparatus or antenna during a thunder or lighting storm. on the power cord to plugs, wall outlets,...
... in . To reduce the risk of this unit by the hanging power and signal cables on the back of the appliance, and have a qualified electrician install a separate circuit breaker. on the wall, make the TV with liquids, such as vases, cups, etc. Do not try to prevent possible electric shock ... or any objects to fall into the product, and do not expose this unit is connected to a three-prong grounded AC outlet). Do not install this product near flammable objects such as this apparatus or antenna during a thunder or lighting storm. on the power cord to plugs, wall outlets,...
User Manual
Page 5
...with hand or sharp object such as nail, pencil or pen, or make a scratch on the screen, appearing as a bookcase. Do not install in accordance to grounding electrodes and requirements for a long period, the ventilation openings may produce some protection against voltage surges and built-up static...panel with chemicals such as to carry larger TVs. An outdoor antenna system should not be visible on it can occur. Do not install in contact with general household waste. Some minute dot defects may take 2 or more people to provide some temporary distortion effects on ...
...with hand or sharp object such as nail, pencil or pen, or make a scratch on the screen, appearing as a bookcase. Do not install in accordance to grounding electrodes and requirements for a long period, the ventilation openings may produce some protection against voltage surges and built-up static...panel with chemicals such as to carry larger TVs. An outdoor antenna system should not be visible on it can occur. Do not install in contact with general household waste. Some minute dot defects may take 2 or more people to provide some temporary distortion effects on ...

User Manual
Page 6
... Information 10 Back Panel Information 12 Stand Instructions 16 VESA Wall Mounting 22 Cable Management 23 Swivel Stand 25 Positioning your Display 25 Desktop Pedestal Installation 26 Attaching the TV to a Desk 27 Kensington Security System 27 Securing the TV to the wall to prevent falling when the TV is used...
... Information 10 Back Panel Information 12 Stand Instructions 16 VESA Wall Mounting 22 Cable Management 23 Swivel Stand 25 Positioning your Display 25 Desktop Pedestal Installation 26 Attaching the TV to a Desk 27 Kensington Security System 27 Securing the TV to the wall to prevent falling when the TV is used...

User Manual
Page 16
PREPARATION PREPARATION STAND INSTRUCTIONS (For 19/22LD350) I Image shown may differ from damage. 2 Assemble the TV as shown until you hear it click. 16 INSTALLATION 1 Carefully place the TV screen side down on a cushioned surface to protect the screen from your TV.
PREPARATION PREPARATION STAND INSTRUCTIONS (For 19/22LD350) I Image shown may differ from damage. 2 Assemble the TV as shown until you hear it click. 16 INSTALLATION 1 Carefully place the TV screen side down on a cushioned surface to protect the screen from your TV.
User Manual
Page 18
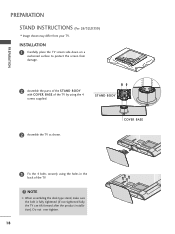
...the TV as shown. COVER BASE 3 Fix the 4 bolts securely using the holes in the back of the TV by using the 4 screws supplied. INSTALLATION 1 Carefully place the TV screen side down on a cushioned surface to protect the screen from your TV. Do not over tighten. 18 NOTE G ...When assembling the desk type stand, make sure the bolt is fully tightened (If not tightened fully, the TV can tilt forward after the product installation). PREPARATION PREPARATION STAND INSTRUCTIONS (For 26/32LD350) I Image shown may differ from damage. 2 Assemble the parts of the STAND BODY with COVER BASE...
...the TV as shown. COVER BASE 3 Fix the 4 bolts securely using the holes in the back of the TV by using the 4 screws supplied. INSTALLATION 1 Carefully place the TV screen side down on a cushioned surface to protect the screen from your TV. Do not over tighten. 18 NOTE G ...When assembling the desk type stand, make sure the bolt is fully tightened (If not tightened fully, the TV can tilt forward after the product installation). PREPARATION PREPARATION STAND INSTRUCTIONS (For 26/32LD350) I Image shown may differ from damage. 2 Assemble the parts of the STAND BODY with COVER BASE...

User Manual
Page 19
PREPARATION DETACHMENT 1 Carefully place the TV screen side down on a cushioned surface to protect the screen from damage. 2 Loose the bolts from TV. 3 Detach the stand from TV. PROTECTION COVER After removing the stand, install the included protection cover over the hole for the stand. Press the PROTECTION COVER into the TV until you hear it click. 19
PREPARATION DETACHMENT 1 Carefully place the TV screen side down on a cushioned surface to protect the screen from damage. 2 Loose the bolts from TV. 3 Detach the stand from TV. PROTECTION COVER After removing the stand, install the included protection cover over the hole for the stand. Press the PROTECTION COVER into the TV until you hear it click. 19

User Manual
Page 20
Do not over tighten. 20 PREPARATION PREPARATION STAND INSTRUCTIONS (For 32/37/42/47LD450) INSTALLATION 1 Carefully place the TV screen side down on a cushioned surface to protect the screen from damage. 2 Assemble the TV as shown. 3 Fix the 4 bolts securely using the holes in the back of the TV. ! NOTE G When assembling the desk type stand, make sure the bolt is fully tightened (If not tightened fully, the TV can tilt forward after the product installation).
Do not over tighten. 20 PREPARATION PREPARATION STAND INSTRUCTIONS (For 32/37/42/47LD450) INSTALLATION 1 Carefully place the TV screen side down on a cushioned surface to protect the screen from damage. 2 Assemble the TV as shown. 3 Fix the 4 bolts securely using the holes in the back of the TV. ! NOTE G When assembling the desk type stand, make sure the bolt is fully tightened (If not tightened fully, the TV can tilt forward after the product installation).

User Manual
Page 21
Press the PROTECTION COVER into the TV until you hear it click. 21 PREPARATION DETACHMENT 1 Carefully place the TV screen side down on a cushioned surface to protect the screen from damage. 2 Loose the bolts from TV. 3 Detach the stand from TV. 4 PROTECTION COVER After removing the stand, install the included protection cover over the hole for the stand.
Press the PROTECTION COVER into the TV until you hear it click. 21 PREPARATION DETACHMENT 1 Carefully place the TV screen side down on a cushioned surface to protect the screen from damage. 2 Loose the bolts from TV. 3 Detach the stand from TV. 4 PROTECTION COVER After removing the stand, install the included protection cover over the hole for the stand.

User Manual
Page 22
... perpendicular to the floor. PREPARATION VESA WALL MOUNTING Install your wall mount on a ceiling or slanted wall, it may cause damage to the inside to the TV. We recommend that wall mounting be performed by a qualified professional installer. LG recommends that you use fasten the screws too strongly..., this may result in the table. Do not use an LG brand wall mount when mounting the TV to a wall. G LG is not liable for assembly are shown in personal...
... perpendicular to the floor. PREPARATION VESA WALL MOUNTING Install your wall mount on a ceiling or slanted wall, it may cause damage to the inside to the TV. We recommend that wall mounting be performed by a qualified professional installer. LG recommends that you use fasten the screws too strongly..., this may result in the table. Do not use an LG brand wall mount when mounting the TV to a wall. G LG is not liable for assembly are shown in personal...

User Manual
Page 23
CABLE MANAGEMENT I Image shown may differ from your TV. For 19/22LD350 1 After connecting the cables as necessary, install CABLE HOLDER as shown and bundle the cables. AC-IN K PREPARATION 23
CABLE MANAGEMENT I Image shown may differ from your TV. For 19/22LD350 1 After connecting the cables as necessary, install CABLE HOLDER as shown and bundle the cables. AC-IN K PREPARATION 23

User Manual
Page 25
PREPARATION SWIVEL STAND (Except 19/22LD350) After installing the TV, you can adjust the TV set manually to the left or right direction by 20 degrees to suit your TV. POSITIONING YOUR DISPLAY (For 19/22LD350) I Adjust the position of the panel in various ways for maximum comfort. • Tilt range 12 0 03 25 I Here shown may be somewhat different from your viewing position.
PREPARATION SWIVEL STAND (Except 19/22LD350) After installing the TV, you can adjust the TV set manually to the left or right direction by 20 degrees to suit your TV. POSITIONING YOUR DISPLAY (For 19/22LD350) I Adjust the position of the panel in various ways for maximum comfort. • Tilt range 12 0 03 25 I Here shown may be somewhat different from your viewing position.

User Manual
Page 26
G Do not mount near or above any type of 4 inches on all four sides from your TV. PREPARATION PREPARATION DESKTOP PEDESTAL INSTALLATION I Image shown may differ from the wall. 4 inches 4 inches 4 inches 4 inches CAUTION G Ensure adequate ventilation by following the clearance recommendations. For proper ventilation, allow a clearance of heat source. 26
G Do not mount near or above any type of 4 inches on all four sides from your TV. PREPARATION PREPARATION DESKTOP PEDESTAL INSTALLATION I Image shown may differ from the wall. 4 inches 4 inches 4 inches 4 inches CAUTION G Ensure adequate ventilation by following the clearance recommendations. For proper ventilation, allow a clearance of heat source. 26

User Manual
Page 27
... use of the Kensington Security System, refer to the floor/wall per installation instructions. Stand 1-Screw (provided as parts of the Kensington company. KENSINGTON SECURITY SYSTEM I This feature is not available for expensive electronic equipment such as shown ...
... use of the Kensington Security System, refer to the floor/wall per installation instructions. Stand 1-Screw (provided as parts of the Kensington company. KENSINGTON SECURITY SYSTEM I This feature is not available for expensive electronic equipment such as shown ...

User Manual
Page 29
... copper wire when connecting the antenna. 2. I To improve the picture quality in a poor signal area, please purchase a signal amplifier and install properly. Antenna (Analog or Digital) Wall Antenna Socket or Outdoor Antenna without a Cable Box Connections. Cable Cable TV Wall Jack RF Coaxial ...Wire (75 ohm) ANTENNA /CABLE IN I If the antenna is not installed properly, contact your TV. ANTENNA OR CABLE CONNECTION 1. Wall Antenna Socket Multi-family Dwellings/Apartments (Connect to wall antenna socket) ANTENNA /...
... copper wire when connecting the antenna. 2. I To improve the picture quality in a poor signal area, please purchase a signal amplifier and install properly. Antenna (Analog or Digital) Wall Antenna Socket or Outdoor Antenna without a Cable Box Connections. Cable Cable TV Wall Jack RF Coaxial ...Wire (75 ohm) ANTENNA /CABLE IN I If the antenna is not installed properly, contact your TV. ANTENNA OR CABLE CONNECTION 1. Wall Antenna Socket Multi-family Dwellings/Apartments (Connect to wall antenna socket) ANTENNA /...

User Manual
Page 47
...such as 2-1, 2-2, etc. G p.52 THUMBSTICK (Up/Down/Left Navigates the on the back side and install the batteries matching correct polarity. SIMPLINK See a list of the screen. I Install two 1.5V AAA batteries. I Close cover. 47 INFO Displays channel information at the screen. When you ... to your preference. Don't mix old or used batteries with new ones. Right/ENTER) RETURN Allows the user to TV. G p.64 EXIT Installing Batteries I Open the battery compartment cover on -screen menus and adjusts the system settings to the last channel viewed. G p.59 Q.MENU Opens...
...such as 2-1, 2-2, etc. G p.52 THUMBSTICK (Up/Down/Left Navigates the on the back side and install the batteries matching correct polarity. SIMPLINK See a list of the screen. I Install two 1.5V AAA batteries. I Close cover. 47 INFO Displays channel information at the screen. When you ... to your preference. Don't mix old or used batteries with new ones. Right/ENTER) RETURN Allows the user to TV. G p.64 EXIT Installing Batteries I Open the battery compartment cover on -screen menus and adjusts the system settings to the last channel viewed. G p.59 Q.MENU Opens...

User Manual
Page 116
... service center, if the picture has not appeared after five minutes. Please after switching on . Poor reception on some channels I Install new batteries. *This feature is muted during the product startup process. No picture when connecting HDMI I Check the power control settings...tool. I Station or cable product experiencing problems, tune to +, - I Try another station. Lines or streaks in . Ensure you are installed with correct polarity (+ to another channel. to receive weaker station. I Test the wall power outlet, plug another channel. In this case ...
... service center, if the picture has not appeared after five minutes. Please after switching on . Poor reception on some channels I Install new batteries. *This feature is muted during the product startup process. No picture when connecting HDMI I Check the power control settings...tool. I Station or cable product experiencing problems, tune to +, - I Try another station. Lines or streaks in . Ensure you are installed with correct polarity (+ to another channel. to receive weaker station. I Test the wall power outlet, plug another channel. In this case ...

User Manual
Page 117
.... No sound when connecting HDMI or USB I Press the VOL or VOLUME button. There is a problem in menu option. I Sound muted? I Are the audio cables installed properly? I Adjust Balance in PC mode. (Only PC mode applied) The signal is out of the speakers Unusual sound from one of range I Adjust resolution...
.... No sound when connecting HDMI or USB I Press the VOL or VOLUME button. There is a problem in menu option. I Sound muted? I Are the audio cables installed properly? I Adjust Balance in PC mode. (Only PC mode applied) The signal is out of the speakers Unusual sound from one of range I Adjust resolution...

User Manual
Page 129
... copy the source along with the major components (compiler, kernel, and so on) of the operating system on a medium customarily used to control compilation and installation of the executable. or, c) Accompany it with the complete corresponding machinereadable source code, which is a work based on the Program, the distribution of the whole...
... copy the source along with the major components (compiler, kernel, and so on) of the operating system on a medium customarily used to control compilation and installation of the executable. or, c) Accompany it with the complete corresponding machinereadable source code, which is a work based on the Program, the distribution of the whole...

