
User Manual
Page 4
... by the hanging power and signal cables on shelves above the unit). 17 GROUNDING Ensure that is the disconnecting device. SAFETY INSTRUCTIONS 11 Never touch this product to rain, moisture or other liquids. When mounting a TV on the wall, make the TV with liquids, such as this unit by an authorized servicer. Periodically examine the cord of your...
... by the hanging power and signal cables on shelves above the unit). 17 GROUNDING Ensure that is the disconnecting device. SAFETY INSTRUCTIONS 11 Never touch this product to rain, moisture or other liquids. When mounting a TV on the wall, make the TV with liquids, such as this unit by an authorized servicer. Periodically examine the cord of your...
User Manual
Page 5
... the TV or hear strange sounds, unplug the power cord contact an authorized service center. 26 Do not press strongly upon the panel with general household waste. Do not press against it can occur. However, they have been removed. Avoid touching the LCD screen or holding your local authority. 5 Do not dispose of time. Disposal of this product with...
... the TV or hear strange sounds, unplug the power cord contact an authorized service center. 26 Do not press strongly upon the panel with general household waste. Do not press against it can occur. However, they have been removed. Avoid touching the LCD screen or holding your local authority. 5 Do not dispose of time. Disposal of this product with...

User Manual
Page 6
... List 67 Music List 71 PICTURE CONTROL Picture Size (Aspect Ratio) Control 74 Picture Wizard 76 Preset Picture Settings (Picture Mode 78 Manual Picture Adjustment - Add / Delete Channel (Manual Tuning 55 - User Mode 79 Picture Improvement Technology 80 Expert Picture Control 81 Energy Saving 84 Picture Reset 85 Power Indicator 86 Demo Mode 87 Auto Scan (Auto Tuning 53 - CONTENTS WARNING / CAUTION 2 SAFETY INSTRUCTIONS 3 FEATURE OF THIS TV 8 PREPARATION Accessories 9 Front Panel Information 10 Back Panel Information 12 Stand Instructions 16 VESA Wall Mounting 22 Cable...
... List 67 Music List 71 PICTURE CONTROL Picture Size (Aspect Ratio) Control 74 Picture Wizard 76 Preset Picture Settings (Picture Mode 78 Manual Picture Adjustment - Add / Delete Channel (Manual Tuning 55 - User Mode 79 Picture Improvement Technology 80 Expert Picture Control 81 Energy Saving 84 Picture Reset 85 Power Indicator 86 Demo Mode 87 Auto Scan (Auto Tuning 53 - CONTENTS WARNING / CAUTION 2 SAFETY INSTRUCTIONS 3 FEATURE OF THIS TV 8 PREPARATION Accessories 9 Front Panel Information 10 Back Panel Information 12 Stand Instructions 16 VESA Wall Mounting 22 Cable...

User Manual
Page 7
... Setup 102 Auto On/Off Time Setting 103 Sleep Timer Setting 104 PARENTAL CONTROL / RATINGS Set Password & Lock System 105 Channel Blocking 108 Movie & TV Rating 109 Downloadable Rating 114 External Input Blocking 115 APPENDIX Troubleshooting 116 Maintenance 118 Product Specifications 119 IR Codes 121 External Control Through RS-232C 122 Open Source License 126 7 SOUND & LANGUAGE CONTROL Auto Volume Leveler (Auto Volume 88 Clear Voice II 89 Preset Sound Setting (Sound Mode 90 Sound Setting Adjustment - User Mode 91 Balance 92 TV Speakers On/Off Setup 93 Audio Reset...
... Setup 102 Auto On/Off Time Setting 103 Sleep Timer Setting 104 PARENTAL CONTROL / RATINGS Set Password & Lock System 105 Channel Blocking 108 Movie & TV Rating 109 Downloadable Rating 114 External Input Blocking 115 APPENDIX Troubleshooting 116 Maintenance 118 Product Specifications 119 IR Codes 121 External Control Through RS-232C 122 Open Source License 126 7 SOUND & LANGUAGE CONTROL Auto Volume Leveler (Auto Volume 88 Clear Voice II 89 Preset Sound Setting (Sound Mode 90 Sound Setting Adjustment - User Mode 91 Balance 92 TV Speakers On/Off Setup 93 Audio Reset...
User Manual
Page 30
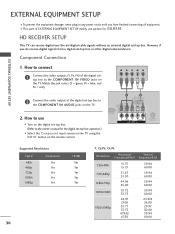
... 1 EXTERNAL EQUIPMENT SETUP EXTERNAL EQUIPMENT SETUP I Turn on the digital set -top box. Match the jack colors (Y = green, PB = blue, and PR = red). Y PB PR L R 2 Connect the audio output of the digital set -top box or other digital external device. Component Connection 1. However, if you have finished connecting all equipment. HD RECEIVER SETUP This TV can receive digital over-the-air/digital cable signals without an external digital set -top box. (Refer to the COMPONENT IN VIDEO jacks on the remote control. 1 2 RS-232C IN (CONTROL&SERVICE) OPTICAL AUDIO IN DIGITAL (RGB...
... 1 EXTERNAL EQUIPMENT SETUP EXTERNAL EQUIPMENT SETUP I Turn on the digital set -top box. Match the jack colors (Y = green, PB = blue, and PR = red). Y PB PR L R 2 Connect the audio output of the digital set -top box or other digital external device. Component Connection 1. However, if you have finished connecting all equipment. HD RECEIVER SETUP This TV can receive digital over-the-air/digital cable signals without an external digital set -top box. (Refer to the COMPONENT IN VIDEO jacks on the remote control. 1 2 RS-232C IN (CONTROL&SERVICE) OPTICAL AUDIO IN DIGITAL (RGB...
User Manual
Page 31
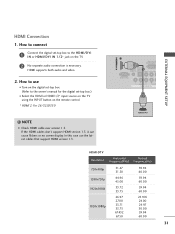
... remote control. * HDMI 2: For 26/32LD350 ! How to the HDMI/DVI I Select the HDMI or HDMI1/2* input source on the TV using the INPUT button on the TV. 2 No separate audio connection is necessary. If the HDMI cables don't support HDMI version 1.3, it can cause flickers or no screen display. NOTE G Check HDMI cable over version 1.3. EXTERNAL EQUIPMENT SETUP /DVI IN HDMI Connection 1. HDMI supports both audio and video. 2. In this case use I Turn on the digital set-top box. (Refer to the owner's manual...
... remote control. * HDMI 2: For 26/32LD350 ! How to the HDMI/DVI I Select the HDMI or HDMI1/2* input source on the TV using the INPUT button on the TV. 2 No separate audio connection is necessary. If the HDMI cables don't support HDMI version 1.3, it can cause flickers or no screen display. NOTE G Check HDMI cable over version 1.3. EXTERNAL EQUIPMENT SETUP /DVI IN HDMI Connection 1. HDMI supports both audio and video. 2. In this case use I Turn on the digital set-top box. (Refer to the owner's manual...

User Manual
Page 32
... HDMI cable or adapter is necessary. 1 RS-232C IN (CONTROL&SERVICE) OPTICAL AUDIO IN DIGITAL (RGB/DVI) AUDIO OUT VIDEO L(MONO) AUDIO R RGB IN (PC) 1 Y PB PR L R VIDEO AUDIO COMPONENT IN 2 L R AUDIO DVI OUTPUT 32 NOTE G A DVI to use I Select the HDMI or HDMI1 input source on the TV using the INPUT button on the TV. 2. DVI doesn't support audio, so a separate audio connection is required for the digital set -top box audio output to HDMI Connection 1. How to connect 1 Connect the DVI output of the digital set-top box...
... HDMI cable or adapter is necessary. 1 RS-232C IN (CONTROL&SERVICE) OPTICAL AUDIO IN DIGITAL (RGB/DVI) AUDIO OUT VIDEO L(MONO) AUDIO R RGB IN (PC) 1 Y PB PR L R VIDEO AUDIO COMPONENT IN 2 L R AUDIO DVI OUTPUT 32 NOTE G A DVI to use I Select the HDMI or HDMI1 input source on the TV using the INPUT button on the TV. 2. DVI doesn't support audio, so a separate audio connection is required for the digital set -top box audio output to HDMI Connection 1. How to connect 1 Connect the DVI output of the digital set-top box...

User Manual
Page 33
... IN (CONTROL&SERVICE) OPTICAL AUDIO IN DIGITAL (RGB/DVI) AUDIO OUT VIDEO L(MONO) AUDIO R N (PC) Y PB PR L R VIDEO AUDIO COMPONENT IN ANTENNA /CABLE IN Component Input ports To get better picture quality, connect a DVD player to the component input ports as shown below. Y PB PR L R 2 Connect the audio outputs of the DVD to the COMPONENT IN AUDIO jacks on the DVD player, insert a DVD. Match the jack colors (Y = green, PB = blue, and PR = red). I Turn on the TV. 2. I Select the Component input source on the TV using the INPUT button on DVD player Y Y PB...
... IN (CONTROL&SERVICE) OPTICAL AUDIO IN DIGITAL (RGB/DVI) AUDIO OUT VIDEO L(MONO) AUDIO R N (PC) Y PB PR L R VIDEO AUDIO COMPONENT IN ANTENNA /CABLE IN Component Input ports To get better picture quality, connect a DVD player to the component input ports as shown below. Y PB PR L R 2 Connect the audio outputs of the DVD to the COMPONENT IN AUDIO jacks on the DVD player, insert a DVD. Match the jack colors (Y = green, PB = blue, and PR = red). I Turn on the TV. 2. I Select the Component input source on the TV using the INPUT button on DVD player Y Y PB...

User Manual
Page 34
... (CONTROL&SERVICE) OPTICAL AUDIO IN DIGITAL (RGB/DVI) AUDIO OUT VIDEO L(MONO) AUDIO R AV IN 1 N (PC) Y PB PR L R VIDEO AUDIO COMPONENT IN ANTENNA /CABLE IN 1 VIDEO L R AUDIO /DVI IN 1 RS-232C I Turn on the TV. 2 No separated audio connection is necessary. I Select the HDMI or HDMI1 / 2* input source on the TV using the INPUT button on the remote control. How to use I Refer to use the latest cables that support HDMI version 1.3. How to the DVD player's manual for operating instructions. * HDMI 2: For 26/32LD350 ! How to connect 1 Connect...
... (CONTROL&SERVICE) OPTICAL AUDIO IN DIGITAL (RGB/DVI) AUDIO OUT VIDEO L(MONO) AUDIO R AV IN 1 N (PC) Y PB PR L R VIDEO AUDIO COMPONENT IN ANTENNA /CABLE IN 1 VIDEO L R AUDIO /DVI IN 1 RS-232C I Turn on the TV. 2 No separated audio connection is necessary. I Select the HDMI or HDMI1 / 2* input source on the TV using the INPUT button on the remote control. How to use I Refer to use the latest cables that support HDMI version 1.3. How to the DVD player's manual for operating instructions. * HDMI 2: For 26/32LD350 ! How to connect 1 Connect...

User Manual
Page 36
... owner's manual.) I Select the A V or AV1/2* input source on the TV using the INPUT button on the remote control. * AV2: For 26/32LD350 ! How to use I Insert a video tape into the VCR and press PLAY on the VCR. (Refer to the AUDIO L/MONO jack of the TV. Match the jack colors (Video = yellow, Audio Left = white, and Audio Right = red). 2. AV IN 1 EXTERNAL EQUIPMENT SETUP EXTERNAL EQUIPMENT SETUP Composite (RCA) Connection 1. RS-232C IN (CONTROL&SERVICE) OPTICAL AUDIO...
... owner's manual.) I Select the A V or AV1/2* input source on the TV using the INPUT button on the remote control. * AV2: For 26/32LD350 ! How to use I Insert a video tape into the VCR and press PLAY on the VCR. (Refer to the AUDIO L/MONO jack of the TV. Match the jack colors (Video = yellow, Audio Left = white, and Audio Right = red). 2. AV IN 1 EXTERNAL EQUIPMENT SETUP EXTERNAL EQUIPMENT SETUP Composite (RCA) Connection 1. RS-232C IN (CONTROL&SERVICE) OPTICAL AUDIO...

User Manual
Page 38
... instruction manual for operation. 1 RS-232C IN (CONTROL&SERVICE) OPTICAL AUDIO IN DIGITAL (RGB/DVI) AUDIO OUT VIDEO L(MONO) AUDIO R RGB IN (PC) 1 Y PB PR L R VIDEO AUDIO COMPONENT IN ! G Audio with external audio equipments, such as amplifiers or speakers, you can listen to connect 1 Plug the headphone into the optical output port. AV IN 1 /DVI IN EXTERNAL EQUIPMENT SETUP EXTERNAL EQUIPMENT SETUP AUDIO OUT CONNECTION Send the TV's audio to the digital audio input on the back of the optical cable to external audio equipment via the Audio Output port...
... instruction manual for operation. 1 RS-232C IN (CONTROL&SERVICE) OPTICAL AUDIO IN DIGITAL (RGB/DVI) AUDIO OUT VIDEO L(MONO) AUDIO R RGB IN (PC) 1 Y PB PR L R VIDEO AUDIO COMPONENT IN ! G Audio with external audio equipments, such as amplifiers or speakers, you can listen to connect 1 Plug the headphone into the optical output port. AV IN 1 /DVI IN EXTERNAL EQUIPMENT SETUP EXTERNAL EQUIPMENT SETUP AUDIO OUT CONNECTION Send the TV's audio to the digital audio input on the back of the optical cable to external audio equipment via the Audio Output port...

User Manual
Page 39
... TV. EXTERNAL EQUIPMENT SETUP /DVI IN PC SETUP This TV provides Plug and Play capability, meaning that the PC adjusts automatically to use I (CONTROL&SER OPTICAL AUDIO IN DIGITAL (RGB/DVI) AUDIO OUT VIDEO L(MONO) AU RGB IN (PC) Y PB PR L VIDEO AUDI COMPONENT IN 1 2 RGB OUTPUT AUDIO 39 How to the TV's settings. I Select the RGB-PC input source on the TV using the INPUT button on the remote control. 1 RS-232C I Turn on the...
... TV. EXTERNAL EQUIPMENT SETUP /DVI IN PC SETUP This TV provides Plug and Play capability, meaning that the PC adjusts automatically to use I (CONTROL&SER OPTICAL AUDIO IN DIGITAL (RGB/DVI) AUDIO OUT VIDEO L(MONO) AU RGB IN (PC) Y PB PR L VIDEO AUDI COMPONENT IN 1 2 RGB OUTPUT AUDIO 39 How to the TV's settings. I Select the RGB-PC input source on the TV using the INPUT button on the remote control. 1 RS-232C I Turn on the...

User Manual
Page 46
G p.84 AV MODE Toggles through inputs. G p.48 CHANNEL Changes the channel. ENERGY SAVING Adjusts the Energy Saving. G p.58 RATIO Changes the aspect ratio. G p.74 MUTE Switches the sound on from one full set of screen information to the next UP/DOWN one. COLOR BUTTON USB, SIMPLINK Control buttons Controls USB menu (Photo List and Music List.) Controls the SIMPLINK compatible devices. VOLUME UP Adjusts the volume. /DOWN MARK Select the input to the last TV channel. ENERGY AV MODE INPUT TV...
G p.84 AV MODE Toggles through inputs. G p.48 CHANNEL Changes the channel. ENERGY SAVING Adjusts the Energy Saving. G p.58 RATIO Changes the aspect ratio. G p.74 MUTE Switches the sound on from one full set of screen information to the next UP/DOWN one. COLOR BUTTON USB, SIMPLINK Control buttons Controls USB menu (Photo List and Music List.) Controls the SIMPLINK compatible devices. VOLUME UP Adjusts the volume. /DOWN MARK Select the input to the last TV channel. ENERGY AV MODE INPUT TV...

User Manual
Page 59
... The video resolution is 1920x1080p V-Chip: The program contains V-Chip information. CC Caption : The program contains one or more audio services. BRIEF INFORMATION Brief Info shows the present screen information. 1 INFO Show the Brief Info on the screen. 2 BACK Return to select wanted Audio. WATCHING TV / CHANNEL CONTROL 7 DOLBY DIGITAL CNN 1 2 3 4 5 6 Brief Info Title Test.. Refer to select wanted Closed caption. Use the Q.MENU menu to the LOCK menu: A (Age...
... The video resolution is 1920x1080p V-Chip: The program contains V-Chip information. CC Caption : The program contains one or more audio services. BRIEF INFORMATION Brief Info shows the present screen information. 1 INFO Show the Brief Info on the screen. 2 BACK Return to select wanted Audio. WATCHING TV / CHANNEL CONTROL 7 DOLBY DIGITAL CNN 1 2 3 4 5 6 Brief Info Title Test.. Refer to select wanted Closed caption. Use the Q.MENU menu to the LOCK menu: A (Age...

User Manual
Page 105
... Parental Control can be used to block program viewing based on the ratings sent by the broadcasting station. Most television programs and television movies can be viewed. For USA LOCK Move Enter Lock System : Off Set Password Block Channel Movie Rating TV Rating-Children TV Rating-General Downloadable Rating Input Block For Canada LOCK Move Enter Lock System : Off Set Password Block Channel TV Rating-English TV Rating-French Downloadable Rating Input Block Enter Password **** Close 1 MENU...
... Parental Control can be used to block program viewing based on the ratings sent by the broadcasting station. Most television programs and television movies can be viewed. For USA LOCK Move Enter Lock System : Off Set Password Block Channel Movie Rating TV Rating-Children TV Rating-General Downloadable Rating Input Block For Canada LOCK Move Enter Lock System : Off Set Password Block Channel TV Rating-English TV Rating-French Downloadable Rating Input Block Enter Password **** Close 1 MENU...

User Manual
Page 116
... support HDMI version 1.3. Power is muted during the product startup process. I TV will be automatically turned off I Test the wall power outlet, plug another channel. I Station signal is any function to restore the brightness of the antenna). The HDMI cables don't support HDMI version 1.3, it cause flickers or no signal for sources of no screen display. The remote control doesn't work I Check for 15 minutes. I Is the sleep timer set : TV, VCR etc. to receive...
... support HDMI version 1.3. Power is muted during the product startup process. I TV will be automatically turned off I Test the wall power outlet, plug another channel. I Station signal is any function to restore the brightness of the antenna). The HDMI cables don't support HDMI version 1.3, it cause flickers or no signal for sources of no screen display. The remote control doesn't work I Check for 15 minutes. I Is the sleep timer set : TV, VCR etc. to receive...

User Manual
Page 119
... PRODUCT SPECIFICATIONS MODELS Dimensions (Width x Height x Depth) With stand Without stand Weight With stand Without stand MODELS Dimensions (Width x Height x Depth) With stand Without stand Weight With stand Without stand Power requirement Television System Program Coverage External Antenna Impedance Environment condition Operating Temperature Operating Humidity Storage Temperature Storage Humidity 19LD350 (19LD350-UA/UB) 18.2 x 13.8 x 6.7 inches 462.4 x 353.0 x 171.0 mm 22LD350 (22LD350-UA/UB) 21.0 x 15.6 x 6.7 inches 533.4 x 397.0 x 171.0 mm 18.2 x 12.1 x 2.5 inches 462...
... PRODUCT SPECIFICATIONS MODELS Dimensions (Width x Height x Depth) With stand Without stand Weight With stand Without stand MODELS Dimensions (Width x Height x Depth) With stand Without stand Weight With stand Without stand Power requirement Television System Program Coverage External Antenna Impedance Environment condition Operating Temperature Operating Humidity Storage Temperature Storage Humidity 19LD350 (19LD350-UA/UB) 18.2 x 13.8 x 6.7 inches 462.4 x 353.0 x 171.0 mm 22LD350 (22LD350-UA/UB) 21.0 x 15.6 x 6.7 inches 533.4 x 397.0 x 171.0 mm 18.2 x 12.1 x 2.5 inches 462...

User Manual
Page 124
... Set ID '0', every connected the TV is indicated as decimal (1~ 99) on menu and as command. [Set ID] : Use the small character, if set ID to read mode, it returns the data of command. [Cr] : Carriage Return ASCII code '0x0D' [ ] : ASCII code 'space (0x20)' * In this format when receiving abnormal data from non-viable functions or communication errors. Sharpness k 12. Set ID is controlled. Auto...
... Set ID '0', every connected the TV is indicated as decimal (1~ 99) on menu and as command. [Set ID] : Use the small character, if set ID to read mode, it returns the data of command. [Cr] : Carriage Return ASCII code '0x0D' [ ] : ASCII code 'space (0x20)' * In this format when receiving abnormal data from non-viable functions or communication errors. Sharpness k 12. Set ID is controlled. Auto...

Brochure
Page 3
... IN1 SPEAKER OUT VIDEO L(MONO)-AUDIO-R L R Y PB PR L COMPONENT IN R ANTENNA/ CABLE IN 6.4" VIDEO L/MONO AUDIO R USB IN SIDE AV IN 2 22LD350C REAR /DVI IN RS-232C IN (CONTROL&SERVICE) OPTICAL AUDIO IN DIGITAL (RGB/DVI) AUDIO OUT VIDEO L(MONO) AUDIO R AV IN RGB IN (PC) Y PB PR L R VIDEO AUDIO COMPONENT IN ANTENNA/ CABLE IN H/P USB IN SIDE SERVICE ONLY COVER BASE Type TV Major 2 Minor 0 Minimum Volume 0 Maximum Volume 100 Start Volume No Level 20 Power Management No Setting 1 Key Management 0 Factory Reset...
... IN1 SPEAKER OUT VIDEO L(MONO)-AUDIO-R L R Y PB PR L COMPONENT IN R ANTENNA/ CABLE IN 6.4" VIDEO L/MONO AUDIO R USB IN SIDE AV IN 2 22LD350C REAR /DVI IN RS-232C IN (CONTROL&SERVICE) OPTICAL AUDIO IN DIGITAL (RGB/DVI) AUDIO OUT VIDEO L(MONO) AUDIO R AV IN RGB IN (PC) Y PB PR L R VIDEO AUDIO COMPONENT IN ANTENNA/ CABLE IN H/P USB IN SIDE SERVICE ONLY COVER BASE Type TV Major 2 Minor 0 Minimum Volume 0 Maximum Volume 100 Start Volume No Level 20 Power Management No Setting 1 Key Management 0 Factory Reset...

Brochure
Page 4
.../OUTPUTS RF In (Antenna/Cable) 1 L/R Audio/Composite Video In 1 (rear), 1 (side except 22") HD Component Video In (Y, Pb, Pr) + L/R Audio1 Variable Auido (External Speaker) Out 1 (L/R 2W each) Digital Audio Out (Optical) 1 HDMI/HDCP Input (V1.3 with stand weight 9.4 lbs (22") 16.0 lbs (26") 20.2 lbs (32") ShippingWeight 12.3 lbs (22") 20.0 lbs (26") 25.3 lbs (32") SERVICE/LIMITED WARRANTY 2 Years (Parts/Labor) UPC CODE 32LD350C 7 1919290046 2 26LD350C 7 1919290047 9 22LD350C 7 1919290048 6 www.L G s o l u t i o n s .com LG...
.../OUTPUTS RF In (Antenna/Cable) 1 L/R Audio/Composite Video In 1 (rear), 1 (side except 22") HD Component Video In (Y, Pb, Pr) + L/R Audio1 Variable Auido (External Speaker) Out 1 (L/R 2W each) Digital Audio Out (Optical) 1 HDMI/HDCP Input (V1.3 with stand weight 9.4 lbs (22") 16.0 lbs (26") 20.2 lbs (32") ShippingWeight 12.3 lbs (22") 20.0 lbs (26") 25.3 lbs (32") SERVICE/LIMITED WARRANTY 2 Years (Parts/Labor) UPC CODE 32LD350C 7 1919290046 2 26LD350C 7 1919290047 9 22LD350C 7 1919290048 6 www.L G s o l u t i o n s .com LG...


