Owners Manual
Page 2
... Connecting Peripherals 16 - Assembling the stand base 10 - Adjusting the stand height 11 - Installing onto a table 11 - Connecting Headphones 18 USER SETTINGS 18 Activating the Main Menu 18 - Installing to a wall 15 USING THE MONITOR 15 Connecting to External Devices 17 - HDMI connection 15 -...4 ASSEMBLING AND PREPARING 4 Product Components 5 Supported Drivers and Software 6 Component and Button Description 7 - HDMI connection 17 Connecting to a PC 15 - Menu Settings 23 TROUBLESHOOTING 25 SPECIFICATIONS 25 24GM79G 26 Factory Support Mode 26 HDMI Timing (Video) 26 Power LED
... Connecting Peripherals 16 - Assembling the stand base 10 - Adjusting the stand height 11 - Installing onto a table 11 - Connecting Headphones 18 USER SETTINGS 18 Activating the Main Menu 18 - Installing to a wall 15 USING THE MONITOR 15 Connecting to External Devices 17 - HDMI connection 15 -...4 ASSEMBLING AND PREPARING 4 Product Components 5 Supported Drivers and Software 6 Component and Button Description 7 - HDMI connection 17 Connecting to a PC 15 - Menu Settings 23 TROUBLESHOOTING 25 SPECIFICATIONS 25 24GM79G 26 Factory Support Mode 26 HDMI Timing (Video) 26 Power LED

Owners Manual
Page 3
...which is sold in Europe market and which needs to meet the ErP Directive: * This monitor is set to be disabled, change the option to display. * To make this setting be turned off automatically in 4 hours after you turned on the license. ENEGNLGISH 3 LICENSE Each model... has different licenses. The terms HDMI and HDMI High-Definition Multimedia Interface, and the HDMI Logo are all registered trademarks of the Video Electronics Standards Association. Visit www.lg.com...
...which is sold in Europe market and which needs to meet the ErP Directive: * This monitor is set to be disabled, change the option to display. * To make this setting be turned off automatically in 4 hours after you turned on the license. ENEGNLGISH 3 LICENSE Each model... has different licenses. The terms HDMI and HDMI High-Definition Multimedia Interface, and the HDMI Logo are all registered trademarks of the Video Electronics Standards Association. Visit www.lg.com...
Owners Manual
Page 12
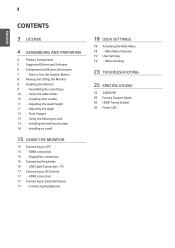
... be rotated easily using the pivot feature, the stand does not make sure that some Windows versions and some graphics card drivers may use different settings for the screen pivot key or may not support the pivot key at all. Note that when rotating the monitor using the screen pivot shortcut...
... be rotated easily using the pivot feature, the stand does not make sure that some Windows versions and some graphics card drivers may use different settings for the screen pivot key or may not support the pivot key at all. Note that when rotating the monitor using the screen pivot shortcut...
Owners Manual
Page 13
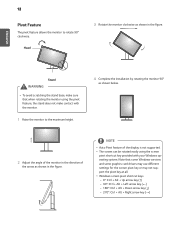
... website at http://www.kensington.com. ENEGNLGISH 13 Using the Kensington lock The Kensington security system connector is located at the back of the Monitor set and a table. For more information on installation and usage, refer to use excessive force when mounting the wall mount plate, as this can be purchased... the specification of the Kensington lock is sold separately. The accessories can damage the monitor's screen. Connect the Kensington security system cable between the Monitor set .
... website at http://www.kensington.com. ENEGNLGISH 13 Using the Kensington lock The Kensington security system connector is located at the back of the Monitor set and a table. For more information on installation and usage, refer to use excessive force when mounting the wall mount plate, as this can be purchased... the specification of the Kensington lock is sold separately. The accessories can damage the monitor's screen. Connect the Kensington security system cable between the Monitor set .
Owners Manual
Page 14
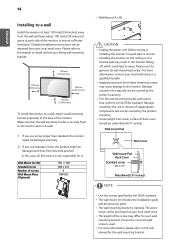
... Make sure that conform to the monitor. yyScrew length from your local retail store or a qualified installer. Please refer to the manual to install and set up a tilting wall mounting bracket. 100 mm (3.94 inches) 100 mm (3.94 inches) 100 mm (3.94 inches) 100 mm (3.94 inches) To... to avoid electric shocks. yyApplying excessive force when fastening screws may result in this case, LG Electronics is securely fixed to the monitor and to the wall. 1 If you use the genuine LG wall mounting bracket. Damage caused by the use or misuse of the monitor to injury. ...
... Make sure that conform to the monitor. yyScrew length from your local retail store or a qualified installer. Please refer to the manual to install and set up a tilting wall mounting bracket. 100 mm (3.94 inches) 100 mm (3.94 inches) 100 mm (3.94 inches) 100 mm (3.94 inches) To... to avoid electric shocks. yyApplying excessive force when fastening screws may result in this case, LG Electronics is securely fixed to the monitor and to the wall. 1 If you use the genuine LG wall mounting bracket. Damage caused by the use or misuse of the monitor to injury. ...
Owners Manual
Page 17
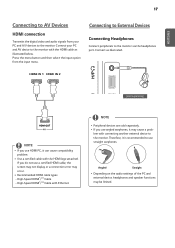
Connect as illustrated below. yyUse a certified cable with connecting another external device to the monitor. Angled Straight yy Depending on the audio settings of the PC and external device, headphones and speaker functions may cause a prob- Connect your PC and A/V devices to the monitor. Connecting to External Devices ...
Connect as illustrated below. yyUse a certified cable with connecting another external device to the monitor. Angled Straight yy Depending on the audio settings of the PC and external device, headphones and speaker functions may cause a prob- Connect your PC and A/V devices to the monitor. Connecting to External Devices ...
Owners Manual
Page 18
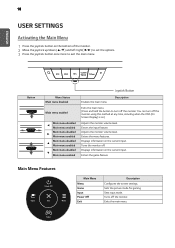
... picture mode for gaming. Description Exits the main menu. (Press and hold the button to set the options. Enters the menu features. ENEGNLGISH 18 USER SETTINGS FPS1 FPS2 Custom RTS (Game) Custom Activating the Main Menu 1 Press the joystick button on the bottom of the monitor. 2 Move... Off Power Off Input Input Exit Exit Menu Menu Game Game Menu Main Menu Menu Game Input Power Off Exit Description Configures the screen settings. Displays information on the current input. Adjusts the monitor volume level. FPS1 FPS2 RTS Custom (Game) Custom FPS1 FPS2 Custom RTS (...
... picture mode for gaming. Description Exits the main menu. (Press and hold the button to set the options. Enters the menu features. ENEGNLGISH 18 USER SETTINGS FPS1 FPS2 Custom RTS (Game) Custom Activating the Main Menu 1 Press the joystick button on the bottom of the monitor. 2 Move... Off Power Off Input Input Exit Exit Menu Menu Game Game Menu Main Menu Menu Game Input Power Off Exit Description Configures the screen settings. Displays information on the current input. Adjusts the monitor volume level. FPS1 FPS2 RTS Custom (Game) Custom FPS1 FPS2 Custom RTS (...
Owners Manual
Page 19
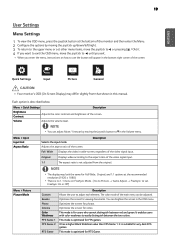
...) may look the same for RTS Game. Optimizes the screen for users who cannot distinguish between the two colors. ENEGNLGISH 19 User Settings Menu Settings 1 To view the OSD menu, press the joystick button at the recommended resolution (1920 x 1080). NOTE yy The display may ...video signal input. This mode is for viewing documents. Volume Adjusts the volume level. This mode is described below. Menu > Quick Settings Description Brightness Contrast Adjusts the color contrast and brightness of the screen. Menu > Input Input List Aspect Ratio Selects the input mode....
...) may look the same for RTS Game. Optimizes the screen for users who cannot distinguish between the two colors. ENEGNLGISH 19 User Settings Menu Settings 1 To view the OSD menu, press the joystick button at the recommended resolution (1920 x 1080). NOTE yy The display may ...video signal input. This mode is for viewing documents. Volume Adjusts the volume level. This mode is described below. Menu > Quick Settings Description Brightness Contrast Adjusts the color contrast and brightness of the screen. Menu > Input Input List Aspect Ratio Selects the input mode....

Owners Manual
Page 20
...to the latest driver. For a fastmoving picture, it is recommended that of the input signal with that you use Fast. Setting to Fast may result in unnecessarily high sharpness. Provides seamless and natural images by synchronizing the vertical frequency of the output signal... Motion Blur Reduction cannot be affected. High Keeps the current contrast ratio of the screen. CAUTION yy Supported Interface: DisplayPort,HDMI. Sets a response time for comfortable viewing. Adjusts the sharpness of your PC screen may be enabled simultaneously. Middle The optimized picture quality...
...to the latest driver. For a fastmoving picture, it is recommended that of the input signal with that you use Fast. Setting to Fast may result in unnecessarily high sharpness. Provides seamless and natural images by synchronizing the vertical frequency of the output signal... Motion Blur Reduction cannot be affected. High Keeps the current contrast ratio of the screen. CAUTION yy Supported Interface: DisplayPort,HDMI. Sets a response time for comfortable viewing. Adjusts the sharpness of your PC screen may be enabled simultaneously. Middle The optimized picture quality...

Owners Manual
Page 21
... ad- yy This function is automatically turned off . yy When the monitor is off when you want to adjust the gamma settings, select Mode 4. Cool Sets the screen color to have better visibility in fast-moving videos. Red You can customize the picture color using the gaming function.... 1ms Motion Blur Reduction You can control the black contrast to a bluish tone. Mode 4 If you do not need to Picture reset your settings? Medium Sets the screen color between a red and blue tone. Hue Adjusts the tone of this function, select 1920 x 1080 @ 144 Hz before enabling...
... ad- yy This function is automatically turned off . yy When the monitor is off when you want to adjust the gamma settings, select Mode 4. Cool Sets the screen color to have better visibility in fast-moving videos. Red You can customize the picture color using the gaming function.... 1ms Motion Blur Reduction You can control the black contrast to a bluish tone. Mode 4 If you do not need to Picture reset your settings? Medium Sets the screen color between a red and blue tone. Hue Adjusts the tone of this function, select 1920 x 1080 @ 144 Hz before enabling...
Owners Manual
Page 22
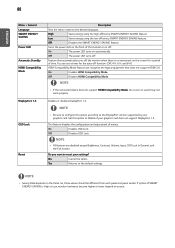
...version supported by your graphics card. Turns the power LED on the front of menus. On The power LED turns on the Panel. You can set a timer for a period of SMART ENERGY SAVING is High or Low, monitor luminance become higher or lower depend on or off. So, ...On Enables OSD Lock. If option of time. Low Saves energy using the high-efficiency SMART ENERGY SAVING feature. Off Disables HDMI Compatibility Mode. Set this option according to the desired language. NOTE yy If the connected device does not support HDMI Compatibility Mode, the screen or sound may not...
...version supported by your graphics card. Turns the power LED on the front of menus. On The power LED turns on the Panel. You can set a timer for a period of SMART ENERGY SAVING is High or Low, monitor luminance become higher or lower depend on or off. So, ...On Enables OSD Lock. If option of time. Low Saves energy using the high-efficiency SMART ENERGY SAVING feature. Off Disables HDMI Compatibility Mode. Set this option according to the desired language. NOTE yy If the connected device does not support HDMI Compatibility Mode, the screen or sound may not...
Owners Manual
Page 23
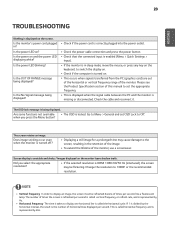
... to display an image, the screen must be flickering. yy Horizontal frequency The time it . Check the cable and reconnect it takes to set OSD Lock to 1080P or the recommended resolution. This is called the horizontal cycle. Is the power on . Is the No Signal message... the signal cable between the PC and the monitor is locked. yyTo extend the lifetime of the monitor. Go to Menu > General and set the appropriate frequency. Please see the Product Specification section of times per second. ENEGNLGISH 23 TROUBLESHOOTING Nothing is displayed on ? Is the power ...
... to display an image, the screen must be flickering. yy Horizontal frequency The time it . Check the cable and reconnect it takes to set OSD Lock to 1080P or the recommended resolution. This is called the horizontal cycle. Is the power on . Is the No Signal message... the signal cable between the PC and the monitor is locked. yyTo extend the lifetime of the monitor. Go to Menu > General and set the appropriate frequency. Please see the Product Specification section of times per second. ENEGNLGISH 23 TROUBLESHOOTING Nothing is displayed on ? Is the power ...
Owners Manual
Page 24
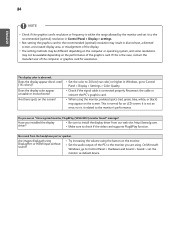
... performance. yyMake sure to the recommended (optimal) resolution may not be different depending on the monitor. yyTry increasing the volume using . yyNot setting the graphics card to check if the video card supports Plug&Play function. The display color is connected properly. Reconnect the cable or reinsert ... the signal cable is abnormal. No sound from our web site: http://www.lg.com. Does the display color appear unstable or monochrome? This is it to 24 bit (true color) or higher. yyThe setting methods may be available depending on the screen? It is not an error, ...
... performance. yyMake sure to the recommended (optimal) resolution may not be different depending on the monitor. yyTry increasing the volume using . yyNot setting the graphics card to check if the video card supports Plug&Play function. The display color is connected properly. Reconnect the cable or reinsert ... the signal cable is abnormal. No sound from our web site: http://www.lg.com. Does the display color appear unstable or monochrome? This is it to 24 bit (true color) or higher. yyThe setting methods may be available depending on the screen? It is not an error, ...
Owners Manual
Page 25
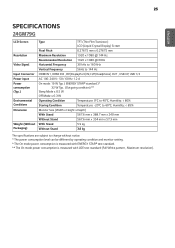
... Condition Temperature: -20°C to change without notice. * The power consumption level can be different by operating condition and monitor setting. * The On mode power consumption is measured with ENERGY STAR® test standard. ** The On mode power consumption is measured... 354 mm x 57.3 mm With Stand 5.9 kg Without Stand 3.8 kg The specifications are subject to 60°C; 25 ENEGNLGISH SPECIFICATIONS 24GM79G LCD Screen Resolution Video Signal Input Connector Power input Power consumption (Typ.) Environmental Conditions Dimension Weight (Without Packaging) Type TFT (Thin Film...
... Condition Temperature: -20°C to change without notice. * The power consumption level can be different by operating condition and monitor setting. * The On mode power consumption is measured with ENERGY STAR® test standard. ** The On mode power consumption is measured... 354 mm x 57.3 mm With Stand 5.9 kg Without Stand 3.8 kg The specifications are subject to 60°C; 25 ENEGNLGISH SPECIFICATIONS 24GM79G LCD Screen Resolution Video Signal Input Connector Power input Power consumption (Typ.) Environmental Conditions Dimension Weight (Without Packaging) Type TFT (Thin Film...


