
Owners Manual
Page 1
Owner's Manual LED MONITOR* *LG LED Monitors are LCD Monitors with LED Backlighting. Please read the safety information carefully before using the product. LED Monitor Model List 24GM79G www.lg.com
Owner's Manual LED MONITOR* *LG LED Monitors are LCD Monitors with LED Backlighting. Please read the safety information carefully before using the product. LED Monitor Model List 24GM79G www.lg.com
Owners Manual
Page 2
...Component and Button Description 7 - Assembling the stand base 10 - Installing onto a table 11 - Pivot Feature 13 - USB Cable Connection - Using the Kensington lock 13 - Main Menu Features 19 User Settings 19 - HDMI connection 17 Connecting to Use the Joystick Button 8 Moving and Lifting the Monitor 9 Installing the Monitor 9 - Adjusting the stand height 11 - Installing the wall mount plate 14 - DisplayPort connection 16 Connecting Peripherals 16 - Menu Settings 23 TROUBLESHOOTING 25 SPECIFICATIONS 25 24GM79G 26 Factory Support Mode 26 HDMI Timing (Video) 26 Power LED How...
...Component and Button Description 7 - Assembling the stand base 10 - Installing onto a table 11 - Pivot Feature 13 - USB Cable Connection - Using the Kensington lock 13 - Main Menu Features 19 User Settings 19 - HDMI connection 17 Connecting to Use the Joystick Button 8 Moving and Lifting the Monitor 9 Installing the Monitor 9 - Adjusting the stand height 11 - Installing the wall mount plate 14 - DisplayPort connection 16 Connecting Peripherals 16 - Menu Settings 23 TROUBLESHOOTING 25 SPECIFICATIONS 25 24GM79G 26 Factory Support Mode 26 HDMI Timing (Video) 26 Power LED How...

Owners Manual
Page 3
VESA, VESA logo, DisplayPort compliance logo and DisplayPort compliance logo for more information on display if there is no adjustment to display. * To make this setting be disabled, change the option to be turned off automatically in 4 hours after you turned on the license. Visit www.lg.com for dual-mode source devices are trademarks or registered trademarks of HDMI Licensing Administrator, Inc. in OSD menu of the...
VESA, VESA logo, DisplayPort compliance logo and DisplayPort compliance logo for more information on display if there is no adjustment to display. * To make this setting be disabled, change the option to be turned off automatically in 4 hours after you turned on the license. Visit www.lg.com for dual-mode source devices are trademarks or registered trademarks of HDMI Licensing Administrator, Inc. in OSD menu of the...

Owners Manual
Page 5
... image noises. Drivers and Software Monitor Driver OnScreen Control Installation Priority Recommended Recommended 24GM79G O O yyThe product warranty will not cover damage or injury caused by LG, the screen may not display or there may look different from the LGE website (www.lg.com). yyWithout prior notice, all information and specifications in this manual are subject to change to ensure safety and product performance. NOTE yyNote that use...
... image noises. Drivers and Software Monitor Driver OnScreen Control Installation Priority Recommended Recommended 24GM79G O O yyThe product warranty will not cover damage or injury caused by LG, the screen may not display or there may look different from the LGE website (www.lg.com). yyWithout prior notice, all information and specifications in this manual are subject to change to ensure safety and product performance. NOTE yyNote that use...
Owners Manual
Page 7
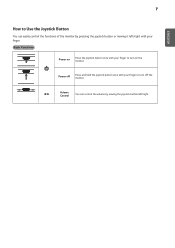
7 ENEGNLGISH How to Use the Joystick Button You can control the volume by pressing the joystick button or moving the joystick button left /right with your finger to turn off Press and hold the joystick button once with your finger to turn on Press the joystick button once with your finger. Power off the monitor. ◄/► Volume Control You can easily control the functions of the monitor by moving it left /right. Basic Functions Power on the monitor.
7 ENEGNLGISH How to Use the Joystick Button You can control the volume by pressing the joystick button or moving the joystick button left /right with your finger to turn off Press and hold the joystick button once with your finger to turn on Press the joystick button once with your finger. Power off the monitor. ◄/► Volume Control You can easily control the functions of the monitor by moving it left /right. Basic Functions Power on the monitor.
Owners Manual
Page 11
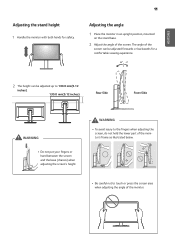
... viewing experience. 35 - 5 2 The height can be adjusted forwards or backwards for safety. 11 Adjusting the angle 1 Place the monitor in an upright position, mounted on the stand base. 2 Adjust the angle of the monitor. yyBe careful not to 130.0 mm(5.12 inches). 130.0 mm(5.12 inches) Rear Side Front Side WARNING yyDo not put your fingers or hand between the screen and the base...
... viewing experience. 35 - 5 2 The height can be adjusted forwards or backwards for safety. 11 Adjusting the angle 1 Place the monitor in an upright position, mounted on the stand base. 2 Adjust the angle of the monitor. yyBe careful not to 130.0 mm(5.12 inches). 130.0 mm(5.12 inches) Rear Side Front Side WARNING yyDo not put your fingers or hand between the screen and the base...
Owners Manual
Page 12
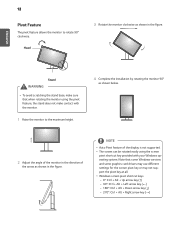
... yyTo avoid scratching the stand base, make sure that some Windows versions and some graphics card drivers may use different settings for the screen pivot key or may not support the pivot key at all. 12 Pivot Feature The pivot feature allows the monitor to the maximum height. 4 Complete the installation by rotating the monitor 90° as shown below. 2 Adjust the angle of the...
... yyTo avoid scratching the stand base, make sure that some Windows versions and some graphics card drivers may use different settings for the screen pivot key or may not support the pivot key at all. 12 Pivot Feature The pivot feature allows the monitor to the maximum height. 4 Complete the installation by rotating the monitor 90° as shown below. 2 Adjust the angle of the...
Owners Manual
Page 13
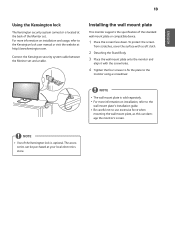
... the screen from scratches, cover the surface with a soft cloth. 2 Detaching the Stand Body. 3 Place the wall mount plate onto the monitor and align it with the screw holes. 4 Tighten the four screws to fix the plate to the Kensington lock user manual or visit the website at http://www.kensington.com. For more information on installation and usage, refer to the monitor using a screwdriver...
... the screen from scratches, cover the surface with a soft cloth. 2 Detaching the Stand Body. 3 Place the wall mount plate onto the monitor and align it with the screw holes. 4 Tighten the four screws to fix the plate to the Kensington lock user manual or visit the website at http://www.kensington.com. For more information on installation and usage, refer to the monitor using a screwdriver...
Owners Manual
Page 14
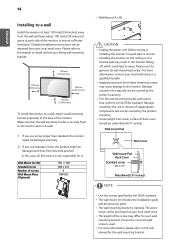
... 8mm(0.31 inches). Damage caused by the use or misuse of back cover should be covered by the product warranty. Detailed installation instructions can be damaged internally. 2 If you use the genuine LG wall mounting bracket. yyInstalling the monitor on the ceiling or on a slanted wall may cause damage to the user manual for it. yyThe wall mount kit includes the installation guide and all necessary parts. yyScrew length...
... 8mm(0.31 inches). Damage caused by the use or misuse of back cover should be covered by the product warranty. Detailed installation instructions can be damaged internally. 2 If you use the genuine LG wall mounting bracket. yyInstalling the monitor on the ceiling or on a slanted wall may cause damage to the user manual for it. yyThe wall mount kit includes the installation guide and all necessary parts. yyScrew length...
Owners Manual
Page 15
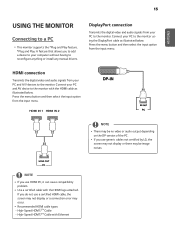
... HDMI®/TM Cable - yyRecommended HDMI cable types - HDMI connection Transmits the digital video and audio signals from the input menu. NOTE yyIf you do not use generic cables not certified by LG, the screen may not display or there may occur. Connect your computer without having to the monitor. Connect your PC to reconfigure anything or install any manual drivers. yy If you use a certified HDMI cable, the screen may not display or a connection error may be no video or audio...
... HDMI®/TM Cable - yyRecommended HDMI cable types - HDMI connection Transmits the digital video and audio signals from the input menu. NOTE yyIf you do not use generic cables not certified by LG, the screen may not display or there may occur. Connect your computer without having to the monitor. Connect your PC to reconfigure anything or install any manual drivers. yy If you use a certified HDMI cable, the screen may not display or a connection error may be no video or audio...
Owners Manual
Page 16
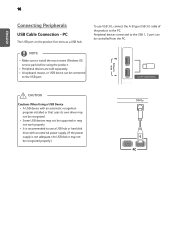
... be supported or may not be connected to use USB 3.0, connect the A-B type USB 3.0 cable of the product to install the most recent Windows OS service pack before using the product. NOTE yyMake sure to the PC. yyPeripheral devices are sold separately) CAUTION Cautions When Using a USB Device yyA USB device with an external power supply. (If the power supply is recommended to the USB port. 5 V 0.9 A 1 2 (sold separately. To use a USB hub...
... be supported or may not be connected to use USB 3.0, connect the A-B type USB 3.0 cable of the product to install the most recent Windows OS service pack before using the product. NOTE yyMake sure to the PC. yyPeripheral devices are sold separately) CAUTION Cautions When Using a USB Device yyA USB device with an external power supply. (If the power supply is recommended to the USB port. 5 V 0.9 A 1 2 (sold separately. To use a USB hub...
Owners Manual
Page 18
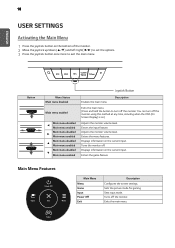
... monitor. ENEGNLGISH 18 USER SETTINGS FPS1 FPS2 Custom RTS (Game) Custom Activating the Main Menu 1 Press the joystick button on the bottom of the monitor. 2 Move the joystick up/down (▲/▼) and left/right(◄/►) to turn off the monitor: You can turn off the monitor using this method at any time, including when the OSD (On Screen Display) is on.) Adjusts the monitor volume...
... monitor. ENEGNLGISH 18 USER SETTINGS FPS1 FPS2 Custom RTS (Game) Custom Activating the Main Menu 1 Press the joystick button on the bottom of the monitor. 2 Move the joystick up/down (▲/▼) and left/right(◄/►) to turn off the monitor: You can turn off the monitor using this method at any time, including when the OSD (On Screen Display) is on.) Adjusts the monitor volume...
Owners Manual
Page 19
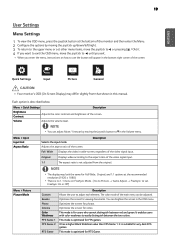
... the menu, instructions on how to use the button will appear in the Volume menu. Description Full Wide Displays the video in the OSD menu. Original Displays video according to easily distinguish between red and green. This mode is optimized for users who cannot distinguish between the two colors. It enables users with color weakness to the aspect ratio of the screen. This mode is for RTS Game. Menu > Quick Settings Description Brightness Contrast Adjusts the color contrast and brightness of the screen...
... the menu, instructions on how to use the button will appear in the Volume menu. Description Full Wide Displays the video in the OSD menu. Original Displays video according to easily distinguish between red and green. This mode is optimized for users who cannot distinguish between the two colors. It enables users with color weakness to the aspect ratio of the screen. This mode is for RTS Game. Menu > Quick Settings Description Brightness Contrast Adjusts the color contrast and brightness of the screen...

Owners Manual
Page 20
... PC screen may cause image sticking. Off FreeSync function off in this mode. Picture Adjust Game Adjust Brightness Contrast Sharpness SUPER RESOLUTION+ Black Level DFC Response Time FreeSync Adjusts the brightness of the screen. High Keeps the current contrast ratio of the screen. Adjusts the sharpness of the input signal with that you use the response time improvement feature. yy If the picture mode is effective for desktop icons. Middle The optimized picture quality...
... PC screen may cause image sticking. Off FreeSync function off in this mode. Picture Adjust Game Adjust Brightness Contrast Sharpness SUPER RESOLUTION+ Black Level DFC Response Time FreeSync Adjusts the brightness of the screen. High Keeps the current contrast ratio of the screen. Adjusts the sharpness of the input signal with that you use the response time improvement feature. yy If the picture mode is effective for desktop icons. Middle The optimized picture quality...

Owners Manual
Page 21
... screen color to a reddish tone. Green Blue Six Color Meets the user requirements for colors by customization. Hue Adjusts the tone of this function, select 1920 x 1080 @ 144 Hz before enabling 1ms Motion Blur Reduction. Saturation Adjusts the saturation of the screen for the following vertical frequency. (60Hz, 100Hz, 120Hz, 144Hz) Off Turns 1ms Motion Blur Reduction Mode off. Picture Reset Do you are not using Red, Green, and Blue colors...
... screen color to a reddish tone. Green Blue Six Color Meets the user requirements for colors by customization. Hue Adjusts the tone of this function, select 1920 x 1080 @ 144 Hz before enabling 1ms Motion Blur Reduction. Saturation Adjusts the saturation of the screen for the following vertical frequency. (60Hz, 100Hz, 120Hz, 144Hz) Off Turns 1ms Motion Blur Reduction Mode off. Picture Reset Do you are not using Red, Green, and Blue colors...
Owners Manual
Page 22
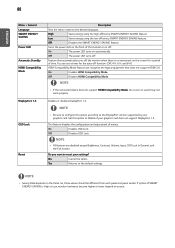
... select. High Saves energy using the low-efficiency SMART ENERGY SAVING feature. Feature that does not support HDMI 2.0. NOTE yy All features are disabled except Brightness, Contrast, Volume, Input, OSD Lock in General, and the Exit button. Enables or disables DisplayPort 1.2. This feature disables the configuration and adjustment of the monitor on source. 22 ENEGNLGISH Menu > General Language SMART ENERGY SAVING Power LED Automatic Standby HDMI Compatibility Mode DisplayPort 1.2 OSD Lock Reset Description Sets the menu screen to the desired language. You can...
... select. High Saves energy using the low-efficiency SMART ENERGY SAVING feature. Feature that does not support HDMI 2.0. NOTE yy All features are disabled except Brightness, Contrast, Volume, Input, OSD Lock in General, and the Exit button. Enables or disables DisplayPort 1.2. This feature disables the configuration and adjustment of the monitor on source. 22 ENEGNLGISH Menu > General Language SMART ENERGY SAVING Power LED Automatic Standby HDMI Compatibility Mode DisplayPort 1.2 OSD Lock Reset Description Sets the menu screen to the desired language. You can...
Owners Manual
Page 23
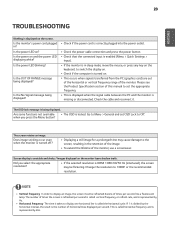
... OF RANGE message being displayed. yyCheck if the power cord is enabled (Menu > Quick Settings > Input). yyCheck that the connected input is correctly plugged into the power outlet. yyCheck if the computer is turned on and the power LED displaying white? Please see the Product Specification section of this manual to set OSD Lock to Off. when you select the appropriate resolution? The screen retains an image. The number of times per second. This is called horizontal frequency...
... OF RANGE message being displayed. yyCheck if the power cord is enabled (Menu > Quick Settings > Input). yyCheck that the connected input is correctly plugged into the power outlet. yyCheck if the computer is turned on and the power LED displaying white? Please see the Product Specification section of this manual to set OSD Lock to Off. when you select the appropriate resolution? The screen retains an image. The number of times per second. This is called horizontal frequency...
Owners Manual
Page 24
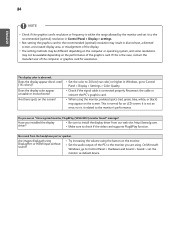
... the graphics card's resolution or frequency is within the range allowed by the monitor and set the monitor as default device. yyCheck if the signal cable is abnormal. This is normal for assistance. Have you see an "Unrecognized monitor, Plug&Play (VESA DDC) monitor found" message? Are images displayed using the monitor, pixilated spots (red, green, blue, white, or black) may appear on the performance of the PC to Control Panel > Display > Settings > Color Quality. yySet the audio output...
... the graphics card's resolution or frequency is within the range allowed by the monitor and set the monitor as default device. yyCheck if the signal cable is abnormal. This is normal for assistance. Have you see an "Unrecognized monitor, Plug&Play (VESA DDC) monitor found" message? Are images displayed using the monitor, pixilated spots (red, green, blue, white, or black) may appear on the performance of the PC to Control Panel > Display > Settings > Color Quality. yySet the audio output...
Owners Manual
Page 25
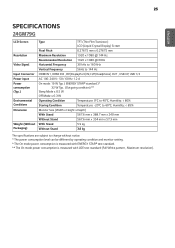
Humidity: < 85% Monitor Size (Width x Height x Depth) With Stand 567.6 mm x 388.7 mm x 240 mm Without Stand 567.6 mm x 354 mm x 57.3 mm With Stand 5.9 kg Without Stand 3.8 kg The specifications are subject to 40°C; 25 ENEGNLGISH SPECIFICATIONS 24GM79G LCD Screen Resolution Video Signal Input Connector Power input Power consumption (Typ.) Environmental Conditions Dimension Weight (Without Packaging) Type TFT (Thin Film Transistor) LCD (Liquid Crystal Display) Screen Pixel Pitch 0.27675 mm x 0.27675 mm Maximum Resolution 1920...
Humidity: < 85% Monitor Size (Width x Height x Depth) With Stand 567.6 mm x 388.7 mm x 240 mm Without Stand 567.6 mm x 354 mm x 57.3 mm With Stand 5.9 kg Without Stand 3.8 kg The specifications are subject to 40°C; 25 ENEGNLGISH SPECIFICATIONS 24GM79G LCD Screen Resolution Video Signal Input Connector Power input Power consumption (Typ.) Environmental Conditions Dimension Weight (Without Packaging) Type TFT (Thin Film Transistor) LCD (Liquid Crystal Display) Screen Pixel Pitch 0.27675 mm x 0.27675 mm Maximum Resolution 1920...
Owners Manual
Page 27
... ever need service. In addition to the source code, all referred license terms, warranty disclaimers and copyright notices are located on the back and on one side of Conformity Trade Name LG Responsible Party LG Electronics USA, Inc. MODEL SERIAL To obtain the source code under GPL, LGPL, MPL, and other open source licenses, that is intended for download.LG Electronics will also provide open source code...
... ever need service. In addition to the source code, all referred license terms, warranty disclaimers and copyright notices are located on the back and on one side of Conformity Trade Name LG Responsible Party LG Electronics USA, Inc. MODEL SERIAL To obtain the source code under GPL, LGPL, MPL, and other open source licenses, that is intended for download.LG Electronics will also provide open source code...


