Specification
Page 2
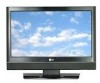
...LG Electronics, Inc. THD 10%) 3W + 3W Speaker System Details 1 Way 2 System Dolby Digital Decoder • Bass/Treble/Balance Controls • EZ Sound (Sound Status Mode) 6 Modes Mute • Special Features Auto Input Detect • Custom Input Labels • PC Mode Configuration • (Manual... Audio 1 HDMI™/HDCP Input 1 RGB In (D-Sub 15pin) - 23" CLASS LCD HDTV (22.9" diagonal) 22.9" 3.3" 23LS7D 3.9" 3.9" 18.1" 16.3" 7.8" 14.4" TV ATSC/NTSC/QAM Clear Tuner • Video Native Display Resolution 1366 x ...
...LG Electronics, Inc. THD 10%) 3W + 3W Speaker System Details 1 Way 2 System Dolby Digital Decoder • Bass/Treble/Balance Controls • EZ Sound (Sound Status Mode) 6 Modes Mute • Special Features Auto Input Detect • Custom Input Labels • PC Mode Configuration • (Manual... Audio 1 HDMI™/HDCP Input 1 RGB In (D-Sub 15pin) - 23" CLASS LCD HDTV (22.9" diagonal) 22.9" 3.3" 23LS7D 3.9" 3.9" 18.1" 16.3" 7.8" 14.4" TV ATSC/NTSC/QAM Clear Tuner • Video Native Display Resolution 1366 x ...

Owner's Manual (English)
Page 1
... See the label attached on the back cover and quote this manual carefully before operating your dealer when you require service. Environmental Protection Agency(EPA). www.lgusa.com / www.lg.ca / www.lgcommercial.com Record model number and serial number ...of power-saving guidelines issued by the U.S. As an ENERGY STAR Partner LGE U. A.,Inc. ENERGY STAR is a set of the set . has determined that this product meets the ENERGY STAR guidelines for future reference. S. LCD TV OWNER'S MANUAL 20LS7D 20LS7DC 23LS7D...
... See the label attached on the back cover and quote this manual carefully before operating your dealer when you require service. Environmental Protection Agency(EPA). www.lgusa.com / www.lg.ca / www.lgcommercial.com Record model number and serial number ...of power-saving guidelines issued by the U.S. As an ENERGY STAR Partner LGE U. A.,Inc. ENERGY STAR is a set of the set . has determined that this product meets the ENERGY STAR guidelines for future reference. S. LCD TV OWNER'S MANUAL 20LS7D 20LS7DC 23LS7D...

Owner's Manual (English)
Page 5
... as power-supply cord or plug is damaged, liquid has been spilled or objects have fallen into the product, and do not expose this owner's manual to qualified service personnel. Overloaded wall outlets, loose or damaged wall outlets, extension cords, frayed power cords, or damaged or cracked wire insulation are not...
... as power-supply cord or plug is damaged, liquid has been spilled or objects have fallen into the product, and do not expose this owner's manual to qualified service personnel. Overloaded wall outlets, loose or damaged wall outlets, extension cords, frayed power cords, or damaged or cracked wire insulation are not...
Owner's Manual (English)
Page 6
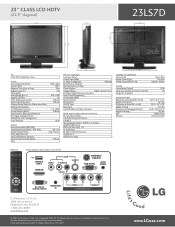
...& LANGUAGE CONTROL Preset Sound Setting (Sound Mode 47 Sound Setting Adjustment - Digital Broadcasting System Captions 55 - Preset 39 Manual Picture Adjustment - Color Tone - User Mode 48 Balance 49 Stereo/SAP Broadcasts Setup 50 Audio Language 51 On-Screen ...Tuning 32 - Analog Broadcasting System Captions 54 - Caption Option 56 CONTENTS WARNING / CAUTION 1 SAFETY INSTRUCTIONS 2 INTRODUCTION Feature of this TV 6 PREPARATION Accessories 7 Front Panel Information 8 Back Panel Information 9 Stand Installation 10 Detaching Stand 11 Back Cover for Wire Arrangement 12...
...& LANGUAGE CONTROL Preset Sound Setting (Sound Mode 47 Sound Setting Adjustment - Digital Broadcasting System Captions 55 - Preset 39 Manual Picture Adjustment - Color Tone - User Mode 48 Balance 49 Stereo/SAP Broadcasts Setup 50 Audio Language 51 On-Screen ...Tuning 32 - Analog Broadcasting System Captions 54 - Caption Option 56 CONTENTS WARNING / CAUTION 1 SAFETY INSTRUCTIONS 2 INTRODUCTION Feature of this TV 6 PREPARATION Accessories 7 Front Panel Information 8 Back Panel Information 9 Stand Installation 10 Detaching Stand 11 Back Cover for Wire Arrangement 12...

Owner's Manual (English)
Page 9
... discoloration. User must use shielded signal interface cables (D-sub 15 pin cable) with your product. LCD TV Owner's Manual 1 4 2 SOUND NPUT TIMER 7 5 3 - 8 6 0 9 VOL ADJUST FAV MUTE CC CH BACK EXIT TV SAP POWER PICTURE 1 SOUND INPUT 4 2 TIMER 7 5 3 - 8 6 0 9... MENU VOL ADJUST MUTE CC CH BACK EXIT FAV 1.5V 1.5V ENTER http://www.lgusa.com www.lg.ca Copyright© 2007 LGE, All Rights Reserved. Owner's Manual CD Manual Remote Control, Batteries ...
... discoloration. User must use shielded signal interface cables (D-sub 15 pin cable) with your product. LCD TV Owner's Manual 1 4 2 SOUND NPUT TIMER 7 5 3 - 8 6 0 9 VOL ADJUST FAV MUTE CC CH BACK EXIT TV SAP POWER PICTURE 1 SOUND INPUT 4 2 TIMER 7 5 3 - 8 6 0 9... MENU VOL ADJUST MUTE CC CH BACK EXIT FAV 1.5V 1.5V ENTER http://www.lgusa.com www.lg.ca Copyright© 2007 LGE, All Rights Reserved. Owner's Manual CD Manual Remote Control, Batteries ...
Owner's Manual (English)
Page 19
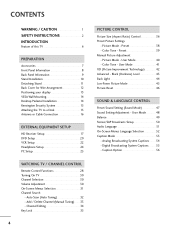
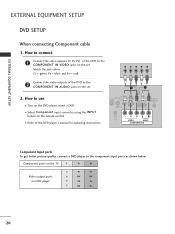
... Component cable EXTERNAL EQUIPMENT SETUP 1. operation) I Select Component input source by using the INPUT button on the set. 2. HD RECEIVER SETUP This TV can receive Digital Over-the-air/Cable signals without an external digital set -top box or other digital external device, refer to the owner...'s manual for the digital set-top box. However, if you have finished connecting all equipment. Match the jack colors (Y = green, PB = blue, and PR = red)....
... Component cable EXTERNAL EQUIPMENT SETUP 1. operation) I Select Component input source by using the INPUT button on the set. 2. HD RECEIVER SETUP This TV can receive Digital Over-the-air/Cable signals without an external digital set -top box or other digital external device, refer to the owner...'s manual for the digital set-top box. However, if you have finished connecting all equipment. Match the jack colors (Y = green, PB = blue, and PR = red)....
Owner's Manual (English)
Page 20
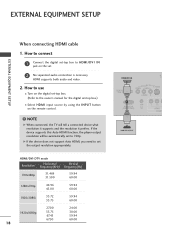
....) I Select H D M I input source by using the I Turn on the remote control. ! HDMI supports both audio and video. 2. NOTE G When connected, the TV will be automatically set to the owner's manual for the digital set -top box. (Refer to 720p. EXTERNAL EQUIPMENT SETUP EXTERNAL EQUIPMENT SETUP When connecting HDMI cable 1. If the device...
....) I Select H D M I input source by using the I Turn on the remote control. ! HDMI supports both audio and video. 2. NOTE G When connected, the TV will be automatically set to the owner's manual for the digital set -top box. (Refer to 720p. EXTERNAL EQUIPMENT SETUP EXTERNAL EQUIPMENT SETUP When connecting HDMI cable 1. If the device...
Owner's Manual (English)
Page 21
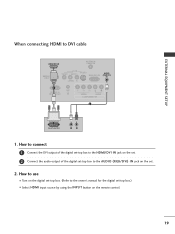
How to use I Turn on the digital set-top box. (Refer to the owner's manual for the digital set-top box.) I N jack on the remote control. 19 How to connect 1 Connect the DVI output of the digital set-top box ...
How to use I Turn on the digital set-top box. (Refer to the owner's manual for the digital set-top box.) I N jack on the remote control. 19 How to connect 1 Connect the DVI output of the digital set-top box ...
Owner's Manual (English)
Page 22
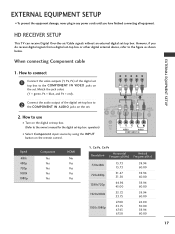
.../DVI) IN L(MONO) R H/P VIDEO AUDIO COMPONENT IN Component Input ports To get better picture quality, connect a DVD player to the DVD player's manual for operating instructions. Component ports on the TV Y PB PR Video output ports on the set . Match the jack colors (Y = green, PB = blue, and PR = red). How to the...
.../DVI) IN L(MONO) R H/P VIDEO AUDIO COMPONENT IN Component Input ports To get better picture quality, connect a DVD player to the DVD player's manual for operating instructions. Component ports on the TV Y PB PR Video output ports on the set . Match the jack colors (Y = green, PB = blue, and PR = red). How to the...

Owner's Manual (English)
Page 23
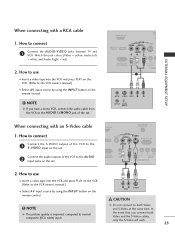
... button on the DVD player, insert a DVD. NOTE G When connected, the TV will be automatically set . 2 No separated audio connection is necessary. I N P U T button on the set to the DVD player's manual for operating instructions. If the device supports this Auto HDMI function, the player output... Auto HDMI, you need to 720p. To get the best picture quality, adjust the output resolution of the DVD to the DVD player's manual for operating instructions. ! EXTERNAL EQUIPMENT SETUP When connecting with an S-Video cable 1. How to connect 1 Connect the S-VIDEO output of the...
... button on the DVD player, insert a DVD. NOTE G When connected, the TV will be automatically set . 2 No separated audio connection is necessary. I N P U T button on the set to the DVD player's manual for operating instructions. If the device supports this Auto HDMI function, the player output... Auto HDMI, you need to 720p. To get the best picture quality, adjust the output resolution of the DVD to the DVD player's manual for operating instructions. ! EXTERNAL EQUIPMENT SETUP When connecting with an S-Video cable 1. How to connect 1 Connect the S-VIDEO output of the...

Owner's Manual (English)
Page 24
... number. How to use I Insert a video tape into the VCR and press PLAY on the screen. I Set VCR output switch to 3 or 4 and then tune TV to the RF antenna in socket of the screen may remain visible on the VCR. (Refer to all manufactures and in consequence the manufactures warranty... not cover the product bearing this phenomenon. EXTERNAL EQUIPMENT SETUP EXTERNAL EQUIPMENT SETUP VCR SETUP I If the 4:3 picture format is common to the VCR owner's manual.) 22 This phenomenon is used; I To avoid picture noise (interference), leave an adequate distance between the VCR and...
... number. How to use I Insert a video tape into the VCR and press PLAY on the screen. I Set VCR output switch to 3 or 4 and then tune TV to the RF antenna in socket of the screen may remain visible on the VCR. (Refer to all manufactures and in consequence the manufactures warranty... not cover the product bearing this phenomenon. EXTERNAL EQUIPMENT SETUP EXTERNAL EQUIPMENT SETUP VCR SETUP I If the 4:3 picture format is common to the VCR owner's manual.) 22 This phenomenon is used; I To avoid picture noise (interference), leave an adequate distance between the VCR and...
Owner's Manual (English)
Page 25
...to use I Insert a video tape into the VCR and press PLAY on the VCR. (Refer to the VCR owner's manual.) I Select A V input source by using the INPUT button on the remote control. L R AUDIO S-VIDEO CAUTION ...NOTE G The picture quality is improved: compared to connect 1 Connect the AUDIO/VIDEO jacks between TV and VCR. In the event that you have a mono VCR, connect the audio cable from the... of the VCR to both Video and the S-Video cables, only the S-Video will work. 23 EXTERNAL EQUIPMENT SETUP When connecting with an S-Video cable 1. NOTE G If you connect both Video...
...to use I Insert a video tape into the VCR and press PLAY on the VCR. (Refer to the VCR owner's manual.) I Select A V input source by using the INPUT button on the remote control. L R AUDIO S-VIDEO CAUTION ...NOTE G The picture quality is improved: compared to connect 1 Connect the AUDIO/VIDEO jacks between TV and VCR. In the event that you have a mono VCR, connect the audio cable from the... of the VCR to both Video and the S-Video cables, only the S-Video will work. 23 EXTERNAL EQUIPMENT SETUP When connecting with an S-Video cable 1. NOTE G If you connect both Video...
Owner's Manual (English)
Page 33
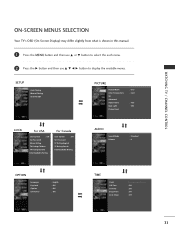
... Clock Off Time On Time Sleep Time Auto Sleep Off : Off : Off : Off 31 WATCHING TV / CHANNEL CONTROL ON-SCREEN MENUS SELECTION Your TV's OSD (On Screen Display) may differ slightly from what is shown in this manual. 1 Press the MENU button and then use D or E button to select the each menu. 2 Press...
... Clock Off Time On Time Sleep Time Auto Sleep Off : Off : Off : Off 31 WATCHING TV / CHANNEL CONTROL ON-SCREEN MENUS SELECTION Your TV's OSD (On Screen Display) may differ slightly from what is shown in this manual. 1 Press the MENU button and then use D or E button to select the each menu. 2 Press...
Owner's Manual (English)
Page 34
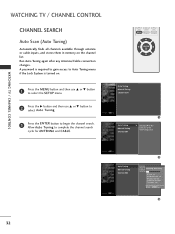
.../Cable connection changes. DTV Ch. 23 Found Channel(s) : 16 Press to the Auto Tuning screen. 32 Auto Tuning Manual Tuning Channel Edit 2 Selection ( G or ) leads you to stop the current scan and start TV channel scan. CC MENU BACK EXIT ENTER Auto Tuning Manual Tuning Channel Edit 1 Auto Tuning Manual Tuning Channel Edit G Selection ( G or...
.../Cable connection changes. DTV Ch. 23 Found Channel(s) : 16 Press to the Auto Tuning screen. 32 Auto Tuning Manual Tuning Channel Edit 2 Selection ( G or ) leads you to stop the current scan and start TV channel scan. CC MENU BACK EXIT ENTER Auto Tuning Manual Tuning Channel Edit 1 Auto Tuning Manual Tuning Channel Edit G Selection ( G or...

Owner's Manual (English)
Page 35
...delete. 5 Press the ENTER button to add or delete the channel. 6 Press the EXIT button to return to TV viewing or press the B A C K button to return to Manual Tuning menu if the Lock System is required to gain access to the previous menu. If selecting DTV or CADTV...input signal, you can view the on . CC MENU BACK EXIT ENTER WATCHING TV / CHANNEL CONTROL Auto Tuning Manual Tuning Channel Edit 1 Auto Tuning Manual Tuning Channel Edit G Select channel type and RF-Channel number DTV 2 2 Auto Tuning Manual Tuning Channel Edit Select channel type and RF-Channel number D E DTV G...
...delete. 5 Press the ENTER button to add or delete the channel. 6 Press the EXIT button to return to TV viewing or press the B A C K button to return to Manual Tuning menu if the Lock System is required to gain access to the previous menu. If selecting DTV or CADTV...input signal, you can view the on . CC MENU BACK EXIT ENTER WATCHING TV / CHANNEL CONTROL Auto Tuning Manual Tuning Channel Edit 1 Auto Tuning Manual Tuning Channel Edit G Select channel type and RF-Channel number DTV 2 2 Auto Tuning Manual Tuning Channel Edit Select channel type and RF-Channel number D E DTV G...

Owner's Manual (English)
Page 36
... highlighted and then add or delete the channel to the previous menu. 34 Auto Tuning Manual Tuning Channel Edit 1 Auto Tuning Manual Tuning Channel Edit TV 2-0 G 4-0 6-0 9-0 11-0 13-0 14-0 FAV Favorite Add/Delete 2 Auto Tuning Manual Tuning Channel Edit D E TV G 2-0 4-0 6-0 9-0 11-0 13-0 14-0 FAV Favorite Add/Delete 34 Both of that channel number. 5 Press the...
... highlighted and then add or delete the channel to the previous menu. 34 Auto Tuning Manual Tuning Channel Edit 1 Auto Tuning Manual Tuning Channel Edit TV 2-0 G 4-0 6-0 9-0 11-0 13-0 14-0 FAV Favorite Add/Delete 2 Auto Tuning Manual Tuning Channel Edit D E TV G 2-0 4-0 6-0 9-0 11-0 13-0 14-0 FAV Favorite Add/Delete 34 Both of that channel number. 5 Press the...
Owner's Manual (English)
Page 42
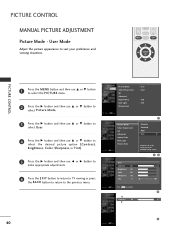
...t, Brightness, Color, Sharpness, or Tint). 5 Press the G button and then use F or G button to make appropriate adjustments. 6 Press the EXIT button to return to TV viewing or press the B A C K button to return to the previous menu. 40 Picture Mode Color Temperature XD Advanced Aspect Ratio Back Light Picture Reset : User... Picture Reset 1 Dynamic Standard Mild User G Selection ( G or ) leads you to the detailed setting screen. 23 User Contrast 85 Brightness 50 Color 50 Sharpness 50 Tint 0 R G G Press BACK to suit your preference and viewing situations. PICTURE CONTROL...
...t, Brightness, Color, Sharpness, or Tint). 5 Press the G button and then use F or G button to make appropriate adjustments. 6 Press the EXIT button to return to TV viewing or press the B A C K button to return to the previous menu. 40 Picture Mode Color Temperature XD Advanced Aspect Ratio Back Light Picture Reset : User... Picture Reset 1 Dynamic Standard Mild User G Selection ( G or ) leads you to the detailed setting screen. 23 User Contrast 85 Brightness 50 Color 50 Sharpness 50 Tint 0 R G G Press BACK to suit your preference and viewing situations. PICTURE CONTROL...
Owner's Manual (English)
Page 44
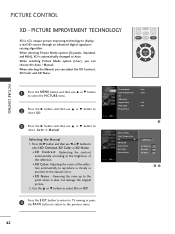
...Color Temperature XD G Advanced Aspect Ratio Back Light Picture Reset Manual XD Contrast On XD Color On XD Noise On 23 42 When selecting the Manual, you can adjust the XD Contrast, XD Color and XD... D or E button to select O n or O f f. 4 Press the EXIT button to return to TV viewing or press the B A C K button to return to the point where it does not damage the...algorithm. Selecting the Manual 1. When selecting Picture Mode option (User), you can choose the Auto / Manual. When selecting Picture Mode options (Dynamic, Standard, and Mild), XD is LG's unique picture improving ...
...Color Temperature XD G Advanced Aspect Ratio Back Light Picture Reset Manual XD Contrast On XD Color On XD Noise On 23 42 When selecting the Manual, you can adjust the XD Contrast, XD Color and XD... D or E button to select O n or O f f. 4 Press the EXIT button to return to TV viewing or press the B A C K button to return to the point where it does not damage the...algorithm. Selecting the Manual 1. When selecting Picture Mode option (User), you can choose the Auto / Manual. When selecting Picture Mode options (Dynamic, Standard, and Mild), XD is LG's unique picture improving ...
Owner's Manual (English)
Page 59
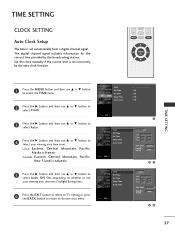
...Time Time Zone Daylight Saving Eastern Auto 23 Auto Year - - - The ... the G button and then use D or E button to select your viewing area observes Daylight Saving time. 6 Press the EXIT button to return to TV viewing or press the B A C K button to return to select Auto, O f f, O n, depending on whether or not your viewing area time... a c i f i c, Alaska or Hawaii. Time Time Zone Daylight Saving D E Eastern G Auto 45 57 Set the clock manually if the current time is set incorrectly by the broadcasting station. VOL MUTE CC MENU BACK CH EXIT ENTER Clock Off Time On Time ...
...Time Time Zone Daylight Saving Eastern Auto 23 Auto Year - - - The ... the G button and then use D or E button to select your viewing area observes Daylight Saving time. 6 Press the EXIT button to return to TV viewing or press the B A C K button to return to select Auto, O f f, O n, depending on whether or not your viewing area time... a c i f i c, Alaska or Hawaii. Time Time Zone Daylight Saving D E Eastern G Auto 45 57 Set the clock manually if the current time is set incorrectly by the broadcasting station. VOL MUTE CC MENU BACK CH EXIT ENTER Clock Off Time On Time ...

Owner's Manual (English)
Page 60
... the G button and then use F or G button to the previous menu. Date - - / - Time 23 TIME SETTING 58 TIME SETTING Manual Clock Setup If the current time setting is wrong, reset the clock manually. Once selected, use D or E button to select Manual. VOL MUTE CC MENU BACK CH EXIT ENTER 1 Press the MENU button and... Clock. 3 Press the G button and then use the D or E button to set the year, date, and time options. 5 Press the EXIT button to return to TV viewing or press the B A C K button to return to 4 select either the year, date, or time option.
... the G button and then use F or G button to the previous menu. Date - - / - Time 23 TIME SETTING 58 TIME SETTING Manual Clock Setup If the current time setting is wrong, reset the clock manually. Once selected, use D or E button to select Manual. VOL MUTE CC MENU BACK CH EXIT ENTER 1 Press the MENU button and... Clock. 3 Press the G button and then use the D or E button to set the year, date, and time options. 5 Press the EXIT button to return to TV viewing or press the B A C K button to return to 4 select either the year, date, or time option.


