
Brochure
Page 1
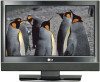
LCD TV OWNER'S MANUAL LCD TV MODELS 20LS7D 20LS7DC 23LS7D 23LS7DC Please read this manual carefully before operating your dealer when you require service. Record model number and serial number of power-saving guidelines issued by the U.S. As an ENERGY STAR Partner LGE U. www.lgusa.com / www.lg.ca / www.lgcommercial.com S. has determined that...
LCD TV OWNER'S MANUAL LCD TV MODELS 20LS7D 20LS7DC 23LS7D 23LS7DC Please read this manual carefully before operating your dealer when you require service. Record model number and serial number of power-saving guidelines issued by the U.S. As an ENERGY STAR Partner LGE U. www.lgusa.com / www.lg.ca / www.lgcommercial.com S. has determined that...

Brochure
Page 4
... 1 Do not use attachments/accessories specified by adding statements after the end of the polarized or grounding-type plug. Owner Manual 2 A polarized plug has two blades with dry cloth. The important safety instructions shall be used , shall be included ... safety information may be placed immediately adjacOewOnwnenretMrManatunauolal that produce heat. 7 Only use this apparatus near any ventilation openings. Owner Manual Owner Manual 5 Do not defeat the safety purpose of the following safety instructions shall be included where applicable, and, when used ...
... 1 Do not use attachments/accessories specified by adding statements after the end of the polarized or grounding-type plug. Owner Manual 2 A polarized plug has two blades with dry cloth. The important safety instructions shall be used , shall be included ... safety information may be placed immediately adjacOewOnwnenretMrManatunauolal that produce heat. 7 Only use this apparatus near any ventilation openings. Owner Manual Owner Manual 5 Do not defeat the safety purpose of the following safety instructions shall be included where applicable, and, when used ...

Brochure
Page 5
..., do not expose this apparatus during lightning storms or when unused for long periods of time. 12 Outdoor use marking : WARNING - Any of this owner's manual to dripping or splashing and no additional outlets or branch circuits. If grounding methods are dangerous. Power Supply Short-circuit Breaker 15 DISCONNECTING DEVICE FROM...
..., do not expose this apparatus during lightning storms or when unused for long periods of time. 12 Outdoor use marking : WARNING - Any of this owner's manual to dripping or splashing and no additional outlets or branch circuits. If grounding methods are dangerous. Power Supply Short-circuit Breaker 15 DISCONNECTING DEVICE FROM...

Brochure
Page 6
... 33 - Color Tone - User Mode 42 XD - EZ Picture - Preset 40 Manual Picture Adjustment 41 EZ Picture - Picture Improvement Technology 43 Advanced - Analog Broadcasting System Captions 52 - Channel Editing 34 DTV Signal Strength 35 Input Source Selection ...
... 33 - Color Tone - User Mode 42 XD - EZ Picture - Preset 40 Manual Picture Adjustment 41 EZ Picture - Picture Improvement Technology 43 Advanced - Analog Broadcasting System Captions 52 - Channel Editing 34 DTV Signal Strength 35 Input Source Selection ...
Brochure
Page 7
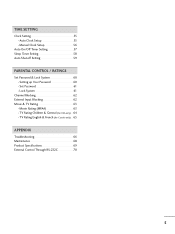
... only) . . 65 APPENDIX Troubleshooting 66 Maintenance 68 Product Specifications 69 External Control Through RS-232C 70 5 TIME SETTING Clock Setting 55 Auto Clock Setup 55 Manual Clock Setup 56 Auto On/Off Timer Setting 57 Sleep Timer Setting 58 Auto Shut-off Setting 59 PARENTAL CONTROL / RATINGS Set Password & Lock System...
... only) . . 65 APPENDIX Troubleshooting 66 Maintenance 68 Product Specifications 69 External Control Through RS-232C 70 5 TIME SETTING Clock Setting 55 Auto Clock Setup 55 Manual Clock Setup 56 Auto On/Off Timer Setting 57 Sleep Timer Setting 58 Auto Shut-off Setting 59 PARENTAL CONTROL / RATINGS Set Password & Lock System...

Brochure
Page 9
Owner's Manual LCD TV Owner's Manual http://www.lgusa.com www.lg.ca Copyright© 2007 LGE, All Rights Reserved. 7 5 3 - 8 6 0 9 BACK FAV MUTE C CH EXIT TV SAP POWER PICTURE 1 SOUND INPUT 4 2 TIMER 7 5 3 - 8 6 0 9 VOL BACK FAV MUTE MENU CC CH ADJUST EXIT ENTER 1.5V 1.5V Owner's Manual CD Manual Remote Control, Batteries Power Cord Cable Management Option...
Owner's Manual LCD TV Owner's Manual http://www.lgusa.com www.lg.ca Copyright© 2007 LGE, All Rights Reserved. 7 5 3 - 8 6 0 9 BACK FAV MUTE C CH EXIT TV SAP POWER PICTURE 1 SOUND INPUT 4 2 TIMER 7 5 3 - 8 6 0 9 VOL BACK FAV MUTE MENU CC CH ADJUST EXIT ENTER 1.5V 1.5V Owner's Manual CD Manual Remote Control, Batteries Power Cord Cable Management Option...

Brochure
Page 19
... IN VIDEO jacks on the set -top box. When connecting Component cable 1. Connect the audio output of the digital set top box to the owner's manual for the digital set . HD RECEIVER SETUP This TV can receive Digital Over-the-air/Cable signals without an external digital set . 2. However, if you...
... IN VIDEO jacks on the set -top box. When connecting Component cable 1. Connect the audio output of the digital set top box to the owner's manual for the digital set . HD RECEIVER SETUP This TV can receive Digital Over-the-air/Cable signals without an external digital set . 2. However, if you...
Brochure
Page 20
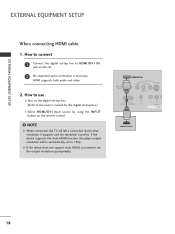
... COMP HDMI-DTV OUTPUT 18 HDMI supports both audio and video. 2. How to use I Turn on the digital set-top box. (Refer to the owner's manual for the digital set-top box.) I Select H D M I / D V I input source by using the I N P U T button on the set -top box to HDMI/DVI IN jack on the...
... COMP HDMI-DTV OUTPUT 18 HDMI supports both audio and video. 2. How to use I Turn on the digital set-top box. (Refer to the owner's manual for the digital set-top box.) I Select H D M I / D V I input source by using the I N P U T button on the set -top box to HDMI/DVI IN jack on the...

Brochure
Page 21
... IN (RGB/DVI) L(MONO) R 1 H/P RS-232C IN (CONTROL & SERVICE) VIDEO AUDIO COMPONENT IN 2 DVI-DTV OUTPUT L R 1. EXTERNAL EQUIPMENT SETUP When connecting HDMI to the owner's manual for the digital set . 2.
... IN (RGB/DVI) L(MONO) R 1 H/P RS-232C IN (CONTROL & SERVICE) VIDEO AUDIO COMPONENT IN 2 DVI-DTV OUTPUT L R 1. EXTERNAL EQUIPMENT SETUP When connecting HDMI to the owner's manual for the digital set . 2.

Brochure
Page 22
...) IN AUDIO IN (RGB/DVI) L(MONO) R H/P E) VIDEO AUDIO COMPONENT IN Component Input ports To get better picture quality, connect a DVD player to the DVD player's manual for operating instructions. How to connect 1 Connect the video outputs (Y, PB, PR) of the DVD to the COMPONENT IN VIDEO jacks on the DVD player...
...) IN AUDIO IN (RGB/DVI) L(MONO) R H/P E) VIDEO AUDIO COMPONENT IN Component Input ports To get better picture quality, connect a DVD player to the DVD player's manual for operating instructions. How to connect 1 Connect the video outputs (Y, PB, PR) of the DVD to the COMPONENT IN VIDEO jacks on the DVD player...

Brochure
Page 23
... the I Turn on the set. 2 Connect the audio outputs of the DVD to the DVD player's manual for operating instructions. ! G If the device does not support Auto HDMI, you need to the DVD player's manual for operating instructions. If the device supports this Auto HDMI function, the player output resolution will tell...
... the I Turn on the set. 2 Connect the audio outputs of the DVD to the DVD player's manual for operating instructions. ! G If the device does not support Auto HDMI, you need to the DVD player's manual for operating instructions. If the device supports this Auto HDMI function, the player output resolution will tell...

Brochure
Page 24
... OUTPUT SWITCH Wall Jack 2 Antenna 1. How to use I Insert a video tape into the VCR and press PLAY on the VCR. (Refer to the VCR owner's manual.) 22 the fixed images on the sides of the screen may remain visible on the set. 2 Connect the antenna cable to the RF antenna in...
... OUTPUT SWITCH Wall Jack 2 Antenna 1. How to use I Insert a video tape into the VCR and press PLAY on the VCR. (Refer to the VCR owner's manual.) 22 the fixed images on the sides of the screen may remain visible on the set. 2 Connect the antenna cable to the RF antenna in...

Brochure
Page 25
... the INPUT button on the VCR. (Refer to both Video and the S-Video cables, only the S-Video will work. 23 How to the VCR owner's manual.) I Insert a video tape into the VCR and press PLAY on the remote control. G Do not connect to the VCR owner...'s manual.) I Insert a video tape into the VCR and press PLAY on the remote control. ! ANT IN S-VIDEO VIDEO L R ANT OUT OUTPUT SWITCH When connecting with a RCA ...
... the INPUT button on the VCR. (Refer to both Video and the S-Video cables, only the S-Video will work. 23 How to the VCR owner's manual.) I Insert a video tape into the VCR and press PLAY on the remote control. G Do not connect to the VCR owner...'s manual.) I Insert a video tape into the VCR and press PLAY on the remote control. ! ANT IN S-VIDEO VIDEO L R ANT OUT OUTPUT SWITCH When connecting with a RCA ...
Brochure
Page 33
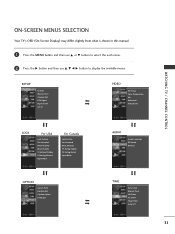
... and then use D or E button to select the each menu. 2 Press the G button and then use D E F G button to display the available menus. SETUP EZ Scan Manual Scan Channel Edit DTV Signal Input Source Set ID VIDEO EZ Picture Color Temperature XD Advanced Video Reset WATCHING TV / CHANNEL CONTROL LOCK For USA... TV Rating-English TV Rating-French Input Block OPTION Aspect Ratio Caption/Text Caption Option Language AUDIO Audio Language EZ Sound Balance TIME Auto Clock Manual Clock Off Timer On Timer Sleep Timer Auto Off 31
... and then use D or E button to select the each menu. 2 Press the G button and then use D E F G button to display the available menus. SETUP EZ Scan Manual Scan Channel Edit DTV Signal Input Source Set ID VIDEO EZ Picture Color Temperature XD Advanced Video Reset WATCHING TV / CHANNEL CONTROL LOCK For USA... TV Rating-English TV Rating-French Input Block OPTION Aspect Ratio Caption/Text Caption Option Language AUDIO Audio Language EZ Sound Balance TIME Auto Clock Manual Clock Off Timer On Timer Sleep Timer Auto Off 31
Brochure
Page 34
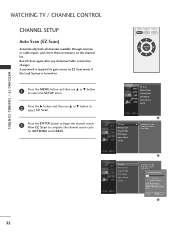
... cycle for ANTENNA and CABLE. Allow EZ Scan to stop the current scan and start DIGITAL ANTENNA channel scan. Next MENU Previous 3 32 EZ Scan Manual Scan Channel Edit DTV Signal Input Source Set ID 2 Selection ( G or ) leads you to the EZ scan screen. Processing EZ scan... CC MENU ...ADJUST EXIT ENTER EZ Scan Manual Scan Channel Edit DTV Signal Input Source Set ID EZ Scan Manual Scan Channel Edit DTV Signal Input Source Set ID 1 G Selection ( G or ) leads you to EZ Scan menu if the...
... cycle for ANTENNA and CABLE. Allow EZ Scan to stop the current scan and start DIGITAL ANTENNA channel scan. Next MENU Previous 3 32 EZ Scan Manual Scan Channel Edit DTV Signal Input Source Set ID 2 Selection ( G or ) leads you to the EZ scan screen. Processing EZ scan... CC MENU ...ADJUST EXIT ENTER EZ Scan Manual Scan Channel Edit DTV Signal Input Source Set ID EZ Scan Manual Scan Channel Edit DTV Signal Input Source Set ID 1 G Selection ( G or ) leads you to EZ Scan menu if the...

Brochure
Page 35
... the channel. 6 Press the EXIT button to return to TV viewing or press MENU button to return to select the SETUP menu. TV 2 EZ Scan Manual Scan Channel Edit DTV Signal Input Source Set ID 2 Select channel type and RF-channel number. Press the G button and then use D or E button ...to 2 select Manual Scan. 3 Press the G button and then use D or E button to select T V, D T V, CATV, and CADTV. 4 Press the G button and then use D or E button 1 to the ...
... the channel. 6 Press the EXIT button to return to TV viewing or press MENU button to return to select the SETUP menu. TV 2 EZ Scan Manual Scan Channel Edit DTV Signal Input Source Set ID 2 Select channel type and RF-channel number. Press the G button and then use D or E button ...to 2 select Manual Scan. 3 Press the G button and then use D or E button to select T V, D T V, CATV, and CADTV. 4 Press the G button and then use D or E button 1 to the ...

Brochure
Page 36
... MENU button to return to the previous menu. - 0 FAV BACK VOL MUTE CC MENU ADJUST CH EXIT ENTER EZ Scan Manual Scan Channel Edit DTV Signal Input Source Set ID 1 EZ Scan Manual Scan Channel Edit DTV Signal Input Source Set ID G Selection ( G or ) leads you can add or delete the channel...
... MENU button to return to the previous menu. - 0 FAV BACK VOL MUTE CC MENU ADJUST CH EXIT ENTER EZ Scan Manual Scan Channel Edit DTV Signal Input Source Set ID 1 EZ Scan Manual Scan Channel Edit DTV Signal Input Source Set ID G Selection ( G or ) leads you can add or delete the channel...

Brochure
Page 37
WATCHING TV / CHANNEL CONTROL DTV SIGNAL STRENGTH This feature displays the DTV signal levels being received. EZ Scan Manual Scan Channel Edit DTV Signal Input Source Set ID EZ Scan Manual Scan Channel Edit DTV Signal Input Source Set ID 1 Bad Normal Good 23 35 DTV Signal: This function is only available when...
WATCHING TV / CHANNEL CONTROL DTV SIGNAL STRENGTH This feature displays the DTV signal levels being received. EZ Scan Manual Scan Channel Edit DTV Signal Input Source Set ID EZ Scan Manual Scan Channel Edit DTV Signal Input Source Set ID 1 Bad Normal Good 23 35 DTV Signal: This function is only available when...

Brochure
Page 38
..., RGB-PC, H D M I / D V I. 4 Press EXIT button to return to TV viewing or press MENU button to return to your TV. EZ Scan Manual Scan Channel Edit DTV Signal Input Source Set ID EZ Scan Manual Scan Channel Edit DTV Signal Input Source Set ID 1 G TV AV Component RGB-PC HDMI/DVI 23 36
..., RGB-PC, H D M I / D V I. 4 Press EXIT button to return to TV viewing or press MENU button to return to your TV. EZ Scan Manual Scan Channel Edit DTV Signal Input Source Set ID EZ Scan Manual Scan Channel Edit DTV Signal Input Source Set ID 1 G TV AV Component RGB-PC HDMI/DVI 23 36

Brochure
Page 43
... EZ Picture Color Temperature XD Advanced Video Reset 1 Daylight Normal Night Time User 1 G User 2 Selection ( G or ) leads you to suit your preference and viewing situations. MANUAL PICTURE ADJUSTMENT EZ Picture - User Mode Adjust the picture appearance to the detailed setting screen. User1 Contrast 85 Brightness 50 Color 50 Sharpness 50 Tint...
... EZ Picture Color Temperature XD Advanced Video Reset 1 Daylight Normal Night Time User 1 G User 2 Selection ( G or ) leads you to suit your preference and viewing situations. MANUAL PICTURE ADJUSTMENT EZ Picture - User Mode Adjust the picture appearance to the detailed setting screen. User1 Contrast 85 Brightness 50 Color 50 Sharpness 50 Tint...


