Fax System (V) Operation Guide
Page 6
... Print Output 6-35 2 in 1 Reception 6-36 Remote Diagnostics 6-37 Prohibiting FAX Printing at Specified Times (Unusable Time 6-38 Setting the Paper Output 6-39 7 Optional Equipment Internet FAX Kit (A 7-2 Expansion Memory 7-3 Dual FAX 7-3 8 Internet Faxing (i-FAX) (Option) What is i-FAX 8-2 i-FAX Settings 8-4 i-FAX Transmission 8-8 i-FAX Reception 8-13 9 About Network FAX What is Network FAX 9-2 Setup 9-4 10 Troubleshooting Indicators During Sending/Receiving Operation 10-2 Precautions...
... Print Output 6-35 2 in 1 Reception 6-36 Remote Diagnostics 6-37 Prohibiting FAX Printing at Specified Times (Unusable Time 6-38 Setting the Paper Output 6-39 7 Optional Equipment Internet FAX Kit (A 7-2 Expansion Memory 7-3 Dual FAX 7-3 8 Internet Faxing (i-FAX) (Option) What is i-FAX 8-2 i-FAX Settings 8-4 i-FAX Transmission 8-8 i-FAX Reception 8-13 9 About Network FAX What is Network FAX 9-2 Setup 9-4 10 Troubleshooting Indicators During Sending/Receiving Operation 10-2 Precautions...

Fax System (V) Operation Guide
Page 14
... Explains how to check the status of the same originals to functions, such as forwarding, saving, and printing the received originals for Internet faxing. Setup and Registration Explains various settings and registration pertaining to multiple recipients and scheduling the next transmission. Chapter 9 - xii Introduction About This Guide This guide consists of the...
... Explains how to check the status of the same originals to functions, such as forwarding, saving, and printing the received originals for Internet faxing. Setup and Registration Explains various settings and registration pertaining to multiple recipients and scheduling the next transmission. Chapter 9 - xii Introduction About This Guide This guide consists of the...
Fax System (V) Operation Guide
Page 20
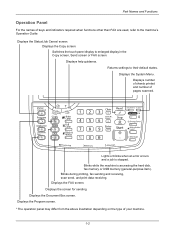
... default states. Lights or blinks when an error occurs and a job is accessing the hard disk, fax memory or USB memory (general-purpose item). Returns settings to enlarged display in the Copy screen, Send screen or FAX screen. Part Names and Functions Operation Panel For the names of pages scanned. Displays the Status...
... default states. Lights or blinks when an error occurs and a job is accessing the hard disk, fax memory or USB memory (general-purpose item). Returns settings to enlarged display in the Copy screen, Send screen or FAX screen. Part Names and Functions Operation Panel For the names of pages scanned. Displays the Status...
Fax System (V) Operation Guide
Page 21
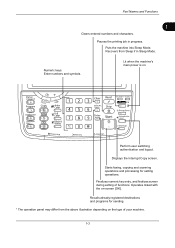
... on the type of functions. Displays the Interrupt Copy screen. Operates linked with the on . Recalls already registered destinations and programs for setting operations. Enter numbers and symbols. Starts faxing, copying and scanning operations and processing for sending. * The operation panel may differ from Sleep if in progress. Pauses the printing job...
... on the type of functions. Displays the Interrupt Copy screen. Operates linked with the on . Recalls already registered destinations and programs for setting operations. Enter numbers and symbols. Starts faxing, copying and scanning operations and processing for sending. * The operation panel may differ from Sleep if in progress. Pauses the printing job...

Fax System (V) Operation Guide
Page 22
...required when functions other than FAX are used as a fax machine. To receive faxes with this panel. 2 Main power switch Set this switch to the ON (|) side when performing the fax or copier operation. The touch panel lights to enable operation. 3 MP (Multi Purpose) tray Set the paper in this tray ...when using a type of your machine. 1 Operation panel Perform the fax operation with the power turned off . Connect the modular cord for the telephone line to this ...
...required when functions other than FAX are used as a fax machine. To receive faxes with this panel. 2 Main power switch Set this switch to the ON (|) side when performing the fax or copier operation. The touch panel lights to enable operation. 3 MP (Multi Purpose) tray Set the paper in this tray ...when using a type of your machine. 1 Operation panel Perform the fax operation with the power turned off . Connect the modular cord for the telephone line to this ...
Fax System (V) Operation Guide
Page 26
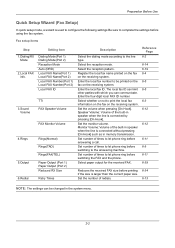
...) In quick setup mode, a wizard is larger than the current paper size. Select whether or not to print the local fax information on the fax on the receiving system. Set number of the built-in speaker when the line is connected by pressing [On Hook]. Reference Page 6-2 6-14 6-19 6-4 6-5 6-5 6-3 6-12 6-12 6-11 6-9 6-11...
...) In quick setup mode, a wizard is larger than the current paper size. Select whether or not to print the local fax information on the fax on the receiving system. Set number of the built-in speaker when the line is connected by pressing [On Hook]. Reference Page 6-2 6-14 6-19 6-4 6-5 6-5 6-3 6-12 6-12 6-11 6-9 6-11...
Fax System (V) Operation Guide
Page 27
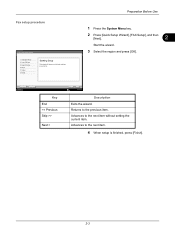
Preparation Before Use 1 Press the System Menu key. 2 Press [Quick Setup Wizard], [FAX Setup], and then [Next]. 2 Start the wizard. 3 Select the region and press [OK]. Advances to the next item without setting the current item. Fax setup procedure FAX - Dialing/RX Mode 2. Advances to the next item. 4 When setup is finished, press [Finish]. 2-3 Quick...
Preparation Before Use 1 Press the System Menu key. 2 Press [Quick Setup Wizard], [FAX Setup], and then [Next]. 2 Start the wizard. 3 Select the region and press [OK]. Advances to the next item without setting the current item. Fax setup procedure FAX - Dialing/RX Mode 2. Advances to the next item. 4 When setup is finished, press [Finish]. 2-3 Quick...

Fax System (V) Operation Guide
Page 28
... the login user name and password are both 'Admin'. 3 Press [Change] of the operation panel regularly. NOTE: If you . Because the FAX delayed transmission is displayed. Time Zone Set time zone. Zone -12:00 International Date Line West -11:00 Samoa -11:00 UTC-11 -10:00 Hawaii -09:00 Alaska -08... the time by a 24-hour system. 8 Press [OK]. 10 Hour 10 Minute Off 31 Second Status Cancel OK 10/10/2010 10:10 2-4 Date/Time Set the date and time. 2010 Year 10 Month 10 Day 6 Press [Change] of Date/Time. 7 Enter the date and time using [+]/[-].
... the login user name and password are both 'Admin'. 3 Press [Change] of the operation panel regularly. NOTE: If you . Because the FAX delayed transmission is displayed. Time Zone Set time zone. Zone -12:00 International Date Line West -11:00 Samoa -11:00 UTC-11 -10:00 Hawaii -09:00 Alaska -08... the time by a 24-hour system. 8 Press [OK]. 10 Hour 10 Minute Off 31 Second Status Cancel OK 10/10/2010 10:10 2-4 Date/Time Set the date and time. 2010 Year 10 Month 10 Day 6 Press [Change] of Date/Time. 7 Enter the date and time using [+]/[-].

Fax System (V) Operation Guide
Page 29
... you want to the Address Book. There are two registration methods - You can register new destinations to set from the Address Book. Contact Registration (fax) Up to 2,000 destinations can select the destination for registering several contact registrations as a contact, refer to...Address Book] to use an LDAP address book. 2 Changing the initially displayed address book Set the initially displayed address book to Contact Registration (i-FAX) on page 2-8. and, group registration for a fax or i-FAX from [Machine Address Book] or [Ext Address Book], and press [OK]. Edit ...
... you want to the Address Book. There are two registration methods - You can register new destinations to set from the Address Book. Contact Registration (fax) Up to 2,000 destinations can select the destination for registering several contact registrations as a contact, refer to...Address Book] to use an LDAP address book. 2 Changing the initially displayed address book Set the initially displayed address book to Contact Registration (i-FAX) on page 2-8. and, group registration for a fax or i-FAX from [Machine Address Book] or [Ext Address Book], and press [OK]. Edit ...
Fax System (V) Operation Guide
Page 31
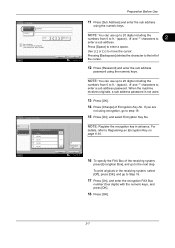
Sub Address Sub Address Password 1234567890 Space Set sub address. For details, refer to Registering an Encryption Key on page 6-30. 1/1 Off Encryption Box Cancel OK 10/10/2010 10:10 16 To specify the FAX Box of the receiving system, press [Encryption Box], and go to 2 enter a ... (space)', '#' and '*' characters to the next step. Pressing [Backspace] deletes the character to Step 19. 17 Press [On], and enter the encryption FAX Box number (four digits) with the numeric keys, and press [OK]. 18 Press [OK]. 2-7 NOTE: Register the encryption key in the receiving system...
Sub Address Sub Address Password 1234567890 Space Set sub address. For details, refer to Registering an Encryption Key on page 6-30. 1/1 Off Encryption Box Cancel OK 10/10/2010 10:10 16 To specify the FAX Box of the receiving system, press [Encryption Box], and go to 2 enter a ... (space)', '#' and '*' characters to the next step. Pressing [Backspace] deletes the character to Step 19. 17 Press [On], and enter the encryption FAX Box number (four digits) with the numeric keys, and press [OK]. 18 Press [OK]. 2-7 NOTE: Register the encryption key in the receiving system...
Fax System (V) Operation Guide
Page 32
...from 33,600 bps, 14,400 bps, and 9,600 bps. The destination is added to change the settings. Go to register, and Press [Next]. Contact name, i-FAX address, transmission mode and the conditions for each item has been entered correctly. 21 Check if the destination ...]. If you selected [Yes], the one -touch key has already been registered, the overwrite registration confirmation screen appears. Contact Registration (i-FAX) Up to change the settings, and press [OK]. Press [Change] of noise on the telephone line during transmission. The destination details can be registered. Key ...
...from 33,600 bps, 14,400 bps, and 9,600 bps. The destination is added to change the settings. Go to register, and Press [Next]. Contact name, i-FAX address, transmission mode and the conditions for each item has been entered correctly. 21 Check if the destination ...]. If you selected [Yes], the one -touch key has already been registered, the overwrite registration confirmation screen appears. Contact Registration (i-FAX) Up to change the settings, and press [OK]. Press [Change] of noise on the telephone line during transmission. The destination details can be registered. Key ...
Fax System (V) Operation Guide
Page 101
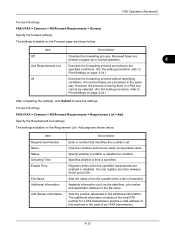
... machine in the same way. All received faxes are enabled or disabled. Forward Settings FAX/i-FAX > Common > RX/Forward Requirements > Requirement List > Add Specify the Requirement List settings. Specify whether to save the settings. Specifies whether a time is forwarded. FAX Operation (Advanced) Forward Settings FAX/i-FAX > Common > RX/Forward Requirements > General Specify the forward settings. Item Requirement Number Name Status Activating...
... machine in the same way. All received faxes are enabled or disabled. Forward Settings FAX/i-FAX > Common > RX/Forward Requirements > Requirement List > Add Specify the Requirement List settings. Specify whether to save the settings. Specifies whether a time is forwarded. FAX Operation (Advanced) Forward Settings FAX/i-FAX > Common > RX/Forward Requirements > General Specify the forward settings. Item Requirement Number Name Status Activating...
Fax System (V) Operation Guide
Page 102
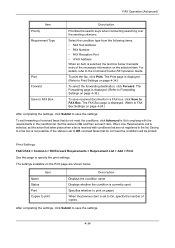
... On, specify the number of the necessary information on paper. For details, refer to specify the print settings. The Print page is set to Print Settings on page 4-34.) To select the forwarding destination, click Forward. Print Settings FAX/i-FAX > Common > RX/Forward Requirements > Requirement List > Add > Print Use this page to the Command Center RX...
... On, specify the number of the necessary information on paper. For details, refer to specify the print settings. The Print page is set to Print Settings on page 4-34.) To select the forwarding destination, click Forward. Print Settings FAX/i-FAX > Common > RX/Forward Requirements > Requirement List > Add > Print Use this page to the Command Center RX...
Fax System (V) Operation Guide
Page 103
... . • Add(Refer to Editing Destinations on page 4-36.) • Import Contacts • Import Groups • Delete After completing the settings, click Submit to enable encryption for transmission. Destination List Specifies the FAX box to forward. Note the SSL protocol must also be appended. Number of Destination Displays the number of registered...
... . • Add(Refer to Editing Destinations on page 4-36.) • Import Contacts • Import Groups • Delete After completing the settings, click Submit to enable encryption for transmission. Destination List Specifies the FAX box to forward. Note the SSL protocol must also be appended. Number of Destination Displays the number of registered...
Fax System (V) Operation Guide
Page 104
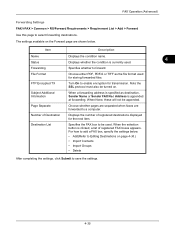
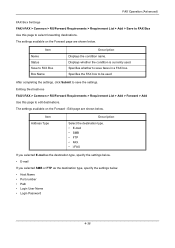
... Name • Port number • Path • Login User Name • Login Password 4-36 Edit page are shown below. FAX Operation (Advanced) FAX Box Settings FAX/i-FAX > Common > RX/Forward Requirements > Requirement List > Add > Save to FAX Box Use this page to edit destinations. Item Address Type Description Select the destination type. • E-mail • SMB...
... Name • Port number • Path • Login User Name • Login Password 4-36 Edit page are shown below. FAX Operation (Advanced) FAX Box Settings FAX/i-FAX > Common > RX/Forward Requirements > Requirement List > Add > Save to FAX Box Use this page to edit destinations. Item Address Type Description Select the destination type. • E-mail • SMB...
Fax System (V) Operation Guide
Page 105
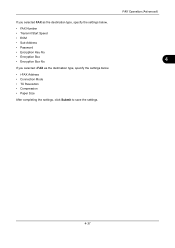
FAX Operation (Advanced) 4 4-37 If you selected i-FAX as the destination type, specify the settings below . • i-FAX Address • Connection Mode • TX Resolution • Compression • Paper Size After completing the settings, click Submit to save the settings. If you selected FAX as the destination type, specify the settings below . • FAX Number • Transmit Start Speed • ECM • Sub Address • Password • Encryption Key No. • Encryption Box • Encryption Box No.
FAX Operation (Advanced) 4 4-37 If you selected i-FAX as the destination type, specify the settings below . • i-FAX Address • Connection Mode • TX Resolution • Compression • Paper Size After completing the settings, click Submit to save the settings. If you selected FAX as the destination type, specify the settings below . • FAX Number • Transmit Start Speed • ECM • Sub Address • Password • Encryption Key No. • Encryption Box • Encryption Box No.
Fax System (V) Operation Guide
Page 150
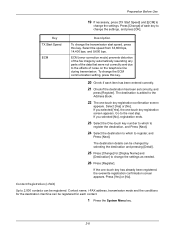
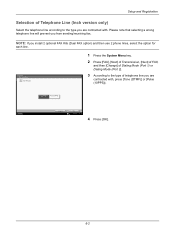
...) Status Cancel OK 10/10/2010 10:10 4 Press [OK]. 6-2 FAX Port 1 Set FAX port. 1 Press the System Menu key. 2 Press [FAX], [Next] of Transmission, [Next] of FAX, and then [Change] of telephone line you are contracted with , press [Tone (DTMF)] or [Pulse (10PPS)]. FAX - Please note that selecting a wrong telephone line will prevent you install...
...) Status Cancel OK 10/10/2010 10:10 4 Press [OK]. 6-2 FAX Port 1 Set FAX port. 1 Press the System Menu key. 2 Press [FAX], [Next] of Transmission, [Next] of FAX, and then [Change] of telephone line you are contracted with , press [Tone (DTMF)] or [Pulse (10PPS)]. FAX - Please note that selecting a wrong telephone line will prevent you install...
Fax System (V) Operation Guide
Page 160
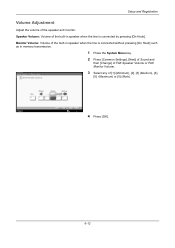
...:10 4 Press [OK]. 6-12 Speaker Volume: Volume of the built-in memory transmission. 1 Press the System Menu key. 2 Press [Common Settings], [Next] of Sound and then [Change] of the built-in speaker when the line is connected without pressing [On Hook] such as in ...speaker when the line is connected by pressing [On Hook]. Common Settings - Monitor Volume: Volume of FAX Speaker Volume or FAX Monitor Volume. Setup and Registration Volume Adjustment Adjust the volume of [1] (Minimum), [2], [3] (Medium), [4], [5] (Maximum) or [0]...
...:10 4 Press [OK]. 6-12 Speaker Volume: Volume of the built-in memory transmission. 1 Press the System Menu key. 2 Press [Common Settings], [Next] of Sound and then [Change] of the built-in speaker when the line is connected without pressing [On Hook] such as in ...speaker when the line is connected by pressing [On Hook]. Common Settings - Monitor Volume: Volume of FAX Speaker Volume or FAX Monitor Volume. Setup and Registration Volume Adjustment Adjust the volume of [1] (Minimum), [2], [3] (Medium), [4], [5] (Maximum) or [0]...
Fax System (V) Operation Guide
Page 197
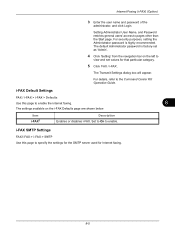
... to pages other than the Start page. The Transmit Settings dialog box will appear. Item i-FAX† Description Enables or disables i-FAX. For security purposes, setting the Administrator password is factory-set as 'Admin'. 4 Click 'Setting' from the navigation bar on the i-FAX Defaults page are shown below. i-FAX Default Settings FAX / i-FAX > i-FAX > Defaults Use this page to the Command Center...
... to pages other than the Start page. The Transmit Settings dialog box will appear. Item i-FAX† Description Enables or disables i-FAX. For security purposes, setting the Administrator password is factory-set as 'Admin'. 4 Click 'Setting' from the navigation bar on the i-FAX Defaults page are shown below. i-FAX Default Settings FAX / i-FAX > i-FAX > Defaults Use this page to the Command Center...
Fax System (V) Operation Guide
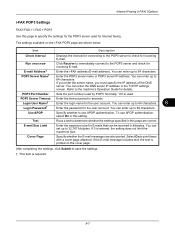
Page 199
... whether the E-mail messages are shown below. After completing the settings, click Submit to specify the settings for the POP3 server used for incoming E-mail. Internet Faxing (i-FAX) (Option) i-FAX POP3 Settings FAX/i-FAX > i-FAX > POP3 Use this page to save the settings. † This item is required. 8-7 The settings available on the cover page. You can enter up to the...
... whether the E-mail messages are shown below. After completing the settings, click Submit to specify the settings for the POP3 server used for incoming E-mail. Internet Faxing (i-FAX) (Option) i-FAX POP3 Settings FAX/i-FAX > i-FAX > POP3 Use this page to save the settings. † This item is required. 8-7 The settings available on the cover page. You can enter up to the...


