180/220 Operation Guide Rev-2
Page 15
... THE USE OF, OR INABILITY TO USE, THE MFP. Warranty 180/220 MULTIFUNCTIONAL PRODUCT LIMITED WARRANTY Kyocera Mita America, Inc. In the event the MFP or an accessory is not able to provide service, write to Kyocera at the address below for the original retail purchaser (referred to ...be defective within the warranty period, Kyocera's only obligation and the Customer's exclusive remedy shall be replacement of the developing unit, the drum unit, the transfer belt, and the fixing unit. If the Kyocera Dealer is found to as "MFP"), and the new accessories ...
... THE USE OF, OR INABILITY TO USE, THE MFP. Warranty 180/220 MULTIFUNCTIONAL PRODUCT LIMITED WARRANTY Kyocera Mita America, Inc. In the event the MFP or an accessory is not able to provide service, write to Kyocera at the address below for the original retail purchaser (referred to ...be defective within the warranty period, Kyocera's only obligation and the Customer's exclusive remedy shall be replacement of the developing unit, the drum unit, the transfer belt, and the fixing unit. If the Kyocera Dealer is found to as "MFP"), and the new accessories ...
180/220 Operation Guide Rev-2
Page 133
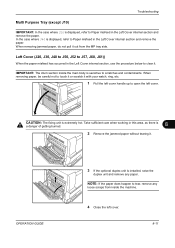
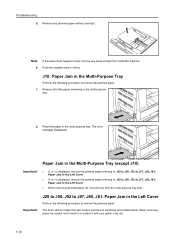
... J20 is extremely hot. When removing jammed paper, do not pull it . CAUTION: The fixing unit is displayed, refer to scratches and contaminants. IMPORTANT: The drum section inside the machine. 4 Close the left cover. Left Cover (J20, J30, J40 to J50, J52 to J57, J60, J61)) When the paper misfeed has...
... J20 is extremely hot. When removing jammed paper, do not pull it . CAUTION: The fixing unit is displayed, refer to scratches and contaminants. IMPORTANT: The drum section inside the machine. 4 Close the left cover. Left Cover (J20, J30, J40 to J50, J52 to J57, J60, J61)) When the paper misfeed has...
180/220 Operation Guide Rev-2
Page 134
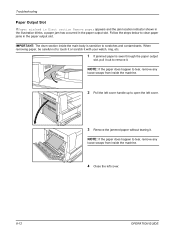
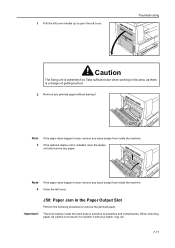
..., remove any loose scraps from inside the machine. 2 Pull the left cover handle up to clear paper jams in the paper output slot. IMPORTANT: The drum section inside the main body is seen through the paper output slot, pull it . Follow the steps below to open the left cover. 8-12 OPERATION...
..., remove any loose scraps from inside the machine. 2 Pull the left cover handle up to clear paper jams in the paper output slot. IMPORTANT: The drum section inside the main body is seen through the paper output slot, pull it . Follow the steps below to open the left cover. 8-12 OPERATION...
180/220 Operation Guide Rev-2
Page 144
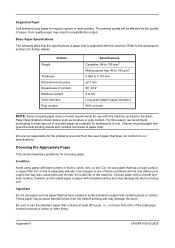
...smooth and even surface; Refer to use. For this reason, we recommend purchasing a small amount of recycled paper as it may damage the drum. Choosing the Appropriate Paper This section describes guidelines for regular copiers or laser printers. Choose paper with bent corners or that contains plastic or... Paper Use standard copy paper for choosing paper. Basic Paper Specifications The following table lists the specifications of printing and may damage the drum or fusing unit. These paper may produce harmful fumes from the use of paper that does not conform to use paper that has ...
...smooth and even surface; Refer to use. For this reason, we recommend purchasing a small amount of recycled paper as it may damage the drum. Choosing the Appropriate Paper This section describes guidelines for regular copiers or laser printers. Choose paper with bent corners or that contains plastic or... Paper Use standard copy paper for choosing paper. Basic Paper Specifications The following table lists the specifications of printing and may damage the drum or fusing unit. These paper may produce harmful fumes from the use of paper that does not conform to use paper that has ...
180/220 Operation Guide Rev-2
Page 149
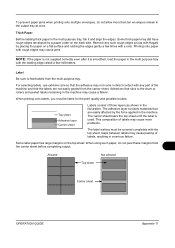
... tray with rough edges may cause peeling of three layers as with Hagaki by a paper cutter on the top sheet. Label Be sure to the drum or rollers and peeled labels remaining in direct contact with a ruler. Thick Paper Before loading thick paper in the multi purpose tray, fan it is...
... tray with rough edges may cause peeling of three layers as with Hagaki by a paper cutter on the top sheet. Label Be sure to the drum or rollers and peeled labels remaining in direct contact with a ruler. Thick Paper Before loading thick paper in the multi purpose tray, fan it is...
180/220 Operation Guide Rev-2
Page 151
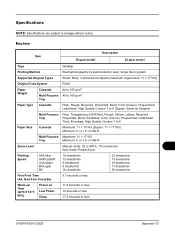
Machine Item 18 ppm model Description 22 ppm model Type Printing Method Supported Original Types Desktop Electrophotography by semiconductor laser, single drum system Sheet, Book, 3-dimensional objects (maximum original size: 11 × 17"/A3) Original Feed System Paper Weight Cassette Multi Purpose Tray Paper Type Cassette Multi ...
Machine Item 18 ppm model Description 22 ppm model Type Printing Method Supported Original Types Desktop Electrophotography by semiconductor laser, single drum system Sheet, Book, 3-dimensional objects (maximum original size: 11 × 17"/A3) Original Feed System Paper Weight Cassette Multi Purpose Tray Paper Type Cassette Multi ...

Operation Guide
Page 78
Perform drum refresh. - Is the copy paper wet? Middle 2 is set at the Paper type Set Middle 1 at high humidity? Is Middle 2 set .) 7-3 Replace the copy paper with dry, new 2-1 paper. Troubleshooting Symptom Copies are curled. The copies are blurred. Items to check Corrective procedure Reference page Is this machine used at the Paper type (Paper - (Paper Weight) setting? (Normally, Weight) setting.
Perform drum refresh. - Is the copy paper wet? Middle 2 is set at the Paper type Set Middle 1 at high humidity? Is Middle 2 set .) 7-3 Replace the copy paper with dry, new 2-1 paper. Troubleshooting Symptom Copies are curled. The copies are blurred. Items to check Corrective procedure Reference page Is this machine used at the Paper type (Paper - (Paper Weight) setting? (Normally, Weight) setting.
Operation Guide
Page 85
... it out from inside the main body is displayed, remove the jammed paper referring to J20 to J50, J52 to remove the jammed paper. The drum section inside the machine. 6 Push the cassette back in the Left Cover. • When removing jammed paper, do not pull it . J20 to J50, J52...
... it out from inside the main body is displayed, remove the jammed paper referring to J20 to J50, J52 to remove the jammed paper. The drum section inside the machine. 6 Push the cassette back in the Left Cover. • When removing jammed paper, do not pull it . J20 to J50, J52...
Operation Guide
Page 86
... loose scraps from inside the main body is sensitive to tear, remove any jammed paper without tearing it with your watch, ring, etc. 7-11 The drum section inside the machine. 4 Close the left cover. Note If the paper does happen to scratches and contaminants. Note 3 If the paper does happen to...
... loose scraps from inside the main body is sensitive to tear, remove any jammed paper without tearing it with your watch, ring, etc. 7-11 The drum section inside the machine. 4 Close the left cover. Note If the paper does happen to scratches and contaminants. Note 3 If the paper does happen to...


