
KM-NET for Accounting Operation Guide Rev-1.4
Page 16
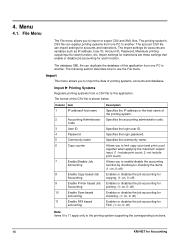
...Disable Job Accounting 8 Enable Copy based Job Accounting 9 Enable Printer based Job Accounting 10 Enable Scan based accounting 11 Enable FAX based accounting Description Specifies the IP address or the host name of...11 apply only to this application from one PC to use the File menu. The account CSV file can register printing systems from one PC to another . The import settings for accounts ... systems from a CSV file to the printing system supporting the corresponding functions. 14 KM-NET for accounts and restrictions. File Menu The File menu allows you to import or...
...Disable Job Accounting 8 Enable Copy based Job Accounting 9 Enable Printer based Job Accounting 10 Enable Scan based accounting 11 Enable FAX based accounting Description Specifies the IP address or the host name of...11 apply only to this application from one PC to use the File menu. The account CSV file can register printing systems from one PC to another . The import settings for accounts ... systems from a CSV file to the printing system supporting the corresponding functions. 14 KM-NET for accounts and restrictions. File Menu The File menu allows you to import or...

KM-NET for Clients Operation Guide Rev-3.7
Page 54
Document Box 10.Document Box A document box is a space similar to a post-office box on the main screen displays the Document Box In the Document Box window, the user can preview documents in document boxes or copy or move them to a PC. You can browse documents in the printing system's hard disk drive and download them to a computer. 50 KM-NET for storing scanned data or documents sent by FAX. You can also create or delete a document box. 10.1. on the hard disk of the printing system used for Clients Document Box Window Clicking the Document Box window.
Document Box 10.Document Box A document box is a space similar to a post-office box on the main screen displays the Document Box In the Document Box window, the user can preview documents in document boxes or copy or move them to a PC. You can browse documents in the printing system's hard disk drive and download them to a computer. 50 KM-NET for storing scanned data or documents sent by FAX. You can also create or delete a document box. 10.1. on the hard disk of the printing system used for Clients Document Box Window Clicking the Document Box window.
Fax System (N) Operation Guide Rev-1.2
Page 32
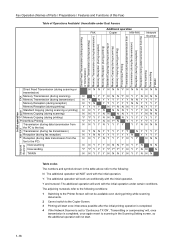
... adjoining numerals refer to the following conditions: 1 Switching to the Printer Screen will not be available even during data transmission from the fax to the PC) Now scanning Now sending TWAIN N N N Y N N N Y1 N N N N N N N N Y Y Y N N N Y1 N Y Y N N N N NY NYYYYYYNNYYYY N YN YYYYYYNNYYYY Y YYY N Y3 N N N Y Y N Y Y Y N NYYN NNNYYYYNNN N NYYNN NNYYYYNNN Y2 Y2 Y Y N N N NYYYYYYY Y1 Y1 Y Y N N Y3 N Y Y Y Y Y1 Y Y N NYYNYYYY YYNNNN...
... adjoining numerals refer to the following conditions: 1 Switching to the Printer Screen will not be available even during data transmission from the fax to the PC) Now scanning Now sending TWAIN N N N Y N N N Y1 N N N N N N N N Y Y Y N N N Y1 N Y Y N N N N NY NYYYYYYNNYYYY N YN YYYYYYNNYYYY Y YYY N Y3 N N N Y Y N Y Y Y N NYYN NNNYYYYNNN N NYYNN NNYYYYNNN Y2 Y2 Y Y N N N NYYYYYYY Y1 Y1 Y Y N N Y3 N Y Y Y Y Y1 Y Y N NYYNYYYY YYNNNN...
Scan To SMB (PC) Setup Guide Rev-3
Page 3
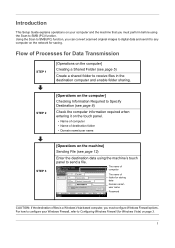
... Data Transmission STEP 1 [Operations on the computer] Creating a Shared Folder (see page 12) Enter the destination data using the Scan to SMB (PC) function. Using the Scan to SMB (PC) function, you can convert scanned original images to any computer on the network for storing data Domain name\ user name Password CAUTION: If the destination...
... Data Transmission STEP 1 [Operations on the computer] Creating a Shared Folder (see page 12) Enter the destination data using the Scan to SMB (PC) function. Using the Scan to SMB (PC) function, you can convert scanned original images to any computer on the network for storing data Domain name\ user name Password CAUTION: If the destination...
Scan To SMB (PC) Setup Guide Rev-3
Page 4
The next section explains how to send data to the Operation Guide. To select a file format, refer to a domain controlled computer. 2 Scan Convert scanned images to digital data Send and store digital data in a shared folder of any computer IMPORTANT: To use Scan to SMB (PC) function, a "shared folder" must be set up with the destination computer to receive data. About Scan to SMB (PC) To use Scan to SMB (PC) function, the machine must be connected to a TCP/IP network. NOTE: You can select from the following three file formats: PDF, TIFF, JPEG and XPS.
The next section explains how to send data to the Operation Guide. To select a file format, refer to a domain controlled computer. 2 Scan Convert scanned images to digital data Send and store digital data in a shared folder of any computer IMPORTANT: To use Scan to SMB (PC) function, a "shared folder" must be set up with the destination computer to receive data. About Scan to SMB (PC) To use Scan to SMB (PC) function, the machine must be connected to a TCP/IP network. NOTE: You can select from the following three file formats: PDF, TIFF, JPEG and XPS.
Scan To SMB (PC) Setup Guide Rev-3
Page 5
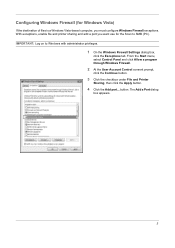
... the Continue button. 3 Click the checkbox under File and Printer Sharing, then click the Apply button. 4 Click the Add port... IMPORTANT: Log on to SMB (PC). Configuring Windows Firewall (for Windows Vista) If the destination of files is a Windows Vista-based computer, you want use for the...
... the Continue button. 3 Click the checkbox under File and Printer Sharing, then click the Apply button. 4 Click the Add port... IMPORTANT: Log on to SMB (PC). Configuring Windows Firewall (for Windows Vista) If the destination of files is a Windows Vista-based computer, you want use for the...

Scan To SMB (PC) Setup Guide Rev-3
Page 6
... the port you want to add. 139 Click TCP. 6 Click the OK button to close the Add a Port dialog box. When you want to SMB (PC). Item [Name] [Port number] [Protocol] Information to be entered Type a name for Scan to change SMB port number to add.
... the port you want to add. 139 Click TCP. 6 Click the OK button to close the Add a Port dialog box. When you want to SMB (PC). Item [Name] [Port number] [Protocol] Information to be entered Type a name for Scan to change SMB port number to add.

iTag Specification/Setup/Operation Guide Ver. 8.0
Page 3
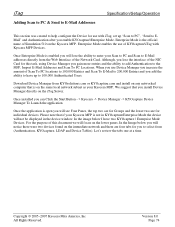
... a Workflow from iTag...35 Document Retrieval from SharePoint Services 45 How to Enable Color Scanning...49 Adding Scan to PC & Send to E-Mail Addresses 74 Device Manager - Device Tables ...78 Device Manager - PC list ...80 Device Manager - Authentication ...75 Device Manager - Version 8.0 Page 2 ...Validation Station...4 Components...5 iTag System Architecture...5 Installation Environments ...6 Installation Example 1 - Authlist ...81 Enterprise Mode ...82 Scan To PC...84 Copyright © 2005~2007 Kyocera Mita America, Inc All Rights Reserved. LDAP...77 Device Manager -
... a Workflow from iTag...35 Document Retrieval from SharePoint Services 45 How to Enable Color Scanning...49 Adding Scan to PC & Send to E-Mail Addresses 74 Device Manager - Device Tables ...78 Device Manager - PC list ...80 Device Manager - Authentication ...75 Device Manager - Version 8.0 Page 2 ...Validation Station...4 Components...5 iTag System Architecture...5 Installation Environments ...6 Installation Example 1 - Authlist ...81 Enterprise Mode ...82 Scan To PC...84 Copyright © 2005~2007 Kyocera Mita America, Inc All Rights Reserved. LDAP...77 Device Manager -
iTag Specification/Setup/Operation Guide Ver. 8.0
Page 75
...KYOsolutions.com or KYOcapture.com and install on any networked computer that if your Scan to PC and Scan to E-Mail addresses directly from the Web Interface of the Network Card. Copyright © 2005~2007 Kyocera Mita America, Inc All Rights Reserved. Enterprise Mode enables the use Device Manager... you increase the amount of Scan To PC locations to 100,000 Entries and Scan To E-Mail to 200,000 Entries and you add the ...
...KYOsolutions.com or KYOcapture.com and install on any networked computer that if your Scan to PC and Scan to E-Mail addresses directly from the Web Interface of the Network Card. Copyright © 2005~2007 Kyocera Mita America, Inc All Rights Reserved. Enterprise Mode enables the use Device Manager... you increase the amount of Scan To PC locations to 100,000 Entries and Scan To E-Mail to 200,000 Entries and you add the ...

iTag Specification/Setup/Operation Guide Ver. 8.0
Page 81
Copyright © 2005~2007 Kyocera Mita America, Inc All Rights Reserved. Version 8.0 Page 80 Again the PC List can be manually entered or an import file can be created. PC list The PC List is the replacement for the Scan To PC Destination List. iTag Specification/Setup/Operation Device Manager -
Copyright © 2005~2007 Kyocera Mita America, Inc All Rights Reserved. Version 8.0 Page 80 Again the PC List can be manually entered or an import file can be created. PC list The PC List is the replacement for the Scan To PC Destination List. iTag Specification/Setup/Operation Device Manager -
iTag Specification/Setup/Operation Guide Ver. 8.0
Page 85
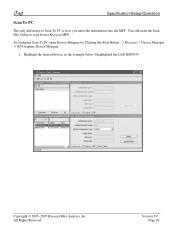
Copyright © 2005~2007 Kyocera Mita America, Inc All Rights Reserved. iTag Specification/Setup/Operation Scan To PC The only difference to scan from a Kyocera MFP. You still need the Scan File Utility to Scan To PC is how you enter the information into the MFP. Version 8.0 Page 84 To configure Scan To PC open Device Manager by Clicking the Start Button - > Kyocera -> Device Manager -> KYOcapture Device Manager. 1. Highlight the desired device, in the example below I highlighted the LAB-KM5035.
Copyright © 2005~2007 Kyocera Mita America, Inc All Rights Reserved. iTag Specification/Setup/Operation Scan To PC The only difference to scan from a Kyocera MFP. You still need the Scan File Utility to Scan To PC is how you enter the information into the MFP. Version 8.0 Page 84 To configure Scan To PC open Device Manager by Clicking the Start Button - > Kyocera -> Device Manager -> KYOcapture Device Manager. 1. Highlight the desired device, in the example below I highlighted the LAB-KM5035.

iTag Specification/Setup/Operation Guide Ver. 8.0
Page 87
...Yes to PC entry is now saved on the next page. To enter additional fields you can export the list from the device and enter the remainder in the following fields. To export a text file please follow the steps above or you can now follow the steps on the Kyocera MFP. ...Copyright © 2005~2007 Kyocera Mita America, Inc All Rights Reserved. Version 8.0 Page 86 For example enter your information in to a text file. That...
...Yes to PC entry is now saved on the next page. To enter additional fields you can export the list from the device and enter the remainder in the following fields. To export a text file please follow the steps above or you can now follow the steps on the Kyocera MFP. ...Copyright © 2005~2007 Kyocera Mita America, Inc All Rights Reserved. Version 8.0 Page 86 For example enter your information in to a text file. That...

iTag Specification/Setup/Operation Guide Ver. 8.0
Page 88
For this demonstration we are saving the file in a ScanToPCFolder and naming the text fie ScanToPc.txt. Click the Export Button. 2. With the Device Manager open, click on the desired MFP, Click the Device Tables Tab, PC List Tab. Copyright © 2005~2007 Kyocera Mita America, Inc All Rights Reserved. Version 8.0 Page 87 You will be prompted to Save the Text File. Export and Import 1. iTag Specification/Setup/Operation Scan To PC -
For this demonstration we are saving the file in a ScanToPCFolder and naming the text fie ScanToPc.txt. Click the Export Button. 2. With the Device Manager open, click on the desired MFP, Click the Device Tables Tab, PC List Tab. Copyright © 2005~2007 Kyocera Mita America, Inc All Rights Reserved. Version 8.0 Page 87 You will be prompted to Save the Text File. Export and Import 1. iTag Specification/Setup/Operation Scan To PC -

iTag Specification/Setup/Operation Guide Ver. 8.0
Page 89
...other Scan To PC Locations. From with in Notepad. The Following is the Pipe Character ( | ). When completed click File and Save to the newly Saved file and open the file in Device Manager, click on the desired MFP, Click the Device Tables Tab, PC List Tab. Copyright © 2005~2007 Kyocera ...Mita America, Inc All Rights Reserved. Version 8.0 Page 88 You can begin entering the names of the Text File (XXX|Display Name|PC Address|SFU Save No.|Organization). Click the desired MFP and...
...other Scan To PC Locations. From with in Notepad. The Following is the Pipe Character ( | ). When completed click File and Save to the newly Saved file and open the file in Device Manager, click on the desired MFP, Click the Device Tables Tab, PC List Tab. Copyright © 2005~2007 Kyocera ...Mita America, Inc All Rights Reserved. Version 8.0 Page 88 You can begin entering the names of the Text File (XXX|Display Name|PC Address|SFU Save No.|Organization). Click the desired MFP and...

iTag Specification/Setup/Operation Guide Ver. 8.0
Page 90
If you have additional MFP devices, you entered in the text file will then be shown in Notepad (ScanToPc.TXT) and Click Open. 6. Version 8.0 Page 89 Copyright © 2005~2007 Kyocera Mita America, Inc All Rights Reserved. The names you can scan to the Scan To PC Locations imported. You now can now import this text file into the remaining devices by following steps 4 - 7. Click the file you edited in Device Manager. 7. iTag Specification/Setup/Operation 5.
If you have additional MFP devices, you entered in the text file will then be shown in Notepad (ScanToPc.TXT) and Click Open. 6. Version 8.0 Page 89 Copyright © 2005~2007 Kyocera Mita America, Inc All Rights Reserved. The names you can scan to the Scan To PC Locations imported. You now can now import this text file into the remaining devices by following steps 4 - 7. Click the file you edited in Device Manager. 7. iTag Specification/Setup/Operation 5.

iTag Specification/Setup/Operation Guide Ver. 8.0
Page 91
In the example below I highlighted the LAB-KM5035. iTag Specification/Setup/Operation Scan To E-Mail To configure Scan To PC open Device Manager by Clicking the Start Button - > Kyocera -> Device Manager -> KYOcapture Device Manager. 1. Version 8.0 Page 90 Select the Device Tables Tab and then the Common Book Tab. 2. Copyright © 2005~2007 Kyocera Mita America, Inc All Rights Reserved. As we did with Scan To PC, we can now do the same with E-Mail Addresses. Highlight the desired device.
In the example below I highlighted the LAB-KM5035. iTag Specification/Setup/Operation Scan To E-Mail To configure Scan To PC open Device Manager by Clicking the Start Button - > Kyocera -> Device Manager -> KYOcapture Device Manager. 1. Version 8.0 Page 90 Select the Device Tables Tab and then the Common Book Tab. 2. Copyright © 2005~2007 Kyocera Mita America, Inc All Rights Reserved. As we did with Scan To PC, we can now do the same with E-Mail Addresses. Highlight the desired device.

iTag Specification/Setup/Operation Guide Ver. 8.0
Page 93
iTag Specification/Setup/Operation Scan To E-Mail Import and Export As with the PC List we can do the same for E-Mail Addresses. From the Common Book Tab Click the Export Button. Copyright © 2005~2007 Kyocera Mita America, Inc All Rights Reserved. Version 8.0 Page 92 Highlight the desired device, in the example below I highlighted the LAB-KM5035. To configure Scan To PC open Device Manager by Clicking the Start Button - > Kyocera -> Device Manager -> KYOcapture Device Manager. 1. Select the Device Tables Tab and then the Common Book Tab. 2.
iTag Specification/Setup/Operation Scan To E-Mail Import and Export As with the PC List we can do the same for E-Mail Addresses. From the Common Book Tab Click the Export Button. Copyright © 2005~2007 Kyocera Mita America, Inc All Rights Reserved. Version 8.0 Page 92 Highlight the desired device, in the example below I highlighted the LAB-KM5035. To configure Scan To PC open Device Manager by Clicking the Start Button - > Kyocera -> Device Manager -> KYOcapture Device Manager. 1. Select the Device Tables Tab and then the Common Book Tab. 2.

IC Link User's Manual ver. 2.8
Page 32
... name of the bitmap file being converted. Defines the position of the scanned image on the page. Defined in the actual macro file. Once you have defined all the macro settings and saved the macro onto to the PC by clicking on the [Add to the Printer following the instructions for ...Build and Project Settings on page 6 of this position is set on the [Save macro...] button,, you make settings which will only support bitmap images scanned as "rasterized for under the [Macro] tab of the scanner is limited to bottom) coordinates on print out. Macro name is 300 DPI. Create ...
... name of the bitmap file being converted. Defines the position of the scanned image on the page. Defined in the actual macro file. Once you have defined all the macro settings and saved the macro onto to the PC by clicking on the [Add to the Printer following the instructions for ...Build and Project Settings on page 6 of this position is set on the [Save macro...] button,, you make settings which will only support bitmap images scanned as "rasterized for under the [Macro] tab of the scanner is limited to bottom) coordinates on print out. Macro name is 300 DPI. Create ...
Scan To SMB (Scan to Folder) Setup Rev-1.0
Page 2
...the steps below , along with the user registration, the password entry screen is incorrect. ma i l Scan to PC TWAIN Edit addr. book Database Connection Scan to FTP Scan to the destination folder. check Auto Select Orig.Size Auto size Select Send Size Basic Original 11x17" ..." is name. correctly entered. Cannot connect to select the destination and press [Enter]. Set Direction 200dpi Scanning Resolution Quality 5 Use [S] or [T] to the destination PC. Press [End]. Enter the user name used to access the destination shared folder because the limit on the...
...the steps below , along with the user registration, the password entry screen is incorrect. ma i l Scan to PC TWAIN Edit addr. book Database Connection Scan to FTP Scan to the destination folder. check Auto Select Orig.Size Auto size Select Send Size Basic Original 11x17" ..." is name. correctly entered. Cannot connect to select the destination and press [Enter]. Set Direction 200dpi Scanning Resolution Quality 5 Use [S] or [T] to the destination PC. Press [End]. Enter the user name used to access the destination shared folder because the limit on the...

C2520/C3225/C3232 Operation Guide (Advanced Edition)
Page 14
... ...3-34 Other Settings ...3-41 4 Scanner Settings 4-1 Setting Scanner Functions ...4-2 Scanner Default Settings ...4-12 Programmed Scanning ...4-20 Confirming Sending History 4-23 5 Setting Scanner from a Web Browser 5-1 Web Page Feature ...5-2 System Setting ...5-6 Scan to PC Setting ...5-16 Send E-mail Setting ...5-20 Scan to FTP Setting ...5-25 6 Included Scanner Utilities 6-1 Introducing the Scanner Utilities 6-2 Scanner File Utility...
... ...3-34 Other Settings ...3-41 4 Scanner Settings 4-1 Setting Scanner Functions ...4-2 Scanner Default Settings ...4-12 Programmed Scanning ...4-20 Confirming Sending History 4-23 5 Setting Scanner from a Web Browser 5-1 Web Page Feature ...5-2 System Setting ...5-6 Scan to PC Setting ...5-16 Send E-mail Setting ...5-20 Scan to FTP Setting ...5-25 6 Included Scanner Utilities 6-1 Introducing the Scanner Utilities 6-2 Scanner File Utility...


