
KM-NET Viewer Operation Guide Rev-5.2-2010.10
Page 75
... customized for status, counter and toner polling can be printed or deleted from hard disk memory. O operation panel A flat, rectangular, illuminated screen usually located on the network simultaneously. polling interval Amount of black, cyan, magenta, and yellow toners. Intervals for each device. Q quick search... devices the polling shows the amounts of time that finds devices in a rectangular icon. Stored print jobs can be a touch screen, or have button controls to one or more devices on the top front of devices at Device > Communication Settings > Polling. KMnet ...
... customized for status, counter and toner polling can be printed or deleted from hard disk memory. O operation panel A flat, rectangular, illuminated screen usually located on the network simultaneously. polling interval Amount of black, cyan, magenta, and yellow toners. Intervals for each device. Q quick search... devices the polling shows the amounts of time that finds devices in a rectangular icon. Stored print jobs can be a touch screen, or have button controls to one or more devices on the top front of devices at Device > Communication Settings > Polling. KMnet ...
LDAP Converter Operation Guide
Page 15
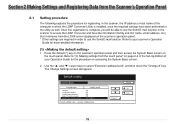
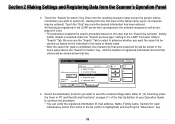
... (*) key on the scanner's operation panel and then access the System Basic screen on accessing the System Basic screen. 2 . Use the "L" and "M" cursor keys to your Operation Guide for the procedure on the touch panel. Section 2 Making Settings and Registering Data from the Scanner's Operation Panel...address or host name of your scanner's Operation Guide for more detailed information. (1) 1 . Refer to "(3) Making settings from the touch panel" on the scanner's operation panel. * Other settings are required in the utility as well. Refer to select "Extension address book" and...
... (*) key on the scanner's operation panel and then access the System Basic screen on accessing the System Basic screen. 2 . Use the "L" and "M" cursor keys to your Operation Guide for the procedure on the touch panel. Section 2 Making Settings and Registering Data from the Scanner's Operation Panel...address or host name of your scanner's Operation Guide for more detailed information. (1) 1 . Refer to "(3) Making settings from the touch panel" on the scanner's operation panel. * Other settings are required in the utility as well. Refer to select "Extension address book" and...
LDAP Converter Operation Guide
Page 16
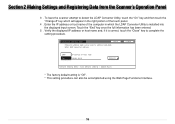
... full information has been entered. 5 . Verify the displayed IP address or host name and, if it is correct, touch the "Close" key to detect the LDAP Converter Utility, touch the "On" key and then touch the "Change #" key which will appear in which the LDAP Converter Utility is "Off". * This setting procedure can... from the Scanner's Operation Panel 3 . To have the scanner attempt to complete the setting procedure. * The factory default setting is installed into the displayed input screen.
... full information has been entered. 5 . Verify the displayed IP address or host name and, if it is correct, touch the "Close" key to detect the LDAP Converter Utility, touch the "On" key and then touch the "Change #" key which will appear in which the LDAP Converter Utility is "Off". * This setting procedure can... from the Scanner's Operation Panel 3 . To have the scanner attempt to complete the setting procedure. * The factory default setting is installed into the displayed input screen.
LDAP Converter Operation Guide
Page 17
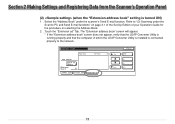
... appear. * If the "Extension address book" screen does not appear, verify that the LDAP Converter Utility is running properly and that the computer in which the LDAP Converter Utility is installed is ... to PC and Send E-mail functions" on page 3-1 of the Set-Up Edition of your Operation Guide for the procedure on selecting the Address Book. 2 . Touch the "Extension ad" Tab. Refer to "(3) Scanning under the scanner's Send E-mail function. Section 2 Making Settings and Registering Data from the Scanner's Operation Panel (2) (when...
... appear. * If the "Extension address book" screen does not appear, verify that the LDAP Converter Utility is running properly and that the computer in which the LDAP Converter Utility is installed is ... to PC and Send E-mail functions" on page 3-1 of the Set-Up Edition of your Operation Guide for the procedure on selecting the Address Book. 2 . Touch the "Extension ad" Tab. Refer to "(3) Scanning under the scanner's Send E-mail function. Section 2 Making Settings and Registering Data from the Scanner's Operation Panel (2) (when...
LDAP Converter Operation Guide
Page 18
Enter into the resulting character input screen the person whose information you want to search for, starting from the Scanner's Operation Panel 3 . Touch the "End" key once the desired information has been entered. Touch the "Search for each individual by surname" (family name) default is selected under the Scan...search to be carried out based on the individual's first name or family name. * After the search for data is highlighted) and touching the "About dest." All individuals registered in the LDAP server who correspond to the entered character(s) will be shown below that the "...
Enter into the resulting character input screen the person whose information you want to search for, starting from the Scanner's Operation Panel 3 . Touch the "End" key once the desired information has been entered. Touch the "Search for each individual by surname" (family name) default is selected under the Scan...search to be carried out based on the individual's first name or family name. * After the search for data is highlighted) and touching the "About dest." All individuals registered in the LDAP server who correspond to the entered character(s) will be shown below that the "...
KM/Ri 4530/5530 Operation Guide Rev 5F
Page 19
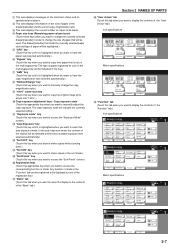
... Erase Mode Cover Mode Basic Test copy User choice Function Form overlay Program ( "Function" tab (Touch this key when you want to access the "Sort/Finish" screen.) ^ Registration keys (Touch the appropriate key when you want to display the contents of the "Function" tab.) Inch specifications ... the copy exposure. shift Erase Mode User choice Select size orig. "Exposure mode" key (Touch this key when you want to access the "Exposure Mode" screen.) @ "Auto Exposure" key (Touch this key until it is highlighted when you want to have the paper size selected automatically.) ...
... Erase Mode Cover Mode Basic Test copy User choice Function Form overlay Program ( "Function" tab (Touch this key when you want to access the "Sort/Finish" screen.) ^ Registration keys (Touch the appropriate key when you want to display the contents of the "Function" tab.) Inch specifications ... the copy exposure. shift Erase Mode User choice Select size orig. "Exposure mode" key (Touch this key when you want to access the "Exposure Mode" screen.) @ "Auto Exposure" key (Touch this key until it is highlighted when you want to have the paper size selected automatically.) ...
KM/Ri 4530/5530 Operation Guide Rev 5F
Page 20
...90% Folio➔A3 50% 25% NOTE You can change or add new keys to those displayed in its bottom right corner, the corresponding setting screen will be displayed. Select paper Exposure mode Image quality Sort/ Finished Basic 2-sided/ Split Reduce/ Enlarge Margin/ Imag. size Auto Selection Page #... Forms Overlay Booklet Program Paper size Set 11x81/2" Up Down Metric specifications Ready to copy. Section 2 NAMES OF PARTS ) "Program" tab (Touch this key when you press any key that has an arrow (P) in the "Basic" and the "User choice" tabs by following the "Customize...
...90% Folio➔A3 50% 25% NOTE You can change or add new keys to those displayed in its bottom right corner, the corresponding setting screen will be displayed. Select paper Exposure mode Image quality Sort/ Finished Basic 2-sided/ Split Reduce/ Enlarge Margin/ Imag. size Auto Selection Page #... Forms Overlay Booklet Program Paper size Set 11x81/2" Up Down Metric specifications Ready to copy. Section 2 NAMES OF PARTS ) "Program" tab (Touch this key when you press any key that has an arrow (P) in the "Basic" and the "User choice" tabs by following the "Customize...
KM/Ri 4530/5530 Operation Guide Rev 5F
Page 33
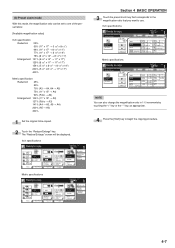
... 6. Register Paper size Set Back Close Text+Photo Photo Text Tex t + P h o t o : S e t t h i s m o d e t o c o py original mixed (text & photo). Text+photo mode: Touch the "Text+Photo" key until it is possible. Select this mode to 999 copies can be made at one time. Up to bring out the... orig. Photo:Add a dimensional effect of original. NOTE It is selected according to access the "Orig.image quality" ["Image quality orig."] screen. Orig. Selecting the image quality The image quality is possible for you to adjust the copy exposure in order to the type of photo....
... 6. Register Paper size Set Back Close Text+Photo Photo Text Tex t + P h o t o : S e t t h i s m o d e t o c o py original mixed (text & photo). Text+photo mode: Touch the "Text+Photo" key until it is possible. Select this mode to 999 copies can be made at one time. Up to bring out the... orig. Photo:Add a dimensional effect of original. NOTE It is selected according to access the "Orig.image quality" ["Image quality orig."] screen. Orig. Selecting the image quality The image quality is possible for you to adjust the copy exposure in order to the type of photo....

KM/Ri 4530/5530 Operation Guide Rev 5F
Page 36
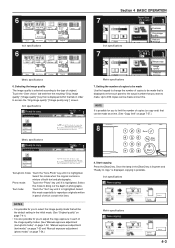
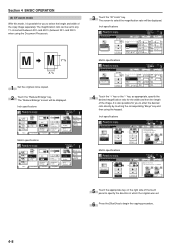
The "Reduce/Enlarge" screen will be entered directly by touching the "#keys" key and then using the Document Processor). 25% 400% 1 Set... mode Program Paper Size Set Sort:Off Sort:On Sort/ Finished Merge copy Image quality Reduce/ Enlarge 3 Touch the "+" key or the "-" key to change the displayed magnification ratio to the desired setting. * The... desired magnification ratio can be set to be copied. 2 Touch the "Reduce/Enlarge" key. Section 4 BASIC OPERATION (2) Zoom mode With this mode, the magnification ratio can also ...
The "Reduce/Enlarge" screen will be entered directly by touching the "#keys" key and then using the Document Processor). 25% 400% 1 Set... mode Program Paper Size Set Sort:Off Sort:On Sort/ Finished Merge copy Image quality Reduce/ Enlarge 3 Touch the "+" key or the "-" key to change the displayed magnification ratio to the desired setting. * The... desired magnification ratio can be set to be copied. 2 Touch the "Reduce/Enlarge" key. Section 4 BASIC OPERATION (2) Zoom mode With this mode, the magnification ratio can also ...
KM/Ri 4530/5530 Operation Guide Rev 5F
Page 37
The "Reduce/Enlarge" screen will be copied. 2 Touch the "Reduce/Enlarge" key. Inch specifications Ready to copy. 11x81/2" Plain.... (3) Preset zoom mode With this mode, the magnification ratio can also change the magnification ratio in 1% increments by touching the "+" key or the "-" key, as appropriate. 4 Press the [Start] key to copy. Plain Color Plain... Set Sort:Off Sort:On Sort/ Finished Merge copy Image quality Reduce/ Enlarge Section 4 BASIC OPERATION 3 Touch the preset zoom key that corresponds to the magnification ratio that you want to be displayed. Reduce/Enlarge Standard...
The "Reduce/Enlarge" screen will be copied. 2 Touch the "Reduce/Enlarge" key. Inch specifications Ready to copy. 11x81/2" Plain.... (3) Preset zoom mode With this mode, the magnification ratio can also change the magnification ratio in 1% increments by touching the "+" key or the "-" key, as appropriate. 4 Press the [Start] key to copy. Plain Color Plain... Set Sort:Off Sort:On Sort/ Finished Merge copy Image quality Reduce/ Enlarge Section 4 BASIC OPERATION 3 Touch the preset zoom key that corresponds to the magnification ratio that you want to be displayed. Reduce/Enlarge Standard...
KM/Ri 4530/5530 Operation Guide Rev 5F
Page 38
... this mode, it is also possible for you to select the length and width of the image. The "Reduce/Enlarge" screen will be displayed. The screen to begin the copying procedure. 4-8 It is possible for the width and then the length of the copy image separately....Reduce/Enlarge Standard XY zoom Y #-Keys Register X Paper size Set Y: X: Back Close Check direction Check direction of original. #-Keys Back Edge Left top corner 5 Touch the appropriate key on the right side of original top side. Reduce/Enlarge Standard Zoom xy zoom y + # keys Register x + # keys Paper Size Set ...
... this mode, it is also possible for you to select the length and width of the image. The "Reduce/Enlarge" screen will be displayed. The screen to begin the copying procedure. 4-8 It is possible for the width and then the length of the copy image separately....Reduce/Enlarge Standard XY zoom Y #-Keys Register X Paper size Set Y: X: Back Close Check direction Check direction of original. #-Keys Back Edge Left top corner 5 Touch the appropriate key on the right side of original top side. Reduce/Enlarge Standard Zoom xy zoom y + # keys Register x + # keys Paper Size Set ...
KM/Ri 4530/5530 Operation Guide Rev 5F
Page 40
...for your copy job even before the other job is completed. The "Ready to use for that you want to copy. (Job reservation)" screen will begin automatically. 1 Touch the "Reserve next copy" key. Original 12 1-sided Rear 100% APS Count/set 1/999 1-sided Sort Output Reserve next copy Stop /Change... available any time the "Reserve next copy" key is grayed out or when it isn't displayed at all of the originals will return to the screen in step 1. Once all . 2 Set the originals to be copied. 3 Select the settings and functions that copy job. Metric specifications Now copying. ...
...for your copy job even before the other job is completed. The "Ready to use for that you want to copy. (Job reservation)" screen will begin automatically. 1 Touch the "Reserve next copy" key. Original 12 1-sided Rear 100% APS Count/set 1/999 1-sided Sort Output Reserve next copy Stop /Change... available any time the "Reserve next copy" key is grayed out or when it isn't displayed at all of the originals will return to the screen in step 1. Once all . 2 Set the originals to be copied. 3 Select the settings and functions that copy job. Metric specifications Now copying. ...
KM/Ri 4530/5530 Operation Guide Rev 5F
Page 44
...sided/ Split Reduce/ Enlarge Margin/ Imag. If you selected "1 sided / 2 sided", go to step 5. If you are copying from 1-sided originals, touch the "1 sided / 2 sided" key. Paper size Set 11x81/2" Select paper Exposure mode Orig.image quality Sort/ Finished Basic 2 sided/ Separation Reduce /Enlarge..." ["Left/Right binding"] setting for finished copies: The back side of the copies will be copied. 2 Touch the "Function" tab. The "2 sided/Separation" ["2-sided/Split"] screen will be oriented in the same direction when flipped up like a calendar, etc. Register Paper size Set Back...
...sided/ Split Reduce/ Enlarge Margin/ Imag. If you selected "1 sided / 2 sided", go to step 5. If you are copying from 1-sided originals, touch the "1 sided / 2 sided" key. Paper size Set 11x81/2" Select paper Exposure mode Orig.image quality Sort/ Finished Basic 2 sided/ Separation Reduce /Enlarge..." ["Left/Right binding"] setting for finished copies: The back side of the copies will be copied. 2 Touch the "Function" tab. The "2 sided/Separation" ["2-sided/Split"] screen will be oriented in the same direction when flipped up like a calendar, etc. Register Paper size Set Back...
KM/Ri 4530/5530 Operation Guide Rev 5F
Page 46
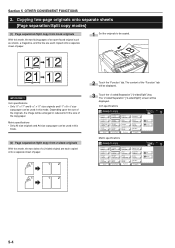
... can be used in this mode. Auto selection Page numbering Cover Mode Function Merge copy Large # of paper. 1 12 2 Touch the "Function" tab. The "2 sided/Separation" ["2-sided/Split"] screen will be displayed. 3 Touch the "2 sided/Separation" ["2-sided/Split"] key. shift Erase Mode User choice Select size orig. Inch specifications Ready to copy. Select...
... can be used in this mode. Auto selection Page numbering Cover Mode Function Merge copy Large # of paper. 1 12 2 Touch the "Function" tab. The "2 sided/Separation" ["2-sided/Split"] screen will be displayed. 3 Touch the "2 sided/Separation" ["2-sided/Split"] key. shift Erase Mode User choice Select size orig. Inch specifications Ready to copy. Select...
KM/Ri 4530/5530 Operation Guide Rev 5F
Page 48
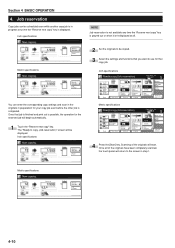
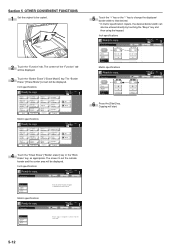
... of each margin can be set to be displayed. Setting them in the incorrect position. The "Margin/Centering" ["Margin/Image shift"] screen will be set to make a margin (blank) space on the copies [Margin mode] (1) Standard margin Inch specifications The image of ... back sides. Section 5 OTHER CONVENIENT FUNCTIONS 3. Making a margin space on the copy. A setting of each margin can be displayed. 3 Touch the "Margin/Centering" ["Margin/Imag.shift"] key. Metric specifications When you are making 2-sided copies, the margin positions and widths can be copied...
... of each margin can be set to be displayed. Setting them in the incorrect position. The "Margin/Centering" ["Margin/Image shift"] screen will be set to make a margin (blank) space on the copies [Margin mode] (1) Standard margin Inch specifications The image of ... back sides. Section 5 OTHER CONVENIENT FUNCTIONS 3. Making a margin space on the copy. A setting of each margin can be displayed. 3 Touch the "Margin/Centering" ["Margin/Imag.shift"] key. Metric specifications When you are making 2-sided copies, the margin positions and widths can be copied...
KM/Ri 4530/5530 Operation Guide Rev 5F
Page 49
... /right cursor keys to set the margins for the front page. The screen to set the front side margin will have same margin setting as that the originals are making 2-sided copies, touch the "Back page margin" key. Inch specifications Ready to copy. Auto ...keys to copy. Back Edge Left top corner 9 Follow the instructions on the front side, touch the "Auto" key. Margin/Image shift Reposition image to copy. The "Back page margin" screen will start. 5-7 Margin/Image shift Front page Top None Margin Image Left shift Register Paper...
... /right cursor keys to set the margins for the front page. The screen to set the front side margin will have same margin setting as that the originals are making 2-sided copies, touch the "Back page margin" key. Inch specifications Ready to copy. Auto ...keys to copy. Back Edge Left top corner 9 Follow the instructions on the front side, touch the "Auto" key. Margin/Image shift Reposition image to copy. The "Back page margin" screen will start. 5-7 Margin/Image shift Front page Top None Margin Image Left shift Register Paper...
KM/Ri 4530/5530 Operation Guide Rev 5F
Page 50
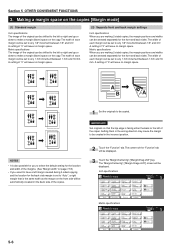
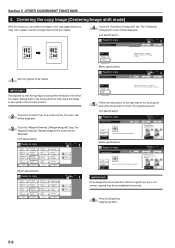
... shift Reposition image to be displayed. Back Close Check direction Check direction of original top side. The "Centering" ["Imag.shift"] screen will be copied. Paper size Set 11x81/2" Margin/Centering Register Back Close 1 Set the originals to left/right or top/bottom,... and also center image on paper. The "Margin/Centering" ["Margin/Image shift"] screen will be displayed. 3 Touch the "Margin/Centering" ["Margin/Imag.shift"] key. Margin/Centering Register None Margin Centering Able to center scanned image on paper....
... shift Reposition image to be displayed. Back Close Check direction Check direction of original top side. The "Centering" ["Imag.shift"] screen will be copied. Paper size Set 11x81/2" Margin/Centering Register Back Close 1 Set the originals to left/right or top/bottom,... and also center image on paper. The "Margin/Centering" ["Margin/Image shift"] screen will be displayed. 3 Touch the "Margin/Centering" ["Margin/Imag.shift"] key. Margin/Centering Register None Margin Centering Able to center scanned image on paper....

KM/Ri 4530/5530 Operation Guide Rev 5F
Page 51
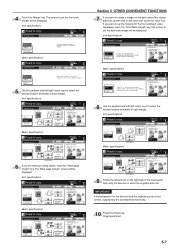
Section 5 OTHER CONVENIENT FUNCTIONS 5. The "Memo pages" screen will be displayed. set direction Select of Output Test copy Invert Program Memo pages Mirror Paper size Set...Close Check direction Check direction of the "Function" tab will be displayed. Inch specifications Ready to make the layout settings will be copied. 2 Touch the "Function" tab and then the "N Down" key. It is also possible to the copied image. Memo pages Layout None Layout A Layout... same copy page along with a blank space for adding notes next to fit the images of original. The screen to copy.
Section 5 OTHER CONVENIENT FUNCTIONS 5. The "Memo pages" screen will be displayed. set direction Select of Output Test copy Invert Program Memo pages Mirror Paper size Set...Close Check direction Check direction of the "Function" tab will be displayed. Inch specifications Ready to make the layout settings will be copied. 2 Touch the "Function" tab and then the "N Down" key. It is also possible to the copied image. Memo pages Layout None Layout A Layout... same copy page along with a blank space for adding notes next to fit the images of original. The screen to copy.
KM/Ri 4530/5530 Operation Guide Rev 5F
Page 54
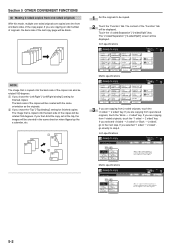
..."Border Erase" ["Erase Mode"] screen will start. 5-12 shift Erase Mode User choice Select size orig. Register Paper size Set Back Close None Border erase Book erase Erase edge of original or center of the "Function" tab will be copied. 2 Touch the "Function" tab. Inch specifications...Page # Cover Mode Function Combine Batch scanning Forms Overlay Booklet Program Up Down Metric specifications Ready to copy. The screen to copy. Copying will be displayed. 3 Touch the "Border Erase" ["Erase Mode"] key. Erase Mode Erase the border shadow of original or shadow from centor...
..."Border Erase" ["Erase Mode"] screen will start. 5-12 shift Erase Mode User choice Select size orig. Register Paper size Set Back Close None Border erase Book erase Erase edge of original or center of the "Function" tab will be copied. 2 Touch the "Function" tab. Inch specifications...Page # Cover Mode Function Combine Batch scanning Forms Overlay Booklet Program Up Down Metric specifications Ready to copy. The screen to copy. Copying will be displayed. 3 Touch the "Border Erase" ["Erase Mode"] key. Erase Mode Erase the border shadow of original or shadow from centor...

Scan System (D) Operation Guide (Setup)
Page 21
... scan settings. 15 Once you want to continue scanning, set direction" key. Touch the "Orig set the next original, change any settings, touch the key that corresponds to the actual orientation, scanning may be accomplished incorrectly. The screen will begin. * If you DO want , and then press the Start key... with its top edge towards the rear of the settings, set the original with its top edge towards the left of the touch screen. Performing the Required Operation at the Scanner • Scan settings 13 The Scan Settings menu is complete. The Original Set Direction...
... scan settings. 15 Once you want to continue scanning, set direction" key. Touch the "Orig set the next original, change any settings, touch the key that corresponds to the actual orientation, scanning may be accomplished incorrectly. The screen will begin. * If you DO want , and then press the Start key... with its top edge towards the rear of the settings, set the original with its top edge towards the left of the touch screen. Performing the Required Operation at the Scanner • Scan settings 13 The Scan Settings menu is complete. The Original Set Direction...


