
Scan System (D) Operation Guide (Setup)
Page 9
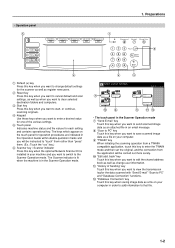
...start, or continue, scanning originals. 4 Keypad Use these keys when you want to save scanned image data as an attached file in order to add information to the Scanner Operation mode. The Scanner indicator is lit when the machine is installed in your computer in an email message. 8 "...Scan to PC" key Touch this key when you want to switch to that file. 1-2 • Operation panel 1. book" key Touch this key when you want to edit the shared address book as well as change default settings for each setting, and contains ...
...start, or continue, scanning originals. 4 Keypad Use these keys when you want to save scanned image data as an attached file in order to add information to the Scanner Operation mode. The Scanner indicator is lit when the machine is installed in your computer in an email message. 8 "...Scan to PC" key Touch this key when you want to switch to that file. 1-2 • Operation panel 1. book" key Touch this key when you want to edit the shared address book as well as change default settings for each setting, and contains ...

Scan System (D) Operation Guide (Setup)
Page 14
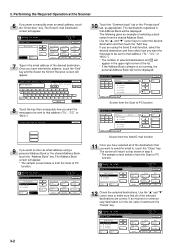
...Scanner Function screen. 13 Select the shared Address Book that you want to a previously registered group, touch the "Register new group" key. If you want to delete a registered destination, use the "L" and "M" cursor keys to select the name of destinations, or add a destination to edit the information for...the destination that you want to delete and then touch the "Delete" key. * The sample screen below is possible from the Scan to PC function. 15 Destination registration Use the "L" and "M" cursor keys to select the setting that are registering a new destination, go to step ...
...Scanner Function screen. 13 Select the shared Address Book that you want to a previously registered group, touch the "Register new group" key. If you want to delete a registered destination, use the "L" and "M" cursor keys to select the name of destinations, or add a destination to edit the information for...the destination that you want to delete and then touch the "Delete" key. * The sample screen below is possible from the Scan to PC function. 15 Destination registration Use the "L" and "M" cursor keys to select the setting that are registering a new destination, go to step ...

Scan System (D) Operation Guide (Setup)
Page 15
... and then touch the "Change #" key. When you use the Scan to PC function, the image data will be available for the folder that message, this button when you want to add a destination from the shared Address Book to a selected group. Add dest When registering groups, click on Reply in that group will be sent...
... and then touch the "Change #" key. When you use the Scan to PC function, the image data will be available for the folder that message, this button when you want to add a destination from the shared Address Book to a selected group. Add dest When registering groups, click on Reply in that group will be sent...
Scan System (D) Operation Guide (Setup)
Page 20
...The screen will be sent to PC function. 12 Check the selected destinations. key. Once you have selected all of the destinations that Address Book will return to PC function. The Address Book screen will appear. 10 Touch the "Common book" tab or the "Private book" tab, as appropriate. Screen ...The sample screen below is not running, the personal Address Book will appear. 7 Type in the list, select it and touch the "Delete" key. 3-2 Use the "L" and "M" cursor keys to select the desired destination and then touch the "Add" key. The Enter E-mail Destination screen will ...
...The screen will be sent to PC function. 12 Check the selected destinations. key. Once you have selected all of the destinations that Address Book will return to PC function. The Address Book screen will appear. 10 Touch the "Common book" tab or the "Private book" tab, as appropriate. Screen ...The sample screen below is not running, the personal Address Book will appear. 7 Type in the list, select it and touch the "Delete" key. 3-2 Use the "L" and "M" cursor keys to select the desired destination and then touch the "Add" key. The Enter E-mail Destination screen will ...
Scan System D Operation Guide (Functions)
Page 126
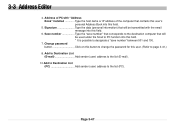
... Type the data (personal information) that contains this user's personal Address Book into this field. 5. Page 3-47 Address of PC with the email message into this field. 6. Add to Destination List (E-mail Add sender (user) address to the list (E-mail). 10.Add to Destination List (PC Add sender (user) address to page 3-41.) 8. Change password button Click on this button to...
... Type the data (personal information) that contains this user's personal Address Book into this field. 5. Page 3-47 Address of PC with the email message into this field. 6. Add to Destination List (E-mail Add sender (user) address to the list (E-mail). 10.Add to Destination List (PC Add sender (user) address to page 3-41.) 8. Change password button Click on this button to...
Scan System D Operation Guide (Functions)
Page 167
... group, click on the Change Password button. the Editing member (PC) Dialogue Box will be saved. It is possible to page 3-90.) 7. The Change Password Dialogue Box will be displayed once again. 9. To add a new destination to page 3-89.) 5. 3-4 Address Book 2. Type in the Address Book Dialogue Box and the changes to the Destination List will...
... group, click on the Change Password button. the Editing member (PC) Dialogue Box will be saved. It is possible to page 3-90.) 7. The Change Password Dialogue Box will be displayed once again. 9. To add a new destination to page 3-89.) 5. 3-4 Address Book 2. Type in the Address Book Dialogue Box and the changes to the Destination List will...
Scan System D Operation Guide (Functions)
Page 169
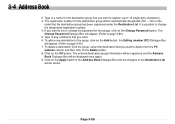
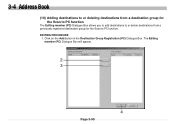
EDITING PROCEDURE 1. The Editing member (PC) Dialogue Box will appear. 2 3 4 Page 3-90 3-4 Address Book (10) Adding destinations to or deleting destinations from a destination group for the Scan to PC function The Editing member (PC) Dialogue Box allows you to add destinations to or delete destinations from a previously registered destination group for the Scan to PC function. Click on the Add button in the Destination Group Registration (PC) Dialogue Box.
EDITING PROCEDURE 1. The Editing member (PC) Dialogue Box will appear. 2 3 4 Page 3-90 3-4 Address Book (10) Adding destinations to or deleting destinations from a destination group for the Scan to PC function The Editing member (PC) Dialogue Box allows you to add destinations to or delete destinations from a previously registered destination group for the Scan to PC function. Click on the Add button in the Destination Group Registration (PC) Dialogue Box.
Scan System D Operation Guide (Functions)
Page 170
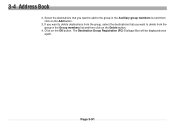
Select the destinations that you want to the group in the Group members list and then click on the OK button. Click on the Delete button. 4. If you want to delete destinations from the group, select the destinations that you want to add to delete from the group in the Auxiliary group members list and then click on the Add button. 3. Page 3-91 The Destination Group Registration (PC) Dialogue Box will be displayed once again. 3-4 Address Book 2.
Select the destinations that you want to the group in the Group members list and then click on the OK button. Click on the Delete button. 4. If you want to delete destinations from the group, select the destinations that you want to add to delete from the group in the Auxiliary group members list and then click on the Add button. 3. Page 3-91 The Destination Group Registration (PC) Dialogue Box will be displayed once again. 3-4 Address Book 2.


