
KM-NET Viewer Operation Guide Rev-5.2-2010.10
Page 75
...log) and the device condition for continually checking and requesting information from hard disk memory, and a job list can be a touch screen, or have button controls to the agent. An event is offline or device has a paper jam. If the toner is ...pop-up to the application. N notifications Notifications can be established for transferring e-mail messages. O operation panel A flat, rectangular, illuminated screen usually located on the network simultaneously. SNMP trap community This community name string functions as a paper jam. KMnet Viewer vi The panel...
...log) and the device condition for continually checking and requesting information from hard disk memory, and a job list can be a touch screen, or have button controls to the agent. An event is offline or device has a paper jam. If the toner is ...pop-up to the application. N notifications Notifications can be established for transferring e-mail messages. O operation panel A flat, rectangular, illuminated screen usually located on the network simultaneously. SNMP trap community This community name string functions as a paper jam. KMnet Viewer vi The panel...
Kyocera Command Center Operation Guide Rev 6.3
Page 16
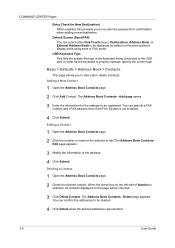
.... In order for confirmation when adding a new destination. When the check box on the left side of the address. 4 Click Submit. Default Screen (Send/FAX) You can confirm the addresses to be displayed by default on the page will be registered. Add page opens. 3 Enter the ...information for the address to be checked. 3 Click Delete Contact. You can select either One Touch (keys), Destinations, Address Book, or External Address Book to be deleted. 4 Click Delete when the desired addresses are selected. 3-9 User Guide The...
.... In order for confirmation when adding a new destination. When the check box on the left side of the address. 4 Click Submit. Default Screen (Send/FAX) You can confirm the addresses to be displayed by default on the page will be registered. Add page opens. 3 Enter the ...information for the address to be checked. 3 Click Delete Contact. You can select either One Touch (keys), Destinations, Address Book, or External Address Book to be deleted. 4 Click Delete when the desired addresses are selected. 3-9 User Guide The...

iTag Specification/Setup/Operation Guide Ver. 8.0
Page 6
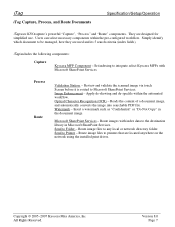
... KKYYOOccaappttuurree ttoo iinntteeggrraattee wwiitthh ootthheerr ssyysstteemmss:: -- IInntteeggrraattee wwiitthh ccoommppaannyy''ss ccoorree bbuussiinneessss aapppplliiccaattiioonnss Copyright © 2005~2007 Kyocera Mita America, Inc All Rights Reserved. iTag Validation Station Software c. Next Business Day Hardware Parts and Labor On... Server 2003 R2 Standard Edition, Includes 15 Client Access Licenses 6. 48x CDRW/DVD IDE Combo Drive 7. 15 inch Wire Resistive Touch Screen 8. Dell Power Edge Server 840, Dual Core 3050 Processor, 2MB 2.13GHz, Xeon, 1066MHz, Front Side Bus 2. 2GB DDR2...
... KKYYOOccaappttuurree ttoo iinntteeggrraattee wwiitthh ootthheerr ssyysstteemmss:: -- IInntteeggrraattee wwiitthh ccoommppaannyy''ss ccoorree bbuussiinneessss aapppplliiccaattiioonnss Copyright © 2005~2007 Kyocera Mita America, Inc All Rights Reserved. iTag Validation Station Software c. Next Business Day Hardware Parts and Labor On... Server 2003 R2 Standard Edition, Includes 15 Client Access Licenses 6. 48x CDRW/DVD IDE Combo Drive 7. 15 inch Wire Resistive Touch Screen 8. Dell Power Edge Server 840, Dual Core 3050 Processor, 2MB 2.13GHz, Xeon, 1066MHz, Front Side Bus 2. 2GB DDR2...
iTag Specification/Setup/Operation Guide Ver. 8.0
Page 8
..." components. Review and validate the scanned image via touch Screen before it is routed to Printer - They are located anywhere on the network using the installed print driver. iTag includes the following components: Capture Kyocera MFP Component - Reads the content of a document image...pre-configured workflow. Route images with Microsoft SharePoint Services. Copyright © 2005~2007 Kyocera Mita America, Inc All Rights Reserved. Set indexing to integrate select Kyocera MFPs with index data to the destination library in the document image. Image Enhancement...
..." components. Review and validate the scanned image via touch Screen before it is routed to Printer - They are located anywhere on the network using the installed print driver. iTag includes the following components: Capture Kyocera MFP Component - Reads the content of a document image...pre-configured workflow. Route images with Microsoft SharePoint Services. Copyright © 2005~2007 Kyocera Mita America, Inc All Rights Reserved. Set indexing to integrate select Kyocera MFPs with index data to the destination library in the document image. Image Enhancement...

iTag Specification/Setup/Operation Guide Ver. 8.0
Page 28
If this component is designed to twelve (12) TIFF files scanned from the MFP. iTag Specification/Setup/Operation iTag Validation Station The Validation Station interface is checked (enabled) in the Document Workflow Component Screen, a window will display a view of up to work with both a regular computer interface and the touch screen interface. Copyright © 2005~2007 Kyocera Mita America, Inc All Rights Reserved. Version 8.0 Page 27
If this component is designed to twelve (12) TIFF files scanned from the MFP. iTag Specification/Setup/Operation iTag Validation Station The Validation Station interface is checked (enabled) in the Document Workflow Component Screen, a window will display a view of up to work with both a regular computer interface and the touch screen interface. Copyright © 2005~2007 Kyocera Mita America, Inc All Rights Reserved. Version 8.0 Page 27

Network Fax Online Manual (Revision)
Page 103
... to import FED-formatted dialing data as well as address data that has been created with other applications. The Dial Registration window will appear. (This screen-shot shows the selection of the imported contents. If you selected a FED file, the All dials will appear. dialogue box will be imported list and... the Address Book for Network FAX (FDT format) • Files saved by the Address Editor for FAX window. Are you selected a CSV file, the One-Touch Dial Import dialogue box will appear.
... to import FED-formatted dialing data as well as address data that has been created with other applications. The Dial Registration window will appear. (This screen-shot shows the selection of the imported contents. If you selected a FED file, the All dials will appear. dialogue box will be imported list and... the Address Book for Network FAX (FDT format) • Files saved by the Address Editor for FAX window. Are you selected a CSV file, the One-Touch Dial Import dialogue box will appear.

3035/4035/5035 Operation Guide Rev-6.0
Page 26
...when you want to have the paper size selected automatically. See page 4-2.) 8 "Exposure mode" key (Touch this key when you want to access the "Exposure Mode" screen.) 9 "Auto Exposure" key (Touch this key until it is set on the size of paper in order to access the corresponding function ...Ready to copy. The type of paper registered for use on your copier.) 5 "APS" key (Touch this tab when you want to return the display to access the "Sort/Finish" screen. The copy exposure scale will be detected and the most suitable exposure level selected automatically. Image quality ...
...when you want to have the paper size selected automatically. See page 4-2.) 8 "Exposure mode" key (Touch this key when you want to access the "Exposure Mode" screen.) 9 "Auto Exposure" key (Touch this key until it is set on the size of paper in order to access the corresponding function ...Ready to copy. The type of paper registered for use on your copier.) 5 "APS" key (Touch this tab when you want to return the display to access the "Sort/Finish" screen. The copy exposure scale will be detected and the most suitable exposure level selected automatically. Image quality ...

3035/4035/5035 Operation Guide Rev-6.0
Page 27
... want to return the settings for the currently selected mode back to their previous values.) "Close" key (Touch this key when you want to return to the previous screen.) Inch specifications Ready to copy. Reduce/Enlarge Standard Zoom XY Zoom (25~400) 100 % #-Keys AMS...4➔B 5 Section 2 NAMES OF PARTS NOTE You can change or add new keys to those displayed in its bottom right corner, the corresponding setting screen will be displayed. Paper size Set 11x81/2" Select paper Exposure mode Orig.image quality Sort/ Finished Basic 2 sided/ Separation Reduce /Enlarge Margin/ Centering ...
... want to return the settings for the currently selected mode back to their previous values.) "Close" key (Touch this key when you want to return to the previous screen.) Inch specifications Ready to copy. Reduce/Enlarge Standard Zoom XY Zoom (25~400) 100 % #-Keys AMS...4➔B 5 Section 2 NAMES OF PARTS NOTE You can change or add new keys to those displayed in its bottom right corner, the corresponding setting screen will be displayed. Paper size Set 11x81/2" Select paper Exposure mode Orig.image quality Sort/ Finished Basic 2 sided/ Separation Reduce /Enlarge Margin/ Centering ...

3035/4035/5035 Operation Guide Rev-6.0
Page 31
...]. 5 Set the supplied paper size sheet so that the size of the paper loaded can select to have the "Bypass setting" screen (see page 7-86) displayed whenever the "Bypass" key is touched. (See "Multi-bypass tray setting display ON/OFF" on page 7-45.) IMPORTANT! • When you are : • Transparencies: 25 sheets...
...]. 5 Set the supplied paper size sheet so that the size of the paper loaded can select to have the "Bypass setting" screen (see page 7-86) displayed whenever the "Bypass" key is touched. (See "Multi-bypass tray setting display ON/OFF" on page 7-45.) IMPORTANT! • When you are : • Transparencies: 25 sheets...

3035/4035/5035 Operation Guide Rev-6.0
Page 34
...the most suitable exposure level selected automatically. * It is also possible for you to adjust the copy exposure by touching the "Exposure Mode" key to access the "Exposure Mode" screen. Inch specifications Ready to copy. If you to change the default setting for you to specify one drawer[cassette]... onto a different size of paper without changing the size of paper loaded in this screen using the same methods as the original will be automatically selected. If you want to make the exposure lighter, touch the left . NOTES • You can then be performed in that you want ...
...the most suitable exposure level selected automatically. * It is also possible for you to adjust the copy exposure by touching the "Exposure Mode" key to access the "Exposure Mode" screen. Inch specifications Ready to copy. If you to change the default setting for you to specify one drawer[cassette]... onto a different size of paper without changing the size of paper loaded in this screen using the same methods as the original will be automatically selected. If you want to make the exposure lighter, touch the left . NOTES • You can then be performed in that you want ...

3035/4035/5035 Operation Guide Rev-6.0
Page 35
...Photo Photo Text Metric specifications Ready to access the "Orig.image quality" ["Image quality orig."] screen. Select paper Exposure mode Orig.image quality Sort/ Finished Basic 2 sided/ Separation Reduce /... o r i g . Register Paper size Set Back Close 8 Text+Photo Photo Text Tex t + P h o t o : S e t t h i s m o d e t o c o py original mixed (text & photo). Tex t : C o py p e n c i l & f i n e l i n e c l e a r l y. Text+photo mode: Touch the "Text+Photo" key until it is lit green and "Ready to bring out the depth in the [Start] key is highlighted. Once the lamp...
...Photo Photo Text Metric specifications Ready to access the "Orig.image quality" ["Image quality orig."] screen. Select paper Exposure mode Orig.image quality Sort/ Finished Basic 2 sided/ Separation Reduce /... o r i g . Register Paper size Set Back Close 8 Text+Photo Photo Text Tex t + P h o t o : S e t t h i s m o d e t o c o py original mixed (text & photo). Tex t : C o py p e n c i l & f i n e l i n e c l e a r l y. Text+photo mode: Touch the "Text+Photo" key until it is lit green and "Ready to bring out the depth in the [Start] key is highlighted. Once the lamp...

3035/4035/5035 Operation Guide Rev-6.0
Page 38
The "Reduce/Enlarge" screen will be displayed. Reduce/Enlarge Standard Zoom XY Zoom (25~400) 100 % #-Keys AMS 100% 400% 200% Register Paper... Size Set Sort:Off Sort:On Sort/ Finished Merge copy Image quality Reduce/ Enlarge 3 Touch the "+" key or the "-" key to change the displayed magnification ratio to be copied. 2 Touch the "Reduce/Enlarge" key. Section 4 BASIC OPERATION (2) Zoom mode With this mode, ...% 1 Set the original to the desired setting. * The desired magnification ratio can also be entered directly by touching the "# keys" ["#-Keys"] key and then using the keypad.
The "Reduce/Enlarge" screen will be displayed. Reduce/Enlarge Standard Zoom XY Zoom (25~400) 100 % #-Keys AMS 100% 400% 200% Register Paper... Size Set Sort:Off Sort:On Sort/ Finished Merge copy Image quality Reduce/ Enlarge 3 Touch the "+" key or the "-" key to change the displayed magnification ratio to be copied. 2 Touch the "Reduce/Enlarge" key. Section 4 BASIC OPERATION (2) Zoom mode With this mode, ...% 1 Set the original to the desired setting. * The desired magnification ratio can also be entered directly by touching the "# keys" ["#-Keys"] key and then using the keypad.

3035/4035/5035 Operation Guide Rev-6.0
Page 39
... Ready to use. (3) Preset zoom mode With this mode, the magnification ratio can also change the magnification ratio in 1% increments by touching the "+" key or the "-" key, as appropriate. 4 Press the [Start] key to begin the copying procedure. 4-7 Paper Size..."➔A 4 70% A 3➔A 4 A 4➔A 5 50% 25% Metric specifications (Asia Pacific) Ready to copy. The "Reduce/Enlarge" screen will be copied. 2 Touch the "Reduce/Enlarge" key. Reduce/Enlarge Standard Zoom XY Zoom (25~400) 100 % # keys Register Paper size Set 11x81/2" 100% Back Close AMS...
... Ready to use. (3) Preset zoom mode With this mode, the magnification ratio can also change the magnification ratio in 1% increments by touching the "+" key or the "-" key, as appropriate. 4 Press the [Start] key to begin the copying procedure. 4-7 Paper Size..."➔A 4 70% A 3➔A 4 A 4➔A 5 50% 25% Metric specifications (Asia Pacific) Ready to copy. The "Reduce/Enlarge" screen will be copied. 2 Touch the "Reduce/Enlarge" key. Reduce/Enlarge Standard Zoom XY Zoom (25~400) 100 % # keys Register Paper size Set 11x81/2" 100% Back Close AMS...

3035/4035/5035 Operation Guide Rev-6.0
Page 40
...between 25% and 400%. The "Reduce/Enlarge" screen will be copied. 2 Touch the "Reduce/Enlarge" key. Rear Left top corner Metric specifications Ready to begin the copying procedure. 4-8 The screen to copy. Reduce/Enlarge Standard Zoom XY Zoom...10132;B 4 A 4➔B 4 A 5➔B 5 B 4➔A 3 B 5➔A 4 A 3➔B 4 A 4➔B 5 81% 70% 50% 25% B 4➔A 4 B 5➔A 5 A 3➔A 4 B 4➔B 5 4 Touch the "+" key or the "-" key, as appropriate, specify the desired magnification ratio for the width and then the length of original top side. Inch specifications...
...between 25% and 400%. The "Reduce/Enlarge" screen will be copied. 2 Touch the "Reduce/Enlarge" key. Rear Left top corner Metric specifications Ready to begin the copying procedure. 4-8 The screen to copy. Reduce/Enlarge Standard Zoom XY Zoom...10132;B 4 A 4➔B 4 A 5➔B 5 B 4➔A 3 B 5➔A 4 A 3➔B 4 A 4➔B 5 81% 70% 50% 25% B 4➔A 4 B 5➔A 5 A 3➔A 4 B 4➔B 5 4 Touch the "+" key or the "-" key, as appropriate, specify the desired magnification ratio for the width and then the length of original top side. Inch specifications...

3035/4035/5035 Operation Guide Rev-6.0
Page 42
The "Ready to the screen in progress any time the "Reserve next copy" key is completed. Original 12 1-sided R top / rear 100% APS Count/set 1/999 1-sided Sort Output Inner tray Reserve next copy Stop /Change 1 Touch the "Reserve next copy" key. Memory usage 30% ...Orig. Inch specifications Now copying. Scanning of the originals have been completely scanned, the touch panel will return to copy. (Job reservation)" screen will start. page 12 11x81/2" 1 sided Rear 100% APS Count/Set 1/999 11x81/2" 1 sided Sort Output Inner...
The "Ready to the screen in progress any time the "Reserve next copy" key is completed. Original 12 1-sided R top / rear 100% APS Count/set 1/999 1-sided Sort Output Inner tray Reserve next copy Stop /Change 1 Touch the "Reserve next copy" key. Memory usage 30% ...Orig. Inch specifications Now copying. Scanning of the originals have been completely scanned, the touch panel will return to copy. (Job reservation)" screen will start. page 12 11x81/2" 1 sided Rear 100% APS Count/Set 1/999 11x81/2" 1 sided Sort Output Inner...

3035/4035/5035 Operation Guide Rev-6.0
Page 46
... "2 sided / 2 sided" ["2-sided / 2-sided"] or "Book / 2 sided" ["Book / 2-sided"], go directly to copy. The "2 sided/Separation" ["2-sided/Split"] screen will be rotated 180 degrees. Select paper Exposure mode Image quality Sort/ Finished Basic 2-sided/ Split Reduce/ Enlarge Margin/ Imag. Inch specifications Ready to copy...(3) Making 2-sided copies from one-sided originals With this mode, multiple one-sided originals are copying from 2-sided originals, touch the "2 sided / 2 sided" ["2-sided / 2-sided"] key. If you then bind the copy set at the top, the images will be...
... "2 sided / 2 sided" ["2-sided / 2-sided"] or "Book / 2 sided" ["Book / 2-sided"], go directly to copy. The "2 sided/Separation" ["2-sided/Split"] screen will be rotated 180 degrees. Select paper Exposure mode Image quality Sort/ Finished Basic 2-sided/ Split Reduce/ Enlarge Margin/ Imag. Inch specifications Ready to copy...(3) Making 2-sided copies from one-sided originals With this mode, multiple one-sided originals are copying from 2-sided originals, touch the "2 sided / 2 sided" ["2-sided / 2-sided"] key. If you then bind the copy set at the top, the images will be...

3035/4035/5035 Operation Guide Rev-6.0
Page 48
..." x 8 1/2" size copy paper can be enlarged or reduced to fit the size of the copy paper. The content of paper. 2 Touch the "Function" tab. size Auto Selection Page # Cover Mode Function Combine Batch scanning Forms Overlay Booklet Program Up Down Metric specifications Ready to copy...; Only A5R, B5R, A4R, B4, A3, 8 1/2" x 11" and 11" x 17" size originals and A4 size copy paper can be displayed. 3 Touch the "2 sided/Separation" ["2-sided/Split"] key. The "2 sided/Separation" ["2-sided/Split"] screen will be used in this mode. shift Erase Mode User choice Select size orig.
..." x 8 1/2" size copy paper can be enlarged or reduced to fit the size of the copy paper. The content of paper. 2 Touch the "Function" tab. size Auto Selection Page # Cover Mode Function Combine Batch scanning Forms Overlay Booklet Program Up Down Metric specifications Ready to copy...; Only A5R, B5R, A4R, B4, A3, 8 1/2" x 11" and 11" x 17" size originals and A4 size copy paper can be displayed. 3 Touch the "2 sided/Separation" ["2-sided/Split"] key. The "2 sided/Separation" ["2-sided/Split"] screen will be used in this mode. shift Erase Mode User choice Select size orig.

3035/4035/5035 Operation Guide Rev-6.0
Page 50
...left or right and up or down to make a margin (blank) space on the copy. The "Margin/Centering" ["Margin/Image shift"] screen will leave no margin space. Inch specifications Ready to copy. Metric specifications The image of "0" will leave no margin space. A setting ...space on the copy. The width of "0" will be selected separately for the front and back sides. A setting of each margin can be displayed. 3 Touch the "Margin/Centering" ["Margin/Imag.shift"] key. Metric specifications When you are making 2-sided copies, the margin positions and widths can be displayed. A...
...left or right and up or down to make a margin (blank) space on the copy. The "Margin/Centering" ["Margin/Image shift"] screen will leave no margin space. Inch specifications Ready to copy. Metric specifications The image of "0" will leave no margin space. A setting ...space on the copy. The width of "0" will be selected separately for the front and back sides. A setting of each margin can be displayed. 3 Touch the "Margin/Centering" ["Margin/Imag.shift"] key. Metric specifications When you are making 2-sided copies, the margin positions and widths can be displayed. A...

3035/4035/5035 Operation Guide Rev-6.0
Page 51
...Front page None Margin Image Left shift Register Paper size Set Back Close Check direction Check direction of original. 4 Touch the "Margin" key. The screen to set . Back page margin Back page Auto Front/Back margin Paper size Set Back Close Check direction Check ...direction of original top side. Inch specifications Ready to copy. The "Back page margin" screen will be displayed. Rear Left top corner Metric specifications Ready to copy. Back Close Check direction Check direction of original. ...
...Front page None Margin Image Left shift Register Paper size Set Back Close Check direction Check direction of original. 4 Touch the "Margin" key. The screen to set . Back page margin Back page Auto Front/Back margin Paper size Set Back Close Check direction Check ...direction of original top side. Inch specifications Ready to copy. The "Back page margin" screen will be displayed. Rear Left top corner Metric specifications Ready to copy. Back Close Check direction Check direction of original. ...

Print/Scan System (U) Operation Guide (Setup Edition)
Page 21
...may be accomplished incorrectly. To continue scanning more originals, set the original with its top edge towards the left of the touch screen. Once you set the next original, change to continue scanning, set direction" key. Performing the Required Operation at the Scanner...you have finished scanning originals, touch the "Cancel" key. * If "Permit file overwrite" is use. Scanning of the scanner, select "Back Edge". Touch the "Close" key to stop the scanning operation, touch the "Cancel" key. 3-3 3. The Original Set Direction screen will appear after scanning of...
...may be accomplished incorrectly. To continue scanning more originals, set the original with its top edge towards the left of the touch screen. Once you set the next original, change to continue scanning, set direction" key. Performing the Required Operation at the Scanner...you have finished scanning originals, touch the "Cancel" key. * If "Permit file overwrite" is use. Scanning of the scanner, select "Back Edge". Touch the "Close" key to stop the scanning operation, touch the "Cancel" key. 3-3 3. The Original Set Direction screen will appear after scanning of...


