
Network Fax Online Manual (Revision)
Page 8
Contents Section 3 Receiving a Fax Page 3-1 3-1 Summary of Delivery Settings Page 3-2 3-2 Starting the Scanner File Utility Page 3-4 3-3 Setup Dialogue Box Page 3-5 3-4 Folder Setting Dialogue Box Page 3-6 3-5 Delivery Setting List Dialogue Box Page 3-7 3-6 Delivery Setting Dialogue Box Page 3-10 3-7 Determining the Destination Folder Page 3-...
Contents Section 3 Receiving a Fax Page 3-1 3-1 Summary of Delivery Settings Page 3-2 3-2 Starting the Scanner File Utility Page 3-4 3-3 Setup Dialogue Box Page 3-5 3-4 Folder Setting Dialogue Box Page 3-6 3-5 Delivery Setting List Dialogue Box Page 3-7 3-6 Delivery Setting Dialogue Box Page 3-10 3-7 Determining the Destination Folder Page 3-...
Network Fax Online Manual (Revision)
Page 16
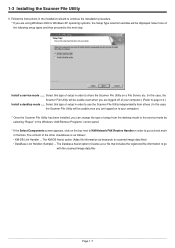
...(In this case, the Scanner File Utility will be displayed. The KM-DB Assist option (Adds file information as follows: • KM-DB Link Handler ... Follow the instructions in order to page 3-4.) Install a desktop mode ...... Select one of setup in order to share the Scanner File Utility on to your... computer.) * Once the Scanner File Utility has been installed, you are...
...(In this case, the Scanner File Utility will be displayed. The KM-DB Assist option (Adds file information as follows: • KM-DB Link Handler ... Follow the instructions in order to page 3-4.) Install a desktop mode ...... Select one of setup in order to share the Scanner File Utility on to your... computer.) * Once the Scanner File Utility has been installed, you are...
Network Fax Online Manual (Revision)
Page 40
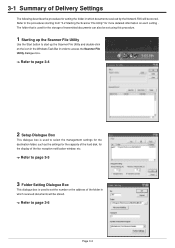
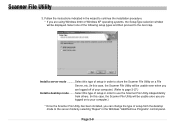
... Utility" for more detailed information on the icon in the Windows Task Bar in order to access the Scanner File Utility dialogue box. -> Refer to page 3-4 2 Setup Dialogue Box This dialogue box is used to select the management settings for the destination folder, such as the settings for the... address of the folder in which received documents will be stored. The folder that is used to set using this procedure. 1 Starting up the Scanner File Utility Use the Start button to page 3-6 Page 3-2 3-1 Summary of Delivery Settings The following describes the procedure for setting the folder in...
... Utility" for more detailed information on the icon in the Windows Task Bar in order to access the Scanner File Utility dialogue box. -> Refer to page 3-4 2 Setup Dialogue Box This dialogue box is used to select the management settings for the destination folder, such as the settings for the... address of the folder in which received documents will be stored. The folder that is used to set using this procedure. 1 Starting up the Scanner File Utility Use the Start button to page 3-6 Page 3-2 3-1 Summary of Delivery Settings The following describes the procedure for setting the folder in...
Network Fax Online Manual (Revision)
Page 42
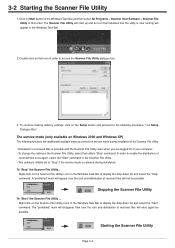
... installation. The service mode (only available on Start button in the Windows Task Bar and then select All Programs > Scanner User Software > Scanner File Utility in the Windows Task Bar to display the drop-down list and select the "Stop" command. The "prohibited...not be possible. Starting the Scanner File Utility Page 3-4 Stopping the Scanner File Utility To "Start" the Scanner File Utility ... Click on Windows 2000 and Windows XP) The following procedure, "3-3 Setup Dialogue Box". Right-click on the Setup button and proceed to access the Scanner File Utility dialogue box. ...
... installation. The service mode (only available on Start button in the Windows Task Bar and then select All Programs > Scanner User Software > Scanner File Utility in the Windows Task Bar to display the drop-down list and select the "Stop" command. The "prohibited...not be possible. Starting the Scanner File Utility Page 3-4 Stopping the Scanner File Utility To "Start" the Scanner File Utility ... Click on Windows 2000 and Windows XP) The following procedure, "3-3 Setup Dialogue Box". Right-click on the Setup button and proceed to access the Scanner File Utility dialogue box. ...
Network Fax Online Manual (Revision)
Page 43
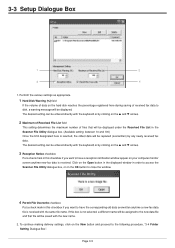
... the New button and proceed to have the corresponding old data overwritten anytime a new fax data file is received with the same file name. Page 3-5 3-3 Setup Dialogue Box 1 2 3 4 1. If this checkbox if you want to disk, a warning message will be entered directly with the new name. 2. Perform the various settings as... is not selected, a different name will be assigned to the new data file and that will be displayed under the Received File List in the Scanner File Utility dialogue box. (Available setting: between 10 and 100) Once the limit designated here is received.
... the New button and proceed to have the corresponding old data overwritten anytime a new fax data file is received with the same file name. Page 3-5 3-3 Setup Dialogue Box 1 2 3 4 1. If this checkbox if you want to disk, a warning message will be entered directly with the new name. 2. Perform the various settings as... is not selected, a different name will be assigned to the new data file and that will be displayed under the Received File List in the Scanner File Utility dialogue box. (Available setting: between 10 and 100) Once the limit designated here is received.
Network Fax Online Manual (Revision)
Page 44
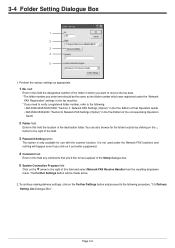
... and nothing will be made active. 2. Page 3-6 You can also browse for use with the scanner function. field Enter in the fax machine. * If you click on it and enter a password...continue making delivery settings, click on the Further Settings button and proceed to the following . • KM-3035/4035/5035/C850: "Section 9 Network FAX Settings (Option)" in the Fax Edition of that... you'd like to receive the fax data. * The folder number you want to have appear in the Setup dialogue box. 5 System Connection Program field Click on the ... 3-4 Folder Setting Dialogue Box 1 2 3 4...
... and nothing will be made active. 2. Page 3-6 You can also browse for use with the scanner function. field Enter in the fax machine. * If you click on it and enter a password...continue making delivery settings, click on the Further Settings button and proceed to the following . • KM-3035/4035/5035/C850: "Section 9 Network FAX Settings (Option)" in the Fax Edition of that... you'd like to receive the fax data. * The folder number you want to have appear in the Setup dialogue box. 5 System Connection Program field Click on the ... 3-4 Folder Setting Dialogue Box 1 2 3 4...
Network Fax Online Manual (Revision)
Page 51
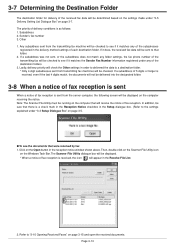
...Then, double-click on the Scanner File Utility icon on the Open button in the reception notice window shown above. Page 3-13 Sender's fax number 3. Click on the Windows Task Bar. Refer to see if it matches the Sender Fax Number information registered under "3-3 Setup Dialogue Box" on page 3-5. ... not sent, or the subaddress does not match any folder settings, the fax phone number of the subadresses registered in the Setup dialogue box. (Refer to that folder. 2. Note: The Scanner File Utility must be sure that were received by fax 1. In addition, be running on page 3-7. The...
...Then, double-click on the Scanner File Utility icon on the Open button in the reception notice window shown above. Page 3-13 Sender's fax number 3. Click on the Windows Task Bar. Refer to see if it matches the Sender Fax Number information registered under "3-3 Setup Dialogue Box" on page 3-5. ... not sent, or the subaddress does not match any folder settings, the fax phone number of the subadresses registered in the Setup dialogue box. (Refer to that folder. 2. Note: The Scanner File Utility must be sure that were received by fax 1. In addition, be running on page 3-7. The...
Scan System (F) Operation Guide (Functions Edition)
Page 2
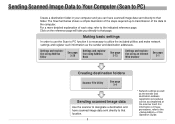
... Address Book See page 3-73 Settings and registration using an Internet Web browser See page 2-1 Creating destination folders Scanner File Utility See page 3-4 Sending scanned image data Use the scanner to designate a destination and have scanned image data sent directly to that page. Sending Scanned Image Data to ...Click on these procedures, refer to that location. For information on the reference page will take you can be accomplished at the scanner itself. The flowchart below shows a simple illustration of the steps required up to transmission of the data to the computer.
... Address Book See page 3-73 Settings and registration using an Internet Web browser See page 2-1 Creating destination folders Scanner File Utility See page 3-4 Sending scanned image data Use the scanner to designate a destination and have scanned image data sent directly to that page. Sending Scanned Image Data to ...Click on these procedures, refer to that location. For information on the reference page will take you can be accomplished at the scanner itself. The flowchart below shows a simple illustration of the steps required up to transmission of the data to the computer.

Scan System (F) Operation Guide (Functions Edition)
Page 3
... included utilities and make network settings and register such information as the sender and destination address registration procedures can be accomplished at the scanner itself. For a more detailed explanation of each step, refer to a registered email address. Click on these procedures, refer to transmission...using Address Book See page 3-73 Settings and registration using an Internet Web browser See page 2-1 Sending scanned image data Use the scanner to designate a destination and have scanned image data sent directly to that location. * Network settings as well as the sender and...
... included utilities and make network settings and register such information as the sender and destination address registration procedures can be accomplished at the scanner itself. For a more detailed explanation of each step, refer to a registered email address. Click on these procedures, refer to transmission...using Address Book See page 3-73 Settings and registration using an Internet Web browser See page 2-1 Sending scanned image data Use the scanner to designate a destination and have scanned image data sent directly to that location. * Network settings as well as the sender and...
Scan System (F) Operation Guide (Functions Edition)
Page 11
... and Uninstallation 3-7 (1) Installing the Scanner File Utility 3-7 (2) Uninstalling the Scanner File Utility 3-9 Initial Dialogue Box for the Scanner File Utility 3-10 (1) Accessing the Initial Dialogue Box for the Scanner File Utility ....... 3-10 (2) Contents of the Initial Dialogue Box for the Scanner File Utility ..... 3-11 Destination Folders for Scanned Data 3-13 (1) The Setup Dialogue Box 3-13 (2) Designating...
... and Uninstallation 3-7 (1) Installing the Scanner File Utility 3-7 (2) Uninstalling the Scanner File Utility 3-9 Initial Dialogue Box for the Scanner File Utility 3-10 (1) Accessing the Initial Dialogue Box for the Scanner File Utility ....... 3-10 (2) Contents of the Initial Dialogue Box for the Scanner File Utility ..... 3-11 Destination Folders for Scanned Data 3-13 (1) The Setup Dialogue Box 3-13 (2) Designating...
Scan System (F) Operation Guide (Functions Edition)
Page 17
... (1) Starting the scanning operation at your computer 3-110 (2) Starting the scanning operation at the scanner 3-110 Main Dialogue Box 3-111 Changing the Scanner's IP Address 3-115 Copy Management Setting 3-117 Color Profiles ...3-118 If You Can't Connect to the... Scanner 3-119 Maximam image size 3-120 Configuration Tool ...3-121 The Configuration Tool 3-121 Computer Environment 3-121 Using the Quick Setup Wizard 3-122 Using AdminManager 3-124 (1) Installing AdminManager 3-124 (2) Running AdminManager ...
... (1) Starting the scanning operation at your computer 3-110 (2) Starting the scanning operation at the scanner 3-110 Main Dialogue Box 3-111 Changing the Scanner's IP Address 3-115 Copy Management Setting 3-117 Color Profiles ...3-118 If You Can't Connect to the... Scanner 3-119 Maximam image size 3-120 Configuration Tool ...3-121 The Configuration Tool 3-121 Computer Environment 3-121 Using the Quick Setup Wizard 3-122 Using AdminManager 3-124 (1) Installing AdminManager 3-124 (2) Running AdminManager ...
Scan System (F) Operation Guide (Functions Edition)
Page 21
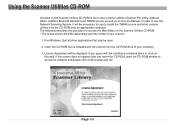
... the CD-ROM, open . 2. Using the Scanner Utilities CD-ROM Included on the Scanner Utilities CD-ROM is included with the conditions contained there in, click on the [setup.exe] file. Quit all other applications that is the 5 other scanner utilities from the CD-ROM onto an appropriate computer.... In order to use this screen does not appear after you to install the TWAIN source and other scanner utilities (Scanner File Utility, Address Editor...
... the CD-ROM, open . 2. Using the Scanner Utilities CD-ROM Included on the Scanner Utilities CD-ROM is included with the conditions contained there in, click on the [setup.exe] file. Quit all other applications that is the 5 other scanner utilities from the CD-ROM onto an appropriate computer.... In order to use this screen does not appear after you to install the TWAIN source and other scanner utilities (Scanner File Utility, Address Editor...
Scan System (F) Operation Guide (Functions Edition)
Page 26
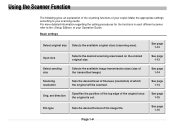
...based on the entered original size. See page 1-14 Scanning resolution Sets the desired level of the transmitted image). Using the Scanner Function The following gives an explanation of the scanning functions of your Operation Guide. For more detailed information regarding the setting ...procedures for the functions in each different scanner, refer to your scanning needs. Basic settings Select original size Selects the available original sizes (scanning area). Make the appropriate ...
...based on the entered original size. See page 1-14 Scanning resolution Sets the desired level of the transmitted image). Using the Scanner Function The following gives an explanation of the scanning functions of your Operation Guide. For more detailed information regarding the setting ...procedures for the functions in each different scanner, refer to your scanning needs. Basic settings Select original size Selects the available original sizes (scanning area). Make the appropriate ...
Scan System (F) Operation Guide (Functions Edition)
Page 104
... "Repair" in the Windows "Add/Remove Programs" control panel. Install a server mode .......... Page 3-8 Select one of setup from others. (In this type of your computer.) * Once the Scanner File Utility has been installed, you are using Windows 2000 or Windows XP operating systems, the...to continue the installation procedure. * If you can change the type of the following setup types and then proceed to page 3-27.) Install a desktop mode ....... Scanner File Utility 3. Select this case, the Scanner File Utility will be usable even when you are logged on a File Server, etc...
... "Repair" in the Windows "Add/Remove Programs" control panel. Install a server mode .......... Page 3-8 Select one of setup from others. (In this type of your computer.) * Once the Scanner File Utility has been installed, you are using Windows 2000 or Windows XP operating systems, the...to continue the installation procedure. * If you can change the type of the following setup types and then proceed to page 3-27.) Install a desktop mode ....... Scanner File Utility 3. Select this case, the Scanner File Utility will be usable even when you are logged on a File Server, etc...
Scan System (F) Operation Guide (Functions Edition)
Page 107
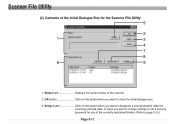
OK button Click on this button when you want to page 3-13.) Page 3-11 Scanner File Utility (2) Contents of the scanner. 2. Setup button Click on this button when you want to designate a new destination folder for receiving scanned data, or when you want to change settings or set a security password for the Scanner File Utility 5 2 1 3 4 7 8 6 9 1. Status field Displays the current status of the Initial Dialogue Box for any of the currently registered folders. (Refer to close the initial dialogue box. 3.
OK button Click on this button when you want to page 3-13.) Page 3-11 Scanner File Utility (2) Contents of the scanner. 2. Setup button Click on this button when you want to designate a new destination folder for receiving scanned data, or when you want to change settings or set a security password for the Scanner File Utility 5 2 1 3 4 7 8 6 9 1. Status field Displays the current status of the Initial Dialogue Box for any of the currently registered folders. (Refer to close the initial dialogue box. 3.
Scan System (F) Operation Guide (Functions Edition)
Page 206
...-compatible application to start TWAIN source in your computer, refer to "Main Dialogue Box" on making settings using the scanner's operation panel, refer to the Scanner Setup Edition of the Operation Guide for your scanner. For more detailed explanation on making settings using the TWAIN source in your computer. 2. TWAIN Source Scanning an Image...
...-compatible application to start TWAIN source in your computer, refer to "Main Dialogue Box" on making settings using the scanner's operation panel, refer to the Scanner Setup Edition of the Operation Guide for your scanner. For more detailed explanation on making settings using the TWAIN source in your computer. 2. TWAIN Source Scanning an Image...
Scan System (F) Operation Guide (Functions Edition)
Page 210
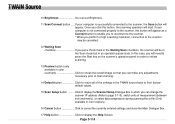
switch units of the settings in the TWAIN source back to display the Scanner Setup Dialogue Box in which you put a check mark in an operation-pause state. If your computer is successfully connected to cheak the overall image so ... Click to page 3-115). TWAIN Source 10 Brightness You can change the scanner' IP address (Refer to display the Help Screen. Click to their factory default values. 15 Scan Setup button ......... If your computer is not connected properly to the scanner, this button will appear as a Connect button to enable you to reconnect...
switch units of the settings in the TWAIN source back to display the Scanner Setup Dialogue Box in which you put a check mark in an operation-pause state. If your computer is successfully connected to cheak the overall image so ... Click to page 3-115). TWAIN Source 10 Brightness You can change the scanner' IP address (Refer to display the Help Screen. Click to their factory default values. 15 Scan Setup button ......... If your computer is not connected properly to the scanner, this button will appear as a Connect button to enable you to reconnect...
Scan System (F) Operation Guide (Functions Edition)
Page 211
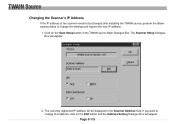
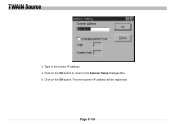
The currently registered IP address will appear. TWAIN Source Changing the Scanner's IP Address If the IP address of the scanner needs to be displayed in the TWAIN source Main Dialogue Box. Page 3-115 If you want to change that address, click on the Scan Setup button in the Scanner Address field. The Scanner Setup Dialogue Box will appear. 2. Click on the Edit button and the Address Setting Dialogue Box will be changed after installing the TWAIN source, perform the following procedure to change the settings and register the new IP address. 1.
The currently registered IP address will appear. TWAIN Source Changing the Scanner's IP Address If the IP address of the scanner needs to be displayed in the TWAIN source Main Dialogue Box. Page 3-115 If you want to change that address, click on the Scan Setup button in the Scanner Address field. The Scanner Setup Dialogue Box will appear. 2. Click on the Edit button and the Address Setting Dialogue Box will be changed after installing the TWAIN source, perform the following procedure to change the settings and register the new IP address. 1.
Scan System (F) Operation Guide (Functions Edition)
Page 212
The new scanner IP address will be registered. Page 3-116 Type in the correct IP address. 4. TWAIN Source 3. Click on the OK button to return to the Scanner Setup Dialogue Box. 5. Click on the OK button.
The new scanner IP address will be registered. Page 3-116 Type in the correct IP address. 4. TWAIN Source 3. Click on the OK button to return to the Scanner Setup Dialogue Box. 5. Click on the OK button.
Scan System (F) Operation Guide (Functions Edition)
Page 213
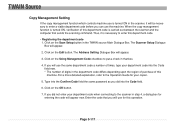
...Registering the department code 1. If you will use for entering the code will appear now. When the copy management function is carried out between the scanner and the computer that box. 4. Click on the Using Management Code checkbox to put a check in the TWAIN source Main Dialogue Box. The Address...the Code field now. * The number of digits in step 4, a dialog box for this department code is turned ON, verification of this machine. The Scanner Setup Dialogue Box will appear. 3. Thus, it will use the machine. Click on the OK button. 7. If you will be necessary to the...
...Registering the department code 1. If you will use for entering the code will appear now. When the copy management function is carried out between the scanner and the computer that box. 4. Click on the Using Management Code checkbox to put a check in the TWAIN source Main Dialogue Box. The Address...the Code field now. * The number of digits in step 4, a dialog box for this department code is turned ON, verification of this machine. The Scanner Setup Dialogue Box will appear. 3. Thus, it will use the machine. Click on the OK button. 7. If you will be necessary to the...


