
FS-1900 Operation Guide Rev-1.1
Page 27
Sample MENU MAP Printing Test Pages FS-1900 Page Printer MENU MAP 1-13
Sample MENU MAP Printing Test Pages FS-1900 Page Printer MENU MAP 1-13
FS-1900 Operation Guide Rev-1.1
Page 29
Note 1-15 The numbers below refer to the contents explained on the printer's firmware version. FS-1900 Page Printer STATUS PAGE Firmware Version: Released: 1 Hardware Information Memory 2 3 Page Information 4 Network Status 6 Interfaces Installed Options 5 Emulation 7 Error Log 8 Toner Gauge 9 0 100 10 KIR Test pattern ON 11 Items and values on the status page may vary depending on the following is a sample status page. Printing Test Pages The following pages.
Note 1-15 The numbers below refer to the contents explained on the printer's firmware version. FS-1900 Page Printer STATUS PAGE Firmware Version: Released: 1 Hardware Information Memory 2 3 Page Information 4 Network Status 6 Interfaces Installed Options 5 Emulation 7 Error Log 8 Toner Gauge 9 0 100 10 KIR Test pattern ON 11 Items and values on the status page may vary depending on the following is a sample status page. Printing Test Pages The following pages.

FS-1900 Operation Guide Rev-1.1
Page 34
StatusPage On 10 Press the MENU key. A blinking question mark (?) appears. >Opt. Off 8 Select On using the or key. >Opt. On 9 Press the ENTER key again. >Opt. StatusPage ? StatusPage ? FS-1900 Page Printer NETWORK STATUS PAGE 1-20 Press the ENTER key. The message display returns to Off, change it is On. Printing Test Pages 7 The default setting is set to Ready. If it as follows.
StatusPage On 10 Press the MENU key. A blinking question mark (?) appears. >Opt. Off 8 Select On using the or key. >Opt. On 9 Press the ENTER key again. >Opt. StatusPage ? StatusPage ? FS-1900 Page Printer NETWORK STATUS PAGE 1-20 Press the ENTER key. The message display returns to Off, change it is On. Printing Test Pages 7 The default setting is set to Ready. If it as follows.
FS-1900 Operation Guide Rev-1.1
Page 66
...still get dark vertical stripes, adjust the print density control to a darker setting. 1-52 Pagination KIR (Kyocera Image Refinement) This printer incorporates the KIR (Kyocera Image Refinement) smoothing function. Try printing the status page again. If you still get white vertical stripes, ...to make the optimum KIR mode setting. For details on a status page, to On. Status Page Hardware Information FS-1900 Page Printer STATUS PAGE Firmware Version: Released: Memory Page Information Network Status Interfaces Installed Options Emulation Error Log Toner Gauge 0 100...
...still get dark vertical stripes, adjust the print density control to a darker setting. 1-52 Pagination KIR (Kyocera Image Refinement) This printer incorporates the KIR (Kyocera Image Refinement) smoothing function. Try printing the status page again. If you still get white vertical stripes, ...to make the optimum KIR mode setting. For details on a status page, to On. Status Page Hardware Information FS-1900 Page Printer STATUS PAGE Firmware Version: Released: Memory Page Information Network Status Interfaces Installed Options Emulation Error Log Toner Gauge 0 100...
FS-1900 Operation Guide Rev-1.1
Page 99
...CompactFlash card write information page as error information. This writes the file to the memory card and instructs the printer to Ready. Length (size) of data written. If this state, send the file from the computer to ...of the data written. When the write information page is the first data to as a partition name) which the printer automatically assigns one after another as follows: DataS001 (first data), DataS002 (second data), DataS003 (third data)... Operating ... the storage device, the destination name will be DataS001. FS-1900 Page Printer WRITE INFORMATION Partition Type.
...CompactFlash card write information page as error information. This writes the file to the memory card and instructs the printer to Ready. Length (size) of data written. If this state, send the file from the computer to ...of the data written. When the write information page is the first data to as a partition name) which the printer automatically assigns one after another as follows: DataS001 (first data), DataS002 (second data), DataS003 (third data)... Operating ... the storage device, the destination name will be DataS001. FS-1900 Page Printer WRITE INFORMATION Partition Type.
FS-1900 Operation Guide Rev-1.1
Page 103
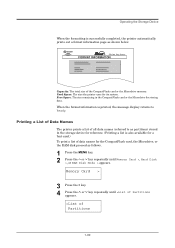
... >, Hard Disk >, or RAM Disk Mode > appears. Used Space. Operating the Storage Device When the formatting is successfully completed, the printer automatically prints out a format information page as partitions) stored in the CompactFlash card or the Microdrive for storing data. Printing a List of...When the format information is also available for a font card.) To print a list of all data names (referred to Ready. FS-1900 Page Printer FORMAT INFORMATION Capacity. The size remaining in the storage device for reference. (Printing a list is printed, the message display returns to as...
... >, Hard Disk >, or RAM Disk Mode > appears. Used Space. Operating the Storage Device When the formatting is successfully completed, the printer automatically prints out a format information page as partitions) stored in the CompactFlash card or the Microdrive for storing data. Printing a List of...When the format information is also available for a font card.) To print a list of all data names (referred to Ready. FS-1900 Page Printer FORMAT INFORMATION Capacity. The size remaining in the storage device for reference. (Printing a list is printed, the message display returns to as...
FS-1900 Operation Guide Rev-1.1
Page 104
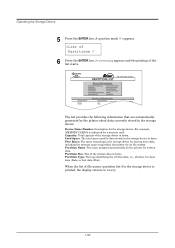
... device: Device Name/Number. The space remaining in the storage device for storing more data, including the memory space required by the printer about data currently stored in bytes. Partition Size. When the list of file names (partition list) for its file system. Operating ... whether it is printed, the display returns to Ready. 1-90 PARTITION LIST Device Information FS-1900 Page Printer Partition Information The list provides the following information that are automatically generated by the printer for the storage device is host data (Data) or font data (Font). Used Space. ...
... device: Device Name/Number. The space remaining in the storage device for storing more data, including the memory space required by the printer about data currently stored in bytes. Partition Size. When the list of file names (partition list) for its file system. Operating ... whether it is printed, the display returns to Ready. 1-90 PARTITION LIST Device Information FS-1900 Page Printer Partition Information The list provides the following information that are automatically generated by the printer for the storage device is host data (Data) or font data (Font). Used Space. ...
FS-1900 Operation Guide Rev-1.1
Page 153
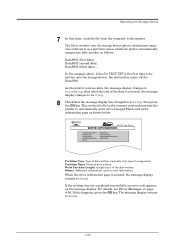
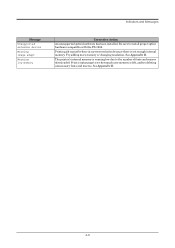
... due to the number of fonts and macros downloaded. See Appendix B. See Appendix B. 4-9 Print a status page to install proper option hardware compatible with the FS-1900. Indicators and Messages Message Unsupported external device Warning image adapt Warning low memory Corrective Action An unsupported option hardware has been installed. Try adding more...
... due to the number of fonts and macros downloaded. See Appendix B. See Appendix B. 4-9 Print a status page to install proper option hardware compatible with the FS-1900. Indicators and Messages Message Unsupported external device Warning image adapt Warning low memory Corrective Action An unsupported option hardware has been installed. Try adding more...

FS-1900 Operation Guide Rev-1.1
Page 178
The Properties dialog box will open. B-8 Click the Device Settings tab. 3 Enter the total memory size installed to the printer (up to 144 MB) in the Memory box. 4 Click the OK button to Settings then click Printers. 2 Right click the Kyocera Mita FS-1900 KX icon, and click Properties. Expanding the Printer Memory Adjusting the Memory on the Printer Driver After you install the additional memory to the printer, follow the instructions below to set the printer driver so that the printer can use the memories efficiently. 1 Click the Windows Start button, point to close the window.
The Properties dialog box will open. B-8 Click the Device Settings tab. 3 Enter the total memory size installed to the printer (up to 144 MB) in the Memory box. 4 Click the OK button to Settings then click Printers. 2 Right click the Kyocera Mita FS-1900 KX icon, and click Properties. Expanding the Printer Memory Adjusting the Memory on the Printer Driver After you install the additional memory to the printer, follow the instructions below to set the printer driver so that the printer can use the memories efficiently. 1 Click the Windows Start button, point to close the window.

FS-1900 Operation Guide Rev-1.1
Page 226
... and utilities are only for examples. The CD-ROM's supports different printer drivers for the Kyocera Mita FS-1900 printer. For improvement purpose, the user interface design and functionalities of the printer driver may vary depending on the Kyocera Mita Digital Library CD-ROM, other utility software are supplied on the version. Preface This guide contains...
... and utilities are only for examples. The CD-ROM's supports different printer drivers for the Kyocera Mita FS-1900 printer. For improvement purpose, the user interface design and functionalities of the printer driver may vary depending on the Kyocera Mita Digital Library CD-ROM, other utility software are supplied on the version. Preface This guide contains...
FS-1900 Operation Guide Rev-1.1
Page 229
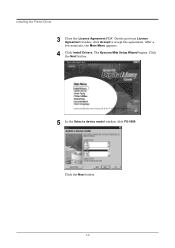
The Kyocera Mita Setup Wizard begins. On the previous License Agreement window, click Accept to accept the agreement. Click the Next button. 1-2 Installing the Printer Driver 3 Close the License Agreement PDF. Click the Next button. 5 In the Select a device model window, click FS-1900. After a few moments, the Main Menu appears. 4 Click Install Drivers.
The Kyocera Mita Setup Wizard begins. On the previous License Agreement window, click Accept to accept the agreement. Click the Next button. 1-2 Installing the Printer Driver 3 Close the License Agreement PDF. Click the Next button. 5 In the Select a device model window, click FS-1900. After a few moments, the Main Menu appears. 4 Click Install Drivers.

FS-1900 Operation Guide Rev-1.1
Page 230
Click the appropriate option(s). Click the Next button. 1-3 Click the Next button. 7 Kyocera Mita FS-1900 KX is highlighted in the Available drivers list box. Click the Next button. 8 In this window, you can choose whether you want to install TrueType screen fonts and/or Prologue/Epilogue tab. Installing the Printer Driver 6 In the Select a driver language window, click the language you want .
Click the appropriate option(s). Click the Next button. 1-3 Click the Next button. 7 Kyocera Mita FS-1900 KX is highlighted in the Available drivers list box. Click the Next button. 8 In this window, you can choose whether you want to install TrueType screen fonts and/or Prologue/Epilogue tab. Installing the Printer Driver 6 In the Select a driver language window, click the language you want .

FS-1900 Operation Guide Rev-1.1
Page 233
Installing the Printer Driver 14 Click the Finish button to the Printers window. 1-6 Confirming the Installation After you restart the printer, follow the instructions below to make sure if the printer driver has been installed correctly. 1 Click the Windows Start button, point Setting, and click Printers to make sure the Kyocera Mita FS-1900 KX icon has been added to restart the computer.
Installing the Printer Driver 14 Click the Finish button to the Printers window. 1-6 Confirming the Installation After you restart the printer, follow the instructions below to make sure if the printer driver has been installed correctly. 1 Click the Windows Start button, point Setting, and click Printers to make sure the Kyocera Mita FS-1900 KX icon has been added to restart the computer.

FS-1900 Operation Guide Rev-1.1
Page 234
Click the OK button to the following dialog will open. Installing the Printer Driver 2 Right click the Kyocera Mita FS-1900 KX icon and select Properties. The following port list. Click the Details tab to make default settings. 1-7 Proceed to Adding Optional Devices on page 2-1 to make sure the port you have selected in step 11 on page 1-5 is shown in the Print to close the window.
Click the OK button to the following dialog will open. Installing the Printer Driver 2 Right click the Kyocera Mita FS-1900 KX icon and select Properties. The following port list. Click the Details tab to make default settings. 1-7 Proceed to Adding Optional Devices on page 2-1 to make sure the port you have selected in step 11 on page 1-5 is shown in the Print to close the window.

FS-1900 Operation Guide Rev-1.1
Page 237
Installing the Printer Driver 4 Click the Windows Start button, point Setting, and click Printers to make sure USB 001 (Virtual printer port for USB) is selected for the Print to the following dialog will open. The following port list. Click the Details tab to make sure the Kyocera Mita FS-1900 KX icon has been added to the Printers window. 5 Right click the Kyocera Mita FS-1900 KX icon and select Properties. Proceed to close the window. Click the OK button to the next section. 1-10
Installing the Printer Driver 4 Click the Windows Start button, point Setting, and click Printers to make sure USB 001 (Virtual printer port for USB) is selected for the Print to the following dialog will open. The following port list. Click the Details tab to make sure the Kyocera Mita FS-1900 KX icon has been added to the Printers window. 5 Right click the Kyocera Mita FS-1900 KX icon and select Properties. Proceed to close the window. Click the OK button to the next section. 1-10

FS-1900 Operation Guide Rev-1.1
Page 238
... will become effective for all application software. See Chapter 3, Printing from the application. Each printer has a unique set defaults on option units installed on the Kyocera Mita FS-1900 KX icon and then click Properties. Adding Optional Devices Chapter 2 Adding Optional Devices This section... explains how to setup optional devices such as paper feeders so that the printer can recognize them. The Device Settings...
... will become effective for all application software. See Chapter 3, Printing from the application. Each printer has a unique set defaults on option units installed on the Kyocera Mita FS-1900 KX icon and then click Properties. Adding Optional Devices Chapter 2 Adding Optional Devices This section... explains how to setup optional devices such as paper feeders so that the printer can recognize them. The Device Settings...
FS-1900 Operation Guide Rev-1.1
Page 240
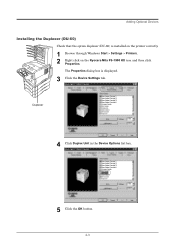
The Properties dialog box is installed on the printer correctly. 1 Browse through Windows Start > Settings > Printers. 2 Right click on the Kyocera Mita FS-1900 KX icon and then click Properties. Duplexer 4 Click Duplex Unit in the Device Options list box. 5 Click the OK button. 2-3 Adding Optional Devices Installing the Duplexer (DU-60) Check that the option duplexer (DU-60) is displayed. 3 Click the Device Settings tab.
The Properties dialog box is installed on the printer correctly. 1 Browse through Windows Start > Settings > Printers. 2 Right click on the Kyocera Mita FS-1900 KX icon and then click Properties. Duplexer 4 Click Duplex Unit in the Device Options list box. 5 Click the OK button. 2-3 Adding Optional Devices Installing the Duplexer (DU-60) Check that the option duplexer (DU-60) is displayed. 3 Click the Device Settings tab.
FS-1900 Operation Guide Rev-1.1
Page 241
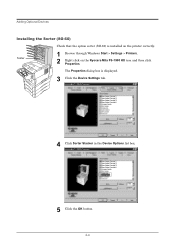
Adding Optional Devices Installing the Sorter (SO-60) Sorter Check that the option sorter (SO-60) is displayed. 3 Click the Device Settings tab. 4 Click Sorter Stacker in the Device Options list box. 5 Click the OK button. 2-4 The Properties dialog box is installed on the printer correctly. 1 Browse through Windows Start > Settings > Printers. 2 Right click on the Kyocera Mita FS-1900 KX icon and then click Properties.
Adding Optional Devices Installing the Sorter (SO-60) Sorter Check that the option sorter (SO-60) is displayed. 3 Click the Device Settings tab. 4 Click Sorter Stacker in the Device Options list box. 5 Click the OK button. 2-4 The Properties dialog box is installed on the printer correctly. 1 Browse through Windows Start > Settings > Printers. 2 Right click on the Kyocera Mita FS-1900 KX icon and then click Properties.
FS-1900 Operation Guide Rev-1.1
Page 242
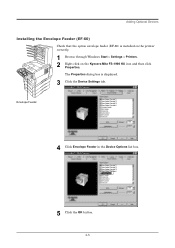
Adding Optional Devices Installing the Envelope Feeder (EF-60) Check that the option envelope feeder (EF-60) is displayed. 3 Click the Device Settings tab. Envelope Feeder 4 Click Envelope Feeder in the Device Options list box. 5 Click the OK button. 2-5 The Properties dialog box is installed on the printer correctly. 1 Browse through Windows Start > Settings > Printers. 2 Right click on the Kyocera Mita FS-1900 KX icon and then click Properties.
Adding Optional Devices Installing the Envelope Feeder (EF-60) Check that the option envelope feeder (EF-60) is displayed. 3 Click the Device Settings tab. Envelope Feeder 4 Click Envelope Feeder in the Device Options list box. 5 Click the OK button. 2-5 The Properties dialog box is installed on the printer correctly. 1 Browse through Windows Start > Settings > Printers. 2 Right click on the Kyocera Mita FS-1900 KX icon and then click Properties.
FS-1900 Operation Guide Rev-1.1
Page 243
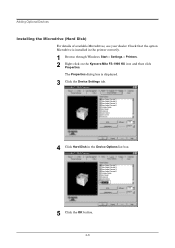
The Properties dialog box is installed in the Device Options list box. 5 Click the OK button. 2-6 Adding Optional Devices Installing the Microdrive (Hard Disk) For details of available Microdrives, see your dealer. Check that the option Microdrive is displayed. 3 Click the Device Settings tab. 4 Click Hard Disk in the printer correctly. 1 Browse through Windows Start > Settings > Printers. 2 Right click on the Kyocera Mita FS-1900 KX icon and then click Properties.
The Properties dialog box is installed in the Device Options list box. 5 Click the OK button. 2-6 Adding Optional Devices Installing the Microdrive (Hard Disk) For details of available Microdrives, see your dealer. Check that the option Microdrive is displayed. 3 Click the Device Settings tab. 4 Click Hard Disk in the printer correctly. 1 Browse through Windows Start > Settings > Printers. 2 Right click on the Kyocera Mita FS-1900 KX icon and then click Properties.


