
Operation Guide
Page 3
... Paper into MP (Multi-Purpose)Tray 2-14 3 Connecting and Printing 3-1 Connections 3-2 Installing the Printer Driver 3-3 Printing 3-7 Status Monitor 3-10 Configuration Tool 3-14 Uninstalling Software 3-18 4 Maintenance 4-1 General Information 4-2 Toner Container Replacement 4-2 Cleaning the Printer 4-6 Prolonged Non-Use and Moving the Printer 4-9 5 Troubleshooting 5-1 General Guidelines 5-2 Print Quality Problems 5-3 Understanding Indicators 5-5 Cleaning Paper Jams 5-9 6 Option 6-1 General...
... Paper into MP (Multi-Purpose)Tray 2-14 3 Connecting and Printing 3-1 Connections 3-2 Installing the Printer Driver 3-3 Printing 3-7 Status Monitor 3-10 Configuration Tool 3-14 Uninstalling Software 3-18 4 Maintenance 4-1 General Information 4-2 Toner Container Replacement 4-2 Cleaning the Printer 4-6 Prolonged Non-Use and Moving the Printer 4-9 5 Troubleshooting 5-1 General Guidelines 5-2 Print Quality Problems 5-3 Understanding Indicators 5-5 Cleaning Paper Jams 5-9 6 Option 6-1 General...

Operation Guide
Page 27
...) Paper (Amber) Attention (Amber) Toner (Amber) Indicators There are used to memory. To identify the printer status, check the indicators on the top right of the printer at Ready status. You cannot print, but the printer can receive data. The printer status is running low. Machine Parts 1-5 Lit A paper jam has occurred or the cassette is exhausted...
...) Paper (Amber) Attention (Amber) Toner (Amber) Indicators There are used to memory. To identify the printer status, check the indicators on the top right of the printer at Ready status. You cannot print, but the printer can receive data. The printer status is running low. Machine Parts 1-5 Lit A paper jam has occurred or the cassette is exhausted...

Operation Guide
Page 28
Resumes printing by switching automatically to the following table for 10 seconds or more Press momentarily Press for 3 to 9 seconds Press for the name and description of the basic functions of each key. Clears the error. Prints the service status page. Key Cancel GO Status At Ready At Error Paper Empty Keys Refer to an available paper source. 1-6 Machine Parts Operation Press for 1 second or more Press momentarily Press momentarily Function Cancels the data from the PC Switches On-line/Off-line Prints the status page.
Resumes printing by switching automatically to the following table for 10 seconds or more Press momentarily Press for 3 to 9 seconds Press for the name and description of the basic functions of each key. Clears the error. Prints the service status page. Key Cancel GO Status At Ready At Error Paper Empty Keys Refer to an available paper source. 1-6 Machine Parts Operation Press for 1 second or more Press momentarily Press momentarily Function Cancels the data from the PC Switches On-line/Off-line Prints the status page.

Operation Guide
Page 38
...using Custom. Up to define and select customized paper types. Not only can also enable or disable the duplex path when using the printer driver and Configuration Tool. Paper type can be stored *. Paper source Paper Type Plain MP tray Paper Cassette Yes Yes Paper Weight ...Duplex path Range Display in Status Monitor (MP tray available only in Cassette mode) 64 to 90g/m2 Normal2 Yes Transparency Yes No Transparency Extra Heavy No Preprinted Yes...
...using Custom. Up to define and select customized paper types. Not only can also enable or disable the duplex path when using the printer driver and Configuration Tool. Paper type can be stored *. Paper source Paper Type Plain MP tray Paper Cassette Yes Yes Paper Weight ...Duplex path Range Display in Status Monitor (MP tray available only in Cassette mode) 64 to 90g/m2 Normal2 Yes Transparency Yes No Transparency Extra Heavy No Preprinted Yes...

Operation Guide
Page 45
3 Connecting and Printing This chapter explains how to start up the printer, print from your PC, and use the application software included in the CD-ROM. Connections Installing the Printer Driver Printing Status Monitor Configuration Tool Uninstalling Software 3-2 3-3 3-7 3-10 3-14 3-18 Connecting and Printing 3-1
3 Connecting and Printing This chapter explains how to start up the printer, print from your PC, and use the application software included in the CD-ROM. Connections Installing the Printer Driver Printing Status Monitor Configuration Tool Uninstalling Software 3-2 3-3 3-7 3-10 3-14 3-18 Connecting and Printing 3-1

Operation Guide
Page 54
... a 3D image. Screen Overview The screen overview of the monitored printer as follows. Exiting the Status Monitor Use either of the methods listed below to launch the Status Monitor. 3-10 Status Monitor The Status Monitor monitors the printer status and provides an ongoing reporting function. Accessing the Status Monitor Use either of the methods listed below to exit...
... a 3D image. Screen Overview The screen overview of the monitored printer as follows. Exiting the Status Monitor Use either of the methods listed below to launch the Status Monitor. 3-10 Status Monitor The Status Monitor monitors the printer status and provides an ongoing reporting function. Accessing the Status Monitor Use either of the methods listed below to exit...

Operation Guide
Page 55
Connecting and Printing 3-11 If an information notification event occurs, the 3D view and an alert sound are used to Status Monitor Settings on page 3-12. For information on the sound notification settings, refer to notify you position the cursor over the icon, the printer name appears. Status Monitor icon The Status Monitor icon is displayed in the taskbar notification area when the Status Monitor is running. When you .
Connecting and Printing 3-11 If an information notification event occurs, the 3D view and an alert sound are used to Status Monitor Settings on page 3-12. For information on the sound notification settings, refer to notify you position the cursor over the icon, the printer name appears. Status Monitor icon The Status Monitor icon is displayed in the taskbar notification area when the Status Monitor is running. When you .

Operation Guide
Page 56
... has two tabs to set up the Status Monitor. Use the Preference option to configure its settings. Although a sound file is unnecessary, this function is WAV. Sound Notification Tab The Event Notification tab ...
... has two tabs to set up the Status Monitor. Use the Preference option to configure its settings. Although a sound file is unnecessary, this function is WAV. Sound Notification Tab The Event Notification tab ...

Operation Guide
Page 57
Connecting and Printing 3-13 Transparency Displays the Status Monitor as a transparent window. Always on top Positions the Status Monitor in front of the Status Monitor window. Appearance Tab The Appearance tab is contains the following items. Enlarge window Doubles the size of other active windows.
Connecting and Printing 3-13 Transparency Displays the Status Monitor as a transparent window. Always on top Positions the Status Monitor in front of the Status Monitor window. Appearance Tab The Appearance tab is contains the following items. Enlarge window Doubles the size of other active windows.

Operation Guide
Page 58
...8226; Exit using the Close button: Click in the top-right corner of the Configuration Tool, run the Status Monitor on your computer at first. 1 Right-click the Status Monitor icon in the KX driver. The Configuration Tool window appears.. Note To configure the settings of the... Configuration Tool window. • Exit using the OK or Cancel button: Clicking OK exits the Configuration Tool after applying the modified printer settings. Note When the printer is connected...
...8226; Exit using the Close button: Click in the top-right corner of the Configuration Tool, run the Status Monitor on your computer at first. 1 Right-click the Status Monitor icon in the KX driver. The Configuration Tool window appears.. Note To configure the settings of the... Configuration Tool window. • Exit using the OK or Cancel button: Clicking OK exits the Configuration Tool after applying the modified printer settings. Note When the printer is connected...

Operation Guide
Page 59
... the paper size and type of printed pages. It also enables or disables duplex printing for FS-1300D only. Duplex printing is available for the each media type. Connecting and Printing 3-15 Status Tab The Status tab displays current information about the paper feeder attached to the machine, such as the model name...
... the paper size and type of printed pages. It also enables or disables duplex printing for FS-1300D only. Duplex printing is available for the each media type. Connecting and Printing 3-15 Status Tab The Status tab displays current information about the paper feeder attached to the machine, such as the model name...

Operation Guide
Page 64
...status at this stage. • If you only use genuine Kyocera Parts and Supplies. The toner container must then be used up. Frequency of toner container replacement Assuming an average toner coverage of 3,600 pages (FS-1300D) or 2,000 pages (FS-1100). to support the recycling operation of toner usage. • When the printer... describes basic maintenance tasks you can replace the toner container according to the printer's status: Also, the internal parts need replacing approximately once every 7,200 pages (FS-1300D) or 4,000 pages (FS-1100). The information gathered is a starter ...
...status at this stage. • If you only use genuine Kyocera Parts and Supplies. The toner container must then be used up. Frequency of toner container replacement Assuming an average toner coverage of 3,600 pages (FS-1300D) or 2,000 pages (FS-1100). to support the recycling operation of toner usage. • When the printer... describes basic maintenance tasks you can replace the toner container according to the printer's status: Also, the internal parts need replacing approximately once every 7,200 pages (FS-1300D) or 4,000 pages (FS-1100). The information gathered is a starter ...

Operation Guide
Page 74
We suggest you have encountered a problem that the procedures for more information. Check Items Check the Ready indicator. The printer prints a status page but data from the computer. Check the power switch is in a recognized combination. Check program files and application software....Print Quality Problems on page 1-5, check if an error has occurred and clear the error. Check if a status page can be a problem with a specific file or application, check the printer settings for further information. Paper is not working. The indicators are available at: http://www.kyoceramita.com/...
We suggest you have encountered a problem that the procedures for more information. Check Items Check the Ready indicator. The printer prints a status page but data from the computer. Check the power switch is in a recognized combination. Check program files and application software....Print Quality Problems on page 1-5, check if an error has occurred and clear the error. Check if a status page can be a problem with a specific file or application, check the printer settings for further information. Paper is not working. The indicators are available at: http://www.kyoceramita.com/...

Operation Guide
Page 77
... or more) to your PC. Normal Indication The table below shows the indicator combinations when the printer status is installing toner. The printer is normal. Troubleshooting 5-5 Meaning The printer is receiving data. Right-click an indicator, then select Playback and Play to play the animation ... and errors (repairs). Indicator Understanding Indicators The indicator displays generally fall into one of the indicator combinations. The printer is warning up. IMPORTANT To play the animation, you should get the latest version from Adobe site (http://www.adobe.com...
... or more) to your PC. Normal Indication The table below shows the indicator combinations when the printer status is installing toner. The printer is normal. Troubleshooting 5-5 Meaning The printer is receiving data. Right-click an indicator, then select Playback and Play to play the animation ... and errors (repairs). Indicator Understanding Indicators The indicator displays generally fall into one of the indicator combinations. The printer is warning up. IMPORTANT To play the animation, you should get the latest version from Adobe site (http://www.adobe.com...

Operation Guide
Page 78
Printing resumes when the [GO] is receiving data. You cannot print, but the printer can receive data. Indicator Meaning The printer is pressed. Offline status. Printing is pressed. The printer returns to online status when the [GO] is pressed, the cover is printing the last page after waiting. The printer is opened and closed, or the printer receives the print jobs. 5-6 Troubleshooting The printer is in sleep mode.The printer returns to online status when the [GO] is possible.
Printing resumes when the [GO] is receiving data. You cannot print, but the printer can receive data. Indicator Meaning The printer is pressed. Offline status. Printing is pressed. The printer returns to online status when the [GO] is pressed, the cover is printing the last page after waiting. The printer is opened and closed, or the printer receives the print jobs. 5-6 Troubleshooting The printer is in sleep mode.The printer returns to online status when the [GO] is possible.
Operation Guide
Page 81
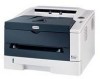
... inside the duplex section. Paper jam at the paper cassette. Remove the paper jam. The cassette number can occur in the table below shows the printer's paper paths including the optional paper feeder. Reference page page 5-10 page 5-11 page 5-12 page 5-13 page 5-15 Troubleshooting 5-9 Paper jams can... printer will light. Cleaning Paper Jams If paper jams in the paper transport system, or no paper sheets are also shown here, with each location explained in more than one component on the paper paths. The locations where paper jams might occur are fed at the MP tray. Status ...
... inside the duplex section. Paper jam at the paper cassette. Remove the paper jam. The cassette number can occur in the table below shows the printer's paper paths including the optional paper feeder. Reference page page 5-10 page 5-11 page 5-12 page 5-13 page 5-15 Troubleshooting 5-9 Paper jams can... printer will light. Cleaning Paper Jams If paper jams in the paper transport system, or no paper sheets are also shown here, with each location explained in more than one component on the paper paths. The locations where paper jams might occur are fed at the MP tray. Status ...
Operation Guide
Page 93
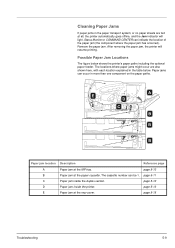
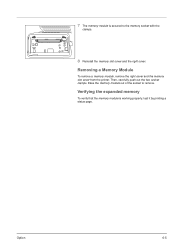
Ease the memory module out of the socket to the memory socket with the clamps. 8 Reinstall the memory slot cover and the right cover. Option 6-5 7 The memory module is working properly, test it by printing a status page. Verifying the expanded memory To verify that the memory module is secured to remove. Then, carefully push out the two socket clamps. Removing a Memory Module To remove a memory module, remove the right cover and the memory slot cover from the printer.
Ease the memory module out of the socket to the memory socket with the clamps. 8 Reinstall the memory slot cover and the right cover. Option 6-5 7 The memory module is working properly, test it by printing a status page. Verifying the expanded memory To verify that the memory module is secured to remove. Then, carefully push out the two socket clamps. Removing a Memory Module To remove a memory module, remove the right cover and the memory slot cover from the printer.
