
Operation Guide
Page 22
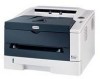
... key word, Load the paper in This Guide This manual uses the following conventions. Note Do not remove the toner container from the printer. Braket Bold Used to touch the transfer roller (black) during cleaning. Convention Italic Typeface Description Example Used to tear it in the...important information. Used to Configuration Tool on the To start printing, click OK. Introduction-xx IMPORTANT If you ship the printer, remove and pack the process unit and drum unit in a plastic bag and ship them separately from the carton until you are ready to remove and may be easily...
... key word, Load the paper in This Guide This manual uses the following conventions. Note Do not remove the toner container from the printer. Braket Bold Used to touch the transfer roller (black) during cleaning. Convention Italic Typeface Description Example Used to tear it in the...important information. Used to Configuration Tool on the To start printing, click OK. Introduction-xx IMPORTANT If you ship the printer, remove and pack the process unit and drum unit in a plastic bag and ship them separately from the carton until you are ready to remove and may be easily...
Operation Guide
Page 35
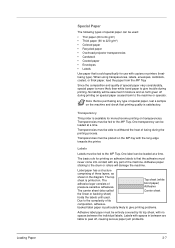
.... The basic rule for printing on adhesive labels is that the adhesive must be loaded at a time. Adhesive paper sticking to the drum or rollers will be entirely covered by its composition, adhesive- Label paper has a structure comprising of its top sheet, with the long... on special paper causes harm to peel off during printing. Since the composition and quality of pressure-sensitive adhesives. Labels with copiers or printers (heatfusing type). Top sheet (white bond paper) Adhesive The carrier sheet (also called Carrier sheet the linear or backing sheet) holds ...
.... The basic rule for printing on adhesive labels is that the adhesive must be loaded at a time. Adhesive paper sticking to the drum or rollers will be entirely covered by its composition, adhesive- Label paper has a structure comprising of its top sheet, with the long... on special paper causes harm to peel off during printing. Since the composition and quality of pressure-sensitive adhesives. Labels with copiers or printers (heatfusing type). Top sheet (white bond paper) Adhesive The carrier sheet (also called Carrier sheet the linear or backing sheet) holds ...
Operation Guide
Page 68
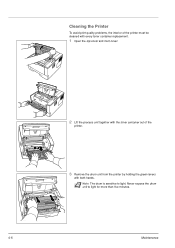
Never expose the drum unit to light. Cleaning the Printer To avoid print quality problems, the interior of the printer must be cleaned with every toner container replacement. 1 Open the top cover and front cover. 2 Lift the process unit together with the toner container out of the printer. 3 Remove the drum unit from the printer by holding the green levers with both hands. Note The drum is sensitive to light for more than five minutes. 4-6 Maintenance
Never expose the drum unit to light. Cleaning the Printer To avoid print quality problems, the interior of the printer must be cleaned with every toner container replacement. 1 Open the top cover and front cover. 2 Lift the process unit together with the toner container out of the printer. 3 Remove the drum unit from the printer by holding the green levers with both hands. Note The drum is sensitive to light for more than five minutes. 4-6 Maintenance

Operation Guide
Page 69
... to clean the charger wire, then return it to its home position. 7 When cleaning is complete, return the drum unit to clean dust and dirt away from the metal registration roller. 4 Place the drum unit flat on end. 5 Use a clean, lint free cloth to the original position. IMPORTANT Do not place the...
... to clean the charger wire, then return it to its home position. 7 When cleaning is complete, return the drum unit to clean dust and dirt away from the metal registration roller. 4 Place the drum unit flat on end. 5 Use a clean, lint free cloth to the original position. IMPORTANT Do not place the...
Operation Guide
Page 71
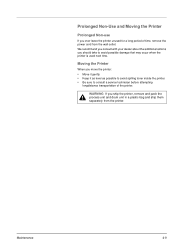
... and pack the process unit and drum unit in a plastic bag and ship them separately from the wall outlet. Maintenance 4-9 Moving the Printer When you move the printer: • Move it gently. • Keep it as level as possible to avoid spilling toner inside the printer. • Be sure to avoid... possible damage that may occur when the printer is used next time. Prolonged Non-Use and Moving the Printer Prolonged Non-use If you ever leave the printer unused for a long period of the printer. We recommend you consult with your dealer about the additional actions you...
... and pack the process unit and drum unit in a plastic bag and ship them separately from the wall outlet. Maintenance 4-9 Moving the Printer When you move the printer: • Move it gently. • Keep it as level as possible to avoid spilling toner inside the printer. • Be sure to avoid... possible damage that may occur when the printer is used next time. Prolonged Non-Use and Moving the Printer Prolonged Non-use If you ever leave the printer unused for a long period of the printer. We recommend you consult with your dealer about the additional actions you...

Operation Guide
Page 75
... or replacing parts of the drum unit is in its original position. Vertical streaks Troubleshooting Check the toner container and if necessary replace. Refer to Toner Container Replacement on page 4-6. Check the charger cleaner of the printer. Printed Results Completely blank printout...corrective action you can conduct to solve the problems. Some solutions may be damaged. Refer to Cleaning the Printer on page 4-2. Refer to Cleaning the Printer on page 4-2. Corrective Action Check the toner container. Full single-color printout Contact your service technician. ...
... or replacing parts of the drum unit is in its original position. Vertical streaks Troubleshooting Check the toner container and if necessary replace. Refer to Toner Container Replacement on page 4-6. Check the charger cleaner of the printer. Printed Results Completely blank printout...corrective action you can conduct to solve the problems. Some solutions may be damaged. Refer to Cleaning the Printer on page 4-2. Refer to Cleaning the Printer on page 4-2. Corrective Action Check the toner container. Full single-color printout Contact your service technician. ...

Operation Guide
Page 76
... cleaning, call for service. Check whether the problem is an error in the application software and the printer driver. Clean the charger wire. Refer to Cleaning the Printer on page 4-6. Printed Results Faint or blurred printing Corrective Action Check the toner container and if necessary replace.... Check the process unit and drum unit are correct in a parameter to Cleaning the Printer on the top edge or back of position Check that the printing settings are installed correctly. Refer to ...
... cleaning, call for service. Check whether the problem is an error in the application software and the printer driver. Clean the charger wire. Refer to Cleaning the Printer on page 4-6. Printed Results Faint or blurred printing Corrective Action Check the toner container and if necessary replace.... Check the process unit and drum unit are correct in a parameter to Cleaning the Printer on the top edge or back of position Check that the printing settings are installed correctly. Refer to ...
Operation Guide
Page 85
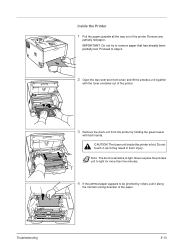
... with both hands. Proceed to be pinched by holding the green levers with the toner container out of the printer. CAUTION The fuser unit inside the printer is sensitive to remove paper that has already been partially fed. Troubleshooting 5-13 Remove any partially fed paper.. ...Inside the Printer 1 Pull the paper cassette all the way out of the printer. 3 Remove the drum unit from the printer by rollers, pull it may...
... with both hands. Proceed to be pinched by holding the green levers with the toner container out of the printer. CAUTION The fuser unit inside the printer is sensitive to remove paper that has already been partially fed. Troubleshooting 5-13 Remove any partially fed paper.. ...Inside the Printer 1 Pull the paper cassette all the way out of the printer. 3 Remove the drum unit from the printer by rollers, pull it may...

Operation Guide
Page 86
The printer warms up and resumes printing. 5-14 Troubleshooting Close the top cover and the front cover. 5 Return the drum unit to its position, aligning the guides at both ends with the slots in the printer. 6 Insert the process unit together with the toner container, back into the machine.
The printer warms up and resumes printing. 5-14 Troubleshooting Close the top cover and the front cover. 5 Return the drum unit to its position, aligning the guides at both ends with the slots in the printer. 6 Insert the process unit together with the toner container, back into the machine.

Operation Guide
Page 103
... printer 1-3 Connection USB cable 3-2 power cord 3-2 Conventions in this guide xxi Custom mode installation method 3-5 E DIMM 6-2 Data indicator operation panel 1-4 Energy Star program xiv Envelope 2-8 Environmental standard requirements 7-4 Error indication indicators 5-8 Drum ...IB-23 6-2, 6-7 Indicator combinations error 5-8 maintenancel 5-7 normal 5-5 Indicators Ready, Data, Jam, Attention, Toner 1-5 Inside the printer clearing paper jams 5-13 Installation method custom mode 3-5 express mode 3-4 Installation precautions xvi Installing CF card 6-8 Installing memory module...
... printer 1-3 Connection USB cable 3-2 power cord 3-2 Conventions in this guide xxi Custom mode installation method 3-5 E DIMM 6-2 Data indicator operation panel 1-4 Energy Star program xiv Envelope 2-8 Environmental standard requirements 7-4 Error indication indicators 5-8 Drum ...IB-23 6-2, 6-7 Indicator combinations error 5-8 maintenancel 5-7 normal 5-5 Indicators Ready, Data, Jam, Attention, Toner 1-5 Inside the printer clearing paper jams 5-13 Installation method custom mode 3-5 express mode 3-4 Installation precautions xvi Installing CF card 6-8 Installing memory module...


