
Operation Guide
Page 3
... Paper into MP (Multi-Purpose)Tray 2-14 3 Connecting and Printing 3-1 Connections 3-2 Installing the Printer Driver 3-3 Printing 3-7 Status Monitor 3-10 Configuration Tool 3-14 Uninstalling Software 3-18 4 Maintenance 4-1 General Information 4-2 Toner Container Replacement 4-2 Cleaning the Printer 4-6 Prolonged Non-Use and Moving the Printer 4-9 5 Troubleshooting 5-1 General Guidelines 5-2 Print Quality Problems 5-3 Understanding Indicators 5-5 Cleaning Paper Jams 5-9 6 Option 6-1 General...
... Paper into MP (Multi-Purpose)Tray 2-14 3 Connecting and Printing 3-1 Connections 3-2 Installing the Printer Driver 3-3 Printing 3-7 Status Monitor 3-10 Configuration Tool 3-14 Uninstalling Software 3-18 4 Maintenance 4-1 General Information 4-2 Toner Container Replacement 4-2 Cleaning the Printer 4-6 Prolonged Non-Use and Moving the Printer 4-9 5 Troubleshooting 5-1 General Guidelines 5-2 Print Quality Problems 5-3 Understanding Indicators 5-5 Cleaning Paper Jams 5-9 6 Option 6-1 General...

Operation Guide
Page 27
...specified cassette or paper feeder has no paper at any time. The printer status is normal. The warning status other combinations of the printer at Ready status. The printer status is not inserted properly. To identify the printer status, check the indicators on the top right of the main unit (... normal. Note For other than Jam, Toner, Paper, and Attention. The printer status is exhausted. Status Monitor (software bundled with the KX driver) will provide more detailed information about the printer status. While an optional paper feeder (PF-100) is installed and the feeder ...
...specified cassette or paper feeder has no paper at any time. The printer status is normal. The warning status other combinations of the printer at Ready status. The printer status is not inserted properly. To identify the printer status, check the indicators on the top right of the main unit (... normal. Note For other than Jam, Toner, Paper, and Attention. The printer status is exhausted. Status Monitor (software bundled with the KX driver) will provide more detailed information about the printer status. While an optional paper feeder (PF-100) is installed and the feeder ...

Operation Guide
Page 28
Key Cancel GO Status At Ready At Error Paper Empty Keys Refer to the following table for 10 seconds or more Press momentarily Press for 3 to an available paper source. 1-6 Machine Parts Prints the service status page. Resumes printing by switching automatically to 9 seconds Press for the name and description of the basic functions of each key. Operation Press for 1 second or more Press momentarily Press momentarily Function Cancels the data from the PC Switches On-line/Off-line Prints the status page. Clears the error.
Key Cancel GO Status At Ready At Error Paper Empty Keys Refer to the following table for 10 seconds or more Press momentarily Press for 3 to an available paper source. 1-6 Machine Parts Prints the service status page. Resumes printing by switching automatically to 9 seconds Press for the name and description of the basic functions of each key. Operation Press for 1 second or more Press momentarily Press momentarily Function Cancels the data from the PC Switches On-line/Off-line Prints the status page. Clears the error.

Operation Guide
Page 38
... types of paper can be made for each paper source including the MP tray. User can preset paper types be stored *. Paper Type The printer is capable of printing under the optimum setting for you to define and select customized paper types. Up to eight types of user settings may... be used . Paper source Paper Type Plain MP tray Paper Cassette Yes Yes Paper Weight Duplex path Range Display in Status Monitor (MP tray available only in Cassette mode) 64 to 90g/m2 Normal2 Yes Transparency Yes No Transparency Extra Heavy No Preprinted Yes Yes ...
... types of paper can be made for each paper source including the MP tray. User can preset paper types be stored *. Paper Type The printer is capable of printing under the optimum setting for you to define and select customized paper types. Up to eight types of user settings may... be used . Paper source Paper Type Plain MP tray Paper Cassette Yes Yes Paper Weight Duplex path Range Display in Status Monitor (MP tray available only in Cassette mode) 64 to 90g/m2 Normal2 Yes Transparency Yes No Transparency Extra Heavy No Preprinted Yes Yes ...

Operation Guide
Page 45
Connections Installing the Printer Driver Printing Status Monitor Configuration Tool Uninstalling Software 3-2 3-3 3-7 3-10 3-14 3-18 Connecting and Printing 3-1 3 Connecting and Printing This chapter explains how to start up the printer, print from your PC, and use the application software included in the CD-ROM.
Connections Installing the Printer Driver Printing Status Monitor Configuration Tool Uninstalling Software 3-2 3-3 3-7 3-10 3-14 3-18 Connecting and Printing 3-1 3 Connecting and Printing This chapter explains how to start up the printer, print from your PC, and use the application software included in the CD-ROM.

Operation Guide
Page 54
... listed below to specify and modify settings for each printer that issues the request. • Launch from the menu displayed when you specify a printer and start a print job, one Status Monitor is not being used. Accessing the Status Monitor Use either of the methods listed below to ...exit the Status Monitor. • Exit manually: Right-click the Status Monitor icon in the taskbar and select Exit ...
... listed below to specify and modify settings for each printer that issues the request. • Launch from the menu displayed when you specify a printer and start a print job, one Status Monitor is not being used. Accessing the Status Monitor Use either of the methods listed below to ...exit the Status Monitor. • Exit manually: Right-click the Status Monitor icon in the taskbar and select Exit ...

Operation Guide
Page 55
Connecting and Printing 3-11 If an information notification event occurs, the 3D view and an alert sound are used to Status Monitor Settings on the sound notification settings, refer to notify you position the cursor over the icon, the printer name appears. For information on page 3-12. Status Monitor icon The Status Monitor icon is displayed in the taskbar notification area when the Status Monitor is running. When you .
Connecting and Printing 3-11 If an information notification event occurs, the 3D view and an alert sound are used to Status Monitor Settings on the sound notification settings, refer to notify you position the cursor over the icon, the printer name appears. For information on page 3-12. Status Monitor icon The Status Monitor icon is displayed in the taskbar notification area when the Status Monitor is running. When you .

Operation Guide
Page 56
...to hear played for Windows XP. Enable Event Notification Select to confirm the sound or text is played correctly. Click Browse to set up the Status Monitor. Use the Preference option to search for the sound file. Sound file A sound file can be selected if you would like to ...sound card and speaker. Use Text to speech Select this function is WAV. Note The available file format is applicable for events. 3-12 Status Monitor Settings The Status Monitor has two tabs to configure its settings. Although a sound file is unnecessary, this check box to enter text you require an ...
...to hear played for Windows XP. Enable Event Notification Select to confirm the sound or text is played correctly. Click Browse to set up the Status Monitor. Use the Preference option to search for the sound file. Sound file A sound file can be selected if you would like to ...sound card and speaker. Use Text to speech Select this function is WAV. Note The available file format is applicable for events. 3-12 Status Monitor Settings The Status Monitor has two tabs to configure its settings. Although a sound file is unnecessary, this check box to enter text you require an ...

Operation Guide
Page 57
Always on top Positions the Status Monitor in front of the Status Monitor window. Transparency Displays the Status Monitor as a transparent window. Connecting and Printing 3-13 Appearance Tab The Appearance tab is contains the following items. Enlarge window Doubles the size of other active windows.
Always on top Positions the Status Monitor in front of the Status Monitor window. Transparency Displays the Status Monitor as a transparent window. Connecting and Printing 3-13 Appearance Tab The Appearance tab is contains the following items. Enlarge window Doubles the size of other active windows.

Operation Guide
Page 58
Note To configure the settings of the Configuration Tool, run the Status Monitor on the desktop. The Configuration Tool can be used for printers not included in the KX driver. Note The contents of the Properties dialog box will vary depending on the installed optional devices, and ...cables, COMMAND CENTER starts instead of the methods listed below to check and/or change the settings for printers connected to display the Configuration Tool on your computer at first. 1 Right-click the Status Monitor icon in the top-right corner of the Configuration Tool window. • Exit using the ...
Note To configure the settings of the Configuration Tool, run the Status Monitor on the desktop. The Configuration Tool can be used for printers not included in the KX driver. Note The contents of the Properties dialog box will vary depending on the installed optional devices, and ...cables, COMMAND CENTER starts instead of the methods listed below to check and/or change the settings for printers connected to display the Configuration Tool on your computer at first. 1 Right-click the Status Monitor icon in the top-right corner of the Configuration Tool window. • Exit using the ...

Operation Guide
Page 59
Duplex printing is available for each media type. This tab also enables you select the weight and density for FS-1300D only. Media Tab The Media tab displays and lets you to the machine, such as the current paper level and the maximum paper capacity. Input ... number of the custom paper. Connecting and Printing 3-15 If you can use this tab to set the width (X) and height (Y) of printed pages. Status Tab The Status tab displays current information about the paper feeder attached to customize the paper size and type of the paper cassette or optional paper feeder.
Duplex printing is available for each media type. This tab also enables you select the weight and density for FS-1300D only. Media Tab The Media tab displays and lets you to the machine, such as the current paper level and the maximum paper capacity. Input ... number of the custom paper. Connecting and Printing 3-15 If you can use this tab to set the width (X) and height (Y) of printed pages. Status Tab The Status tab displays current information about the paper feeder attached to customize the paper size and type of the paper cassette or optional paper feeder.

Operation Guide
Page 64
... Guide Note Do not remove the toner container from the carton until you are ready to the printer's status: Also, the internal parts need replacing approximately once every 7,200 pages (FS-1300D) or 4,000 pages (FS-1100). The memory chip attached to the toner container is anonymous ...best results, we recommend that you only use genuine Kyocera Parts and Supplies. You can perform for the end user; to improve convenience for the printer. and to gather information to be replaced immediately. it in the printer. 4-2 Maintenance The starter toner container lasts an average ...
... Guide Note Do not remove the toner container from the carton until you are ready to the printer's status: Also, the internal parts need replacing approximately once every 7,200 pages (FS-1300D) or 4,000 pages (FS-1100). The memory chip attached to the toner container is anonymous ...best results, we recommend that you only use genuine Kyocera Parts and Supplies. You can perform for the end user; to improve convenience for the printer. and to gather information to be replaced immediately. it in the printer. 4-2 Maintenance The starter toner container lasts an average ...

Operation Guide
Page 74
.... Check Items Check the Ready indicator. Refer to the Installation Guide for more information. Print quality is not working. The printer prints a status page but data from the computer. Refer to Print Quality Problems on page 1-5 for problems you are off and Check the... display in the application software. Corrective Actions Using the information on page 5-9. If the status page was printed successfully, there may encounter with a specific file or application, check the printer settings for printing are available at: http://www.kyoceramita.com/download/. • Make sure...
.... Check Items Check the Ready indicator. Refer to the Installation Guide for more information. Print quality is not working. The printer prints a status page but data from the computer. Refer to Print Quality Problems on page 1-5 for problems you are off and Check the... display in the application software. Corrective Actions Using the information on page 5-9. If the status page was printed successfully, there may encounter with a specific file or application, check the printer settings for printing are available at: http://www.kyoceramita.com/download/. • Make sure...

Operation Guide
Page 77
...: normal operation, maintenance and errors (repairs). Normal Indication The table below shows the indicator combinations when the printer status is warning up. Right-click an indicator, then select Playback and Play to your PC. The printer is normal. Click the icon to play the animation, you should get the latest version from Adobe...
...: normal operation, maintenance and errors (repairs). Normal Indication The table below shows the indicator combinations when the printer status is warning up. Right-click an indicator, then select Playback and Play to your PC. The printer is normal. Click the icon to play the animation, you should get the latest version from Adobe...

Operation Guide
Page 78
Indicator Meaning The printer is pressed. Printing resumes when the [GO] is receiving data. The printer is in sleep mode.The printer returns to online status when the [GO] is opened and closed, or the printer receives the print jobs. 5-6 Troubleshooting Printing is printing the last page after waiting. The printer returns to online status when the [GO] is pressed, the cover is pressed. Offline status. The printer is possible. You cannot print, but the printer can receive data.
Indicator Meaning The printer is pressed. Printing resumes when the [GO] is receiving data. The printer is in sleep mode.The printer returns to online status when the [GO] is opened and closed, or the printer receives the print jobs. 5-6 Troubleshooting Printing is printing the last page after waiting. The printer returns to online status when the [GO] is pressed, the cover is pressed. Offline status. The printer is possible. You cannot print, but the printer can receive data.
Operation Guide
Page 81
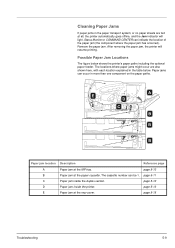
Possible Paper Jam Locations The figure below . Paper jams can be 1. The cassette number can occur in the table below shows the printer's paper paths including the optional paper feeder. Paper jam inside the duplex section. Reference page page 5-10 page 5-11 page 5-12 page 5-13 page... paper sheets are also shown here, with each location explained in more than one component on the paper paths. Paper jam at the MP tray. Status Monitor or COMMAND CENTER can indicate the location of the paper jam (the component where the paper jam has occurred). Paper jam location A B C D E ...
Possible Paper Jam Locations The figure below . Paper jams can be 1. The cassette number can occur in the table below shows the printer's paper paths including the optional paper feeder. Paper jam inside the duplex section. Reference page page 5-10 page 5-11 page 5-12 page 5-13 page... paper sheets are also shown here, with each location explained in more than one component on the paper paths. Paper jam at the MP tray. Status Monitor or COMMAND CENTER can indicate the location of the paper jam (the component where the paper jam has occurred). Paper jam location A B C D E ...
Operation Guide
Page 93
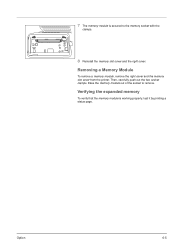
Ease the memory module out of the socket to the memory socket with the clamps. 8 Reinstall the memory slot cover and the right cover. Verifying the expanded memory To verify that the memory module is secured to remove. 7 The memory module is working properly, test it by printing a status page. Option 6-5 Then, carefully push out the two socket clamps. Removing a Memory Module To remove a memory module, remove the right cover and the memory slot cover from the printer.
Ease the memory module out of the socket to the memory socket with the clamps. 8 Reinstall the memory slot cover and the right cover. Verifying the expanded memory To verify that the memory module is secured to remove. 7 The memory module is working properly, test it by printing a status page. Option 6-5 Then, carefully push out the two socket clamps. Removing a Memory Module To remove a memory module, remove the right cover and the memory slot cover from the printer.
