bizhub 181 GDI Print Controler User Manual
Page 30
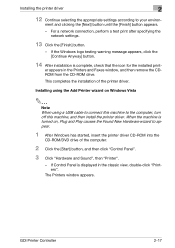
...remove the CDROM from the CD-ROM drive. GDI Printer Controller 2-17 Installing the printer driver 2 12 Continue selecting the appropriate settings according to the computer, turn off this machine to your environ- er appears in the classic view, double-click "Printers". Installing... Windows Vista 2 Note When using a USB cable to connect this machine, and then install the printer driver. For a network connection, perform a test print after specifying the network settings. 13 Click the [Finish] button. - ment and clicking the [Next] button until the [Finish] button appears. -...
...remove the CDROM from the CD-ROM drive. GDI Printer Controller 2-17 Installing the printer driver 2 12 Continue selecting the appropriate settings according to the computer, turn off this machine to your environ- er appears in the classic view, double-click "Printers". Installing... Windows Vista 2 Note When using a USB cable to connect this machine, and then install the printer driver. For a network connection, perform a test print after specifying the network settings. 13 Click the [Finish] button. - ment and clicking the [Next] button until the [Finish] button appears. -...

bizhub 181 GDI Print Controler User Manual
Page 33
... "Install this driver software anyway". 13 Click the [Finish] button. - 2 Installing the printer driver 12 Continue selecting the appropriate settings according to your environ- For a network connection, perform a test print after specifying the network settings. 14 After installation is complete, check that the icon for the installed print- er appears in the Printers window...
... "Install this driver software anyway". 13 Click the [Finish] button. - 2 Installing the printer driver 12 Continue selecting the appropriate settings according to your environ- For a network connection, perform a test print after specifying the network settings. 14 After installation is complete, check that the icon for the installed print- er appears in the Printers window...
bizhub 181 GDI Print Controler User Manual
Page 36
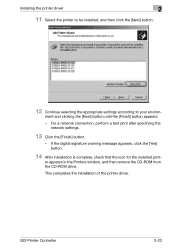
ment and clicking the [Next] button until the [Finish] button appears. - This completes the installation of the printer driver. For a network connection, perform a test print after specifying the network settings. 13 Click the [Finish] button. - GDI Printer Controller 2-23 er appears in the Printers window, and then remove the CD-ROM from the CD... the installed print- Installing the printer driver 2 11 Select the printer to be installed, and then click the [Next] button. 12 Continue selecting the appropriate settings according to your environ-
ment and clicking the [Next] button until the [Finish] button appears. - This completes the installation of the printer driver. For a network connection, perform a test print after specifying the network settings. 13 Click the [Finish] button. - GDI Printer Controller 2-23 er appears in the Printers window, and then remove the CD-ROM from the CD... the installed print- Installing the printer driver 2 11 Select the printer to be installed, and then click the [Next] button. 12 Continue selecting the appropriate settings according to your environ-

IC-206 User Manual
Page 16
... 6-3 Environments for network scan transmissions 6-4 7 Network settings 7.1 Network settings 7-1 List of network settings 7-1 List of LDAP settings 7-5 7.2 Specifying settings from the control panel 7-7 7.3 NETWORK SETTING 7-9 Specifying the IP address, subnet mask and default gateway ...... 7-9 Specifying the DNS settings 7-13 Specifying the gateway transmission setting 7-14 Specifying the WEB setting 7-15 Specifying the LPD setting 7-16 Specifying the SLP setting 7-17 Specifying the SNMP setting 7-18 7.4 E-MAIL SETTING 1 7-19...
... 6-3 Environments for network scan transmissions 6-4 7 Network settings 7.1 Network settings 7-1 List of network settings 7-1 List of LDAP settings 7-5 7.2 Specifying settings from the control panel 7-7 7.3 NETWORK SETTING 7-9 Specifying the IP address, subnet mask and default gateway ...... 7-9 Specifying the DNS settings 7-13 Specifying the gateway transmission setting 7-14 Specifying the WEB setting 7-15 Specifying the LPD setting 7-16 Specifying the SLP setting 7-17 Specifying the SNMP setting 7-18 7.4 E-MAIL SETTING 1 7-19...

IC-206 User Manual
Page 52
... driver 2 11 Select the printer to be installed, and then click the [Next] button. 12 Continue selecting the appropriate settings according to your environ- For a network connection, perform a test print after specifying the network settings. 13 Click the [Finish] button. - This completes the installation of the printer driver. ment and clicking the [Next] button...
... driver 2 11 Select the printer to be installed, and then click the [Next] button. 12 Continue selecting the appropriate settings according to your environ- For a network connection, perform a test print after specifying the network settings. 13 Click the [Finish] button. - This completes the installation of the printer driver. ment and clicking the [Next] button...

IC-206 User Manual
Page 55
..., perform a test print after specifying the network settings. 14 After installation is complete, check that the icon for the installed print- er appears in the Printers window, and then remove the CD-ROM ... the [Finish] button. - 2 Installing the printer driver 11 Select the printer to be installed, and then click the [Next] button. 12 Continue selecting the appropriate settings according to your environ- This completes the installation of the printer driver. 2-22 IC-206 If the User Account Control dialog box appears, click the...
..., perform a test print after specifying the network settings. 14 After installation is complete, check that the icon for the installed print- er appears in the Printers window, and then remove the CD-ROM ... the [Finish] button. - 2 Installing the printer driver 11 Select the printer to be installed, and then click the [Next] button. 12 Continue selecting the appropriate settings according to your environ- This completes the installation of the printer driver. 2-22 IC-206 If the User Account Control dialog box appears, click the...

IC-206 User Manual
Page 58
... appears. - er appears in the Printers window, and then remove the CD-ROM from the CD-ROM drive. IC-206 2-25 For a network connection, perform a test print after specifying the network settings. 13 Click the [Finish] button. - Installing the printer driver 2 11 Select the printer to be installed, and then click the [Next...
... appears. - er appears in the Printers window, and then remove the CD-ROM from the CD-ROM drive. IC-206 2-25 For a network connection, perform a test print after specifying the network settings. 13 Click the [Finish] button. - Installing the printer driver 2 11 Select the printer to be installed, and then click the [Next...

IC-206 User Manual
Page 75
If the code was incorrectly entered, press the [Clear/Stop] key to erase the number, and then type it in the administrator access code, and then press the [OK] key. - The manufacturer's default setting is selected, and then press the [OK] key. - If fax kit FK-506 is installed 5 In the "NETWORK SETTING" menu, press the [,] or [+] key until "NETWORK SETTING" is "000000". - 3 Network printing 3 Type in correctly. 4 Press the [,] or [+] key until "IP ADDRESS SETTING" is selected, and then press the [OK] key. 3-10 IC-206
If the code was incorrectly entered, press the [Clear/Stop] key to erase the number, and then type it in the administrator access code, and then press the [OK] key. - The manufacturer's default setting is selected, and then press the [OK] key. - If fax kit FK-506 is installed 5 In the "NETWORK SETTING" menu, press the [,] or [+] key until "NETWORK SETTING" is "000000". - 3 Network printing 3 Type in correctly. 4 Press the [,] or [+] key until "IP ADDRESS SETTING" is selected, and then press the [OK] key. 3-10 IC-206

IC-206 User Manual
Page 76
...] key. - If "AUTO" is selected, a screen appears, allowing you to specify the IP address. IC-206 - Network printing 3 6 Press the [,] or [+] key until "AUTO" or "SPECIFY" is on the network. After the message "ACCEPTED" appears, the "NETWORK SETTING" menu appears again. - If the value was incorrectly entered, press the [Clear/Stop] key to erase...
...] key. - If "AUTO" is selected, a screen appears, allowing you to specify the IP address. IC-206 - Network printing 3 6 Press the [,] or [+] key until "AUTO" or "SPECIFY" is on the network. After the message "ACCEPTED" appears, the "NETWORK SETTING" menu appears again. - If the value was incorrectly entered, press the [Clear/Stop] key to erase...

IC-206 User Manual
Page 77
... - For the gateway, consult with the network administrator. - After the screen shown below appears, turn the machine off , then on again to restart it in correctly. 10 Press the [OK] key. The message "ACCEPTED" appears, and then the "NETWORK SETTING" menu appears again. 11 Press the [Reset...] key in the gateway. In order to apply the new settings, the machine must be restarted. 3-12 IC-206 Network printing - If the number was incorrectly entered, press the [Clear/Stop...
... - For the gateway, consult with the network administrator. - After the screen shown below appears, turn the machine off , then on again to restart it in correctly. 10 Press the [OK] key. The message "ACCEPTED" appears, and then the "NETWORK SETTING" menu appears again. 11 Press the [Reset...] key in the gateway. In order to apply the new settings, the machine must be restarted. 3-12 IC-206 Network printing - If the number was incorrectly entered, press the [Clear/Stop...

IC-206 User Manual
Page 140
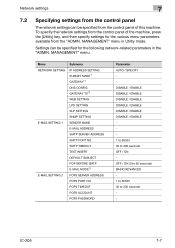
... (IP address of the machine. 7.1 Network settings The available network operations are limited according to the connected LAN environment. Specify the network settings according to the environment and functions to be specified o o o o o o IC-206 7-1 Consult with the network adminis- TING chine. work administrator. trator. Network settings 7 7 Network settings This chapter provides descriptions on specifying network settings from the control panel of the...
... (IP address of the machine. 7.1 Network settings The available network operations are limited according to the connected LAN environment. Specify the network settings according to the environment and functions to be specified o o o o o o IC-206 7-1 Consult with the network adminis- TING chine. work administrator. trator. Network settings 7 7 Network settings This chapter provides descriptions on specifying network settings from the control panel of the...

IC-206 User Manual
Page 141
... the e-mail o DRESS address of the DNS server. Consult with the net- 7 Network settings Parameter Description Scan to Server (FTP) ● Settings Machine control panel o PageScope Web Connection o - If a DNS server is used. Consult with the net- tion. LPD SET- Specify the IP ad- o o - - Obtain from the net- work administrator. dress or host name...
... the e-mail o DRESS address of the DNS server. Consult with the net- 7 Network settings Parameter Description Scan to Server (FTP) ● Settings Machine control panel o PageScope Web Connection o - If a DNS server is used. Consult with the net- tion. LPD SET- Specify the IP ad- o o - - Obtain from the net- work administrator. dress or host name...

IC-206 User Manual
Page 142
...been attached when scan data is used when sending scan data attached to an e-mail message. POP BE- E-MAIL Specify the default - Network settings 7 Parameter Description Scan to insert text explain- Specify the amount o OUT of the SMTP server. Select whether or not ●*6 ... times out. Scan to an e-mail mes- work administrator. TEXT IN- DEFAULT Specify the default o SUBJECT subject used . Settings Machine control panel o PageScope Web Connection o o o o o o o o o o o IC-206 7-3 tion entered using the keypad).
...been attached when scan data is used when sending scan data attached to an e-mail message. POP BE- E-MAIL Specify the default - Network settings 7 Parameter Description Scan to insert text explain- Specify the amount o OUT of the SMTP server. Select whether or not ●*6 ... times out. Scan to an e-mail mes- work administrator. TEXT IN- DEFAULT Specify the default o SUBJECT subject used . Settings Machine control panel o PageScope Web Connection o o o o o o o o o o o IC-206 7-3 tion entered using the keypad).

IC-206 User Manual
Page 143
... seconds) until the connection with the net- Specify the account ●*6 COUNT name used to log on to E-mail E-MAIL SETTING 2 POP3 SERV- Consult with the net- ing for check- sages. Settings Machine control panel PageScope Web Connection o o o o o o o o o o o - o - o - 7-4 IC-206 POP3 PORT Specify the port ●*6 NO. Consult... ●*6 OUT of time (between 1 and 65535) of error notification e-mail messages if an error occurs while receiving an Internet fax. 7 Network settings Parameter Description Scan to the POP3 server.
... seconds) until the connection with the net- Specify the account ●*6 COUNT name used to log on to E-mail E-MAIL SETTING 2 POP3 SERV- Consult with the net- ing for check- sages. Settings Machine control panel PageScope Web Connection o o o o o o o o o o o - o - o - 7-4 IC-206 POP3 PORT Specify the port ●*6 NO. Consult... ●*6 OUT of time (between 1 and 65535) of error notification e-mail messages if an error occurs while receiving an Internet fax. 7 Network settings Parameter Description Scan to the POP3 server.

IC-206 User Manual
Page 144
.... ministrator. Select whether or not SSL is used for des- Consult with the network administrator. Specify the search attributes when us - Con- Network settings 7 *1: Necessary if notification of the URL is to be sent by e-mail. Specify where to start the search in order to ...the User's Guide for the LDAP server. For details on direct faxing, refer to use direct faxing. Consult with the network ad- Consult with...
.... ministrator. Select whether or not SSL is used for des- Consult with the network administrator. Specify the search attributes when us - Con- Network settings 7 *1: Necessary if notification of the URL is to be sent by e-mail. Specify where to start the search in order to ...the User's Guide for the LDAP server. For details on direct faxing, refer to use direct faxing. Consult with the network ad- Consult with...

IC-206 User Manual
Page 145
...search results. Type in a password if any setting other than "ANONYMOUS" was selected as the authentication method. 7 Network settings Parameter SEARCH METHOD LDAP TIMEOUT MAX. Type in an account name if any setting other than "ANONYMOUS" was selected as the ...authentication method. Consult with the network administrator. Specify the amount of items o (...
...search results. Type in a password if any setting other than "ANONYMOUS" was selected as the authentication method. 7 Network settings Parameter SEARCH METHOD LDAP TIMEOUT MAX. Type in an account name if any setting other than "ANONYMOUS" was selected as the ...authentication method. Consult with the network administrator. Specify the amount of items o (...
IC-206 User Manual
Page 146
... MODE*3 POP3 SERVER ADDRESS POP3 PORT NO. Menu NETWORK SETTING E-MAIL SETTING 1 E-MAIL SETTING 2 Submenu IP ADDRESS SETTING SUBNET MASK*1 GATEWAY*1 DNS CONFIG GATEWAY TX*3 WEB SETTING LPD SETTING SLP SETTING SNMP SETTING SENDER NAME E-MAIL ADDRESS SMTP SERVER ADDRESS SMTP PORT NO. IC-206 7-7 Network settings 7 7.2 Specifying settings from the control panel The network settings can be specified from the control panel of...
... MODE*3 POP3 SERVER ADDRESS POP3 PORT NO. Menu NETWORK SETTING E-MAIL SETTING 1 E-MAIL SETTING 2 Submenu IP ADDRESS SETTING SUBNET MASK*1 GATEWAY*1 DNS CONFIG GATEWAY TX*3 WEB SETTING LPD SETTING SLP SETTING SNMP SETTING SENDER NAME E-MAIL ADDRESS SMTP SERVER ADDRESS SMTP PORT NO. IC-206 7-7 Network settings 7 7.2 Specifying settings from the control panel The network settings can be specified from the control panel of...

IC-206 User Manual
Page 147
... PORT NO. 1 to 100 items AUTHENTICATION ANONYMOUS/SIMPLE/DIGESTMD5/GSS-SPNEGO LDAP ACCOUNT - SEARCH RESULTS 5 to 65535 SSL SETTING DISABLE/ENABLE SEARCH BASE - LDAP PASSWORD - 7 Network settings Menu Submenu Parameter LDAP SETTING LDAP SERVER ADDR. - USER SETTING NTP SERVER ADDRESS*2 - ATTRIBUTE - TIME ZONE*2 - *1: These items can be specified if the optional fax kit FK-506...
... PORT NO. 1 to 100 items AUTHENTICATION ANONYMOUS/SIMPLE/DIGESTMD5/GSS-SPNEGO LDAP ACCOUNT - SEARCH RESULTS 5 to 65535 SSL SETTING DISABLE/ENABLE SEARCH BASE - LDAP PASSWORD - 7 Network settings Menu Submenu Parameter LDAP SETTING LDAP SERVER ADDR. - USER SETTING NTP SERVER ADDRESS*2 - ATTRIBUTE - TIME ZONE*2 - *1: These items can be specified if the optional fax kit FK-506...

IC-206 User Manual
Page 148
..., subnet mask and default gateway The settings for the following parameters. - DNS CONFIG - IP ADDRESS SETTING - This section provides details on specifying settings for the IP address to the gateway are specified from the "ADMIN. SNMP SETTING 2 Reminder Before specifying network settings, check with the network administrator for the necessary information. Network settings 7 7.3 NETWORK SETTING Network settings are specified in a continuous operation. 1 Press...
..., subnet mask and default gateway The settings for the following parameters. - DNS CONFIG - IP ADDRESS SETTING - This section provides details on specifying settings for the IP address to the gateway are specified from the "ADMIN. SNMP SETTING 2 Reminder Before specifying network settings, check with the network administrator for the necessary information. Network settings 7 7.3 NETWORK SETTING Network settings are specified in a continuous operation. 1 Press...

IC-206 User Manual
Page 149
If fax kit FK-506 is "000000". - If the number was incorrectly entered, press the [Clear/Stop] key to erase the number, and then type it in the administrator access code, and then press the [OK] key. - The manufacturer's default setting is installed 7-10 IC-206 MANAGEMENT" is selected, and then press the [OK] key. 3 Type in correctly. 4 Press the [,] or [+] key until "ADMIN. 7 Network settings 2 Press the [,] or [+] key until "NETWORK SETTING" is selected, and then press the [OK] key. -
If fax kit FK-506 is "000000". - If the number was incorrectly entered, press the [Clear/Stop] key to erase the number, and then type it in the administrator access code, and then press the [OK] key. - The manufacturer's default setting is installed 7-10 IC-206 MANAGEMENT" is selected, and then press the [OK] key. 3 Type in correctly. 4 Press the [,] or [+] key until "ADMIN. 7 Network settings 2 Press the [,] or [+] key until "NETWORK SETTING" is selected, and then press the [OK] key. -


