
User Manual
Page 4
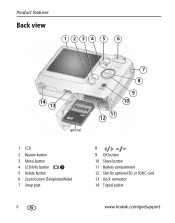
Product features Back view 1 234 5 6 14 13 optional 7 8 9 10 11 12 1 LCD 2 Review button 3 Menu button 4 LCD/Info button 5 Delete button 6 Zoom button (Telephoto/Wide) 7 Strap post 8 9 OK button 10 Share button 11 Battery compartment 12 Slot for optional SD or SDHC card 13 Dock connector 14 Tripod socket ii www.kodak.com/go/support
Product features Back view 1 234 5 6 14 13 optional 7 8 9 10 11 12 1 LCD 2 Review button 3 Menu button 4 LCD/Info button 5 Delete button 6 Zoom button (Telephoto/Wide) 7 Strap post 8 9 OK button 10 Share button 11 Battery compartment 12 Slot for optional SD or SDHC card 13 Dock connector 14 Tripod socket ii www.kodak.com/go/support
User Manual
Page 5
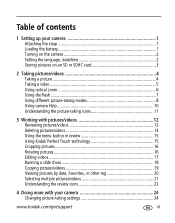
... optical zoom 6 Using the flash 7 Using different picture-taking modes 8 Using camera Help 10 Understanding the picture-taking icons 11 3 Working with pictures/videos 12 Reviewing pictures/videos 12 Deleting pictures/videos 14 Using the menu button in review 15 Using Kodak Perfect Touch technology 15 Cropping pictures 16 Rotating pictures 16 Editing videos...
... optical zoom 6 Using the flash 7 Using different picture-taking modes 8 Using camera Help 10 Understanding the picture-taking icons 11 3 Working with pictures/videos 12 Reviewing pictures/videos 12 Deleting pictures/videos 14 Using the menu button in review 15 Using Kodak Perfect Touch technology 15 Cropping pictures 16 Rotating pictures 16 Editing videos...

User Manual
Page 10
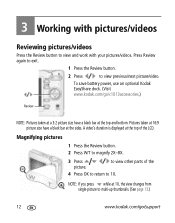
Reviewing the picture just taken After you take a picture or video, the LCD displays a quickview for approximately 10 seconds. (To exit the quickview sooner, press the Shutter button halfway.) The picture is saved unless you press the Delete button. Delete Play a video. When the framing marks turn green, press the Shutter button completely down. To review pictures/videos anytime, see page 12. 4 www.kodak.com/go/support 2 Taking pictures/videos Taking a picture 1 2 Framing marks Press the Shutter button halfway to focus and set exposure.
Reviewing the picture just taken After you take a picture or video, the LCD displays a quickview for approximately 10 seconds. (To exit the quickview sooner, press the Shutter button halfway.) The picture is saved unless you press the Delete button. Delete Play a video. When the framing marks turn green, press the Shutter button completely down. To review pictures/videos anytime, see page 12. 4 www.kodak.com/go/support 2 Taking pictures/videos Taking a picture 1 2 Framing marks Press the Shutter button halfway to focus and set exposure.
User Manual
Page 18
To save battery power, use an optional Kodak EasyShare dock. (Visit www.kodak.com/go /support A video's duration is displayed at the sides. NOTE: If you press while at 1X, the view changes from single-picture to multi-up thumbnails. (See page 13.) 12 www.kodak.com/go /c1013accessories.) Review NOTE: Pictures taken at a 3:2 picture size...
To save battery power, use an optional Kodak EasyShare dock. (Visit www.kodak.com/go /support A video's duration is displayed at the sides. NOTE: If you press while at 1X, the view changes from single-picture to multi-up thumbnails. (See page 13.) 12 www.kodak.com/go /c1013accessories.) Review NOTE: Pictures taken at a 3:2 picture size...

User Manual
Page 19
...Press during playback to play at 2X, 4X. NOTE: To select multiple pictures/videos, see page 35). Viewing picture/video information 1 Press the Review button. 2 Repeatedly press the LCD/Info button to find previous/next video. Press to play /pause. NOTE: To hear audio, transfer the... video to single-picture view. www.kodak.com/go/support 13 Working with pictures/videos Playing videos 1 Press the Review button. 2 Press to turn on/off status icons and picture/video info. Viewing thumbnails (multi-up) 1...
...Press during playback to play at 2X, 4X. NOTE: To select multiple pictures/videos, see page 35). Viewing picture/video information 1 Press the Review button. 2 Repeatedly press the LCD/Info button to find previous/next video. Press to play /pause. NOTE: To hear audio, transfer the... video to single-picture view. www.kodak.com/go/support 13 Working with pictures/videos Playing videos 1 Press the Review button. 2 Press to turn on/off status icons and picture/video info. Viewing thumbnails (multi-up) 1...

User Manual
Page 20
.... 2 Press to find previous/next picture/video. 3 Press the Menu button. 4 Press to highlight Protect, then press OK. Protecting pictures/videos from deletion 1 Press the Review button. 2 Press to exit the menu. The picture/video is protected and cannot be deleted. I Press the Menu button to find previous/next picture/video... memory or an SD/SDHC card deletes all (including protected) pictures/videos. (Formatting internal memory also deletes email addresses, tag names, and favorites.) 14 www.kodak.com/go/support Working with the protected picture/video.
.... 2 Press to find previous/next picture/video. 3 Press the Menu button. 4 Press to highlight Protect, then press OK. Protecting pictures/videos from deletion 1 Press the Review button. 2 Press to exit the menu. The picture/video is protected and cannot be deleted. I Press the Menu button to find previous/next picture/video... memory or an SD/SDHC card deletes all (including protected) pictures/videos. (Formatting internal memory also deletes email addresses, tag names, and favorites.) 14 www.kodak.com/go/support Working with the protected picture/video.

User Manual
Page 21
...replace the original picture or to exit the menu. www.kodak.com/go/support 15 I Press the Menu button to save the enhanced picture as a new one. The enhancement is previewed in review 1 Press the Review button, then the Menu button. 2 Press to find previous... 2 Press the Menu button. Press picture. NOTE: You cannot enhance previously enhanced pictures. Using Kodak Perfect Touch technology Kodak Perfect Touch technology helps ensure better, brighter pictures. 1 Press the Review button, then to highlight a setting, then press the OK button. 3 Highlight an option, ...
...replace the original picture or to exit the menu. www.kodak.com/go/support 15 I Press the Menu button to save the enhanced picture as a new one. The enhancement is previewed in review 1 Press the Review button, then the Menu button. 2 Press to find previous... 2 Press the Menu button. Press picture. NOTE: You cannot enhance previously enhanced pictures. Using Kodak Perfect Touch technology Kodak Perfect Touch technology helps ensure better, brighter pictures. 1 Press the Review button, then to highlight a setting, then press the OK button. 3 Highlight an option, ...

User Manual
Page 22
... prompts to replace the original picture or to exit the menu. 16 www.kodak.com/go/support Rotating pictures You can crop a picture so that only the desired portion of the picture remains. 1 Press the Review button, then picture. to highlight 3 Press to highlight Crop, then press OK.... 4 Press Telephoto (T) to zoom in portrait or landscape orientation. 1 Press the Review button, then to highlight an option: Rotate Right-rotates the picture 90 degrees clockwise . Press OK. 5 Follow the screen prompts. Working with ...
... prompts to replace the original picture or to exit the menu. 16 www.kodak.com/go/support Rotating pictures You can crop a picture so that only the desired portion of the picture remains. 1 Press the Review button, then picture. to highlight 3 Press to highlight Crop, then press OK.... 4 Press Telephoto (T) to zoom in portrait or landscape orientation. 1 Press the Review button, then to highlight an option: Rotate Right-rotates the picture 90 degrees clockwise . Press OK. 5 Follow the screen prompts. Working with ...
User Manual
Page 23
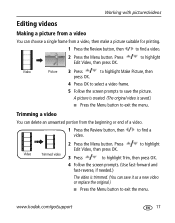
...You can save the picture. Trimming a video You can delete an unwanted portion from a video, then make a picture suitable for printing. 1 Press the Review button, then to exit the menu. Video Trimmed video 3 Press to highlight Trim, then press OK. 4 Follow the screen prompts. (Use fast-forward and...as a new video or replace the original.) I Press the Menu button to exit the menu. to highlight Edit Video, then press OK. www.kodak.com/go/support 17 Press Edit Video, then press OK. Press to find a video. 2 Press the Menu button. Working with pictures/videos Editing...
...You can save the picture. Trimming a video You can delete an unwanted portion from a video, then make a picture suitable for printing. 1 Press the Review button, then to exit the menu. Video Trimmed video 3 Press to highlight Trim, then press OK. 4 Follow the screen prompts. (Use fast-forward and...as a new video or replace the original.) I Press the Menu button to exit the menu. to highlight Edit Video, then press OK. www.kodak.com/go/support 17 Press Edit Video, then press OK. Press to find a video. 2 Press the Menu button. Working with pictures/videos Editing...

User Manual
Page 24
...kodak.com/go/support Auto options: The camera includes the first and last frames, then 2, 7, or 14 equally spaced frames. Manual options: You choose the first and last frames; the camera chooses 2, 7, or 14 equally spaced frames. Each picture/video is displayed once. Running a slide show 1 Press the Review... Video 4-, 9-, or Edit Video, then press OK. 16-up picture, suitable for a 4 x 6-inch (10 x 15 cm) print. 1 Press the Review button, then video. Working with pictures/videos Making a video action print From a video, you can make a 4-, 9-, or 16-up picture 3 Press to ...
...kodak.com/go/support Auto options: The camera includes the first and last frames, then 2, 7, or 14 equally spaced frames. Manual options: You choose the first and last frames; the camera chooses 2, 7, or 14 equally spaced frames. Each picture/video is displayed once. Running a slide show 1 Press the Review... Video 4-, 9-, or Edit Video, then press OK. 16-up picture, suitable for a 4 x 6-inch (10 x 15 cm) print. 1 Press the Review button, then video. Working with pictures/videos Making a video action print From a video, you can make a 4-, 9-, or 16-up picture 3 Press to ...

User Manual
Page 26
... option. 4 Press OK. Press the Telephoto (T) button to multi-up view. I For more about tags, see page 21. 20 www.kodak.com/go/support You can sort by tag. 1 Press the Review button, then the Menu button. 2 Press to highlight View by the date a picture was taken or-if you've tagged...pictures/videos from the original location after copying, delete them . Viewing pictures by date, Favorites, or other tag If you have many pictures on your camera or card, you can sort them so that you created-you applied for print, email, and favorites are copied, not moved. Tags that you can...
... option. 4 Press OK. Press the Telephoto (T) button to multi-up view. I For more about tags, see page 21. 20 www.kodak.com/go/support You can sort by tag. 1 Press the Review button, then the Menu button. 2 Press to highlight View by the date a picture was taken or-if you've tagged...pictures/videos from the original location after copying, delete them . Viewing pictures by date, Favorites, or other tag If you have many pictures on your camera or card, you can sort them so that you created-you applied for print, email, and favorites are copied, not moved. Tags that you can...
User Manual
Page 27
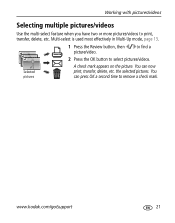
A check mark appears on the picture. You can press OK a second time to remove a check mark. the selected pictures. www.kodak.com/go/support 21 You can now print, transfer, delete, etc. Working with pictures/videos Selecting multiple pictures/videos Use the multi-select feature when you have two or more pictures/videos to select pictures/videos. Multi-select is used most effectively in Multi-Up mode, page 13. 1 Press the Review button, then picture/video. to find a Selected pictures 2 Press the OK button to print, transfer, delete, etc.
A check mark appears on the picture. You can press OK a second time to remove a check mark. the selected pictures. www.kodak.com/go/support 21 You can now print, transfer, delete, etc. Working with pictures/videos Selecting multiple pictures/videos Use the multi-select feature when you have two or more pictures/videos to select pictures/videos. Multi-select is used most effectively in Multi-Up mode, page 13. 1 Press the Review button, then picture/video. to find a Selected pictures 2 Press the OK button to print, transfer, delete, etc.
User Manual
Page 28
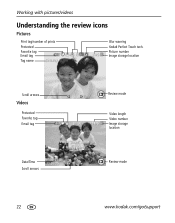
Picture number Image storage location Scroll arrows Videos Protected Favorite tag Email tag Review mode Video length Video number Image storage location Date/Time Scroll arrows Review mode 22 www.kodak.com/go/support Working with pictures/videos Understanding the review icons Pictures Print tag/number of prints Protected Favorite tag Email tag Tag name Blur warning Kodak Perfect Touch tech.
Picture number Image storage location Scroll arrows Videos Protected Favorite tag Email tag Review mode Video length Video number Image storage location Date/Time Scroll arrows Review mode 22 www.kodak.com/go/support Working with pictures/videos Understanding the review icons Pictures Print tag/number of prints Protected Favorite tag Email tag Tag name Blur warning Kodak Perfect Touch tech.

User Manual
Page 29
White-Printability is not sharp enough for an acceptable 4 x 6-inch (10 x 15 cm) print. Red-Picture is still being determined. www.kodak.com/go/support 23 Green-Picture is not determined. Yellow-Picture may be sharp enough for an acceptable 4 x 6-inch (10 x 15 cm) print or sharpness is sharp enough for an acceptable 4 x 6-inch (10 x 15 cm) print. Working with pictures/videos Understanding blur warning icons A picture blur warning icon is displayed during quickview and review.
White-Printability is not sharp enough for an acceptable 4 x 6-inch (10 x 15 cm) print. Red-Picture is still being determined. www.kodak.com/go/support 23 Green-Picture is not determined. Yellow-Picture may be sharp enough for an acceptable 4 x 6-inch (10 x 15 cm) print or sharpness is sharp enough for an acceptable 4 x 6-inch (10 x 15 cm) print. Working with pictures/videos Understanding blur warning icons A picture blur warning icon is displayed during quickview and review.

User Manual
Page 36
... appears in Auto/SCN modes, press the LCD/Info button appears. Repeat until the grid Sharing your pictures Press the Share button to tag your camera Using the framing grid to other pictures with your pictures and videos. Press to locate a picture. 2 Press to highlight Print , then press OK.* 3 Press... a picture. Doing more with the print quantity screen displayed. Press to select the number of copies (0-99). Press to exit the menu. 30 www.kodak.com/go/support This is then displayed.) I Press the Share button to change the print quantity. I After pressing the...
... appears in Auto/SCN modes, press the LCD/Info button appears. Repeat until the grid Sharing your pictures Press the Share button to tag your camera Using the framing grid to other pictures with your pictures and videos. Press to locate a picture. 2 Press to highlight Print , then press OK.* 3 Press... a picture. Doing more with the print quantity screen displayed. Press to select the number of copies (0-99). Press to exit the menu. 30 www.kodak.com/go/support This is then displayed.) I Press the Share button to change the print quantity. I After pressing the...

User Manual
Page 38
... pictures/videos to your computer, EasyShare software opens and categorizes your computer, EasyShare software prompts you create Use the Tag feature to create tag names and assign them . Then, all the pictures/videos you take are taking pictures/videos. 32 www.kodak.com/go/support When Set Tag... highlight a Tag name, then press OK. Pre-tagging Use the Set Tag feature (see Help in use the on-camera keyboard. 4 Press to send them to pictures/videos. 1 Press the Review button, then find a picture/video. 2 Press the Menu button. 3 Press to highlight Exit, then press OK. ...
... pictures/videos to your computer, EasyShare software opens and categorizes your computer, EasyShare software prompts you create Use the Tag feature to create tag names and assign them . Then, all the pictures/videos you take are taking pictures/videos. 32 www.kodak.com/go/support When Set Tag... highlight a Tag name, then press OK. Pre-tagging Use the Set Tag feature (see Help in use the on-camera keyboard. 4 Press to send them to pictures/videos. 1 Press the Review button, then find a picture/video. 2 Press the Menu button. 3 Press to highlight Exit, then press OK. ...

User Manual
Page 39
Doing more with your camera 1 Press the Review button, then the Menu button. 2 Choose View By, then Favorites. View favorites on your camera Tagging pictures/videos as favorites Tag pictures as favorites 1 Press the Review button. To remove the tag, press OK again. www.kodak.com/go/support 33 Press to find a picture. 2 Press the Menu button, highlight Favorite, then press OK. The Favorite icon appears in the status area.
Doing more with your camera 1 Press the Review button, then the Menu button. 2 Choose View By, then Favorites. View favorites on your camera Tagging pictures/videos as favorites Tag pictures as favorites 1 Press the Review button. To remove the tag, press OK again. www.kodak.com/go/support 33 Press to find a picture. 2 Press the Menu button, highlight Favorite, then press OK. The Favorite icon appears in the status area.
User Manual
Page 45
... Install new batteries (see page 1). rechargeable digital camera I Limit the following Camera does not I Transfer pictures to the computer (see page 51) before loading with Kodak Ni-MH batteries in the camera. Do not remove card while the camera is operating normally. Pictures remaining I If ... picture) on the LCD screen. If the camera still does turn on the LCD; number does not decrease after taking pictures. excessive use the Battery Refresh feature. you own an EasyShare camera dock series 3 or EasyShare printer dock series 3, use of the following...
... Install new batteries (see page 1). rechargeable digital camera I Limit the following Camera does not I Transfer pictures to the computer (see page 51) before loading with Kodak Ni-MH batteries in the camera. Do not remove card while the camera is operating normally. Pictures remaining I If ... picture) on the LCD screen. If the camera still does turn on the LCD; number does not decrease after taking pictures. excessive use the Battery Refresh feature. you own an EasyShare camera dock series 3 or EasyShare printer dock series 3, use of the following...
User Manual
Page 46
...In Review mode, a I Use Fill flash (see page 3). Picture is at least 2 ft (0.6 m) between the camera and the subject. I Move so there is before inserting or removing a card. I Move so there is too light. Camera freezes up mode. inserted or removed. 40 www.kodak.com/...go/support I Increase Exposure Compensation (see page 29). I Turn the camera off when a card is no more of a picture. I Decrease Exposure Compensation ...
...In Review mode, a I Use Fill flash (see page 3). Picture is at least 2 ft (0.6 m) between the camera and the subject. I Move so there is before inserting or removing a card. I Move so there is too light. Camera freezes up mode. inserted or removed. 40 www.kodak.com/...go/support I Increase Exposure Compensation (see page 29). I Turn the camera off when a card is no more of a picture. I Decrease Exposure Compensation ...
User Manual
Page 57
..."), excluding batteries, to the authorized service facility for one year from within the country where the Products were originally purchased. Reviewing your camera in cold weather, carry spare batteries and keep them warm. Kodak will , at temperatures below 41° F (5° C). Appendix Extending battery life I See Auto Power Off (see page 12) - If...
..."), excluding batteries, to the authorized service facility for one year from within the country where the Products were originally purchased. Reviewing your camera in cold weather, carry spare batteries and keep them warm. Kodak will , at temperatures below 41° F (5° C). Appendix Extending battery life I See Auto Power Off (see page 12) - If...


