User Manual
Page 3
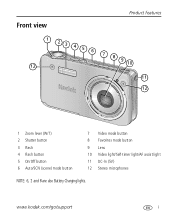
www.kodak.com/go/support i Front view Product features 12 1 23 4 5 6 7 8 9 10 11 12 1 Zoom lever (W/T) 2 Shutter button 3 Flash 4 Flash button 5 On/Off button 6 Auto/SCN (scene) mode button 7 Video mode button 8 Favorites mode button 9 Lens 10 Video light/Self-timer light/AF assist light 11 DC-In (5V) 12 Stereo microphones NOTE: 6, 7, and 8are also Battery Charginglights.
www.kodak.com/go/support i Front view Product features 12 1 23 4 5 6 7 8 9 10 11 12 1 Zoom lever (W/T) 2 Shutter button 3 Flash 4 Flash button 5 On/Off button 6 Auto/SCN (scene) mode button 7 Video mode button 8 Favorites mode button 9 Lens 10 Video light/Self-timer light/AF assist light 11 DC-In (5V) 12 Stereo microphones NOTE: 6, 7, and 8are also Battery Charginglights.
User Manual
Page 4
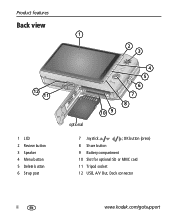
Product features Back view 12 11 1 LCD 2 Review button 3 Speaker 4 Menu button 5 Delete button 6 Strap post 1 2 3 optional 10 9 4 5 6 7 8 7 Joystick ; OK b utton (press) 8 Share button 9 Battery compartment 10 Slot for optional SD or MMC card 11 Tripod socket 12 USB, A/V Out, Dock connector ii www.kodak.com/go/support
Product features Back view 12 11 1 LCD 2 Review button 3 Speaker 4 Menu button 5 Delete button 6 Strap post 1 2 3 optional 10 9 4 5 6 7 8 7 Joystick ; OK b utton (press) 8 Share button 9 Battery compartment 10 Slot for optional SD or MMC card 11 Tripod socket 12 USB, A/V Out, Dock connector ii www.kodak.com/go/support

User Manual
Page 5
Table of contents 1 1 Setting up your camera 1 Attaching the strap 1 Loading the KLIC-7004 battery 1 Charging the battery 2 Turning on the camera 3 Setting the language and date/time 4 Storing pictures on an SD or MMC card 4 2 Taking pictures/videos 5 Taking a picture 5 Using...Using different modes 10 Using camera Help 13 Understanding the picture-taking icons 13 3 Working with pictures/videos 14 Reviewing pictures/videos 14 Deleting pictures/videos 15 Using the menu button in review 16 Cropping pictures 17 Adding sound tags 17 Using Kodak Perfect Touch technology 18 Editing...
Table of contents 1 1 Setting up your camera 1 Attaching the strap 1 Loading the KLIC-7004 battery 1 Charging the battery 2 Turning on the camera 3 Setting the language and date/time 4 Storing pictures on an SD or MMC card 4 2 Taking pictures/videos 5 Taking a picture 5 Using...Using different modes 10 Using camera Help 13 Understanding the picture-taking icons 13 3 Working with pictures/videos 14 Reviewing pictures/videos 14 Deleting pictures/videos 15 Using the menu button in review 16 Cropping pictures 17 Adding sound tags 17 Using Kodak Perfect Touch technology 18 Editing...

User Manual
Page 6
Table of contents Understanding the review icons 28 4 Doing more with your camera 30 Using the menu button to change settings 30 Customizing your camera 35 Taking panoramic pictures 38 Using exposure compensation to adjust picture brightness 39 Using the histogram... pictures 48 Dock compatibility for your camera 50 6 Troubleshooting 51 7 Getting help 55 8 Appendix 57 Camera specifications 57 Care and maintenance 59 Upgrading your software and firmware 60 Storage capacities 60 Important safety instructions 60 Battery replacement, battery life 61 Limited warranty 62 Regulatory ...
Table of contents Understanding the review icons 28 4 Doing more with your camera 30 Using the menu button to change settings 30 Customizing your camera 35 Taking panoramic pictures 38 Using exposure compensation to adjust picture brightness 39 Using the histogram... pictures 48 Dock compatibility for your camera 50 6 Troubleshooting 51 7 Getting help 55 8 Appendix 57 Camera specifications 57 Care and maintenance 59 Upgrading your software and firmware 60 Storage capacities 60 Important safety instructions 60 Battery replacement, battery life 61 Limited warranty 62 Regulatory ...
User Manual
Page 7
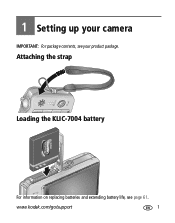
www.kodak.com/go/support 1 Attaching the strap Loading the KLIC-7004 battery For information on replacing batteries and extending battery life, see your product packa ge. 1 Setting up your camera IMPORTANT: For package contents, see page 61.
www.kodak.com/go/support 1 Attaching the strap Loading the KLIC-7004 battery For information on replacing batteries and extending battery life, see your product packa ge. 1 Setting up your camera IMPORTANT: For package contents, see page 61.

User Manual
Page 8
To purchase accessories, visit www.kodak.com/go/v1253accessories. 2 www.kodak.com/go /USBcharging. If the B attery Charging li ghts do not turn on during USB chargi ng, ensure: ■The USB cable is connected to a ...powered USB port ■The computer is turned on, and not in sleep mode For more on USB charging, visit www.kodak.com/go /support Setting up your camera Charging the battery Charge using a USB com puter Charge using a Kodak 5V AC adapter (may be sold separately) USB cable (included) USB / A/V adapter (included...
To purchase accessories, visit www.kodak.com/go/v1253accessories. 2 www.kodak.com/go /USBcharging. If the B attery Charging li ghts do not turn on during USB chargi ng, ensure: ■The USB cable is connected to a ...powered USB port ■The computer is turned on, and not in sleep mode For more on USB charging, visit www.kodak.com/go /support Setting up your camera Charging the battery Charge using a USB com puter Charge using a Kodak 5V AC adapter (may be sold separately) USB cable (included) USB / A/V adapter (included...

User Manual
Page 9
Turning on the camera Press the On/Off button to turn the camera on the camera in Auto mode. www.kodak.com/go/support 3 NOTE: You can also press the Auto/SCN, Video, or Favorites button to turn on in that mode. Fo r d ock compatibility, see the do ck us er's guide. Setting up your camera Charging the battery using other accessories K odak Easy Share camera or pr inter dock; Kodak EasyShare HDTV dock; Kodak EasyShare photo fram e dock 2 (Ma y be sold separately.) For details, see page 50.
Turning on the camera Press the On/Off button to turn the camera on the camera in Auto mode. www.kodak.com/go/support 3 NOTE: You can also press the Auto/SCN, Video, or Favorites button to turn on in that mode. Fo r d ock compatibility, see the do ck us er's guide. Setting up your camera Charging the battery using other accessories K odak Easy Share camera or pr inter dock; Kodak EasyShare HDTV dock; Kodak EasyShare photo fram e dock 2 (Ma y be sold separately.) For details, see page 50.

User Manual
Page 19
Taking pictures/videos Using camera Help To better understand each menu option, use camera Help. T Turn on Help Scroll up/dow n OK Turn off Help Understanding the picture-taking icons Self timer L ong time exposure Camera mode Album name White Balance Macro/Landscape Zoom: digital te le ph oto wide H ist ogra m Date stamp Pictures/ time remaining Image storage location Picture size IS O Flash AF zone AF mode Exposure metering Battery level Exposure compensation www.kodak.com/go/support 13 Highlight a menu choice, then press the Zoom telephoto (T) button.
Taking pictures/videos Using camera Help To better understand each menu option, use camera Help. T Turn on Help Scroll up/dow n OK Turn off Help Understanding the picture-taking icons Self timer L ong time exposure Camera mode Album name White Balance Macro/Landscape Zoom: digital te le ph oto wide H ist ogra m Date stamp Pictures/ time remaining Image storage location Picture size IS O Flash AF zone AF mode Exposure metering Battery level Exposure compensation www.kodak.com/go/support 13 Highlight a menu choice, then press the Zoom telephoto (T) button.

User Manual
Page 28
... display interval. To scroll through the seconds quickly, press and hold . 3 Press the OK button. Changing the slide show loop When you have a Kodak EasyShare HDTV dock,see page 25. 1 Press the Review button. 2 Press the Menu button, then to highlight the Review Slide Show, then press the OK... button. The slide show repeats until the battery is displa yed once. Running a continuous slide show display interval The default interval setting displays each picture for 5 seconds. If you turn ...
... display interval. To scroll through the seconds quickly, press and hold . 3 Press the OK button. Changing the slide show loop When you have a Kodak EasyShare HDTV dock,see page 25. 1 Press the Review button. 2 Press the Menu button, then to highlight the Review Slide Show, then press the OK... button. The slide show repeats until the battery is displa yed once. Running a continuous slide show display interval The default interval setting displays each picture for 5 seconds. If you turn ...
User Manual
Page 34
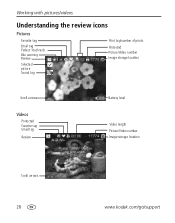
Working with pictures/videos Understanding the review icons Pictures Favorite tag Email t ag Perfect Touch tech. Blur warning Review S el ecte d pict ur e Sound tag Print tag/number of prints Prote cted Picture/Video number Image storage location Scroll arrows Videos Pr ote cted Favorite tag Email t ag Review Battery level Video length Picture/Video number Image storage location Scroll arrow s 28 www.kodak.com/go/support
Working with pictures/videos Understanding the review icons Pictures Favorite tag Email t ag Perfect Touch tech. Blur warning Review S el ecte d pict ur e Sound tag Print tag/number of prints Prote cted Picture/Video number Image storage location Scroll arrows Videos Pr ote cted Favorite tag Email t ag Review Battery level Video length Picture/Video number Image storage location Scroll arrow s 28 www.kodak.com/go/support
User Manual
Page 54
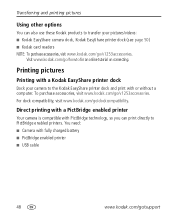
You need: ■ Camera with fully charged battery ■ PictBridge enabled printer ■ USB cable 48 www.kodak.com/go /dockcompatibility. For dock compatibility, visit www.kodak.com/go /support Printing pictures Printing with or without a computer. ...camera is compatible with PictBri dge technology, so you can also use these Kodak products to the Kodak EasyShare pri nter dock and print with a Kodak EasyShare printer dock Dock your camera to transfer your pictures/videos: ■ Kodak EasyShare camera dock, Kodak EasyShare printer dock (see page 50 ) ■ Kodak...
You need: ■ Camera with fully charged battery ■ PictBridge enabled printer ■ USB cable 48 www.kodak.com/go /dockcompatibility. For dock compatibility, visit www.kodak.com/go /support Printing pictures Printing with or without a computer. ...camera is compatible with PictBri dge technology, so you can also use these Kodak products to the Kodak EasyShare pri nter dock and print with a Kodak EasyShare printer dock Dock your camera to transfer your pictures/videos: ■ Kodak EasyShare camera dock, Kodak EasyShare printer dock (see page 50 ) ■ Kodak...

User Manual
Page 57
...full ■ Delete pictures from the ca rd or insert a new card. The battery does not charge using USB c harg ing ■ See page 2 or visit www.kodak.com/go /support 51 www.kodak.com/go /USBcharging. The camera is operating norma lly. Memory card is almost ■ Transfer the pictures to ... do not f unct ion In Review, a blue or black screen is displayed instead of f ■ Make sure the battery is charged and installed correctly (see page 1). ■ Turn the camera off, then on picture size a nd content.) pic tu re Flash does not fire ■ Check the flash setting, ...
...full ■ Delete pictures from the ca rd or insert a new card. The battery does not charge using USB c harg ing ■ See page 2 or visit www.kodak.com/go /support 51 www.kodak.com/go /USBcharging. The camera is operating norma lly. Memory card is almost ■ Transfer the pictures to ... do not f unct ion In Review, a blue or black screen is displayed instead of f ■ Make sure the battery is charged and installed correctly (see page 1). ■ Turn the camera off, then on picture size a nd content.) pic tu re Flash does not fire ■ Check the flash setting, ...

User Manual
Page 58
... clean, dry cloth. ■ Insert a new or charged battery. ■ If the problem still exists, get help (see recognized or camera page 37). freezes with a clean, dry cloth before inserting a battery in EasyShare software. ■ Adjust the camera Video Out setting to NTSC or PAL (see page 14.... Remove the ba ttery. Format the card in internal memory, see pa ge 36). ■ Make sure the external device settings are correct. (See the device's user's guide). 52 www.kodak...
... clean, dry cloth. ■ Insert a new or charged battery. ■ If the problem still exists, get help (see recognized or camera page 37). freezes with a clean, dry cloth before inserting a battery in EasyShare software. ■ Adjust the camera Video Out setting to NTSC or PAL (see page 14.... Remove the ba ttery. Format the card in internal memory, see pa ge 36). ■ Make sure the external device settings are correct. (See the device's user's guide). 52 www.kodak...

User Manual
Page 59
... Com puter d oes n ot communicate with the ca mera ■ Make sure the battery is charged and installed correctly (see pa ge 1). ■ Turn on the dock.) ■ Make sure EasyShare software is installed (see page 46). www.kodak.com/go/support 53 When the framing marks turn green, press the Shutter button... a fla t, steady surface or use a tripod (especially in high-zoom settings or in low light). ■ Reposition the camera for more ava ilable light. ■ Use Fill flash (see page 9) or change your position so light is not behind the subject. ■ Move so ...
... Com puter d oes n ot communicate with the ca mera ■ Make sure the battery is charged and installed correctly (see pa ge 1). ■ Turn on the dock.) ■ Make sure EasyShare software is installed (see page 46). www.kodak.com/go/support 53 When the framing marks turn green, press the Shutter button... a fla t, steady surface or use a tripod (especially in high-zoom settings or in low light). ■ Reposition the camera for more ava ilable light. ■ Use Fill flash (see page 9) or change your position so light is not behind the subject. ■ Move so ...

User Manual
Page 65
Kodak Li-Ion rechargeable digital camera battery KLIC-7004; 5V AC adapter; Do not use cleaning solutions unless designed specifically for more information. ■ For digital camera disposal or recycling information, contact your country. Appendix Communication with a soft,... lint-free cloth or an untreated lens-cleaning tissue. Wipe gently with computer-USB 2.0 high speed (PIMA 15740 protocol); Contact a dealer of Kodak products for camera lenses. EasyShare camera dock...
Kodak Li-Ion rechargeable digital camera battery KLIC-7004; 5V AC adapter; Do not use cleaning solutions unless designed specifically for more information. ■ For digital camera disposal or recycling information, contact your country. Appendix Communication with a soft,... lint-free cloth or an untreated lens-cleaning tissue. Wipe gently with computer-USB 2.0 high speed (PIMA 15740 protocol); Contact a dealer of Kodak products for camera lenses. EasyShare camera dock...

User Manual
Page 66
...card size, and other than those specified herein may be hot. ■ Follow all instructions of the airline. ■ When removing the battery, allow it may cause fire, electric shock, or injury. You may result in internal memory. Contact your software and firmware Downl oad the...The LCD displays the approximate number of pictures (or minutes/seconds of the software included on the Kodak EasyShare software CD and the camera firmware (the software that is not recommended by Kodak may be able to qualified service personnel. there are intended for this product to avoid risk of...
...card size, and other than those specified herein may be hot. ■ Follow all instructions of the airline. ■ When removing the battery, allow it may cause fire, electric shock, or injury. You may result in internal memory. Contact your software and firmware Downl oad the...The LCD displays the approximate number of pictures (or minutes/seconds of the software included on the Kodak EasyShare software CD and the camera firmware (the software that is not recommended by Kodak may be able to qualified service personnel. there are intended for this product to avoid risk of...

User Manual
Page 67
...; C). Wipe the contacts with water and contact your camera, page 35 ). ■ Dirt on usage. Battery replacement, battery life Kodak Li-Ion rechargeable digital camera battery KLI C-7004: 220 pictures per CIPA testing method. (Approx. Appendix ■ Keep batteries out of the reach of batteries according to local and national regulations. Otherwise, a battery may short circuit, discharge energy, become hot...
...; C). Wipe the contacts with water and contact your camera, page 35 ). ■ Dirt on usage. Battery replacement, battery life Kodak Li-Ion rechargeable digital camera battery KLI C-7004: 220 pictures per CIPA testing method. (Approx. Appendix ■ Keep batteries out of the reach of batteries according to local and national regulations. Otherwise, a battery may short circuit, discharge energy, become hot...

User Manual
Page 68
...to any conditions and/or limitations stated herein. If Kodak is longer. Remanufactured Products, parts and materials are warranted for warranty repair. Appendix Limited warranty Kodak warrants Kodak consumer electronic products and accessories ("Products"), excluding batteries, to be free from malfunctions and defects in ...workmanship for the country where the Products were purchased. Limited warranty coverage Warranty service is due to use items supplied by Kodak (such as any request for the remaining warranty term of the original Product, or 90 days after the duration of...
...to any conditions and/or limitations stated herein. If Kodak is longer. Remanufactured Products, parts and materials are warranted for warranty repair. Appendix Limited warranty Kodak warrants Kodak consumer electronic products and accessories ("Products"), excluding batteries, to be free from malfunctions and defects in ...workmanship for the country where the Products were purchased. Limited warranty coverage Warranty service is due to use items supplied by Kodak (such as any request for the remaining warranty term of the original Product, or 90 days after the duration of...
User Manual
Page 73
... off, 36 auto focus (AF) zone, 33 Auto/SCN mode button, i B backlight, 12 battery charging, 2, 3 expected life, 61 extending life, 61 loading, 1 types, 61 beach, 11 blur warning, 29, 33 www.kodak.com/go/support bookmarks, 21 burst, 31 button auto/SCN mode, i delete, 5 favorites mode,... ii on/off, i review, ii Share, ii telephoto/zoom, 7 video mode, i C cable audio/video, 24 USB, 47 camera screen getting help, 13 camera sounds, 36 Canadian compliance, 64 care and maintenance, 59 charging the battery, 2, 3 children, 12 clock, setting, 4 color mode, 31 compatibility docks, 50 computer connecting...
... off, 36 auto focus (AF) zone, 33 Auto/SCN mode button, i B backlight, 12 battery charging, 2, 3 expected life, 61 extending life, 61 loading, 1 types, 61 beach, 11 blur warning, 29, 33 www.kodak.com/go/support bookmarks, 21 burst, 31 button auto/SCN mode, i delete, 5 favorites mode,... ii on/off, i review, ii Share, ii telephoto/zoom, 7 video mode, i C cable audio/video, 24 USB, 47 camera screen getting help, 13 camera sounds, 36 Canadian compliance, 64 care and maintenance, 59 charging the battery, 2, 3 children, 12 clock, setting, 4 color mode, 31 compatibility docks, 50 computer connecting...

User Manual
Page 74
... memory to card, 27 to computer via USB cable, 46 cropping pictures, 17 customer support, 56 customize camera, 35 D date setting, 4 date stamp, 32 DC-in, i de leting during quickview, 5 from...digital image stabilization, 11 digital zoom, 7 setting, 36 displaying slide show, 22 disposal, recycling, 59 dock compatibility, 50 connector, ii printer, 48 downloading pictures, 46 E EasyShare software, 46 edit videos, 19 emailing pictures, videos, 40 68 expected battery..., 39 framing marks, 5 G grid, framing, 39 guidelines, battery, 61 H he lp camera help, 13 Web links, 55 high ISO, 12 histogram, 39 www...
... memory to card, 27 to computer via USB cable, 46 cropping pictures, 17 customer support, 56 customize camera, 35 D date setting, 4 date stamp, 32 DC-in, i de leting during quickview, 5 from...digital image stabilization, 11 digital zoom, 7 setting, 36 displaying slide show, 22 disposal, recycling, 59 dock compatibility, 50 connector, ii printer, 48 downloading pictures, 46 E EasyShare software, 46 edit videos, 19 emailing pictures, videos, 40 68 expected battery..., 39 framing marks, 5 G grid, framing, 39 guidelines, battery, 61 H he lp camera help, 13 Web links, 55 high ISO, 12 histogram, 39 www...


