
User Manual
Page 1
Kodak EasyShare V1253 zoom digital camera User's guide www.kodak.com For interactive tutorials: www.kodak.com/go/howto For help with your camera: www.kodak.com/go/v1253support
Kodak EasyShare V1253 zoom digital camera User's guide www.kodak.com For interactive tutorials: www.kodak.com/go/howto For help with your camera: www.kodak.com/go/v1253support

User Manual
Page 5
...pictures 6 Taking a video 6 Using the 3X optical zoom 7 Using the self-timer 8 Using the flash 9 Using different modes 10 Using camera Help 13 Understanding the picture-taking icons 13 3 Working with pictures/videos 14 Reviewing pictures/videos 14 Deleting pictures/videos 15 Using the menu ...button in review 16 Cropping pictures 17 Adding sound tags 17 Using Kodak Perfect Touch technology 18 Editing videos 19 Running a slide show 22 Viewing pictures/videos in different ways 26 Selecting multiple pictures/...
...pictures 6 Taking a video 6 Using the 3X optical zoom 7 Using the self-timer 8 Using the flash 9 Using different modes 10 Using camera Help 13 Understanding the picture-taking icons 13 3 Working with pictures/videos 14 Reviewing pictures/videos 14 Deleting pictures/videos 15 Using the menu ...button in review 16 Cropping pictures 17 Adding sound tags 17 Using Kodak Perfect Touch technology 18 Editing videos 19 Running a slide show 22 Viewing pictures/videos in different ways 26 Selecting multiple pictures/...

User Manual
Page 6
Table of contents Understanding the review icons 28 4 Doing more with your camera 30 Using the menu button to change settings 30 Customizing your camera 35 Taking panoramic pictures 38 Using exposure compensation to adjust picture brightness 39 Using the histogram to... pictures 46 Installing the software 46 Transferring pictures/videos 47 Printing pictures 48 Dock compatibility for your camera 50 6 Troubleshooting 51 7 Getting help 55 8 Appendix 57 Camera specifications 57 Care and maintenance 59 Upgrading your software and firmware 60 Storage capacities 60 Important safety ...
Table of contents Understanding the review icons 28 4 Doing more with your camera 30 Using the menu button to change settings 30 Customizing your camera 35 Taking panoramic pictures 38 Using exposure compensation to adjust picture brightness 39 Using the histogram to... pictures 46 Installing the software 46 Transferring pictures/videos 47 Printing pictures 48 Dock compatibility for your camera 50 6 Troubleshooting 51 7 Getting help 55 8 Appendix 57 Camera specifications 57 Care and maintenance 59 Upgrading your software and firmware 60 Storage capacities 60 Important safety ...
User Manual
Page 7
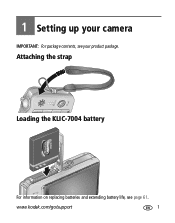
www.kodak.com/go/support 1 Attaching the strap Loading the KLIC-7004 battery For information on replacing batteries and extending battery life, see your product packa ge. 1 Setting up your camera IMPORTANT: For package contents, see page 61.
www.kodak.com/go/support 1 Attaching the strap Loading the KLIC-7004 battery For information on replacing batteries and extending battery life, see your product packa ge. 1 Setting up your camera IMPORTANT: For package contents, see page 61.

User Manual
Page 8
To purchase accessories, visit www.kodak.com/go/v1253accessories. 2 www.kodak.com/go /USBcharging. If the B attery Charging li ghts do not turn on during USB chargi ng, ensure: ■The USB cable is connected to a ...;The computer is turned on, and not in sleep mode For more on USB charging, visit www.kodak.com/go /support Setting up your camera Charging the battery Charge using a USB com puter Charge using a Kodak 5V AC adapter (may be sold separately) USB cable (included) USB / A/V adapter (included) Battery Charging lights Charge...
To purchase accessories, visit www.kodak.com/go/v1253accessories. 2 www.kodak.com/go /USBcharging. If the B attery Charging li ghts do not turn on during USB chargi ng, ensure: ■The USB cable is connected to a ...;The computer is turned on, and not in sleep mode For more on USB charging, visit www.kodak.com/go /support Setting up your camera Charging the battery Charge using a USB com puter Charge using a Kodak 5V AC adapter (may be sold separately) USB cable (included) USB / A/V adapter (included) Battery Charging lights Charge...

User Manual
Page 9
Turning on the camera Press the On/Off button to turn the camera on the camera in Auto mode. Fo r d ock compatibility, see the do ck us er's guide. NOTE: You can also press the Auto/SCN, Video, or Favorites button to turn on in that mode. www.kodak.com/go/support 3 Kodak EasyShare photo fram e dock 2 (Ma y be sold separately.) For details, see page 50. Kodak EasyShare HDTV dock; Setting up your camera Charging the battery using other accessories K odak Easy Share camera or pr inter dock;
Turning on the camera Press the On/Off button to turn the camera on the camera in Auto mode. Fo r d ock compatibility, see the do ck us er's guide. NOTE: You can also press the Auto/SCN, Video, or Favorites button to turn on in that mode. www.kodak.com/go/support 3 Kodak EasyShare photo fram e dock 2 (Ma y be sold separately.) For details, see page 50. Kodak EasyShare HDTV dock; Setting up your camera Charging the battery using other accessories K odak Easy Share camera or pr inter dock;

User Manual
Page 10
... accessed may cause damage. OK to conveniently store more pictures/videos (www.kodak.com/go /support Inserting or removing a card while it may damage the pictures, the card, or the camera. 1 Turn off the camera. 2 Insert or remove the optional card. 3 Turn on an SD or... internal memory. OK (press) 2 to change date & time, see page 36. To change . Storing pictures on the camera. optional 4 www.kodak.com/go /v1253accessories). Setting up your camera Setting the language and date/time L anguag e: 1 to change language in the future, see page 36. for previous/next field....
... accessed may cause damage. OK to conveniently store more pictures/videos (www.kodak.com/go /support Inserting or removing a card while it may damage the pictures, the card, or the camera. 1 Turn off the camera. 2 Insert or remove the optional card. 3 Turn on an SD or... internal memory. OK (press) 2 to change date & time, see page 36. To change . Storing pictures on the camera. optional 4 www.kodak.com/go /v1253accessories). Setting up your camera Setting the language and date/time L anguag e: 1 to change language in the future, see page 36. for previous/next field....

User Manual
Page 11
... 14. 2 Taking pictures/videos Taking a picture 1 Press the On/Off or Auto/SCN button to turn on /off status icons, histogram, and framing grid. www.kodak.com/go/support 5 Fr am ing marks NOTE: You can repeatedly press Info/Display to focus and set exposure. When the framing marks turn on...
... 14. 2 Taking pictures/videos Taking a picture 1 Press the On/Off or Auto/SCN button to turn on /off status icons, histogram, and framing grid. www.kodak.com/go/support 5 Fr am ing marks NOTE: You can repeatedly press Info/Display to focus and set exposure. When the framing marks turn on...

User Manual
Page 12
...halfway. When the framing marks turn green, focus is accomplished. 2 If the camera is not focusing on faces. To review and work with videos, see page 14. 6 www.kodak.com/go/support The camera enters Video mode. 2 Press the Shutter button completely down to take pictures Framing... marks indicate the camera focus area. Taking a video 1 1 Press the Video mode button. NOTE: ...
...halfway. When the framing marks turn green, focus is accomplished. 2 If the camera is not focusing on faces. To review and work with videos, see page 14. 6 www.kodak.com/go/support The camera enters Video mode. 2 Press the Shutter button completely down to take pictures Framing... marks indicate the camera focus area. Taking a video 1 1 Press the Video mode button. NOTE: ...

User Manual
Page 14
The camera takes the picture/pictures afte r the dela y. NOTE: The video stops whennostorage space remains.Only the 2-... Press OK, then the Menu button. 5 Compose the scene. 6 Press the Shutter button halfway, then completely down . Place the camera on a tripod). 2 shot-The first picture is taken after a 10-second delay (so you want to be i ncluded in video mode. 8... www.kodak.com/go/support Taking pictures/videos Using the self-timer Use the self-timer when you have time to take a video,...
The camera takes the picture/pictures afte r the dela y. NOTE: The video stops whennostorage space remains.Only the 2-... Press OK, then the Menu button. 5 Compose the scene. 6 Press the Shutter button halfway, then completely down . Place the camera on a tripod). 2 shot-The first picture is taken after a 10-second delay (so you want to be i ncluded in video mode. 8... www.kodak.com/go/support Taking pictures/videos Using the self-timer Use the self-timer when you have time to take a video,...

User Manual
Page 15
... red eye, turn the Red Eye Prefla sh on. (The first flash shrinks the eye pupil to scroll through flash modes. To ma ke the camera: Red Eye ■ Preflash, turn the Red Eye Preflash off Maintain Settings (see page 33). Use F ill when the subject is in sha dow or... is "backlit" (when light is show n in the LCD status area. www.kodak.com/go/support 9 Taking pictures/videos Using the flash Press the flash button repeatedly to reduce the chance of the lighting conditions. In low light...
... red eye, turn the Red Eye Prefla sh on. (The first flash shrinks the eye pupil to scroll through flash modes. To ma ke the camera: Red Eye ■ Preflash, turn the Red Eye Preflash off Maintain Settings (see page 33). Use F ill when the subject is in sha dow or... is "backlit" (when light is show n in the LCD status area. www.kodak.com/go/support 9 Taking pictures/videos Using the flash Press the flash button repeatedly to reduce the chance of the lighting conditions. In low light...

User Manual
Page 16
... ease of fla sh, if possible. (For Focus System/Dista nces, see page 58.) Press until the Macro or Landscape icon appears in Landscape. The camera uses infinity a uto-focus. Use this mode Auto Scene V ide o For General picture taking pictures in pra ctically any situation. (See pa ge 11... sets the focus distance depending on the zoom position. Auto-focus framing marks are not available in the LCD status area. 10 www.kodak.com/go/support Macro Close range. Use this m ode For Landscape Far-away scenes. Use available light instead of use. Taking pictures/videos ...
... ease of fla sh, if possible. (For Focus System/Dista nces, see page 58.) Press until the Macro or Landscape icon appears in Landscape. The camera uses infinity a uto-focus. Use this mode Auto Scene V ide o For General picture taking pictures in pra ctically any situation. (See pa ge 11... sets the focus distance depending on the zoom position. Auto-focus framing marks are not available in the LCD status area. 10 www.kodak.com/go/support Macro Close range. Use this m ode For Landscape Far-away scenes. Use available light instead of use. Taking pictures/videos ...

User Manual
Page 17
... iza tion Sport Subjects that are in night scenes or low-light conditions. Night Portrait Reduces red eye of people. Place the camera on a steady surfa ce or tripod. Taking pictures/videos Using Scene (SCN) modes Choose a Scene mode-for great pictures in...Landscape Distant scenes. Snow Bright snow scenes. www.kodak.com/go/support 11 NightLandscape Distant scenery at night. The date/time and the mode description a ppear. Panorama Left -Right See page 38. Digital Im age Reducing blur caused by camera shake or subject motion. Text Documents. Fir ework...
... iza tion Sport Subjects that are in night scenes or low-light conditions. Night Portrait Reduces red eye of people. Place the camera on a steady surfa ce or tripod. Taking pictures/videos Using Scene (SCN) modes Choose a Scene mode-for great pictures in...Landscape Distant scenes. Snow Bright snow scenes. www.kodak.com/go/support 11 NightLandscape Distant scenery at night. The date/time and the mode description a ppear. Panorama Left -Right See page 38. Digital Im age Reducing blur caused by camera shake or subject motion. Text Documents. Fir ework...

User Manual
Page 18
Place the camera on steady surface or tripod. Shooting a fast-moving subject. The background gives the sense of children in b righ t ligh t. Action p ictures of movement, while the subject appears still. Choosing your own settings. 12 www.kodak.com/go/support Flash and sound are in low-light scenes. Assures proper focus and...
Place the camera on steady surface or tripod. Shooting a fast-moving subject. The background gives the sense of children in b righ t ligh t. Action p ictures of movement, while the subject appears still. Choosing your own settings. 12 www.kodak.com/go/support Flash and sound are in low-light scenes. Assures proper focus and...

User Manual
Page 19
Highlight a menu choice, then press the Zoom telephoto (T) button. T Turn on Help Scroll up/dow n OK Turn off Help Understanding the picture-taking icons Self timer L ong time exposure Camera mode Album name White Balance Macro/Landscape Zoom: digital te le ph oto wide H ist ogra m Date stamp Pictures/ time remaining Image storage location Picture size IS O Flash AF zone AF mode Exposure metering Battery level Exposure compensation www.kodak.com/go/support 13 Taking pictures/videos Using camera Help To better understand each menu option, use camera Help.
Highlight a menu choice, then press the Zoom telephoto (T) button. T Turn on Help Scroll up/dow n OK Turn off Help Understanding the picture-taking icons Self timer L ong time exposure Camera mode Album name White Balance Macro/Landscape Zoom: digital te le ph oto wide H ist ogra m Date stamp Pictures/ time remaining Image storage location Picture size IS O Flash AF zone AF mode Exposure metering Battery level Exposure compensation www.kodak.com/go/support 13 Taking pictures/videos Using camera Help To better understand each menu option, use camera Help.

User Manual
Page 22
... See page 17 Make Picture See page 19 Tri m See page 19 Videos Action Print See page 20 Bookm ark See page 21 16 www.kodak.com/go/support Working with pictures/videos Using the menu button in review 1 Press the Review button, then the Menu button. 2 Press to highlight a tab...: ■ Review to view pictures/videos ■ Edit to edit pictures/videos ■ Setup for other camera settings (page 35) 3 Press to highlight a setting, then press the OK button. 4 Highlight an option, then press the OK button.
... See page 17 Make Picture See page 19 Tri m See page 19 Videos Action Print See page 20 Bookm ark See page 21 16 www.kodak.com/go/support Working with pictures/videos Using the menu button in review 1 Press the Review button, then the Menu button. 2 Press to highlight a tab...: ■ Review to view pictures/videos ■ Edit to edit pictures/videos ■ Setup for other camera settings (page 35) 3 Press to highlight a setting, then press the OK button. 4 Highlight an option, then press the OK button.

User Manual
Page 23
... Press the O K button. 4 Highlight Record, then press OK. 5 Follow the screen prompts. NOTE: Only one sound tag can be cropped again on the camera. ■ Press the Menu button to exit the menu. Press the OK 4 Follow the screen prompts. Recording a sound tag 1 Press the Review button, then...with pictures/videos Cropping pictures You can record a voice or sound (up to 1 minute long) to a picture. to highlight Sound Tag. www.kodak.com/go/support 17 to find a picture. 2 Press the Menu button, then to highlight the Edit tab. 3 Press to move the crop box.
... Press the O K button. 4 Highlight Record, then press OK. 5 Follow the screen prompts. NOTE: Only one sound tag can be cropped again on the camera. ■ Press the Menu button to exit the menu. Press the OK 4 Follow the screen prompts. Recording a sound tag 1 Press the Review button, then...with pictures/videos Cropping pictures You can record a voice or sound (up to 1 minute long) to a picture. to highlight Sound Tag. www.kodak.com/go/support 17 to find a picture. 2 Press the Menu button, then to highlight the Edit tab. 3 Press to move the crop box.

User Manual
Page 26
... the Menu button to highlight the Edit tab. Highlight Action Print, then press the Video 4-, 9-, or OK button. 16-up picture is created. Auto: The camera incl udes the first and last frames, then 2, 7, or 14 equally spaced frames. If you can make a 4-, 9-, or 16-up picture, suitable for a 4 x 6-inch (10... x 15 cm) print. 1 Press the Review button, then to find a video. 2 Press the Menu button, then to exit the menu. 20 www.kodak.com/go/support Manual: Choose first and last frames; Full Manual: Choose 4, 9, or 16 frames.
... the Menu button to highlight the Edit tab. Highlight Action Print, then press the Video 4-, 9-, or OK button. 16-up picture is created. Auto: The camera incl udes the first and last frames, then 2, 7, or 14 equally spaced frames. If you can make a 4-, 9-, or 16-up picture, suitable for a 4 x 6-inch (10... x 15 cm) print. 1 Press the Review button, then to find a video. 2 Press the Menu button, then to exit the menu. 20 www.kodak.com/go/support Manual: Choose first and last frames; Full Manual: Choose 4, 9, or 16 frames.

User Manual
Page 30
koda k.com/ go /support To connect the camera to a television, use an A/V cable (may not be as good as on a television screen may be sold separately) and the USB / A/V adapter. NOTE: Ensure that ... the slide show is running. (Image quality on a computer monitor or when printed.) 24 www.kodak.com/go / v1253a cce ss orie s . Working with a video input. For a true HDTV experience on your television, dock your camera on a television, computer monitor, or any device equipped with pictures/videos Displaying pictures/videos on a television...
koda k.com/ go /support To connect the camera to a television, use an A/V cable (may not be as good as on a television screen may be sold separately) and the USB / A/V adapter. NOTE: Ensure that ... the slide show is running. (Image quality on a computer monitor or when printed.) 24 www.kodak.com/go / v1253a cce ss orie s . Working with a video input. For a true HDTV experience on your television, dock your camera on a television, computer monitor, or any device equipped with pictures/videos Displaying pictures/videos on a television...

User Manual
Page 36
... www.kodak.com/go/support Using the capture tab Press Menu, , , and OK to get the best results from your camera Using the menu button to change settings You can change settings to access settings Opti ons Se lf-t ime r See page 8. 4 Doing more with your camera. NOTE...: Some settingsremainuntil youchange them;others, until youchange modesor turn off the camera. Some modesoffer limited settings. 1 Press the Menu button. 2 Press to highlight a tab: ■ Capture for...
... www.kodak.com/go/support Using the capture tab Press Menu, , , and OK to get the best results from your camera Using the menu button to change settings You can change settings to access settings Opti ons Se lf-t ime r See page 8. 4 Doing more with your camera. NOTE...: Some settingsremainuntil youchange them;others, until youchange modesor turn off the camera. Some modesoffer limited settings. 1 Press the Menu button. 2 Press to highlight a tab: ■ Capture for...


