

User Manual
Page 23
... /off. rechargeable digital camera battery KLIC-7001. Camera does not I Reformat the card. Short battery life I See page 2 or visit www.kodak.com/go/usbcharging. Battery does not I Limit the following Camera does not I Charge rechargeable battery (see page 1). 3 Solving camera problems For support, visit www.kodak.com/go/m763support, www.kodak.com/go/m863support, www.kodak.com/go /m763support...
... /off. rechargeable digital camera battery KLIC-7001. Camera does not I Reformat the card. Short battery life I See page 2 or visit www.kodak.com/go/usbcharging. Battery does not I Limit the following Camera does not I Charge rechargeable battery (see page 1). 3 Solving camera problems For support, visit www.kodak.com/go/m763support, www.kodak.com/go/m863support, www.kodak.com/go /m763support...
User Manual
Page 24
...-serviceable parts inside the product, contact Kodak customer support. I The use of controls, adjustments, or procedures other than those specified herein may cause fire, electric shock, or injury. I Remove the battery when the product is not recommended by Kodak may result in an airplane, observe...I If using this product; The use only. If the LCD breaks, do not touch the glass or liquid. Contact your local Kodak customer support. I Use only batteries approved for an extended period of batteries according to local and national regulations. I When removing the battery, allow...
...-serviceable parts inside the product, contact Kodak customer support. I The use of controls, adjustments, or procedures other than those specified herein may cause fire, electric shock, or injury. I Remove the battery when the product is not recommended by Kodak may result in an airplane, observe...I If using this product; The use only. If the LCD breaks, do not touch the glass or liquid. Contact your local Kodak customer support. I Use only batteries approved for an extended period of batteries according to local and national regulations. I When removing the battery, allow...

User Manual
Page 4
Product features Back view 1 2 34 5 6 7 14 13 12 11 10 9 8 optional memory card (sold separately) 1 LCD 2 Ready/Battery charging light 3 Delete button 4 Zoom button (Wide/Telephoto) 5 6 OK button 7 Strap post 8 SD or SDHC memory card slot 9 Battery compartment 10 Share button 11 Menu button 12 Review button 13 Dock connector 14 Tripod socket ii www.kodak.com/go/support
Product features Back view 1 2 34 5 6 7 14 13 12 11 10 9 8 optional memory card (sold separately) 1 LCD 2 Ready/Battery charging light 3 Delete button 4 Zoom button (Wide/Telephoto) 5 6 OK button 7 Strap post 8 SD or SDHC memory card slot 9 Battery compartment 10 Share button 11 Menu button 12 Review button 13 Dock connector 14 Tripod socket ii www.kodak.com/go/support

User Manual
Page 5
... pictures/videos 5 Taking a picture 5 Taking a video 6 Using optical zoom 7 Using the flash 8 Using different picture-taking modes 9 Using camera Help 11 Taking panoramic pictures 12 Understanding the picture-taking icons 13 3 Working with pictures/videos 14 Reviewing pictures/videos 14 Using sound tags 16... Deleting pictures/videos 17 Using the menu button in Review 18 Using Kodak Perfect Touch technology 19 Cropping pictures 19 Editing videos 20 Running a slide show 21 Viewing pictures/videos in different ways ...
... pictures/videos 5 Taking a picture 5 Taking a video 6 Using optical zoom 7 Using the flash 8 Using different picture-taking modes 9 Using camera Help 11 Taking panoramic pictures 12 Understanding the picture-taking icons 13 3 Working with pictures/videos 14 Reviewing pictures/videos 14 Using sound tags 16... Deleting pictures/videos 17 Using the menu button in Review 18 Using Kodak Perfect Touch technology 19 Cropping pictures 19 Editing videos 20 Running a slide show 21 Viewing pictures/videos in different ways ...

User Manual
Page 6
... Using the menu button to change settings 29 Customizing your camera 33 Using the self-timer 36 Using burst 37 Using exposure compensation to adjust picture brightness 37 Using the framing grid to compose a picture ... software 45 Transferring pictures with the USB cable 46 Printing pictures 47 Dock compatibility for your camera 49 6 Troubleshooting 50 Camera problems 50 Camera/computer communications 52 LCD screen messages 53 7 Getting help 56 8 Appendix 58 Camera specifications 58 Care and maintenance 61 Upgrading your software and firmware 61 Storage capacities 61 Important...
... Using the menu button to change settings 29 Customizing your camera 33 Using the self-timer 36 Using burst 37 Using exposure compensation to adjust picture brightness 37 Using the framing grid to compose a picture ... software 45 Transferring pictures with the USB cable 46 Printing pictures 47 Dock compatibility for your camera 49 6 Troubleshooting 50 Camera problems 50 Camera/computer communications 52 LCD screen messages 53 7 Getting help 56 8 Appendix 58 Camera specifications 58 Care and maintenance 61 Upgrading your software and firmware 61 Storage capacities 61 Important...

User Manual
Page 8
... about USB charging Purchase battery charging accessories www.kodak.com/go/USBcharging www.kodak.com/go/accessories 2 www.kodak.com/go/support Charge until the Battery Charging light turns off (up your camera Charging the battery USB AC adapter Kodak USB AC adapter (included) USB cable Battery Charging light Kodak EasyShare camera or printer docks (may be sold separately...
... about USB charging Purchase battery charging accessories www.kodak.com/go/USBcharging www.kodak.com/go/accessories 2 www.kodak.com/go/support Charge until the Battery Charging light turns off (up your camera Charging the battery USB AC adapter Kodak USB AC adapter (included) USB cable Battery Charging light Kodak EasyShare camera or printer docks (may be sold separately...

User Manual
Page 9
www.kodak.com/go/support 3 OK to accept. Turning on the camera Setting up your camera Setting the language, date/time Language: 1 to change . for previous/next field. Date/Time: 1 At the prompt, press OK. 2 to change . 2 OK to accept. NOTE: To change the date/time and language in the future, use the Menu button (page 33).
www.kodak.com/go/support 3 OK to accept. Turning on the camera Setting up your camera Setting the language, date/time Language: 1 to change . for previous/next field. Date/Time: 1 At the prompt, press OK. 2 to change . 2 OK to accept. NOTE: To change the date/time and language in the future, use the Menu button (page 33).

User Manual
Page 10
.... CAUTION: A card can purchase an SD or SDHC memory card to conveniently store more pictures and videos (www.kodak.com/go/m763accessories, www.kodak.com/go/m863accessories, www.kodak.com/go /support We recommend Kodak SD or SDHC cards. 1 Turn off the camera. 2 Insert or remove the optional card. 3 Turn on an SD/SDHC card Your...
.... CAUTION: A card can purchase an SD or SDHC memory card to conveniently store more pictures and videos (www.kodak.com/go/m763accessories, www.kodak.com/go/m863accessories, www.kodak.com/go /support We recommend Kodak SD or SDHC cards. 1 Turn off the camera. 2 Insert or remove the optional card. 3 Turn on an SD/SDHC card Your...

User Manual
Page 11
.... (To exit the quickview sooner, press the Shutter button halfway.) The picture is saved unless you press the Delete button. to play a video. www.kodak.com/go/support 5 2 Taking pictures/videos Taking a picture 1 3 On/Off button 2 Framing marks Press the Shutter button halfway to focus and set exposure. When the framing marks...
.... (To exit the quickview sooner, press the Shutter button halfway.) The picture is saved unless you press the Delete button. to play a video. www.kodak.com/go/support 5 2 Taking pictures/videos Taking a picture 1 3 On/Off button 2 Framing marks Press the Shutter button halfway to focus and set exposure. When the framing marks...

User Manual
Page 12
Multiple framing marks may appear when faces are not centered in the scene. The camera attempts to take the picture. To stop recording, press and release the Shutter button again. 6 www.kodak.com/go/support NOTE: Framing marks do not appear in Auto mode (see page 9). Taking pictures/...videos Using the framing marks Framing marks indicate the camera focus area. When you use AF Zone and set Center Zone, ...
Multiple framing marks may appear when faces are not centered in the scene. The camera attempts to take the picture. To stop recording, press and release the Shutter button again. 6 www.kodak.com/go/support NOTE: Framing marks do not appear in Auto mode (see page 9). Taking pictures/...videos Using the framing marks Framing marks indicate the camera focus area. When you use AF Zone and set Center Zone, ...

User Manual
Page 13
.... 3 Take the picture or video. W TD I As you zoom, you can be as close as 13.8 in . (10 x 15 cm) print. Using the digital zoom Use digital zoom in any Still mode or during video recording to get up to 5X magnification beyond optical zoom for an acceptable 4 x 6-in . (35 cm...) to zoom out. Release the button, then press it again. 2 Take the picture. www.kodak.com/go/support 7 Press Wide Angle (W) to your subject. NOTE: For ...
.... 3 Take the picture or video. W TD I As you zoom, you can be as close as 13.8 in . (10 x 15 cm) print. Using the digital zoom Use digital zoom in any Still mode or during video recording to get up to 5X magnification beyond optical zoom for an acceptable 4 x 6-in . (35 cm...) to zoom out. Release the button, then press it again. 2 Take the picture. www.kodak.com/go/support 7 Press Wide Angle (W) to your subject. NOTE: For ...

User Manual
Page 14
... : If Red-eye Pre-flash is turned on: eye I The flash fires once and the I The flash fires once so the eyes camera automatically become accustomed to the flash, then corrects red-eye in heavy shadows. Press the button repeatedly to -subject distance Zoom position Wide angle ... Auto When the lighting conditions require it. Flash Off Never. In low light, hold the camera steady or use a tripod. picture. Flash-to scroll through flash modes (see page 33. 8 www.kodak.com/go/support Red- Fill Every time you take a picture, regardless of the lighting conditions. The current ...
... : If Red-eye Pre-flash is turned on: eye I The flash fires once and the I The flash fires once so the eyes camera automatically become accustomed to the flash, then corrects red-eye in heavy shadows. Press the button repeatedly to -subject distance Zoom position Wide angle ... Auto When the lighting conditions require it. Flash Off Never. In low light, hold the camera steady or use a tripod. picture. Flash-to scroll through flash modes (see page 33. 8 www.kodak.com/go/support Red- Fill Every time you take a picture, regardless of the lighting conditions. The current ...
User Manual
Page 15
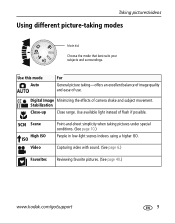
... pictures. (See page 40.) www.kodak.com/go/support 9 SCN Scene High ISO ISO Video Point-and-shoot simplicity when taking modes Mode dial Choose the mode that best suits your subjects and surroundings. Digital Image Minimizing the effects of flash if possible. Use available light instead of camera shake and subject movement. Taking...
... pictures. (See page 40.) www.kodak.com/go/support 9 SCN Scene High ISO ISO Video Point-and-shoot simplicity when taking modes Mode dial Choose the mode that best suits your subjects and surroundings. Digital Image Minimizing the effects of flash if possible. Use available light instead of camera shake and subject movement. Taking...

User Manual
Page 16
...in Landscape. Place the camera on a flat, steady surface or use a tripod. Bright beach scenes. Focus is set to 3 captured images from left into one image. Auto-focus framing marks are not available in night scenes or low-light conditions. Place the camera on a flat, steady... surface or use a tripod. Documents. Place the camera on a flat, steady surface or use a tripod. Distant scenery at night. Panorama Stitching up to Auto Focus (see page 32). 10 www.kodak.com/go/support Close-ups of people. Landscape...
...in Landscape. Place the camera on a flat, steady surface or use a tripod. Bright beach scenes. Focus is set to 3 captured images from left into one image. Auto-focus framing marks are not available in night scenes or low-light conditions. Place the camera on a flat, steady... surface or use a tripod. Documents. Place the camera on a flat, steady surface or use a tripod. Distant scenery at night. Panorama Stitching up to Auto Focus (see page 32). 10 www.kodak.com/go/support Close-ups of people. Landscape...

User Manual
Page 17
... Close-ups of children in bright light. Using camera Help To better understand each menu option, use camera Help. Children Action pictures of yourself. Flash and sound are in low light. T Turn on Help Scroll up/down OK Turn off Help www.kodak.com/go/support 11 Candle light Capturing subjects in shadow or...
... Close-ups of children in bright light. Using camera Help To better understand each menu option, use camera Help. Children Action pictures of yourself. Flash and sound are in low light. T Turn on Help Scroll up/down OK Turn off Help www.kodak.com/go/support 11 Candle light Capturing subjects in shadow or...

User Manual
Page 18
... from the first picture. 4 Compose the second picture. The flash is set with the first picture. Take 2 or 3 pictures. 1 2 3 Get 1 panoramic picture. 12 www.kodak.com/go/support Exposure Compensation, White Balance, AF Zone, AF Control, and Color Mode are automatically stitched together. After you want to stitch them together. The LCD...
... from the first picture. 4 Compose the second picture. The flash is set with the first picture. Take 2 or 3 pictures. 1 2 3 Get 1 panoramic picture. 12 www.kodak.com/go/support Exposure Compensation, White Balance, AF Zone, AF Control, and Color Mode are automatically stitched together. After you want to stitch them together. The LCD...

User Manual
Page 19
Taking pictures/videos Understanding the picture-taking icons Self-timer/Burst Flash Camera mode Album name Framing marks Framing grid Picture size Date stamp Pictures/time remaining Storage location Zoom: Wide, Telephoto, Digital Focus zone Exposure metering White balance Long time exposure ISO speed Battery level Exposure compensation In capture mode-shutter pressed halfway Camera mode Auto Exposure/ Auto Focus warning Battery level Exposure compensation www.kodak.com/go/support 13
Taking pictures/videos Understanding the picture-taking icons Self-timer/Burst Flash Camera mode Album name Framing marks Framing grid Picture size Date stamp Pictures/time remaining Storage location Zoom: Wide, Telephoto, Digital Focus zone Exposure metering White balance Long time exposure ISO speed Battery level Exposure compensation In capture mode-shutter pressed halfway Camera mode Auto Exposure/ Auto Focus warning Battery level Exposure compensation www.kodak.com/go/support 13

User Manual
Page 20
... picture/video. to multi-up thumbnail pictures. (See page 24.) 14 www.kodak.com/go/support OK Review To save battery power, use an optional Kodak EasyShare dock or Kodak 5-volt AC adapter. (Visit: www.kodak.com/go/m763accessories, www.kodak.com/go/m863accessories, www.kodak.com/go/md863accessories.) NOTE: Pictures taken at 3:2 and 16:9 picture sizes have...
... picture/video. to multi-up thumbnail pictures. (See page 24.) 14 www.kodak.com/go/support OK Review To save battery power, use an optional Kodak EasyShare dock or Kodak 5-volt AC adapter. (Visit: www.kodak.com/go/m763accessories, www.kodak.com/go/m863accessories, www.kodak.com/go/md863accessories.) NOTE: Pictures taken at 3:2 and 16:9 picture sizes have...

User Manual
Page 21
Press OK to pause/unpause. 5 Press during playback to play . www.kodak.com/go/support 15 Working with pictures/videos Playing a video 1 Press during playback to reverse at 2X, 4X. Playback speed 4X 2X 1X 2X 4X Reverse Forward 4 Press to play at 2X, 4X. 2 Press the Review button. 3 Press to find previous/next video. during playback to adjust the 7 Press during pause to turn on/off status icons and picture/video info. Viewing picture/video information 1 Press the Review button. 2 Repeatedly press to view previous/next video frame. 6 Press volume.
Press OK to pause/unpause. 5 Press during playback to play . www.kodak.com/go/support 15 Working with pictures/videos Playing a video 1 Press during playback to reverse at 2X, 4X. Playback speed 4X 2X 1X 2X 4X Reverse Forward 4 Press to play at 2X, 4X. 2 Press the Review button. 3 Press to find previous/next video. during playback to adjust the 7 Press during pause to turn on/off status icons and picture/video info. Viewing picture/video information 1 Press the Review button. 2 Repeatedly press to view previous/next video frame. 6 Press volume.

User Manual
Page 22
... the Menu button to videos). Review 3 Press to adjust the volume. 4 Press OK to pause or replay the sound tag during playback. 16 www.kodak.com/go/support Playing a sound tag 1 Press the Review button, then to find a 2 Press the Menu button, then to highlight Sound Tag. Recording a sound tag 1 Press the...
... the Menu button to videos). Review 3 Press to adjust the volume. 4 Press OK to pause or replay the sound tag during playback. 16 www.kodak.com/go/support Playing a sound tag 1 Press the Review button, then to find a 2 Press the Menu button, then to highlight Sound Tag. Recording a sound tag 1 Press the...


