
Extended User Guide
Page 4
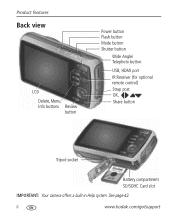
ii www.kodak.com/go/support Product features Back view LCD Delete, Menu, Info buttons Review button Power button Flash button Mode button Shutter button Wide Angle/ Telephoto button USB, HDMI port IR Receiver (for optional remote control) Strap post OK, Share button Tripod socket Battery compartment SD/SDHC Card slot IMPORTANT: Your camera offers a built-in Help system. See page 42.
ii www.kodak.com/go/support Product features Back view LCD Delete, Menu, Info buttons Review button Power button Flash button Mode button Shutter button Wide Angle/ Telephoto button USB, HDMI port IR Receiver (for optional remote control) Strap post OK, Share button Tripod socket Battery compartment SD/SDHC Card slot IMPORTANT: Your camera offers a built-in Help system. See page 42.
Extended User Guide
Page 5
... the strap 1 Loading the KLIC-7006 battery 1 Charging the battery 2 Turning on the camera 4 Setting the language and date/time 4 Storing pictures on an optional SD or SDHC Card 5 2 Taking pictures/videos 6 Taking pictures 6 Taking a video 7 Adjusting LCD... 3 Sharing pictures/videos 16 Sharing pictures through social networks 16 Tagging pictures 18 Marking pictures/videos as favorites and for email 20 4 Reviewing and editing 22 Reviewing pictures/videos 22 Deleting pictures/videos 22 Viewing pictures/videos in different ways 24 A smarter way to find and enjoy your pictures 25...
... the strap 1 Loading the KLIC-7006 battery 1 Charging the battery 2 Turning on the camera 4 Setting the language and date/time 4 Storing pictures on an optional SD or SDHC Card 5 2 Taking pictures/videos 6 Taking pictures 6 Taking a video 7 Adjusting LCD... 3 Sharing pictures/videos 16 Sharing pictures through social networks 16 Tagging pictures 18 Marking pictures/videos as favorites and for email 20 4 Reviewing and editing 22 Reviewing pictures/videos 22 Deleting pictures/videos 22 Viewing pictures/videos in different ways 24 A smarter way to find and enjoy your pictures 25...

Extended User Guide
Page 6
... the review icons 26 Using the menu button in review 27 Cropping pictures 27 Editing videos 28 Selecting multiple pictures/videos 29 Copying pictures/videos 29 Creating a multimedia slide show 30 Displaying pictures/videos on an HD television 31 5 Doing more with your camera 33 Using... Printing pictures 40 Marking your pictures for print 41 7 Troubleshooting 42 Getting help from your camera 42 Troubleshooting 43 Getting help on the Web 47 8 Appendix 48 Camera specifications 48 Care and maintenance 50 Upgrading your software and firmware 50 Storage capacities 51 Important ...
... the review icons 26 Using the menu button in review 27 Cropping pictures 27 Editing videos 28 Selecting multiple pictures/videos 29 Copying pictures/videos 29 Creating a multimedia slide show 30 Displaying pictures/videos on an HD television 31 5 Doing more with your camera 33 Using... Printing pictures 40 Marking your pictures for print 41 7 Troubleshooting 42 Getting help from your camera 42 Troubleshooting 43 Getting help on the Web 47 8 Appendix 48 Camera specifications 48 Care and maintenance 50 Upgrading your software and firmware 50 Storage capacities 51 Important ...
Extended User Guide
Page 19
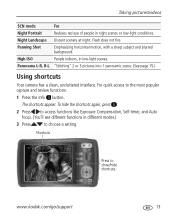
.... Shortcuts Press to the most popular capture and review functions: 1 Press the Info button. Panning Shot Emphasizing horizontal motion, with a sharp subject and blurred background. www.kodak.com/go/support 13 Panorama L-R, R-L "Stitching" 2 or 3 pictures into 1 panoramic scene. (See page 15.) Using shortcuts Your camera has a clean, uncluttered interface. To hide the shortcuts...
.... Shortcuts Press to the most popular capture and review functions: 1 Press the Info button. Panning Shot Emphasizing horizontal motion, with a sharp subject and blurred background. www.kodak.com/go/support 13 Panorama L-R, R-L "Stitching" 2 or 3 pictures into 1 panoramic scene. (See page 15.) Using shortcuts Your camera has a clean, uncluttered interface. To hide the shortcuts...

Extended User Guide
Page 22
... Do you used previously and adds the Share icon to the same sites each time? The camera applies the networking site(s) that you need to download KODAK Software. (See page 39.) 1 Press the Review button, then to choose a social networking site, then press OK. 3 Sharing pictures/videos ...button. A check mark appears. When you transfer the picture to your computer, it 's your favorite social networking sites. IMPORTANT: To use the camera social networking features, you chose. Find a picture, then press and hold the Share button for about 1 second. If it will be sent to...
... Do you used previously and adds the Share icon to the same sites each time? The camera applies the networking site(s) that you need to download KODAK Software. (See page 39.) 1 Press the Review button, then to choose a social networking site, then press OK. 3 Sharing pictures/videos ...button. A check mark appears. When you transfer the picture to your computer, it 's your favorite social networking sites. IMPORTANT: To use the camera social networking features, you chose. Find a picture, then press and hold the Share button for about 1 second. If it will be sent to...
Extended User Guide
Page 23
... can add, edit, or delete email addresses and KODAK PULSE Digital Frames on your camera. (See page 20.) 1 In Review, press the Share button. To return to choose Done, then press OK. When you are in Review and press the Share button, your camera so that a check mark appears. Use the on-screen ...keyboard to make the addition. (Example: [email protected]) To edit an email address or a KODAK PULSE Digital Frame, press to choose the address's nickname or...
... can add, edit, or delete email addresses and KODAK PULSE Digital Frames on your camera. (See page 20.) 1 In Review, press the Share button. To return to choose Done, then press OK. When you are in Review and press the Share button, your camera so that a check mark appears. Use the on-screen ...keyboard to make the addition. (Example: [email protected]) To edit an email address or a KODAK PULSE Digital Frame, press to choose the address's nickname or...
Extended User Guide
Page 24
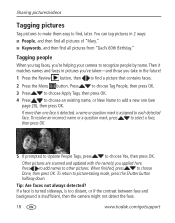
... the Review button, then to find a picture that contains faces. 2 Press the Menu button. Then it matches names and faces in pictures you've taken-and those you applied here. Press to add names to add a new one face is detected, a name or question mark is insufficient, then the camera might not... detect the face. 18 www.kodak.com/go/support Press to choose Tag People, then press OK. 3 Press to choose Apply Tags, then press OK. 4 Press to...
... the Review button, then to find a picture that contains faces. 2 Press the Menu button. Then it matches names and faces in pictures you've taken-and those you applied here. Press to add names to add a new one face is detected, a name or question mark is insufficient, then the camera might not... detect the face. 18 www.kodak.com/go/support Press to choose Tag People, then press OK. 3 Press to choose Apply Tags, then press OK. 4 Press to...
Extended User Guide
Page 26
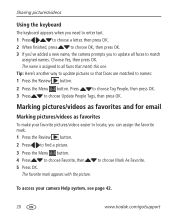
... then press OK. 3 Press to names: 1 Press the Review button. 2 Press the Menu button. Marking pictures/videos as favorites and for email Marking pictures/videos as favorites To make your camera Help system, see page 42. 20 www.kodak.com/go/support The name is assigned to choose Mark As..., then press OK. 2 When finished, press to choose OK, then press OK. 3 If you've added a new name, the camera prompts you can assign the favorite mark. 1 Press the Review button. 2 Press to find a picture. 3 Press the Menu button. 4 Press to choose Favorite, then to all faces to match ...
... then press OK. 3 Press to names: 1 Press the Review button. 2 Press the Menu button. Marking pictures/videos as favorites and for email Marking pictures/videos as favorites To make your camera Help system, see page 42. 20 www.kodak.com/go/support The name is assigned to choose Mark As..., then press OK. 2 When finished, press to choose OK, then press OK. 3 If you've added a new name, the camera prompts you can assign the favorite mark. 1 Press the Review button. 2 Press to find a picture. 3 Press the Menu button. 4 Press to choose Favorite, then to all faces to match ...

Extended User Guide
Page 27
... to create a new email address. (See page 20.) 1 Press the Review button. 2 Press to find a picture. 3 Press the Share button. 4 Press to Capture mode. When you transfer the marked pictures/videos to your camera Help system, see page 42. Press the Shutter button halfway down to return... to choose an email address, then press OK. www.kodak.com/go/support 21 To access your computer, the software prompts you...
... to create a new email address. (See page 20.) 1 Press the Review button. 2 Press to find a picture. 3 Press the Share button. 4 Press to Capture mode. When you transfer the marked pictures/videos to your camera Help system, see page 42. Press the Shutter button halfway down to return... to choose an email address, then press OK. www.kodak.com/go/support 21 To access your computer, the software prompts you...
Extended User Guide
Page 30
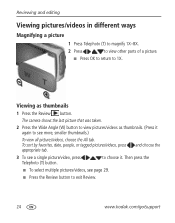
..., see a single picture/video, press Telephoto (T) button. The camera shows the last picture that was taken. 2 Press the Wide Angle (W) button to view pictures/videos as thumbnails 1 Press the Review button. Reviewing and editing Viewing pictures/videos in different ways Magnifying a picture 1... Press Telephoto (T) to magnify 1X-8X. 2 Press to view other parts of a picture. ■ Press OK to return to exit Review. 24 www.kodak.com/go/support
..., see a single picture/video, press Telephoto (T) button. The camera shows the last picture that was taken. 2 Press the Wide Angle (W) button to view pictures/videos as thumbnails 1 Press the Review button. Reviewing and editing Viewing pictures/videos in different ways Magnifying a picture 1... Press Telephoto (T) to magnify 1X-8X. 2 Press to view other parts of a picture. ■ Press OK to return to exit Review. 24 www.kodak.com/go/support
Extended User Guide
Page 31
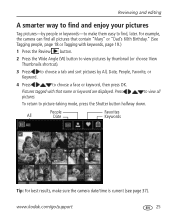
...Keywords Tip: For best results, make them easy to find, later. For example, the camera can find all To return to picture-taking mode, press the Shutter button halfway down. Press pictures. Reviewing and editing A smarter way to find and enjoy your pictures Tag pictures-by All, ...Date, People, Favorite, or Keyword. 4 Press to choose a face or keyword, then press OK. www.kodak.com/go/support 25 Pictures tagged with keywords, page 19.) 1 Press the Review button. 2 Press the Wide Angle (W) button to view pictures by thumbnail (or choose View Thumbnails shortcut). 3 ...
...Keywords Tip: For best results, make them easy to find, later. For example, the camera can find all To return to picture-taking mode, press the Shutter button halfway down. Press pictures. Reviewing and editing A smarter way to find and enjoy your pictures Tag pictures-by All, ...Date, People, Favorite, or Keyword. 4 Press to choose a face or keyword, then press OK. www.kodak.com/go/support 25 Pictures tagged with keywords, page 19.) 1 Press the Review button. 2 Press the Wide Angle (W) button to view pictures by thumbnail (or choose View Thumbnails shortcut). 3 ...

Extended User Guide
Page 33
... to stretch it. To access your camera Help system, see page 42. Reviewing and editing Using the menu button in review 1 Press the Review button, then press the Menu button. 2 Press to choose a tab: ■ Review ■ Edit ■ Setup 3 Press to choose the Cropped picture Edit tab. www.kodak.com/go/support 27 button, then...
... to stretch it. To access your camera Help system, see page 42. Reviewing and editing Using the menu button in review 1 Press the Review button, then press the Menu button. 2 Press to choose a tab: ■ Review ■ Edit ■ Setup 3 Press to choose the Cropped picture Edit tab. www.kodak.com/go/support 27 button, then...

Extended User Guide
Page 34
...from a video, saving only the desired portion. 1 Press the Review video. Choose Trim, then press OK. To access your videos. Reviewing and editing Editing videos You can do incredible things with your camera Help system, see page 42. Choose Make Picture, then press OK.... 3 Follow the screen prompts. Video Trimmed video 3 Follow the screen prompts. button, then to find a 2 Press the Menu button, then to Capture mode. 28 www.kodak...
...from a video, saving only the desired portion. 1 Press the Review video. Choose Trim, then press OK. To access your videos. Reviewing and editing Editing videos You can do incredible things with your camera Help system, see page 42. Choose Make Picture, then press OK.... 3 Follow the screen prompts. Video Trimmed video 3 Follow the screen prompts. button, then to find a 2 Press the Menu button, then to Capture mode. 28 www.kodak...
Extended User Guide
Page 35
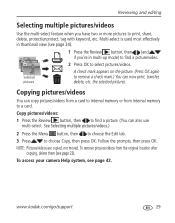
.../videos are copied, not moved. To access your camera Help system, see page 24). 1 Press the Review button, then (and if you have two or ... mark.) You can also use multi-select. the selected pictures. Follow the prompts, then press OK. www.kodak.com/go/support 29 Copying pictures/videos You can copy pictures/videos from a card to find a picture. ...now print, transfer, delete, etc. To remove pictures/videos from internal memory to find a picture/video. Reviewing and editing Selecting multiple pictures/videos Use the multi-select feature when you 're in thumbnail view (see...
.../videos are copied, not moved. To access your camera Help system, see page 24). 1 Press the Review button, then (and if you have two or ... mark.) You can also use multi-select. the selected pictures. Follow the prompts, then press OK. www.kodak.com/go/support 29 Copying pictures/videos You can copy pictures/videos from a card to find a picture. ...now print, transfer, delete, etc. To remove pictures/videos from internal memory to find a picture/video. Reviewing and editing Selecting multiple pictures/videos Use the multi-select feature when you 're in thumbnail view (see...
Extended User Guide
Page 36
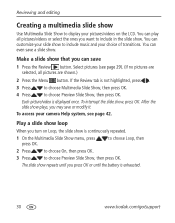
...button. To interrupt the slide show to include music and your choice of transitions. The slide show repeats until the battery is exhausted. 30 www.kodak.com/go/support Each picture/video is not highlighted, press . 3 Press to choose Multimedia Slide Show, then press OK. 4 Press to choose... then press OK. Play a slide show loop When you may save 1 Press the Review button. You can even save a slide show. After the slide show plays, you turn on the LCD. To access your camera Help system, see page 29). (If no pictures are selected, all pictures/videos or...
...button. To interrupt the slide show to include music and your choice of transitions. The slide show repeats until the battery is exhausted. 30 www.kodak.com/go/support Each picture/video is not highlighted, press . 3 Press to choose Multimedia Slide Show, then press OK. 4 Press to choose... then press OK. Play a slide show loop When you may save 1 Press the Review button. You can even save a slide show. After the slide show plays, you turn on the LCD. To access your camera Help system, see page 29). (If no pictures are selected, all pictures/videos or...

Extended User Guide
Page 37
To connect the camera directly to a television, use an HDMI cable (may not be sold separately). Purchase accessories www.kodak.com/go /support 31 Reviewing and editing Displaying pictures/videos on an HD television You can display pictures/videos on a television screen may be as good as on a computer monitor or when printed.) www.kodak.com/go /m580accessories NOTE: The slide show stops if you connect or disconnect the cable while the slide show is running. (Image quality on an HD television, computer monitor, or any device equipped with an HDMI video input.
To connect the camera directly to a television, use an HDMI cable (may not be sold separately). Purchase accessories www.kodak.com/go /support 31 Reviewing and editing Displaying pictures/videos on an HD television You can display pictures/videos on a television screen may be as good as on a computer monitor or when printed.) www.kodak.com/go /m580accessories NOTE: The slide show stops if you connect or disconnect the cable while the slide show is running. (Image quality on an HD television, computer monitor, or any device equipped with an HDMI video input.
Extended User Guide
Page 43
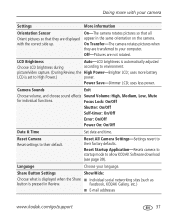
...Camera Settings-Settings revert to their default. Facebook, KODAK Gallery, etc.) ■ E-mail addresses www.kodak.com/go/support 37 On Transfer-The camera rotates pictures when they are displayed with your camera Settings More information Orientation Sensor Orient pictures so that all appear in Review. Reset Camera...; Individual social networking sites (such as button is pressed in the same orientation on the camera. Reset Startup Application-Resets camera to startup mode to allow KODAK Software download (see page 39). Language Choose your computer. On-The...
...Camera Settings-Settings revert to their default. Facebook, KODAK Gallery, etc.) ■ E-mail addresses www.kodak.com/go/support 37 On Transfer-The camera rotates pictures when they are displayed with your camera Settings More information Orientation Sensor Orient pictures so that all appear in Review. Reset Camera...; Individual social networking sites (such as button is pressed in the same orientation on the camera. Reset Startup Application-Resets camera to startup mode to allow KODAK Software download (see page 39). Language Choose your computer. On-The...

Extended User Guide
Page 47
.... ■ Press the Shutter button halfway down to return to Capture mode. See your pictures for print 1 Press the Review button. Marking your printer user's guide for professional printing. Go to www.kodak.com/go /support 41 To access your local photo retailer for details. ■ Make prints at an SD/SDHC... with an SD/SDHC Card slot. Printing from an optional SD or SDHC Card ■ Automatically print tagged pictures when you insert your door. www.kodak.com/go /picturemaker. ■ Take the card to your camera Help system, see page 42.
.... ■ Press the Shutter button halfway down to return to Capture mode. See your pictures for print 1 Press the Review button. Marking your printer user's guide for professional printing. Go to www.kodak.com/go /support 41 To access your local photo retailer for details. ■ Make prints at an SD/SDHC... with an SD/SDHC Card slot. Printing from an optional SD or SDHC Card ■ Automatically print tagged pictures when you insert your door. www.kodak.com/go /picturemaker. ■ Take the card to your camera Help system, see page 42.
Extended User Guide
Page 49
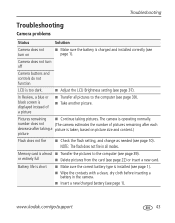
...Transfer the pictures to the computer (see page 39). ■ Take another picture. In Review, a blue or black screen is displayed instead of pictures remaining after each decrease after taking pictures. Camera does not turn on picture size and content.) picture Flash does not fire ■ ...before inserting a battery in all pictures to the computer (see page 39). NOTE: The flash does not fire in the camera. ■ Insert a new/charged battery (see page 1). www.kodak.com/go/support 43 or entirely full ■ Delete pictures from the card (see page 1). The...
...Transfer the pictures to the computer (see page 39). ■ Take another picture. In Review, a blue or black screen is displayed instead of pictures remaining after each decrease after taking pictures. Camera does not turn on picture size and content.) picture Flash does not fire ■ ...before inserting a battery in all pictures to the computer (see page 39). NOTE: The flash does not fire in the camera. ■ Insert a new/charged battery (see page 1). www.kodak.com/go/support 43 or entirely full ■ Delete pictures from the card (see page 1). The...

Extended User Guide
Page 65
... K keyboard, 20 keywords, 19 KODAK EASYSHARE Software upgrading, 50 KODAK Software, download, 39 Kodak Web sites, 42 L language, 37 LCD brightness, 37 reviewing pictures, 22 reviewing videos, 22 LCD brightness, 8, 37 lens cleaning lens, 50 loading battery, 1 SD/SDHC Card, 5 locate pictures, 25 long time exposure, 34, 37 M magnify a picture, 24 maintenance, camera, 50 make picture from...
... K keyboard, 20 keywords, 19 KODAK EASYSHARE Software upgrading, 50 KODAK Software, download, 39 Kodak Web sites, 42 L language, 37 LCD brightness, 37 reviewing pictures, 22 reviewing videos, 22 LCD brightness, 8, 37 lens cleaning lens, 50 loading battery, 1 SD/SDHC Card, 5 locate pictures, 25 long time exposure, 34, 37 M magnify a picture, 24 maintenance, camera, 50 make picture from...


