User Manual
Page 5
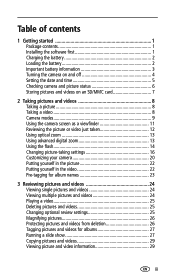
...software first 1 Charging the battery 2 Loading the battery 2 Important battery information 3 Turning the camera on and off 4 Setting the date and time 5 Checking camera and picture status 6 Storing pictures and videos on an SD/MMC card 7 2 Taking pictures and videos 8 Taking a picture 8 Taking a video 8 Camera modes 9 Using the camera... the picture or video just taken 12 Using optical zoom 13 Using advanced digital zoom 13 Using the flash 14 Changing picture-taking settings 16 Customizing your camera 20 Putting yourself in the picture 22 Putting yourself in the video 22 ...
...software first 1 Charging the battery 2 Loading the battery 2 Important battery information 3 Turning the camera on and off 4 Setting the date and time 5 Checking camera and picture status 6 Storing pictures and videos on an SD/MMC card 7 2 Taking pictures and videos 8 Taking a picture 8 Taking a video 8 Camera modes 9 Using the camera... the picture or video just taken 12 Using optical zoom 13 Using advanced digital zoom 13 Using the flash 14 Changing picture-taking settings 16 Customizing your camera 20 Putting yourself in the picture 22 Putting yourself in the video 22 ...

User Manual
Page 6
.../MMC card 38 Printing without a computer 38 7 Troubleshooting 39 Camera problems 39 Computer/connectivity problems 40 Picture quality problems 41 Camera ready light status 42 Camera power light status 43 8 Getting help 44 Helpful links 44 Software help 44 Telephone customer support 44 9 Appendix 46 Camera specifications 46 Tips, safety, maintenance 49 Storage capacities 49...
.../MMC card 38 Printing without a computer 38 7 Troubleshooting 39 Camera problems 39 Computer/connectivity problems 40 Picture quality problems 41 Camera ready light status 42 Camera power light status 43 8 Getting help 44 Helpful links 44 Software help 44 Telephone customer support 44 9 Appendix 46 Camera specifications 46 Tips, safety, maintenance 49 Storage capacities 49...
User Manual
Page 7
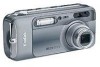
... and videos on a CD), Start Here! The LS753 camera does not fit the universal insert included with the optional Kodak EasyShare camera dock or printer dock. Installing the software first IMPORTANT: Install the software from the Kodak EasyShare software CD before connecting the camera (or dock) to the computer. guide, Kodak EasyShare software CD. See Install the software, page 31 or the Start Here! Contents...
... and videos on a CD), Start Here! The LS753 camera does not fit the universal insert included with the optional Kodak EasyShare camera dock or printer dock. Installing the software first IMPORTANT: Install the software from the Kodak EasyShare software CD before connecting the camera (or dock) to the computer. guide, Kodak EasyShare software CD. See Install the software, page 31 or the Start Here! Contents...

User Manual
Page 11
..., then press the OK button. 3 Press to highlight Date & Time, then press the OK button. 4 Press to exit the menu. See the EasyShare software Help for an extended period of time. 1 SET DATE & TIME is removed for details. 5 to advance to 5 When finished, press the OK button...adjust the date and time. NOTE: Depending on your computer operating system, Kodak EasyShare software may let your computer update the camera clock when you turn on the camera. Setting the date & time, anytime 1 Turn on the camera or if the battery is highlighted. Press the next setting. Press the OK...
..., then press the OK button. 3 Press to highlight Date & Time, then press the OK button. 4 Press to exit the menu. See the EasyShare software Help for an extended period of time. 1 SET DATE & TIME is removed for details. 5 to advance to 5 When finished, press the OK button...adjust the date and time. NOTE: Depending on your computer operating system, Kodak EasyShare software may let your computer update the camera clock when you turn on the camera. Setting the date & time, anytime 1 Turn on the camera or if the battery is highlighted. Press the next setting. Press the OK...

User Manual
Page 15
... a low-level fill flash for softening shadows. Point-and-shoot simplicity when taking . Use EasyShare software to load pictures into the Favorites section of your conditions: 1. rotate 2. Rotate the jog dial to select the highlighted mode. Use the camera screen to fill the frame with sound (see Taking a video, page 8). Full-frame portraits...
... a low-level fill flash for softening shadows. Point-and-shoot simplicity when taking . Use EasyShare software to load pictures into the Favorites section of your conditions: 1. rotate 2. Rotate the jog dial to select the highlighted mode. Use the camera screen to fill the frame with sound (see Taking a video, page 8). Full-frame portraits...

User Manual
Page 24
... in Video and Scene modes (exception-available in Landscape mode. Ideal when you change modes or turn off the camera. NOTE: For the best pictures, the camera is concentrated on a smaller area of the subject centered in the viewfinder. Unavailable in Video mode. Center-weight-... Taking pictures and videos Setting Icon Color Mode Choose color tones. This setting remains until you change modes or turn off the camera. NOTE: EasyShare software also lets you change a color picture to Center-weight, except the metering is set to Multi-zone when in Landscape). This...
... in Video and Scene modes (exception-available in Landscape mode. Ideal when you change modes or turn off the camera. NOTE: For the best pictures, the camera is concentrated on a smaller area of the subject centered in the viewfinder. Unavailable in Video mode. Center-weight-... Taking pictures and videos Setting Icon Color Mode Choose color tones. This setting remains until you change modes or turn off the camera. NOTE: EasyShare software also lets you change a color picture to Center-weight, except the metering is set to Multi-zone when in Landscape). This...

User Manual
Page 29
... your computer. To remove all the pictures or videos you take pictures or videos. See Kodak EasyShare software Help for details. 23 Then copy up to 32 album names to the album name list on your camera 1 In any mode, press the Menu button. 2 Press to highlight Set Album ,... to highlight an album name, then press the OK button. Second-on the screen. If you turn on the camera screen, your pictures and videos in the appropriate album. See the Kodak EasyShare software Help for details. Then, all album selections, select Clear All. 5 Highlight Exit, then press the OK button...
... your computer. To remove all the pictures or videos you take pictures or videos. See Kodak EasyShare software Help for details. 23 Then copy up to 32 album names to the album name list on your camera 1 In any mode, press the Menu button. 2 Press to highlight Set Album ,... to highlight an album name, then press the OK button. Second-on the screen. If you turn on the camera screen, your pictures and videos in the appropriate album. See the Kodak EasyShare software Help for details. Then, all album selections, select Clear All. 5 Highlight Exit, then press the OK button...

User Manual
Page 32
... locate a picture. 2 Repeatedly press the Zoom lever to Telephoto (T) to increase the magnification up to 8X or to Wide (W) to decrease it. ■ To see Kodak EasyShare software Help.) 26 The picture or video is protected and cannot be deleted.
... locate a picture. 2 Repeatedly press the Zoom lever to Telephoto (T) to increase the magnification up to 8X or to Wide (W) to decrease it. ■ To see Kodak EasyShare software Help.) 26 The picture or video is protected and cannot be deleted.

User Manual
Page 33
...Review mode to tag the pictures and videos in the appropriate album folder. See Kodak EasyShare software Help for details. The album name appears with album names. To run a slide show on a television or on your camera 1 Press the Review button, then locate the picture or video. 2 Press ...folder, then press the OK button. When the picture you transfer the tagged pictures and videos to create album names on the camera screen. See Kodak EasyShare software Help for details. Running a slide show 1 Press the Review button, then press the Menu button. 27 To save battery ...
...Review mode to tag the pictures and videos in the appropriate album folder. See Kodak EasyShare software Help for details. The album name appears with album names. To run a slide show on a television or on your camera 1 Press the Review button, then locate the picture or video. 2 Press ...folder, then press the OK button. When the picture you transfer the tagged pictures and videos to create album names on the camera screen. See Kodak EasyShare software Help for details. Running a slide show 1 Press the Review button, then press the Menu button. 27 To save battery ...

User Manual
Page 36
4 Installing the software Minimum system requirements Windows OS-based computers Macintosh computers ■ Windows 98, 98SE, ME, 2000 SP1, or XP OS ■ Internet Explorer 5.01 or higher &#... x 600 pixels (16-bit or 24-bit recommended) ■ Power Mac G3, G4, G5, G4 Cube, iMac; PowerBook G3, G4; To download EasyShare software for Mac OS 8.6 and 9.x, visit www.kodak.com/go/ls753downloads. 30 or iBook computers ■ Mac OS X version 10.2.3, 10.3 ■ Safari 1.0 or higher ■ 128 MB RAM ■...
4 Installing the software Minimum system requirements Windows OS-based computers Macintosh computers ■ Windows 98, 98SE, ME, 2000 SP1, or XP OS ■ Internet Explorer 5.01 or higher &#... x 600 pixels (16-bit or 24-bit recommended) ■ Power Mac G3, G4, G5, G4 Cube, iMac; PowerBook G3, G4; To download EasyShare software for Mac OS 8.6 and 9.x, visit www.kodak.com/go/ls753downloads. 30 or iBook computers ■ Mac OS X version 10.2.3, 10.3 ■ Safari 1.0 or higher ■ 128 MB RAM ■...

User Manual
Page 37
... instructions. Windows OS-based computer-select Complete to the computer. Installing the software Install the software CAUTION: Install Kodak EasyShare software before connecting the camera or optional dock to automatically install all software applications that contains the CD. Failure to do so may cause the software to load incorrectly. 1 Close all applications. This lets you wish to electronically...
... instructions. Windows OS-based computer-select Complete to the computer. Installing the software Install the software CAUTION: Install Kodak EasyShare software before connecting the camera or optional dock to automatically install all software applications that contains the CD. Failure to do so may cause the software to load incorrectly. 1 Close all applications. This lets you wish to electronically...
User Manual
Page 39
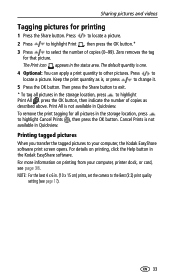
... a picture. Print All is not available in . (10 x 15 cm) prints, set the camera to the Best (3:2) print quality setting (see page 38. Cancel Prints is not available in the Kodak EasyShare software. For details on printing from your computer, the Kodak EasyShare software print screen opens. The Print icon appears in the status area. To remove...
... a picture. Print All is not available in . (10 x 15 cm) prints, set the camera to the Best (3:2) print quality setting (see page 38. Cancel Prints is not available in the Kodak EasyShare software. For details on printing from your computer, the Kodak EasyShare software print screen opens. The Print icon appears in the status area. To remove...

User Manual
Page 40
... details, click the Help button in the Kodak EasyShare software. To tag other pictures/videos with the same address, press to scroll through them to the addresses you transfer the tagged pictures/videos to create an email address book on your camera 1 Press the Share button. To send... the pictures/videos to more than one address, repeat step 3 for emailing First-on your computer Use Kodak EasyShare software to your computer. Selected addresses are checked. 4 To remove a ...
... details, click the Help button in the Kodak EasyShare software. To tag other pictures/videos with the same address, press to scroll through them to the addresses you transfer the tagged pictures/videos to create an email address book on your camera 1 Press the Share button. To send... the pictures/videos to more than one address, repeat step 3 for emailing First-on your computer Use Kodak EasyShare software to your computer. Selected addresses are checked. 4 To remove a ...

User Manual
Page 41
... for 4 x 6 in. (10 x 15 cm) prints. Press the jog dial. 2 Press to carefully review and make some choices. Use Camera Favorites in the Favorites section of your favorite pictures in the Kodak EasyShare software to the computer. Favorites are transferred to customize the size of favorites. Tag pictures as favorites You can store your...
... for 4 x 6 in. (10 x 15 cm) prints. Press the jog dial. 2 Press to carefully review and make some choices. Use Camera Favorites in the Favorites section of your favorite pictures in the Kodak EasyShare software to the computer. Favorites are transferred to customize the size of favorites. Tag pictures as favorites You can store your...

User Manual
Page 42
... Removing all favorites from transferring to access optional settings. Preventing favorites from your camera. Sharing pictures and videos Optional settings In Favorites mode, press the Menu button to the camera 1 Open the Kodak EasyShare software. Slide Show (page 27) Multi-up to Best (3:2) (see page 37...) or an EasyShare dock. To prevent cropping, take pictures with the Picture Quality set to a...
... Removing all favorites from transferring to access optional settings. Preventing favorites from your camera. Sharing pictures and videos Optional settings In Favorites mode, press the Menu button to the camera 1 Open the Kodak EasyShare software. Slide Show (page 27) Multi-up to Best (3:2) (see page 37...) or an EasyShare dock. To prevent cropping, take pictures with the Picture Quality set to a...

User Manual
Page 43
...and videos. ■ Kodak EasyShare camera dock, Kodak EasyShare printer dock ■ Kodak multi-card reader, Kodak SD multimedia card reader-writer Purchase these and other end of the USB cable into the labeled USB port on connecting. Failure to do so may cause the software to the computer. ...cable 1 Turn off the camera. 2 Plug the labeled end of Kodak products or www.kodak.com/go /howto for details. 3 Plug the other accessories at a dealer of the USB cable into the labeled USB port on the camera. 4 Turn on the camera. Kodak EasyShare software opens on your computer user's...
...and videos. ■ Kodak EasyShare camera dock, Kodak EasyShare printer dock ■ Kodak multi-card reader, Kodak SD multimedia card reader-writer Purchase these and other end of the USB cable into the labeled USB port on connecting. Failure to do so may cause the software to the computer. ...cable 1 Turn off the camera. 2 Plug the labeled end of Kodak products or www.kodak.com/go /howto for details. 3 Plug the other accessories at a dealer of the USB cable into the labeled USB port on the camera. 4 Turn on the camera. Kodak EasyShare software opens on your computer user's...
User Manual
Page 44
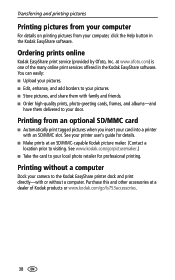
...card into a printer with or without a computer Dock your camera to the Kodak EasyShare printer dock and print directly-with an SD/MMC slot. at an SD/MMC-capable Kodak picture maker. (Contact a location prior to visiting. See www.kodak.com/go /ls753accessories. 38 You can easily: ■ ... prints at www.ofoto.com) is one of the many online print services offered in the Kodak EasyShare software. See your door. Purchase this and other accessories at a dealer of Kodak products or www.kodak.com/go /picturemaker.) ■ Take the card to your printer user's guide for professional ...
...card into a printer with or without a computer Dock your camera to the Kodak EasyShare printer dock and print directly-with an SD/MMC slot. at an SD/MMC-capable Kodak picture maker. (Contact a location prior to visiting. See www.kodak.com/go /ls753accessories. 38 You can easily: ■ ... prints at www.ofoto.com) is one of the many online print services offered in the Kodak EasyShare software. See your door. Purchase this and other accessories at a dealer of Kodak products or www.kodak.com/go /picturemaker.) ■ Take the card to your printer user's guide for professional ...
User Manual
Page 45
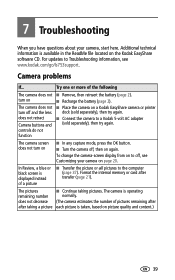
... 21). In Review, a blue or black screen is displayed instead of pictures remaining after each picture is available in the ReadMe file located on the Kodak EasyShare software CD. 7 Troubleshooting When you have questions about your camera on page 20. Additional technical information is taken, based on picture quality and content.) 39
... 21). In Review, a blue or black screen is displayed instead of pictures remaining after each picture is available in the ReadMe file located on the Kodak EasyShare software CD. 7 Troubleshooting When you have questions about your camera on page 20. Additional technical information is taken, based on picture quality and content.) 39
User Manual
Page 46
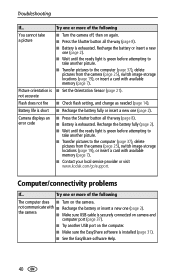
... change as needed (page 14). Computer/connectivity problems If... the camera ■ Make sure USB cable is installed (page 31). ■ See the EasyShare software Help. 40 not communicate with available memory (page 7). ■ Contact your local service provider or visit www.kodak.com/go/support. Battery life is short ■ Recharge the battery...
... change as needed (page 14). Computer/connectivity problems If... the camera ■ Make sure USB cable is installed (page 31). ■ See the EasyShare software Help. 40 not communicate with available memory (page 7). ■ Contact your local service provider or visit www.kodak.com/go/support. Battery life is short ■ Recharge the battery...
User Manual
Page 50
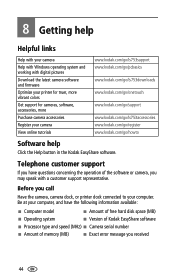
... model ■ Amount of free hard disk space (MB) ■ Operating system ■ Version of Kodak EasyShare software ■ Processor type and speed (MHz) ■ Camera serial number ■ Amount of the software or camera, you may speak with digital pictures Download the latest camera software and firmware Optimize your printer for truer, more vibrant colors Get support for...
... model ■ Amount of free hard disk space (MB) ■ Operating system ■ Version of Kodak EasyShare software ■ Processor type and speed (MHz) ■ Camera serial number ■ Amount of the software or camera, you may speak with digital pictures Download the latest camera software and firmware Optimize your printer for truer, more vibrant colors Get support for...


