

User's Guide
Page 11
Camera Dock 6000 Specifications 76 10 Troubleshooting 77 Troubleshooting-Camera 77 11 Getting Help 89 Helpful Web Links 89 Help in this Manual 89 Software Help 89 Telephone Customer Support 90 12 Appendix 93 Camera Specifications 93 Original Factory Settings 95 Upgrading Your Software and Firmware 96 Tips, Safety, Maintenance 96 Storage Capacities 98 Locating Pictures and Videos on a Card 99 Picture Naming Conventions 99 Using the Battery 101 Power-Saving Features 102 FCC Compliance and Advisory 102 ix
Camera Dock 6000 Specifications 76 10 Troubleshooting 77 Troubleshooting-Camera 77 11 Getting Help 89 Helpful Web Links 89 Help in this Manual 89 Software Help 89 Telephone Customer Support 90 12 Appendix 93 Camera Specifications 93 Original Factory Settings 95 Upgrading Your Software and Firmware 96 Tips, Safety, Maintenance 96 Storage Capacities 98 Locating Pictures and Videos on a Card 99 Picture Naming Conventions 99 Using the Battery 101 Power-Saving Features 102 FCC Compliance and Advisory 102 ix
User's Guide
Page 13
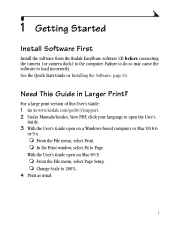
... print version of this User's Guide: 1 Go to www.kodak.com/go/ls633support. 2 Under Manuals/Guides, View PDF, click your language to open the User's Guide. 3 With the User's Guide open on a Windows-based computer or Mac OS 8.6 or 9.x: m From the File menu, select Print. With the User's Guide open on Mac OS X: m From the File menu, select Page Setup. 1 Getting Started Install Software First Install the software from the Kodak EasyShare software CD before connecting the camera (or camera dock) to 200%. 4 Print as usual. 1 Need This Guide in Larger Print? m Change...
... print version of this User's Guide: 1 Go to www.kodak.com/go/ls633support. 2 Under Manuals/Guides, View PDF, click your language to open the User's Guide. 3 With the User's Guide open on a Windows-based computer or Mac OS 8.6 or 9.x: m From the File menu, select Print. With the User's Guide open on Mac OS X: m From the File menu, select Page Setup. 1 Getting Started Install Software First Install the software from the Kodak EasyShare software CD before connecting the camera (or camera dock) to 200%. 4 Print as usual. 1 Need This Guide in Larger Print? m Change...

User's Guide
Page 14
...low battery consumption. Edit-Add special effects to your camera functions. Capture Videos with flash, Self Timer, and zoom features. Set Up -Customize your pictures, make a custom slide show, fix red-eye, crop, rotate, and much more. Install the software from Ofoto, a Kodak Company. Order prints online from the Kodak EasyShare software CD, then: Transfer-Transfer pictures and videos to your computer. What Can I Do With My Camera? Review -Display, protect, and delete pictures and videos. Some Macintosh operating systems may support limited Kodak EasyShare software...
...low battery consumption. Edit-Add special effects to your camera functions. Capture Videos with flash, Self Timer, and zoom features. Set Up -Customize your pictures, make a custom slide show, fix red-eye, crop, rotate, and much more. Install the software from Ofoto, a Kodak Company. Order prints online from the Kodak EasyShare software CD, then: Transfer-Transfer pictures and videos to your computer. What Can I Do With My Camera? Review -Display, protect, and delete pictures and videos. Some Macintosh operating systems may support limited Kodak EasyShare software...

User's Guide
Page 20
... Menu button. Joystick/OK Menu The date format is removed for details. 8 Joystick/OK Setting the Date & Time, Anytime 1 Turn on your computer operating system, Kodak EasyShare software may allow your computer to automatically update the camera clock when you change the date and time. The setting remains until you connect the camera. See the Kodak EasyShare software Help for an extended time. (Select Cancel if you want to change it. AUTO 3 menu Press to step 4 below, Setting the Date & Time, review Anytime. delete The Date & Time screen...
... Menu button. Joystick/OK Menu The date format is removed for details. 8 Joystick/OK Setting the Date & Time, Anytime 1 Turn on your computer operating system, Kodak EasyShare software may allow your computer to automatically update the camera clock when you change the date and time. The setting remains until you connect the camera. See the Kodak EasyShare software Help for an extended time. (Select Cancel if you want to change it. AUTO 3 menu Press to step 4 below, Setting the Date & Time, review Anytime. delete The Date & Time screen...

User's Guide
Page 23
... change it and applies to all camera functions. 6 Press the Menu button to highlight an option, then press the OK button: Auto (default)-the camera uses the card if one is installed. 5 Highlight Continue, then press the OK button again. The number/length of pictures/videos depends on the camera. 2 Press the Menu button. 3 Press to highlight Image Storage , then press the OK button. 4 Press to exit the menu. 11 If not, the camera uses internal memory...
... change it and applies to all camera functions. 6 Press the Menu button to highlight an option, then press the OK button: Auto (default)-the camera uses the card if one is installed. 5 Highlight Continue, then press the OK button again. The number/length of pictures/videos depends on the camera. 2 Press the Menu button. 3 Press to highlight Image Storage , then press the OK button. 4 Press to exit the menu. 11 If not, the camera uses internal memory...
User's Guide
Page 25
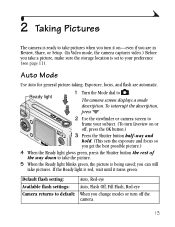
Default flash setting: Auto, Red-eye Available flash settings: Auto, Flash Off, Fill Flash, Red-eye Camera returns to default: When you change modes or turn off , press the OK button.) 3 Press the Shutter button half-way and hold. (This sets the exposure and focus so you get the best possible picture.) 4 When the Ready light glows green, press the Shutter button the rest of the way down to take the picture. 5 When the Ready light blinks green, the picture is being saved; Ready light 1 Turn the Mode dial to...
Default flash setting: Auto, Red-eye Available flash settings: Auto, Flash Off, Fill Flash, Red-eye Camera returns to default: When you change modes or turn off , press the OK button.) 3 Press the Shutter button half-way and hold. (This sets the exposure and focus so you get the best possible picture.) 4 When the Ready light glows green, press the Shutter button the rest of the way down to take the picture. 5 When the Ready light blinks green, the picture is being saved; Ready light 1 Turn the Mode dial to...

User's Guide
Page 46
... Shutter button half-way and hold to take the picture. Default flash setting: Available flash settings: Camera returns to portray a sense of the way down to set the focus. This setting remains until you change the Mode dial or turn off the camera. Press the rest of motion. NOTE: Long Time Exposure cannot be used with Exposure Compensation or manual ISO speed setting. Take the Picture 1 Place the camera on a flat surface or use a tripod. 2 Use the camera screen to exit the menu...
... Shutter button half-way and hold to take the picture. Default flash setting: Available flash settings: Camera returns to portray a sense of the way down to set the focus. This setting remains until you change the Mode dial or turn off the camera. Press the rest of motion. NOTE: Long Time Exposure cannot be used with Exposure Compensation or manual ISO speed setting. Take the Picture 1 Place the camera on a flat surface or use a tripod. 2 Use the camera screen to exit the menu...
User's Guide
Page 49
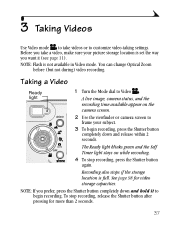
... available in Video mode. delete 2 Use the viewfinder or camera screen to begin recording, press the Shutter button completely down and release within 2 seconds. 3 Taking Videos Use Video mode to take a video, make sure your subject. 3 To begin recording. Taking a Video Ready light 1 Turn the Mode dial to customize video-taking settings. AUTO The Ready light blinks green and the Self OFF Timer light stays on the camera screen. NOTE: Flash is full. NOTE: If you want it to frame your picture storage location is set the way...
... available in Video mode. delete 2 Use the viewfinder or camera screen to begin recording, press the Shutter button completely down and release within 2 seconds. 3 Taking Videos Use Video mode to take a video, make sure your subject. 3 To begin recording. Taking a Video Ready light 1 Turn the Mode dial to customize video-taking settings. AUTO The Ready light blinks green and the Self OFF Timer light stays on the camera screen. NOTE: Flash is full. NOTE: If you want it to frame your picture storage location is set the way...
User's Guide
Page 81
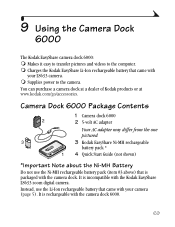
... battery pack * 1 4 Quick Start Guide (not shown) *Important Note about the Ni-MH Battery Do not use the Li-Ion rechargeable battery that is incompatible with the Kodak EasyShare LS633 zoom digital camera. Instead, use the Ni-MH rechargeable battery pack (item #3 above) that came with the camera dock 6000. 69 It is packaged with your LS633 camera. 9 Using the Camera Dock 6000 The Kodak EasyShare camera dock 6000: m Makes it easy to transfer pictures and videos to the camera...
... battery pack * 1 4 Quick Start Guide (not shown) *Important Note about the Ni-MH Battery Do not use the Li-Ion rechargeable battery that is incompatible with the Kodak EasyShare LS633 zoom digital camera. Instead, use the Ni-MH rechargeable battery pack (item #3 above) that came with the camera dock 6000. 69 It is packaged with your LS633 camera. 9 Using the Camera Dock 6000 The Kodak EasyShare camera dock 6000: m Makes it easy to transfer pictures and videos to the camera...

User's Guide
Page 87
... Your Kodak EasyShare camera dock 6000 requires a Kodak EasyShare CX/DX 6000 or LS600 series digital camera. Install the software (page 63). Transfer button was removed Replace the camera on the from the camera dock camera dock and press the during picture transfer. pressed. transferred to cable is not installed. For details on computer. Camera was not Press the Transfer button. Troubleshooting-Camera Dock 6000 Problem Cause Solution Pictures are not AC adapter or USB Check the connections (page 71). Earlier camera models (Kodak EasyShare 4000...
... Your Kodak EasyShare camera dock 6000 requires a Kodak EasyShare CX/DX 6000 or LS600 series digital camera. Install the software (page 63). Transfer button was removed Replace the camera on the from the camera dock camera dock and press the during picture transfer. pressed. transferred to cable is not installed. For details on computer. Camera was not Press the Transfer button. Troubleshooting-Camera Dock 6000 Problem Cause Solution Pictures are not AC adapter or USB Check the connections (page 71). Earlier camera models (Kodak EasyShare 4000...
User's Guide
Page 89
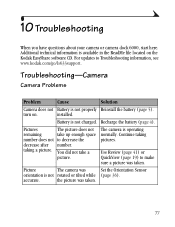
... after number. Picture The camera was Set the Orientation Sensor orientation is available in the ReadMe file located on . 10 Troubleshooting When you have questions about your camera or camera dock 6000, start here. turn on the Kodak EasyShare software CD. taking pictures. Use Review (page 41) or QuickView (page 19) to Troubleshooting information, see www.kodak.com/go/ls633support. The camera is not charged. installed. Battery is operating normally. Troubleshooting-Camera Camera Problems Problem Cause Solution Camera does not Battery is...
... after number. Picture The camera was Set the Orientation Sensor orientation is available in the ReadMe file located on . 10 Troubleshooting When you have questions about your camera or camera dock 6000, start here. turn on the Kodak EasyShare software CD. taking pictures. Use Review (page 41) or QuickView (page 19) to Troubleshooting information, see www.kodak.com/go/ls633support. The camera is not charged. installed. Battery is operating normally. Troubleshooting-Camera Camera Problems Problem Cause Solution Camera does not Battery is...

User's Guide
Page 94
... the laptop user's guide to disable laptops turn off . computer port (page 67). constantly. save battery life. Software is not installed. Cannot transfer Software is not installed. For camera dock 6000 troubleshooting, see page 75. 82 camerasupport Camera power is a problem with the camera. Install the software (page 63). The Battery Monitor or Close that software before starting similar software runs the Kodak software. USB cable is not charged. Close all software computer. Chapter 10 Camera/Computer Communications Problem Cause Solution The...
... the laptop user's guide to disable laptops turn off . computer port (page 67). constantly. save battery life. Software is not installed. Cannot transfer Software is not installed. For camera dock 6000 troubleshooting, see page 75. 82 camerasupport Camera power is a problem with the camera. Install the software (page 63). The Battery Monitor or Close that software before starting similar software runs the Kodak software. USB cable is not charged. Close all software computer. Chapter 10 Camera/Computer Communications Problem Cause Solution The...

User's Guide
Page 97
... a new card (page 10). internal memory memory (Card speed is slow, (Insert a new card) corrupted, or unreadable. Use this card to operate. or the battery has been removed for it back on. If the message reappears, The viewfinder light contact Customer Support glows red and the (page 90). camera turns off .) camera is the first time you Reset the clock (page 8). Card is protected Switch on card) write-protect position. the camera to slow) take pictures only. Card cannot be turned off...
... a new card (page 10). internal memory memory (Card speed is slow, (Insert a new card) corrupted, or unreadable. Use this card to operate. or the battery has been removed for it back on. If the message reappears, The viewfinder light contact Customer Support glows red and the (page 90). camera turns off .) camera is the first time you Reset the clock (page 8). Card is protected Switch on card) write-protect position. the camera to slow) take pictures only. Card cannot be turned off...

User's Guide
Page 102
m Have the following information available: Operating system Processor speed (MHz Computer model Amount of memory (MB Exact error message you received Version of the software or camera, you have questions concerning the operation of Kodak EasyShare software CD Camera serial number 90 Before You Call m Have the camera or camera dock connected to your computer. m Be at your computer. Chapter 11 Telephone Customer Support If you may speak with a customer support representative.
m Have the following information available: Operating system Processor speed (MHz Computer model Amount of memory (MB Exact error message you received Version of the software or camera, you have questions concerning the operation of Kodak EasyShare software CD Camera serial number 90 Before You Call m Have the camera or camera dock connected to your computer. m Be at your computer. Chapter 11 Telephone Customer Support If you may speak with a customer support representative.

User's Guide
Page 107
... Kodak EasyShare LS633 zoom digital camera White balance Auto, Daylight, Tungsten, Fluorescent Zoom (still capture) 3X optical, 3.3X digital Original Factory Settings Feature Date/Time Date/Time Stamp Default Print Quantity Digital Zoom initiation Exposure Compensation Exposure Metering Mode Flash Focus Zone Image Storage ISO Language Liveview Long Time Exposure Orientation Sensor Picture Quality Quickview Factory Setting 2003/1/1; 12:00 Off 1 Pause 0.0 Multi-pattern Auto, Night: Auto flash or Red-eye Sport: Auto flash Landscape, Close-up, Video: Flash Off Multi-zone Auto Auto English...
... Kodak EasyShare LS633 zoom digital camera White balance Auto, Daylight, Tungsten, Fluorescent Zoom (still capture) 3X optical, 3.3X digital Original Factory Settings Feature Date/Time Date/Time Stamp Default Print Quantity Digital Zoom initiation Exposure Compensation Exposure Metering Mode Flash Focus Zone Image Storage ISO Language Liveview Long Time Exposure Orientation Sensor Picture Quality Quickview Factory Setting 2003/1/1; 12:00 Off 1 Pause 0.0 Multi-pattern Auto, Night: Auto flash or Red-eye Sport: Auto flash Landscape, Close-up, Video: Flash Off Multi-zone Auto Auto English...

User's Guide
Page 108
... the camera, turn off the camera and remove the battery and card. Chapter 12 Feature Shutter Sound Slide Show Interval Slide Show Loop Storage Location Video Date Display Video Out White Balance Factory Setting On 5 seconds Off Auto None NTSC Auto Upgrading Your Software and Firmware Download the latest versions of the software included on the Kodak EasyShare software CD and the camera firmware (the software that runs on the lens or camera screen to remove dust and dirt. 2 Wipe the lens or camera screen gently...
... the camera, turn off the camera and remove the battery and card. Chapter 12 Feature Shutter Sound Slide Show Interval Slide Show Loop Storage Location Video Date Display Video Out White Balance Factory Setting On 5 seconds Off Auto None NTSC Auto Upgrading Your Software and Firmware Download the latest versions of the software included on the Kodak EasyShare software CD and the camera firmware (the software that runs on the lens or camera screen to remove dust and dirt. 2 Wipe the lens or camera screen gently...

User's Guide
Page 112
....JPG 100 Chapter 12 m If you use the card in the file name. Burst Pictures When a burst series is incremented by that camera. When a burst series is initiated or ended, the second digit to the left of the decimal is initiated, a letter "B" replaces the underscore in a camera other than the Kodak EasyShare LS633 zoom digital camera, and that camera manufacturer adheres to the documentation that...
....JPG 100 Chapter 12 m If you use the card in the file name. Burst Pictures When a burst series is incremented by that camera. When a burst series is initiated or ended, the second digit to the left of the decimal is initiated, a letter "B" replaces the underscore in a camera other than the Kodak EasyShare LS633 zoom digital camera, and that camera manufacturer adheres to the documentation that...
User's Guide
Page 121
... copying, 48 date imprint, 35 deleting, 43 emailing tagged, 53 file naming, 99 locating on card, 99 magnifying, 44 printing, 68 printing tagged, 52 protecting, 45 quality, setting, 30 reviewing, 41, 42 storage capacity, 98 taking, 13 transfer via camera dock, 74 transfer via USB cable, 67 power auto off, 102 camera, 7 camera dock, 71 light, iv printer dock, 68 printing changing default quantity, 56 from a card, 68 optimizing printer, 89 order online, 68 pictures, 68 tagged pictures, 68 this user guide...
... copying, 48 date imprint, 35 deleting, 43 emailing tagged, 53 file naming, 99 locating on card, 99 magnifying, 44 printing, 68 printing tagged, 52 protecting, 45 quality, setting, 30 reviewing, 41, 42 storage capacity, 98 taking, 13 transfer via camera dock, 74 transfer via USB cable, 67 power auto off, 102 camera, 7 camera dock, 71 light, iv printer dock, 68 printing changing default quantity, 56 from a card, 68 optimizing printer, 89 order online, 68 pictures, 68 tagged pictures, 68 this user guide...
User's Guide
Page 122
..., 46 reviewing videos as you take them, 38 camera screen, 42 deleting, 43 protecting, 45 slide show, 46 S safety, 96 SD card, inserting, 10 self timer button, ii light, i with pictures, 25 with videos, 40 service and support telephone numbers, 90 setting date and time, 8 flash, 22 language, 59 mode dial, 6 picture quality, 30 resolution, 30 self timer, 25, 40 storage location, 11 video out, 59 setup mode, using, 55 share button, ii, 51 shutoff, auto, 102 shutter, i problems, 78 self timer delay, 25, 40 sounds, 58 taking pictures...
..., 46 reviewing videos as you take them, 38 camera screen, 42 deleting, 43 protecting, 45 slide show, 46 S safety, 96 SD card, inserting, 10 self timer button, ii light, i with pictures, 25 with videos, 40 service and support telephone numbers, 90 setting date and time, 8 flash, 22 language, 59 mode dial, 6 picture quality, 30 resolution, 30 self timer, 25, 40 storage location, 11 video out, 59 setup mode, using, 55 share button, ii, 51 shutoff, auto, 102 shutter, i problems, 78 self timer delay, 25, 40 sounds, 58 taking pictures...

User's Guide
Page 123
... for print, 52 Index when to tag, 51 taking pictures, 13 taking videos, 37 telephone support, 90 telephoto button, ii television, slide show, 47 time, setting, 8 timer, shutter delay, 25, 40 tips battery guidelines, 101 maintenance, 96 ReadMe file, 77 safety, 96 transfer via camera dock, 74 via USB cable, 67 trash can, deleting, 19, 38 tripod socket, iv troubleshooting camera, 77 camera dock, 75 turning camera on and off, 7 U upgrading software, firmware, 96 URLs, Kodak Web...
... for print, 52 Index when to tag, 51 taking pictures, 13 taking videos, 37 telephone support, 90 telephoto button, ii television, slide show, 47 time, setting, 8 timer, shutter delay, 25, 40 tips battery guidelines, 101 maintenance, 96 ReadMe file, 77 safety, 96 transfer via camera dock, 74 via USB cable, 67 trash can, deleting, 19, 38 tripod socket, iv troubleshooting camera, 77 camera dock, 75 turning camera on and off, 7 U upgrading software, firmware, 96 URLs, Kodak Web...


