User Guide
Page 3
... multi-feed detection 3-9 Automatic feeding 3-9 Continuous feeding 3-10 Manual feeding 3-10 Feeding documents that require special handling 3-11 Calibrating the scanner 3-11 Image calibration 3-12 Ultrasonics calibration 3-15 4 The Enhanced Printer 4-1 Overview 4-1 Printer...separation roller or separation roller tires 5-16 Replacing the pre-separation pad 5-17 Replacing the imaging guides 5-17 6 Troubleshooting 6-1 Indicator lights 6-1 Accessing the Operator Log 6-3 i600 Series Scanners Message listing 6-6 i600 Series Scanners Numerical Message listing 6-11 i700 Series Scanners...
... multi-feed detection 3-9 Automatic feeding 3-9 Continuous feeding 3-10 Manual feeding 3-10 Feeding documents that require special handling 3-11 Calibrating the scanner 3-11 Image calibration 3-12 Ultrasonics calibration 3-15 4 The Enhanced Printer 4-1 Overview 4-1 Printer...separation roller or separation roller tires 5-16 Replacing the pre-separation pad 5-17 Replacing the imaging guides 5-17 6 Troubleshooting 6-1 Indicator lights 6-1 Accessing the Operator Log 6-3 i600 Series Scanners Message listing 6-6 i600 Series Scanners Numerical Message listing 6-11 i700 Series Scanners...
User Guide
Page 4
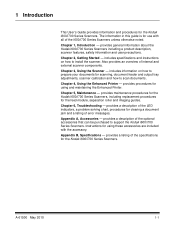
..., procedures for the feed module, separation roller and imaging guides. Chapter 1, Introduction - provides a description of the optional accessories that can be purchased to scan documents. includes specifications and instructions on how to prepare your documents for the Kodak i600/i700 Series Scanners. provides maintenance procedures for the Kodak i600/i700 Series Scanners, including replacement procedures for clearing...
..., procedures for the feed module, separation roller and imaging guides. Chapter 1, Introduction - provides a description of the optional accessories that can be purchased to scan documents. includes specifications and instructions on how to prepare your documents for the Kodak i600/i700 Series Scanners. provides maintenance procedures for the Kodak i600/i700 Series Scanners, including replacement procedures for clearing...
User Guide
Page 5
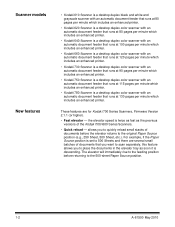
... an enhanced printer. • Kodak i640 Scanner is a desktop duplex color scanner with an automatic document feeder that runs at 100 pages per minute which includes an enhanced printer. • Kodak i660 Scanner is a desktop duplex color scanner with an automatic document feeder that runs at 120 pages...you to quickly reload small stacks of documents that runs at 115 pages per minute which includes an enhanced printer. • Kodak i780 Scanner is a desktop duplex color scanner with an automatic document feeder that you want to scan separately, this feature allows you to the original...
... an enhanced printer. • Kodak i640 Scanner is a desktop duplex color scanner with an automatic document feeder that runs at 100 pages per minute which includes an enhanced printer. • Kodak i660 Scanner is a desktop duplex color scanner with an automatic document feeder that runs at 120 pages...you to quickly reload small stacks of documents that runs at 115 pages per minute which includes an enhanced printer. • Kodak i780 Scanner is a desktop duplex color scanner with an automatic document feeder that you want to scan separately, this feature allows you to the original...
User Guide
Page 6
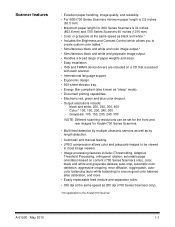
...auto-white balancing) to the Kodak i610 Scanner. Scanner features • Excellent paper handling, image quality, and reliability. • For i600/i700 Series Scanners minimum paper length is 2.5 inches (63.5 mm) • Maximum paper length for Kodak i700 Series Scanners. • Multi-feed detection ... 200 dpi (i700 Series Scanners only). * Not applicable to ensure good color balance after calibration, and more. • Easily replaceable feed module and separation roller. • 300 dpi at the same speed as "sleep" mode). • Document printing capabilities. • Electronic...
...auto-white balancing) to the Kodak i610 Scanner. Scanner features • Excellent paper handling, image quality, and reliability. • For i600/i700 Series Scanners minimum paper length is 2.5 inches (63.5 mm) • Maximum paper length for Kodak i700 Series Scanners. • Multi-feed detection ... 200 dpi (i700 Series Scanners only). * Not applicable to ensure good color balance after calibration, and more. • Easily replaceable feed module and separation roller. • 300 dpi at the same speed as "sleep" mode). • Document printing capabilities. • Electronic...
User Guide
Page 13
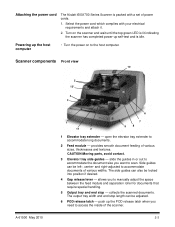
...stop - Attaching the power cord The Kodak i600/i700 Series Scanner is lit indicating the scanner has completed power-up the POD release latch when you want to the host computer. open the elevator tray extender to accommodate documents of the scanner. 2-3 Side guides can be locked into...the space between the feed module and separation roller for documents that require special handling. 5 Output tray and end stop length can be left-, center- collects the scanned documents. Powering up the host computer • Turn the power on the scanner and wait until the top green ...
...stop - Attaching the power cord The Kodak i600/i700 Series Scanner is lit indicating the scanner has completed power-up the POD release latch when you want to the host computer. open the elevator tray extender to accommodate documents of the scanner. 2-3 Side guides can be locked into...the space between the feed module and separation roller for documents that require special handling. 5 Output tray and end stop length can be left-, center- collects the scanned documents. Powering up the host computer • Turn the power on the scanner and wait until the top green ...
User Guide
Page 15
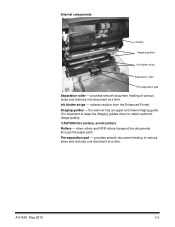
.... Imaging guides - provides smooth document feeding of various sizes and textures one document at a time. provides smooth document feeding of various sizes and textures one document at a time. the scanner has an upper and lower imaging guide. Rollers - Internal components Rollers Imaging guides Ink blotter strips Separation roller Pre-separation pad Separation roller - Pre-separation pad - Ink blotter strips...
.... Imaging guides - provides smooth document feeding of various sizes and textures one document at a time. provides smooth document feeding of various sizes and textures one document at a time. the scanner has an upper and lower imaging guide. Rollers - Internal components Rollers Imaging guides Ink blotter strips Separation roller Pre-separation pad Separation roller - Pre-separation pad - Ink blotter strips...
User Guide
Page 27
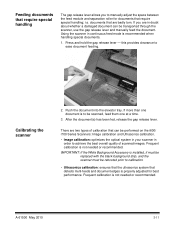
... hold the gap release lever - Frequent calibration is recommended when handling special documents. 1. If you to manually adjust the space between the feed module and separation roller for best performance. Using the scanner in order to achieve the best overall quality of calibration that can be ...transported through the scanner, use the gap release lever and manually feed the document. There are badly torn. IMPORTANT:...
... hold the gap release lever - Frequent calibration is recommended when handling special documents. 1. If you to manually adjust the space between the feed module and separation roller for best performance. Using the scanner in order to achieve the best overall quality of calibration that can be ...transported through the scanner, use the gap release lever and manually feed the document. There are badly torn. IMPORTANT:...
User Guide
Page 40
Some document types generate more paper dust and debris and may require more frequent cleaning than recommended. These cleaners only displace the dust, dirt or debris to another location within the scanner, which could cause the scanner to malfunction. • Some ... the recommended Kodak cleaning procedures. 5 Maintenance This chapter provides: • a cleaning frequency chart • a list of cleaning tools and materials • a list of supplies and accessories • cleaning procedures for the scanner • replacement procedures for wear and replace the separation roller or...
Some document types generate more paper dust and debris and may require more frequent cleaning than recommended. These cleaners only displace the dust, dirt or debris to another location within the scanner, which could cause the scanner to malfunction. • Some ... the recommended Kodak cleaning procedures. 5 Maintenance This chapter provides: • a cleaning frequency chart • a list of cleaning tools and materials • a list of supplies and accessories • cleaning procedures for the scanner • replacement procedures for wear and replace the separation roller or...
User Guide
Page 41
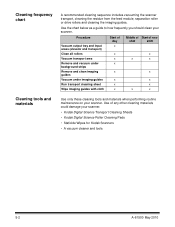
... x x x Middle of Start of any other cleaning materials could damage your scanner. • Kodak Digital Science Transport Cleaning Sheets • Kodak Digital Science Roller Cleaning Pads • Staticide Wipes for Kodak Scanners • A vacuum cleaner and tools 5-2 A-61500 May 2010 Cleaning frequency chart... Cleaning tools and materials A recommended cleaning sequence includes vacuuming the scanner transport, cleaning the residue from the feed module, separation roller or ...
... x x x Middle of Start of any other cleaning materials could damage your scanner. • Kodak Digital Science Transport Cleaning Sheets • Kodak Digital Science Roller Cleaning Pads • Staticide Wipes for Kodak Scanners • A vacuum cleaner and tools 5-2 A-61500 May 2010 Cleaning frequency chart... Cleaning tools and materials A recommended cleaning sequence includes vacuuming the scanner transport, cleaning the residue from the feed module, separation roller or ...
User Guide
Page 44
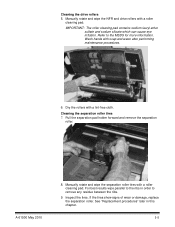
Wash hands with a lint-free cloth. Pull the separation pad holder forward and remove the separation roller. A-61500 May 2010 8. Dry the rollers with soap and water after performing maintenance procedures. 6. For best results wipe parallel to the ribs ...in this chapter. 5-5 Cleaning the drive rollers 5. If the tires show signs of wear or damage, replace the separation roller. Refer to remove any residue between the ribs. 9. Cleaning the separation roller tires 7. See "Replacement procedures" later in order to the MSDS for more information. Manually rotate and wipe the...
Wash hands with a lint-free cloth. Pull the separation pad holder forward and remove the separation roller. A-61500 May 2010 8. Dry the rollers with soap and water after performing maintenance procedures. 6. For best results wipe parallel to the ribs ...in this chapter. 5-5 Cleaning the drive rollers 5. If the tires show signs of wear or damage, replace the separation roller. Refer to remove any residue between the ribs. 9. Cleaning the separation roller tires 7. See "Replacement procedures" later in order to the MSDS for more information. Manually rotate and wipe the...
User Guide
Page 45
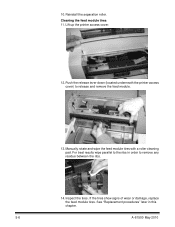
Cleaning the feed module tires 11. Lift up the printer access cover. 12. If the tires show signs of wear or damage, replace the feed module tires. 10. Push the release lever down (located underneath the printer access cover) to remove any residue between the ribs. 14. Manually rotate and wipe the feed module tires with a roller cleaning pad. Inspect the tires. See "Replacement procedures" later in order to release and remove the feed module. 13. For best results wipe parallel to the ribs in this chapter. 5-6 A-61500 May 2010 Reinstall the separation roller.
Cleaning the feed module tires 11. Lift up the printer access cover. 12. If the tires show signs of wear or damage, replace the feed module tires. 10. Push the release lever down (located underneath the printer access cover) to remove any residue between the ribs. 14. Manually rotate and wipe the feed module tires with a roller cleaning pad. Inspect the tires. See "Replacement procedures" later in order to release and remove the feed module. 13. For best results wipe parallel to the ribs in this chapter. 5-6 A-61500 May 2010 Reinstall the separation roller.
User Guide
Page 51
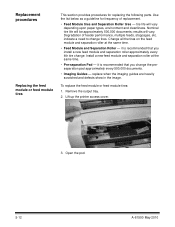
...life will vary. Change all the tires on the feed module and separation roller at the same time. • Pre-separation Pad - indicate a need to change the preseparation pad approximately every 500,000 documents. • Imaging Guides - it is recommended that you change tires... you install a new feed module and separation roller approximately every 4th tire change. Install a new feed module and separation roller at the same time. • Feed Module and Separation Roller - Nominal tire life will be approximately 500,000 documents; Lift up the printer access cover. ...
...life will vary. Change all the tires on the feed module and separation roller at the same time. • Pre-separation Pad - indicate a need to change the preseparation pad approximately every 500,000 documents. • Imaging Guides - it is recommended that you change tires... you install a new feed module and separation roller approximately every 4th tire change. Install a new feed module and separation roller at the same time. • Feed Module and Separation Roller - Nominal tire life will be approximately 500,000 documents; Lift up the printer access cover. ...
User Guide
Page 55
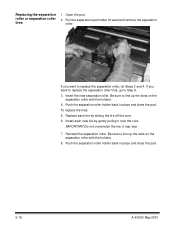
...IMPORTANT:Do not overstretch the tire; it over the core. Push the separation roller holder back in place and close the pod. 5-16 A-61500 May 2010 Be sure to replace the separation roller, do Steps 3 and 4. Push the separation roller holder back in place and close the pod. To replace the tires...: 5. Insert the new separation roller. If you want to line up the slots on the...
...IMPORTANT:Do not overstretch the tire; it over the core. Push the separation roller holder back in place and close the pod. 5-16 A-61500 May 2010 Be sure to replace the separation roller, do Steps 3 and 4. Push the separation roller holder back in place and close the pod. To replace the tires...: 5. Insert the new separation roller. If you want to line up the slots on the...

User Guide
Page 56
...2. The imaging guides should be replaced when they are heavily scratched and defects show in the image. Replacing the preseparation pad Change the pre-separation pad when the frequency of the upper imaging guide to remove it snaps into place. 4. A-61500 May 2010 3. Install the new imaging... guide and turn the screws to replace the lower imaging guide. 5. Remove the pre-separation pad. Close the pod. NOTE: Handle the imaging guides carefully as to not put fingerprints on each end of double-fed documents increases. 1. Repeat Steps 2 and 3 to secure the imaging guide. 4. Close the...
...2. The imaging guides should be replaced when they are heavily scratched and defects show in the image. Replacing the preseparation pad Change the pre-separation pad when the frequency of the upper imaging guide to remove it snaps into place. 4. A-61500 May 2010 3. Install the new imaging... guide and turn the screws to replace the lower imaging guide. 5. Remove the pre-separation pad. Close the pod. NOTE: Handle the imaging guides carefully as to not put fingerprints on each end of double-fed documents increases. 1. Repeat Steps 2 and 3 to secure the imaging guide. 4. Close the...
User Guide
Page 62
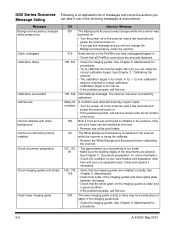
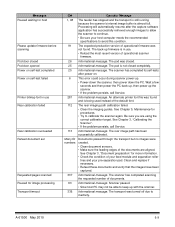
...; Check the condition of your feed module and separation roller tires and your documents is too small. 81 • Make sure the leading edges of the documents are securely fastened. 106, 331 • Clean the imaging guides. The scanner has been successfully calibrated. Many ID numbers A... is installed in the imaging guide area. • Clean the imaging guides. See Chapter 3, "Document preparation" for procedures. • Try to the scanner, wait a few seconds and power the scanner back on. • If the problem persists, call Service. 105, 342 Informational message. x 12...
...; Check the condition of your feed module and separation roller tires and your documents is too small. 81 • Make sure the leading edges of the documents are securely fastened. 106, 331 • Clean the imaging guides. The scanner has been successfully calibrated. Many ID numbers A... is installed in the imaging guide area. • Clean the imaging guides. See Chapter 3, "Document preparation" for procedures. • Try to the scanner, wait a few seconds and power the scanner back on. • If the problem persists, call Service. 105, 342 Informational message. x 12...
User Guide
Page 63
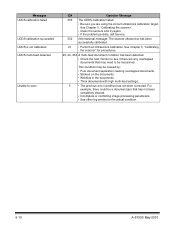
... imaging path calibration failed. • Clean the imaging guides. The scanner was unable to find the document edges to calibrate the scanner again. See Chapter 5, Maintenance for procedures. 124 The document counter is installed in the imaging guide area. • Clean the... cartridge must be caused by poor document separation. • Replace the separation roller tires and pre-separation pad. See Chapter 5, Maintenance for more information. Refeed the document set. 143 Informational message. This may be a small piece of documents has completed. 177 Based on the scanner.
... imaging path calibration failed. • Clean the imaging guides. The scanner was unable to find the document edges to calibrate the scanner again. See Chapter 5, Maintenance for procedures. 124 The document counter is installed in the imaging guide area. • Clean the... cartridge must be caused by poor document separation. • Replace the separation roller tires and pre-separation pad. See Chapter 5, Maintenance for more information. Refeed the document set. 143 Informational message. This may be a small piece of documents has completed. 177 Based on the scanner.
User Guide
Page 65
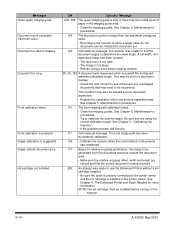
... The feeder has stopped and the transport is still running because the scanner's internal image buffer is almost full. The pod was found . See Chapter 3, "Document preparation" for more information. • Check the condition of your feed module and separation roller tires and your host computer meets the recommended specifications to inactivity. The...
... The feeder has stopped and the transport is still running because the scanner's internal image buffer is almost full. The pod was found . See Chapter 3, "Document preparation" for more information. • Check the condition of your feed module and separation roller tires and your host computer meets the recommended specifications to inactivity. The...
User Guide
Page 66
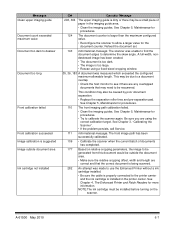
...This condition may need to see if there are using the correct ultrasonics calibration target. See Chapter 3, "Calibrating the scanner". • Clean the sensors and try again. • If the problem persists, call Service. 332 Informational message. See Chapter 3,... procedures. 23, 24, 334 A multi-feed document condition has been detected. • Check the host monitor to be caused by: • Poor document separation causing overlapped documents. • Stickers on the documents. • Wrinkles in the documents • Thick documents with high multi-feed settings. 5 • ...
...This condition may need to see if there are using the correct ultrasonics calibration target. See Chapter 3, "Calibrating the scanner". • Clean the sensors and try again. • If the problem persists, call Service. 332 Informational message. See Chapter 3,... procedures. 23, 24, 334 A multi-feed document condition has been detected. • Check the host monitor to be caused by: • Poor document separation causing overlapped documents. • Stickers on the documents. • Wrinkles in the documents • Thick documents with high multi-feed settings. 5 • ...

User Guide
Page 69
... target is required for more information. • Check the condition of your feed module and separation roller tires and your documents is too small. 81 • Make sure the leading edges of the documents are installed correctly. The scanner has been successfully calibrated. A-61500 May 2010 6-13 Clean and replace if necessary. 149, 178...
... target is required for more information. • Check the condition of your feed module and separation roller tires and your documents is too small. 81 • Make sure the leading edges of the documents are installed correctly. The scanner has been successfully calibrated. A-61500 May 2010 6-13 Clean and replace if necessary. 149, 178...
User Guide
Page 70
... not installed ID# Operator Message 293, 304 The upper imaging guide is properly connected to calibrate the scanner again. NOTE:The ink cartridge must be caused by poor document separation. • Replace the separation roller tires and pre-separation pad. See Chapter 4, The Enhanced Printer and Patch Readers for procedures. 110 The front imaging path...
... not installed ID# Operator Message 293, 304 The upper imaging guide is properly connected to calibrate the scanner again. NOTE:The ink cartridge must be caused by poor document separation. • Replace the separation roller tires and pre-separation pad. See Chapter 4, The Enhanced Printer and Patch Readers for procedures. 110 The front imaging path...