User Guide
Page 3
...documents that require special handling 3-11 Calibrating the scanner 3-11 Image calibration 3-12 Ultrasonics calibration 3-15 4 The Enhanced Printer 4-1 Overview 4-1 Printer specifications 4-2 Accessing the Enhanced Printer 4-3 Changing the printer position 4-4 Replacing the ink cartridge 4-4 Replacing the blotter strips 4-6 Replacing the ink cartridge carrier 4-7 5 Maintenance...6-1 Accessing the Operator Log 6-3 i600 Series Scanners Message listing 6-6 i600 Series Scanners Numerical Message listing 6-11 i700 Series Scanners Message listing 6-12 i700 Series Scanenrs Numerial ...
...documents that require special handling 3-11 Calibrating the scanner 3-11 Image calibration 3-12 Ultrasonics calibration 3-15 4 The Enhanced Printer 4-1 Overview 4-1 Printer specifications 4-2 Accessing the Enhanced Printer 4-3 Changing the printer position 4-4 Replacing the ink cartridge 4-4 Replacing the blotter strips 4-6 Replacing the ink cartridge carrier 4-7 5 Maintenance...6-1 Accessing the Operator Log 6-3 i600 Series Scanners Message listing 6-6 i600 Series Scanners Numerical Message listing 6-11 i700 Series Scanners Message listing 6-12 i700 Series Scanenrs Numerial ...
User Guide
Page 4
... an overview of error messages. Chapter 3, Using the Scanner - provides maintenance procedures for the Kodak i600/i700 Series Scanners, including replacement procedures for the Kodak i600/i700 Series Scanners. Appendix A, Accessories - Appendix B, Specifications - includes information on how to scan documents. Chapter 6, Troubleshooting - provides a listing of the i600/i700 Series Scanners unless otherwise noted. A-61500 May 2010 1-1 includes specifications...
... an overview of error messages. Chapter 3, Using the Scanner - provides maintenance procedures for the Kodak i600/i700 Series Scanners, including replacement procedures for the Kodak i600/i700 Series Scanners. Appendix A, Accessories - Appendix B, Specifications - includes information on how to scan documents. Chapter 6, Troubleshooting - provides a listing of the i600/i700 Series Scanners unless otherwise noted. A-61500 May 2010 1-1 includes specifications...
User Guide
Page 28
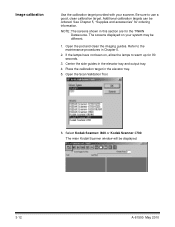
... for the TWAIN Datasource. Be sure to the maintenance procedures in the elevator tray and output tray. 4. See Chapter 5, "Supplies and accessories" for 90 seconds. 3. Center the side guides in Chapter 5. 2. Additional calibration targets can be displayed. 3-12 A-61500 May 2010 Select Kodak Scanner: i600 or Kodak Scanner: i700. The screens displayed on , allow the...
... for the TWAIN Datasource. Be sure to the maintenance procedures in the elevator tray and output tray. 4. See Chapter 5, "Supplies and accessories" for 90 seconds. 3. Center the side guides in Chapter 5. 2. Additional calibration targets can be displayed. 3-12 A-61500 May 2010 Select Kodak Scanner: i600 or Kodak Scanner: i700. The screens displayed on , allow the...
User Guide
Page 40
NOTES: • Follow the recommended Kodak cleaning procedures. A-61500 May 2010 5-1 Cleaning your scanner and preventative maintenance on the feed module and separation roller is normal. Following this procedure as specified in this manual. Some document types generate more paper dust and debris and may require more frequent cleaning than recommended. 5 Maintenance This chapter provides: •...
NOTES: • Follow the recommended Kodak cleaning procedures. A-61500 May 2010 5-1 Cleaning your scanner and preventative maintenance on the feed module and separation roller is normal. Following this procedure as specified in this manual. Some document types generate more paper dust and debris and may require more frequent cleaning than recommended. 5 Maintenance This chapter provides: •...
User Guide
Page 41
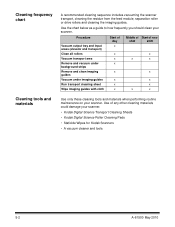
... x x x x Use only these cleaning tools and materials when performing routine maintenance on your scanner. Cleaning frequency chart Cleaning tools and materials A recommended cleaning sequence includes vacuuming the scanner transport, cleaning the residue from the feed module, separation roller or drive rollers and... below as a guide to how frequently you should clean your scanner. • Kodak Digital Science Transport Cleaning Sheets • Kodak Digital Science Roller Cleaning Pads • Staticide Wipes for Kodak Scanners • A vacuum cleaner and tools 5-2 A-61500 May 2010...
... x x x x Use only these cleaning tools and materials when performing routine maintenance on your scanner. Cleaning frequency chart Cleaning tools and materials A recommended cleaning sequence includes vacuuming the scanner transport, cleaning the residue from the feed module, separation roller or drive rollers and... below as a guide to how frequently you should clean your scanner. • Kodak Digital Science Transport Cleaning Sheets • Kodak Digital Science Roller Cleaning Pads • Staticide Wipes for Kodak Scanners • A vacuum cleaner and tools 5-2 A-61500 May 2010...
User Guide
Page 44
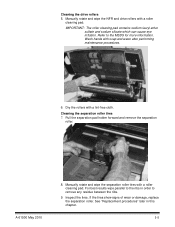
Dry the rollers with soap and water after performing maintenance procedures. 6. For best results wipe parallel to the ribs in this chapter. 5-5 If the tires show signs of wear or damage, replace the separation roller. ...
Dry the rollers with soap and water after performing maintenance procedures. 6. For best results wipe parallel to the ribs in this chapter. 5-5 If the tires show signs of wear or damage, replace the separation roller. ...
User Guide
Page 49
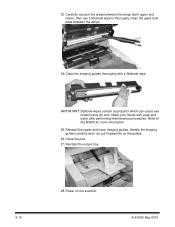
...clean the glass dust plate between the lamps. 24. Close the pod. 27. Clean the imaging guides thoroughly with soap and water after performing maintenance procedures. Reinstall the output tray. 5-10 28. A-61500 May 2010 Carefully vacuum the areas between the lamps (both upper and lower), then use... a Staticide wipe to not put fingerprints on the scanner. IMPORTANT: Staticide wipes contain isopropanol which can cause eye irritation and dry skin. Refer to the MSDS for more information. 25. Power on...
...clean the glass dust plate between the lamps. 24. Close the pod. 27. Clean the imaging guides thoroughly with soap and water after performing maintenance procedures. Reinstall the output tray. 5-10 28. A-61500 May 2010 Carefully vacuum the areas between the lamps (both upper and lower), then use... a Staticide wipe to not put fingerprints on the scanner. IMPORTANT: Staticide wipes contain isopropanol which can cause eye irritation and dry skin. Refer to the MSDS for more information. 25. Power on...
User Guide
Page 62
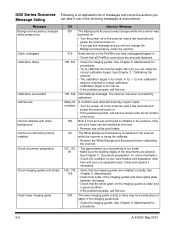
...6-6 A-61500 May 2010 See Chapter 3, "Calibrating the scanner". • The calibration target is too small. The scanner has been successfully calibrated. See 139 Chapter 5, Maintenance. • Clean both printers installed Check document preparation Check imaging guides and lamps Clean lower imaging guide... connectors are securely fastened. 106, 331 • Clean the imaging guides. See Chapter 5, Maintenance for procedures. • Try to the scanner, wait a few seconds and power the scanner back on. • If the problem persists, call Service. 105, 342 Informational message. ...
...6-6 A-61500 May 2010 See Chapter 3, "Calibrating the scanner". • The calibration target is too small. The scanner has been successfully calibrated. See 139 Chapter 5, Maintenance. • Clean both printers installed Check document preparation Check imaging guides and lamps Clean lower imaging guide... connectors are securely fastened. 106, 331 • Clean the imaging guides. See Chapter 5, Maintenance for procedures. • Try to the scanner, wait a few seconds and power the scanner back on. • If the problem persists, call Service. 105, 342 Informational message. ...
User Guide
Page 63
... larger than the maximum configured value. • Reconfigure the scanner to allow a larger value for procedures. 110 The front imaging path calibration failed. • Clean the imaging guides. See Chapter 5, Maintenance for the document counter. The front image path has been successfully calibrated. 109... • Calibrate the scanner when the current batch of paper in the printer carrier. NOTE:The ink ...
... larger than the maximum configured value. • Reconfigure the scanner to allow a larger value for procedures. 110 The front imaging path calibration failed. • Clean the imaging guides. See Chapter 5, Maintenance for the document counter. The front image path has been successfully calibrated. 109... • Calibrate the scanner when the current batch of paper in the printer carrier. NOTE:The ink ...
User Guide
Page 64
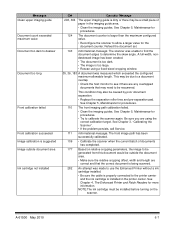
See Chapter 5, Maintenance, for correct installation procedures. • If the problem persists, call Service. 4 The ...for the message Lamps ready for scanning to the Scanning Setup Guide for valid values. 30 A document is holding the feed module up. The lamps are invalid or in conflict with an empty elevator tray or the..., 19 108 280 355 46 One or more documents that is covering the paper present sensor is 500 sheets. NOTE: The following procedure is needed . Informational message. Informational message. The scanner was attempted before the lamps were warmed up. ...
See Chapter 5, Maintenance, for correct installation procedures. • If the problem persists, call Service. 4 The ...for the message Lamps ready for scanning to the Scanning Setup Guide for valid values. 30 A document is holding the feed module up. The lamps are invalid or in conflict with an empty elevator tray or the..., 19 108 280 355 46 One or more documents that is covering the paper present sensor is 500 sheets. NOTE: The following procedure is needed . Informational message. Informational message. The scanner was attempted before the lamps were warmed up. ...
User Guide
Page 65
... being used instead of operational firmware was turned off due to calibrate the scanner again. See Chapter 5, Maintenance for procedures. • Try to inactivity. See Chapter 3, "Calibrating the Scanner". • If the problem persists, call Service. 281 Informational message. See Chapter 3, "Document preparation" for more information. • Check the condition of your feed module...
... being used instead of operational firmware was turned off due to calibrate the scanner again. See Chapter 5, Maintenance for procedures. • Try to inactivity. See Chapter 3, "Calibrating the Scanner". • If the problem persists, call Service. 281 Informational message. See Chapter 3, "Document preparation" for more information. • Check the condition of your feed module...

User Guide
Page 69
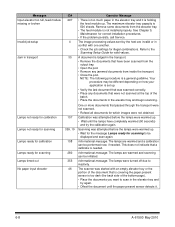
... problem persists, call Service. 105, 342 Informational message. See Chapter 5, Maintenance for procedures. • Try to calibrate the scanner again. See Chapter 3, "Calibrating the scanner". • The calibration target is too small. Clean and replace if ...document preparation Check imaging guides and lamps Clean lower imaging guide ID# Operator Message 381 The Background Accessory was changed while the scanner was unplugged/plugged in. • Check that all FireWire connectors are securely fastened. 106, 331 • Clean the imaging guides. See Chapter 5, Maintenance...
... problem persists, call Service. 105, 342 Informational message. See Chapter 5, Maintenance for procedures. • Try to calibrate the scanner again. See Chapter 3, "Calibrating the scanner". • The calibration target is too small. Clean and replace if ...document preparation Check imaging guides and lamps Clean lower imaging guide ID# Operator Message 381 The Background Accessory was changed while the scanner was unplugged/plugged in. • Check that all FireWire connectors are securely fastened. 106, 331 • Clean the imaging guides. See Chapter 5, Maintenance...
User Guide
Page 70
... front image path has been successfully calibrated. 109 • Calibrate the scanner when the current batch of paper in the printer carrier. See Chapter 5, Maintenance for procedures. 124 The document counter is larger than the maximum configured value. • Reconfigure the scanner to the printer carrier and the ink cartridge is properly connected to...
... front image path has been successfully calibrated. 109 • Calibrate the scanner when the current batch of paper in the printer carrier. See Chapter 5, Maintenance for procedures. 124 The document counter is larger than the maximum configured value. • Reconfigure the scanner to the printer carrier and the ink cartridge is properly connected to...
User Guide
Page 71
... See Chapter 5, Maintenance, for correct installation procedures. • If the problem persists, call Service. 4 The image processing values sent by the host are warmed and a calibration can be different depending on how your application is set up. • Verify the last document that a calibrate is needed . Informational message. The scanner was attempted before...
... See Chapter 5, Maintenance, for correct installation procedures. • If the problem persists, call Service. 4 The image processing values sent by the host are warmed and a calibration can be different depending on how your application is set up. • Verify the last document that a calibrate is needed . Informational message. The scanner was attempted before...
User Guide
Page 72
...and then power the PC back up, then power up with the scanner. 336 Informational message. The rear image path has been successfully calibrated. Clean and replace if necessary. • Refeed these documents and verify that the images have been captured. 337 Informational message. ...The back-up firmware is being used instead of documents. 63 Informational message. The pod was turned off due to keep up the scanner. • If the problem persists, call Service. 113 Informational message. See Chapter 5, Maintenance for image processing Transport timeout ID# Operator Message 1,...
...and then power the PC back up, then power up with the scanner. 336 Informational message. The rear image path has been successfully calibrated. Clean and replace if necessary. • Refeed these documents and verify that the images have been captured. 337 Informational message. ...The back-up firmware is being used instead of documents. 63 Informational message. The pod was turned off due to keep up the scanner. • If the problem persists, call Service. 113 Informational message. See Chapter 5, Maintenance for image processing Transport timeout ID# Operator Message 1,...
User Guide
Page 76
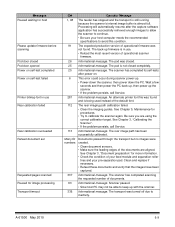
...and it was installed by the Make sure that : • you are feeding small documents, be sure that : • the output tray and side guides are clean. See Chapter 5, Maintenance. • the scanner has been calibrated. If unsatisfactory image quality persists, call Service. Problem solving Use the chart... • when the software was installed, it is oriented correctly for size, weight, etc. • if you are using the Kodak i600/i700 Series Scanners. Image quality is poor or has decreased Make sure that : • the power cord is plugged securely into the receptacle in and...
...and it was installed by the Make sure that : • you are feeding small documents, be sure that : • the output tray and side guides are clean. See Chapter 5, Maintenance. • the scanner has been calibrated. If unsatisfactory image quality persists, call Service. Problem solving Use the chart... • when the software was installed, it is oriented correctly for size, weight, etc. • if you are using the Kodak i600/i700 Series Scanners. Image quality is poor or has decreased Make sure that : • the power cord is plugged securely into the receptacle in and...
User Guide
Page 77
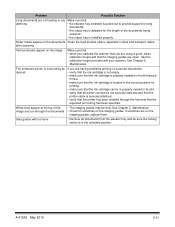
...on the imaging guides. Roller marks appear on the imaging guides, replace them. See Chapter 5, Maintenance. A-61500 May 2010 6-21 See Chapter 5, Maintenance. If scratches are on the documents Clean the feed module rollers, separation rollers and transport rollers. image and run through the host ...properly seated in the unlocked position. Side guides will not move • Remove all documents from the elevator tray and be dirty. Use the calibration target provided with your scanner. The enhanced printer is not printing as desired If you are having problems printing on...
...on the imaging guides. Roller marks appear on the imaging guides, replace them. See Chapter 5, Maintenance. A-61500 May 2010 6-21 See Chapter 5, Maintenance. If scratches are on the documents Clean the feed module rollers, separation rollers and transport rollers. image and run through the host ...properly seated in the unlocked position. Side guides will not move • Remove all documents from the elevator tray and be dirty. Use the calibration target provided with your scanner. The enhanced printer is not printing as desired If you are having problems printing on...
