User Guide
Page 2
... in the host computer 2-2 Installing the Kodak Driver software 2-2 Installing the FireWire cable 2-2 Attaching the power cord 2-3 Powering up the host computer 2-3 Scanner components 2-3 3 Using the Scanner 3-1 Turning the scanner on and off 3-1 Starting and stopping scanning 3-1 Manually pausing and resuming the scanner 3-2 Automatically pausing and resuming the scanner 3-2 Manually ending scanning 3-2 Document preparation 3-3 Adjusting the side guides and...
... in the host computer 2-2 Installing the Kodak Driver software 2-2 Installing the FireWire cable 2-2 Attaching the power cord 2-3 Powering up the host computer 2-3 Scanner components 2-3 3 Using the Scanner 3-1 Turning the scanner on and off 3-1 Starting and stopping scanning 3-1 Manually pausing and resuming the scanner 3-2 Automatically pausing and resuming the scanner 3-2 Manually ending scanning 3-2 Document preparation 3-3 Adjusting the side guides and...
User Guide
Page 3
Exit deflector 3-7 Adjusting the optional short document tray 3-8 Feeding documents using multi-feed detection 3-9 Automatic feeding 3-9 Continuous feeding 3-10 Manual feeding 3-10 Feeding documents that require special handling 3-11 Calibrating the scanner 3-11 Image calibration 3-12 Ultrasonics calibration 3-... Troubleshooting 6-1 Indicator lights 6-1 Accessing the Operator Log 6-3 i600 Series Scanners Message listing 6-6 i600 Series Scanners Numerical Message listing 6-11 i700 Series Scanners Message listing 6-12 i700 Series Scanenrs Numerial Message listing 6-18 Problem ...
Exit deflector 3-7 Adjusting the optional short document tray 3-8 Feeding documents using multi-feed detection 3-9 Automatic feeding 3-9 Continuous feeding 3-10 Manual feeding 3-10 Feeding documents that require special handling 3-11 Calibrating the scanner 3-11 Image calibration 3-12 Ultrasonics calibration 3-... Troubleshooting 6-1 Indicator lights 6-1 Accessing the Operator Log 6-3 i600 Series Scanners Message listing 6-6 i600 Series Scanners Numerical Message listing 6-11 i700 Series Scanners Message listing 6-12 i700 Series Scanenrs Numerial Message listing 6-18 Problem ...
User Guide
Page 6
... set for the front and rear images for i600 Series Scanners is 34 inches (863.6 mm) and i700 Series Scanners 40 inches (1016 mm) • Color or grayscale at the same speed as "sleep" mode). • Document printing capabilities. • Electronic red, green and blue ...(63.5 mm) • Maximum paper length for Kodak i700 Series Scanners. • Multi-feed detection by multiple ultrasonic sensors as well as by length detection. • Automatic and manual feeding. • JPEG compression allows color and grayscale images to the Kodak i610 Scanner. Color:* 100, 150, 200, 240, 300 ...
... set for the front and rear images for i600 Series Scanners is 34 inches (863.6 mm) and i700 Series Scanners 40 inches (1016 mm) • Color or grayscale at the same speed as "sleep" mode). • Document printing capabilities. • Electronic red, green and blue ...(63.5 mm) • Maximum paper length for Kodak i700 Series Scanners. • Multi-feed detection by multiple ultrasonic sensors as well as by length detection. • Automatic and manual feeding. • JPEG compression allows color and grayscale images to the Kodak i610 Scanner. Color:* 100, 150, 200, 240, 300 ...
User Guide
Page 9
... circuit board solder. Do not attempt to , the following: • The scanner weighs 38.6 kg (85 lbs). These include, but are not limited to repair. • The Kodak i600/i700 Series Scanners contain lead in a commercial environment. This equipment has been tested and found to... comply with the instruction manual, may be drawn into the machine. • Take sufficient breaks to 15 ...
... circuit board solder. Do not attempt to , the following: • The scanner weighs 38.6 kg (85 lbs). These include, but are not limited to repair. • The Kodak i600/i700 Series Scanners contain lead in a commercial environment. This equipment has been tested and found to... comply with the instruction manual, may be drawn into the machine. • Take sufficient breaks to 15 ...
User Guide
Page 13
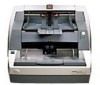
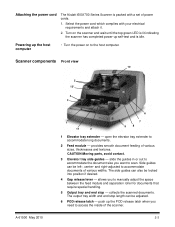
... can be left-, center- collects the scanned documents. Attaching the power cord The Kodak i600/i700 Series Scanner is idle. Select the power cord which complies with a set of various sizes, thicknesses and textures. Side guides can be adjusted. 6 POD release latch - and right-adjusted to manually adjust the space between the feed module...
... can be left-, center- collects the scanned documents. Attaching the power cord The Kodak i600/i700 Series Scanner is idle. Select the power cord which complies with a set of various sizes, thicknesses and textures. Side guides can be adjusted. 6 POD release latch - and right-adjusted to manually adjust the space between the feed module...
User Guide
Page 17
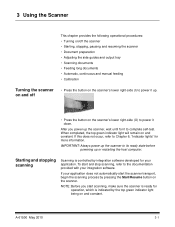
... provides the following operational procedures: • Turning on/off the scanner • Starting, stopping, pausing and resuming the scanner • Document preparation • Adjusting the side guides and output tray • Scanning documents • Feeding long documents • Automatic, continuous and manual feeding • Calibration Turning the scanner on and off • Press the button on the...
... provides the following operational procedures: • Turning on/off the scanner • Starting, stopping, pausing and resuming the scanner • Document preparation • Adjusting the side guides and output tray • Scanning documents • Feeding long documents • Automatic, continuous and manual feeding • Calibration Turning the scanner on and off • Press the button on the...
User Guide
Page 18
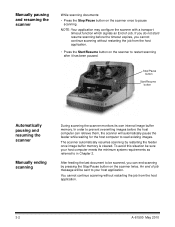
... timeout function which signals an End of job message will automatically pause the feeder while waiting for the host computer to pause scanning. The scanner automatically resumes scanning by pressing the Stop/Pause button on the scanner twice. Manually pausing and resuming the scanner While scanning documents: • Press the Stop/Pause button on the...
... timeout function which signals an End of job message will automatically pause the feeder while waiting for the host computer to pause scanning. The scanner automatically resumes scanning by pressing the Stop/Pause button on the scanner twice. Manually pausing and resuming the scanner While scanning documents: • Press the Stop/Pause button on the...
User Guide
Page 19
... weights from 45 to 200 g/m2 (12 to accommodate the width of damaged paper. Documents as small as 5 cm (2 in .). Scanning documents outside of these specifications may damage the scanner and documents. The Kodak Feeder Kit for Ultra Lightweight Paper can be manually fed, one at a time. • Staples and paper clips in a clear protective sleeve...
... weights from 45 to 200 g/m2 (12 to accommodate the width of damaged paper. Documents as small as 5 cm (2 in .). Scanning documents outside of these specifications may damage the scanner and documents. The Kodak Feeder Kit for Ultra Lightweight Paper can be manually fed, one at a time. • Staples and paper clips in a clear protective sleeve...

User Guide
Page 26
... 25). Continuous feeding Continuous feeding can continuously add a batch of documents to the bottom of the stack. To continuously feed documents, follow Steps 1 through 5 above. Manual feeding To manually feed documents: 1. When the scanner is configured for continuous feeding, the elevator tray is covered. 2. Position the document you want to feed in this position to allow more...
... 25). Continuous feeding Continuous feeding can continuously add a batch of documents to the bottom of the stack. To continuously feed documents, follow Steps 1 through 5 above. Manual feeding To manually feed documents: 1. When the scanner is configured for continuous feeding, the elevator tray is covered. 2. Position the document you want to feed in this position to allow more...
User Guide
Page 27
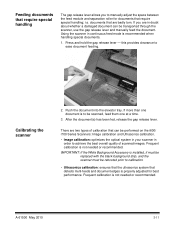
... clearance to be rebooted prior to calibration. • Ultrasonics calibration: ensures that the ultrasonics system that can be transported through the scanner, use the gap release lever and manually feed the document. IMPORTANT: If the White Background Accessory is not needed or recommended. Frequent calibration is installed, it must be replaced with the...
... clearance to be rebooted prior to calibration. • Ultrasonics calibration: ensures that the ultrasonics system that can be transported through the scanner, use the gap release lever and manually feed the document. IMPORTANT: If the White Background Accessory is not needed or recommended. Frequent calibration is installed, it must be replaced with the...
User Guide
Page 40
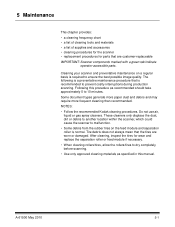
... maintenance procedure that the tires are customer-replaceable IMPORTANT: Scanner components marked with a green tab indicate operator-accessible parts. Following this manual. Do not use air, liquid or gas spray cleaners. A-61500 May 2010 5-1 NOTES: • Follow the recommended Kodak cleaning procedures. Some document types generate more paper dust and debris and may require...
... maintenance procedure that the tires are customer-replaceable IMPORTANT: Scanner components marked with a green tab indicate operator-accessible parts. Following this manual. Do not use air, liquid or gas spray cleaners. A-61500 May 2010 5-1 NOTES: • Follow the recommended Kodak cleaning procedures. Some document types generate more paper dust and debris and may require...


