User Guide
Page 2
... the host computer 2-2 Installing the Kodak Driver software 2-2 Installing the FireWire cable 2-2 Attaching the power cord 2-3 Powering up the host computer 2-3 Scanner components 2-3 3 Using the Scanner 3-1 Turning the scanner on and off 3-1 Starting and stopping scanning 3-1 Manually pausing and resuming the scanner 3-2 Automatically pausing and resuming the scanner 3-2 Manually ending scanning 3-2 Document preparation 3-3 Adjusting the side guides...
... the host computer 2-2 Installing the Kodak Driver software 2-2 Installing the FireWire cable 2-2 Attaching the power cord 2-3 Powering up the host computer 2-3 Scanner components 2-3 3 Using the Scanner 3-1 Turning the scanner on and off 3-1 Starting and stopping scanning 3-1 Manually pausing and resuming the scanner 3-2 Automatically pausing and resuming the scanner 3-2 Manually ending scanning 3-2 Document preparation 3-3 Adjusting the side guides...
User Guide
Page 3
... multi-feed detection 3-9 Automatic feeding 3-9 Continuous feeding 3-10 Manual feeding 3-10 Feeding documents that require special handling 3-11 Calibrating the scanner 3-11 Image calibration 3-12 Ultrasonics calibration 3-15 4 The Enhanced Printer 4-1 Overview 4-1 Printer ... guides 5-17 6 Troubleshooting 6-1 Indicator lights 6-1 Accessing the Operator Log 6-3 i600 Series Scanners Message listing 6-6 i600 Series Scanners Numerical Message listing 6-11 i700 Series Scanners Message listing 6-12 i700 Series Scanenrs Numerial Message listing 6-18 Problem solving 6-20 Appendix ...
... multi-feed detection 3-9 Automatic feeding 3-9 Continuous feeding 3-10 Manual feeding 3-10 Feeding documents that require special handling 3-11 Calibrating the scanner 3-11 Image calibration 3-12 Ultrasonics calibration 3-15 4 The Enhanced Printer 4-1 Overview 4-1 Printer ... guides 5-17 6 Troubleshooting 6-1 Indicator lights 6-1 Accessing the Operator Log 6-3 i600 Series Scanners Message listing 6-6 i600 Series Scanners Numerical Message listing 6-11 i700 Series Scanners Message listing 6-12 i700 Series Scanenrs Numerial Message listing 6-18 Problem solving 6-20 Appendix ...
User Guide
Page 4
includes specifications and instructions on how to prepare your documents for the Kodak i600/i700 Series Scanners. provides maintenance procedures for the Kodak i600/i700 Series Scanners, including replacement procedures for the Kodak i600/i700 Series Scanners. provides a listing of the specifications for the feed module, separation roller and imaging guides. Chapter 1, Introduction - provides general information about the...
includes specifications and instructions on how to prepare your documents for the Kodak i600/i700 Series Scanners. provides maintenance procedures for the Kodak i600/i700 Series Scanners, including replacement procedures for the Kodak i600/i700 Series Scanners. provides a listing of the specifications for the feed module, separation roller and imaging guides. Chapter 1, Introduction - provides general information about the...

User Guide
Page 5
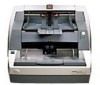
... 80 pages per minute which includes an enhanced printer. • Kodak i620 Scanner is a desktop duplex color scanner with an automatic document feeder that runs at 80 pages per minute which includes an enhanced printer. • Kodak i640 Scanner is a desktop duplex color scanner with an automatic document feeder that runs at 100 pages per minute which includes an...
... 80 pages per minute which includes an enhanced printer. • Kodak i620 Scanner is a desktop duplex color scanner with an automatic document feeder that runs at 80 pages per minute which includes an enhanced printer. • Kodak i640 Scanner is a desktop duplex color scanner with an automatic document feeder that runs at 100 pages per minute which includes an...
User Guide
Page 6
... grayscale deskew, auto-crop, automatic color detection, aggressive cropping, error diffusion, toggle patch, autocolor balancing (auto-white balancing) to the Kodak i610 Scanner. A-61500 May 2010 1-3 Grayscale: 100, 150, 200, 240, 300 NOTE: Different scanning resolutions can be viewed in most image ... and more. • Easily replaceable feed module and separation roller. • 300 dpi at the same speed as "sleep" mode). • Document printing capabilities. • Electronic red, green and blue color dropout. • Output resolutions include: - Color:* 100, 150, 200, 240, ...
... grayscale deskew, auto-crop, automatic color detection, aggressive cropping, error diffusion, toggle patch, autocolor balancing (auto-white balancing) to the Kodak i610 Scanner. A-61500 May 2010 1-3 Grayscale: 100, 150, 200, 240, 300 NOTE: Different scanning resolutions can be viewed in most image ... and more. • Easily replaceable feed module and separation roller. • 300 dpi at the same speed as "sleep" mode). • Document printing capabilities. • Electronic red, green and blue color dropout. • Output resolutions include: - Color:* 100, 150, 200, 240, ...
User Guide
Page 8
...• FireWire Installation Information, A-61511 - A-61500 May 2010 1-5 this installation information is available to support the Kodak i600/ i700 Series Scanners: • Scanning Setup Guide, A-61504 - Warning labels CAUTION: Moving parts, avoid contact. See Chapter 5, "Supplies and accessories"... make the required FireWire cable connections. • White Background Accessory Instructions, A-61503 - Supporting documentation Safety information The following documentation is packed with the FireWire cable and should be used as a quick reference for consumables and catalog numbers.
...• FireWire Installation Information, A-61511 - A-61500 May 2010 1-5 this installation information is available to support the Kodak i600/ i700 Series Scanners: • Scanning Setup Guide, A-61504 - Warning labels CAUTION: Moving parts, avoid contact. See Chapter 5, "Supplies and accessories"... make the required FireWire cable connections. • White Background Accessory Instructions, A-61503 - Supporting documentation Safety information The following documentation is packed with the FireWire cable and should be used as a quick reference for consumables and catalog numbers.
User Guide
Page 9
... long necklaces, etc. • Hair length should review their employer need to observe the common sense precautions applicable to the operation of the scanner or any machinery. Do not attempt to provide reasonable protection against harmful interference when the equipment is operated in a bundle. • Remove all...These limits are not limited to take corrective action. 1-6 A-61500 May 2010 These include, but are designed to repair. • The Kodak i600/i700 Series Scanners contain lead in a domestic environment, radio disturbance may be required to , the following: • The...
... long necklaces, etc. • Hair length should review their employer need to observe the common sense precautions applicable to the operation of the scanner or any machinery. Do not attempt to provide reasonable protection against harmful interference when the equipment is operated in a bundle. • Remove all...These limits are not limited to take corrective action. 1-6 A-61500 May 2010 These include, but are designed to repair. • The Kodak i600/i700 Series Scanners contain lead in a domestic environment, radio disturbance may be required to , the following: • The...
User Guide
Page 11
... can be necessary to Appendix B, Specifications. Microsoft Windows 7 (32-bit) - For i700 Series Scanners only: Microsoft Windows 7 (64-bit) Registering your scanner A-61500 May 2010 It is very important that helps maintain your scanner so Kodak can register your reseller of Kodak Document Imaging products or visit us provide you with the best possible service and...
... can be necessary to Appendix B, Specifications. Microsoft Windows 7 (32-bit) - For i700 Series Scanners only: Microsoft Windows 7 (64-bit) Registering your scanner A-61500 May 2010 It is very important that helps maintain your scanner so Kodak can register your reseller of Kodak Document Imaging products or visit us provide you with the best possible service and...
User Guide
Page 12
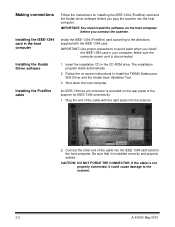
...is not properly connected, it could cause damage to avoid static when you plug the scanner into the scanner. 2. Making connections Installing the IEEE-1394 card in the host computer Installing the Kodak Driver software Installing the FireWire cable Follow the instructions for IEEE-1394 connectivity. 1. IMPORTANT...the IEEE-1394 card in the CD-ROM drive. Connect the other end of the scanner for installing the IEEE-1394 (FireWire) card and the Kodak driver software before you connect the scanner. Install the IEEE-1394 (FireWire) card according to install the TWAIN Datasource, ISIS...
...is not properly connected, it could cause damage to avoid static when you plug the scanner into the scanner. 2. Making connections Installing the IEEE-1394 card in the host computer Installing the Kodak Driver software Installing the FireWire cable Follow the instructions for IEEE-1394 connectivity. 1. IMPORTANT...the IEEE-1394 card in the CD-ROM drive. Connect the other end of the scanner for installing the IEEE-1394 (FireWire) card and the Kodak driver software before you connect the scanner. Install the IEEE-1394 (FireWire) card according to install the TWAIN Datasource, ISIS...
User Guide
Page 13
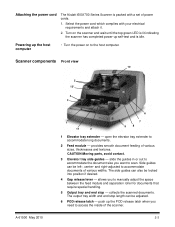
...7 9 8 1 Elevator tray extender - allows you to scan. The output tray width and end stop - Attaching the power cord The Kodak i600/i700 Series Scanner is idle. provides smooth document feeding of power cords. 1. push up the POD release latch when you want to manually adjust the space between the feed module...host computer. collects the scanned documents. Powering up self-test and is packed with your electrical requirements and attach it. 2. The side guides can be locked into position if desired. 4 Gap release lever - Turn on the scanner and wait until the top green...
...7 9 8 1 Elevator tray extender - allows you to scan. The output tray width and end stop - Attaching the power cord The Kodak i600/i700 Series Scanner is idle. provides smooth document feeding of power cords. 1. push up the POD release latch when you want to manually adjust the space between the feed module...host computer. collects the scanned documents. Powering up self-test and is packed with your electrical requirements and attach it. 2. The side guides can be locked into position if desired. 4 Gap release lever - Turn on the scanner and wait until the top green...
User Guide
Page 14
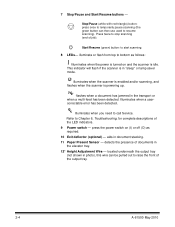
... been detected. Press twice to start scanning. 8 LEDs- This indicator will flash if the scanner is idle. located underneath the output tray (not shown in the elevator tray. 12* Height Adjustment Wire - flashes when a document has jammed in document stacking. 11 Paper Present Sensor - Refer to call Service. detects the presence of the...
... been detected. Press twice to start scanning. 8 LEDs- This indicator will flash if the scanner is idle. located underneath the output tray (not shown in the elevator tray. 12* Height Adjustment Wire - flashes when a document has jammed in document stacking. 11 Paper Present Sensor - Refer to call Service. detects the presence of the...
User Guide
Page 15
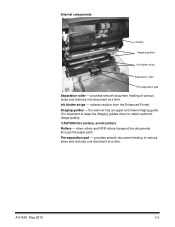
... quality. CAUTION:Hot surface, avoid contact. drive rollers and NFR rollers transport the documents through the paper path. provides smooth document feeding of various sizes and textures one document at a time. A-61500 May 2010 2-5 Imaging guides - collects residue from the...-separation pad - provides smooth document feeding of various sizes and textures one document at a time. Rollers - Internal components Rollers Imaging guides Ink blotter strips Separation roller Pre-separation pad Separation roller - Ink blotter strips - the scanner has an upper and lower imaging...
... quality. CAUTION:Hot surface, avoid contact. drive rollers and NFR rollers transport the documents through the paper path. provides smooth document feeding of various sizes and textures one document at a time. A-61500 May 2010 2-5 Imaging guides - collects residue from the...-separation pad - provides smooth document feeding of various sizes and textures one document at a time. Rollers - Internal components Rollers Imaging guides Ink blotter strips Separation roller Pre-separation pad Separation roller - Ink blotter strips - the scanner has an upper and lower imaging...
User Guide
Page 16
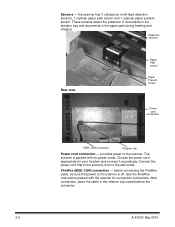
...scanner, then to the wall outlet. Ultrasonic sensors Rear view Paper Path sensor Paper Present sensor Power cord connection IEEE-1394 connection Retainer clip Power cord connection - FireWire (IEEE-1394) connection - Sensors - After connection, place the cable in the paper path during feeding and imaging. These sensors detect the presence of documents... in the elevator tray and documents in the retainer clip located above the connector. 2-6 A-61500 May 2010 See the FireWire...
...scanner, then to the wall outlet. Ultrasonic sensors Rear view Paper Path sensor Paper Present sensor Power cord connection IEEE-1394 connection Retainer clip Power cord connection - FireWire (IEEE-1394) connection - Sensors - After connection, place the cable in the paper path during feeding and imaging. These sensors detect the presence of documents... in the elevator tray and documents in the retainer clip located above the connector. 2-6 A-61500 May 2010 See the FireWire...
User Guide
Page 17
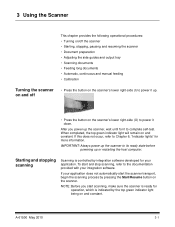
... the following operational procedures: • Turning on/off the scanner • Starting, stopping, pausing and resuming the scanner • Document preparation • Adjusting the side guides and output tray • Scanning documents • Feeding long documents • Automatic, continuous and manual feeding • Calibration Turning the scanner on and off • Press the button on the...
... the following operational procedures: • Turning on/off the scanner • Starting, stopping, pausing and resuming the scanner • Document preparation • Adjusting the side guides and output tray • Scanning documents • Feeding long documents • Automatic, continuous and manual feeding • Calibration Turning the scanner on and off • Press the button on the...
User Guide
Page 18
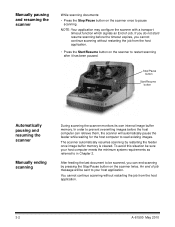
... order to in Chapter 2. After feeding the last document to read existing images. Manually pausing and resuming the scanner While scanning documents: • Press the Stop/Pause button on the scanner once to restart scanning after it has been paused. NOTE: Your application may configure the scanner with a transport timeout function which signals an End...
... order to in Chapter 2. After feeding the last document to read existing images. Manually pausing and resuming the scanner While scanning documents: • Press the Stop/Pause button on the scanner once to restart scanning after it has been paused. NOTE: Your application may configure the scanner with a transport timeout function which signals an End...
User Guide
Page 19
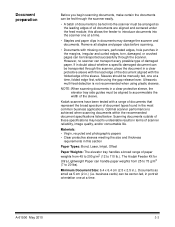
...feed detection is achieved when scanning documents within the recommended document specifications listed below. Documents as small as 5 cm (2 in .). The Kodak Feeder Kit for Ultra Lightweight Paper can handle paper weights from 45 to 200 g/m2 (12 to 110 lb.). Kodak scanners have been tested with the folded... edge of the sleeve. Remove all documents are aligned and centered under the feed module; this section Paper Types: Bond, Laser, Inkjet...
...feed detection is achieved when scanning documents within the recommended document specifications listed below. Documents as small as 5 cm (2 in .). The Kodak Feeder Kit for Ultra Lightweight Paper can handle paper weights from 45 to 200 g/m2 (12 to 110 lb.). Kodak scanners have been tested with the folded... edge of the sleeve. Remove all documents are aligned and centered under the feed module; this section Paper Types: Bond, Laser, Inkjet...

User Guide
Page 20
...can be dry before scanning is 40 inches (1016 mm). Documents larger than the longest document being fed in .) require operator assistance. Paper inks: All inks on the paper must be adjusted for the i700 Series Scanners is started. This includes: Standard offset printing, Inkjet printer,... Thermal transfer, Handwriting inks. Place the documents in .). Pull the side guides all the way out and then push them together ...
...can be dry before scanning is 40 inches (1016 mm). Documents larger than the longest document being fed in .) require operator assistance. Paper inks: All inks on the paper must be adjusted for the i700 Series Scanners is started. This includes: Standard offset printing, Inkjet printer,... Thermal transfer, Handwriting inks. Place the documents in .). Pull the side guides all the way out and then push them together ...

User Guide
Page 24
Remove the end stop on the rail of the output tray and push it up to the desired position to accommodate your documents. 3. Adjusting the optional short document tray The short document tray is standard with the Kodak i700 Series Scanners. See Chapter 5, "Supplies and Consumables" for scanning smaller documents. Adjust the side guides as necessary. 3-8 A-61500 May 2010 This tray is available for ordering information. 1. Slide the short document tray on the output tray. 2. If you have a Kodak i600 Series Scanner, the short document tray can be ordered from Parts Services.
Remove the end stop on the rail of the output tray and push it up to the desired position to accommodate your documents. 3. Adjusting the optional short document tray The short document tray is standard with the Kodak i700 Series Scanners. See Chapter 5, "Supplies and Consumables" for scanning smaller documents. Adjust the side guides as necessary. 3-8 A-61500 May 2010 This tray is available for ordering information. 1. Slide the short document tray on the output tray. 2. If you have a Kodak i600 Series Scanner, the short document tray can be ordered from Parts Services.
User Guide
Page 25
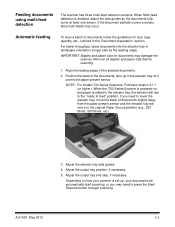
... occur. Automatic feeding To scan a batch of the stacked documents. 2. Feeding documents using multi-feed detection The scanner has three multi-feed detection sensors. NOTE: For Kodak i700 Series Scanners, Firmware Version 2.1.1 (or higher): When the i700 Series Scanner is enabled, adjust the side guides so the documents fully cover at least one sensor. Remove all staples...
... occur. Automatic feeding To scan a batch of the stacked documents. 2. Feeding documents using multi-feed detection The scanner has three multi-feed detection sensors. NOTE: For Kodak i700 Series Scanners, Firmware Version 2.1.1 (or higher): When the i700 Series Scanner is enabled, adjust the side guides so the documents fully cover at least one sensor. Remove all staples...

User Guide
Page 26
... elevator tray will stop when the Transport Timeout has been reached. Manual feeding To manually feed documents: 1. Continuous feeding Continuous feeding can be used when you want to the bottom of the stack. When the scanner is configured for continuous feeding, the elevator tray is configured, the transport will remain in the...
... elevator tray will stop when the Transport Timeout has been reached. Manual feeding To manually feed documents: 1. Continuous feeding Continuous feeding can be used when you want to the bottom of the stack. When the scanner is configured for continuous feeding, the elevator tray is configured, the transport will remain in the...


