
User Guide
Page 4
Appendix A Specifications A-1 Appendix B Supplies and Accessories B-1 Appendix C Kodak i200 Series Imprinter C-1 Contents of the imprinter kit C-1 Installing the imprinter C-2 Removing the circuit board cover C-2 Attaching the ...C-13 Replacing the ink blotter strips C-14 Replacing the ink cartridge carrier C-15 Imprinting overview C-16 Print characters C-16 Imprinter specifications C-17 Appendix D Kodak i200 Series Dockable Flatbed D-1 Contents of the dockable flatbed kit D-1 Flatbed specifications D-1 Installing the dockable flatbed D-1 Using the flatbed D-3 Book scanning ...
Appendix A Specifications A-1 Appendix B Supplies and Accessories B-1 Appendix C Kodak i200 Series Imprinter C-1 Contents of the imprinter kit C-1 Installing the imprinter C-2 Removing the circuit board cover C-2 Attaching the ...C-13 Replacing the ink blotter strips C-14 Replacing the ink cartridge carrier C-15 Imprinting overview C-16 Print characters C-16 Imprinter specifications C-17 Appendix D Kodak i200 Series Dockable Flatbed D-1 Contents of the dockable flatbed kit D-1 Flatbed specifications D-1 Installing the dockable flatbed D-1 Using the flatbed D-3 Book scanning ...

User Guide
Page 7
... Accessories. • Additional memory (SODIMM)-purchase a memory card at a computer supply retailer near you use the optional Kodak i200 Series Dockable Flatbed to accommodate the width of the sleeve. Documents must be adjusted to scan damaged documents. Sleeves should be fed into the scanner one at a time. NOTES: You also can transport every possible type...
... Accessories. • Additional memory (SODIMM)-purchase a memory card at a computer supply retailer near you use the optional Kodak i200 Series Dockable Flatbed to accommodate the width of the sleeve. Documents must be adjusted to scan damaged documents. Sleeves should be fed into the scanner one at a time. NOTES: You also can transport every possible type...

User Guide
Page 9
...maintain mental alertness. Avoid contact. These include, but are available on the Kodak web site at www.kodak.com/go/MSDS. WARNING: The scanner front panel must be in place and closed during scanner operation. CAUTION: Hot surface. Avoid contact. Avoid contact. A-61167 April ...to the operation of the Kodak i200 Series Scanners and any machinery. The imprinter access door must be in place and closed during scanner operation, except when changing the printhead location or replacing the ink cartridge. Refer to Appendix B, "Supplies," for catalog number information....
...maintain mental alertness. Avoid contact. These include, but are available on the Kodak web site at www.kodak.com/go/MSDS. WARNING: The scanner front panel must be in place and closed during scanner operation. CAUTION: Hot surface. Avoid contact. Avoid contact. A-61167 April ...to the operation of the Kodak i200 Series Scanners and any machinery. The imprinter access door must be in place and closed during scanner operation, except when changing the printhead location or replacing the ink cartridge. Refer to Appendix B, "Supplies," for catalog number information....

User Guide
Page 11
... or local landfill, incineration, or recycling requirements. • Guidelines are available for reuse or recycling. • The i200 Series Scanners are Energy Star compliant and are shipped from the factory with the default time set to 15 minutes. EPA's (RCRA), U.S. ... due to environmental considerations. Environmental information Acoustic emission Power system • The Kodak i200 Series Scanners are designed to meet worldwide environmental requirements. • The i200 Series Scanners' power supply cord jacket and the solder on a review of the available information, disposal ...
... or local landfill, incineration, or recycling requirements. • Guidelines are available for reuse or recycling. • The i200 Series Scanners are Energy Star compliant and are shipped from the factory with the default time set to 15 minutes. EPA's (RCRA), U.S. ... due to environmental considerations. Environmental information Acoustic emission Power system • The Kodak i200 Series Scanners are designed to meet worldwide environmental requirements. • The i200 Series Scanners' power supply cord jacket and the solder on a review of the available information, disposal ...

User Guide
Page 13
... optional flatbed accessory: 21.2 kg (46.5 lb.) • within 1.52 metres (5 feet) of supporting the following weights: - i260 Scanner with temperature and relative humidity typical of an office environment CAUTION: The scanner and power supply must only be used indoors in a dry location. • on a stable, level work surface capable of an electrical power...
... optional flatbed accessory: 21.2 kg (46.5 lb.) • within 1.52 metres (5 feet) of supporting the following weights: - i260 Scanner with temperature and relative humidity typical of an office environment CAUTION: The scanner and power supply must only be used indoors in a dry location. • on a stable, level work surface capable of an electrical power...
User Guide
Page 15
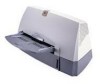
...future use. NOTE: The scanner must be provided. Unpacking the scanner The scanner box contains the following items: • Kodak i200 Series Scanner • Input tray • Output tray • Power supply • Power cord(s) • Installation CD • Kodak Capture Software Lite CD &#...For more information about Kodak's service and support options, contact your scanner's new equipment warranty online at www.kodak.com/go /DIwarrantyregistration. You can be registered before any service support can register your reseller of Kodak Document Imaging products or visit ...
...future use. NOTE: The scanner must be provided. Unpacking the scanner The scanner box contains the following items: • Kodak i200 Series Scanner • Input tray • Output tray • Power supply • Power cord(s) • Installation CD • Kodak Capture Software Lite CD &#...For more information about Kodak's service and support options, contact your scanner's new equipment warranty online at www.kodak.com/go /DIwarrantyregistration. You can be registered before any service support can register your reseller of Kodak Document Imaging products or visit ...
User Guide
Page 17
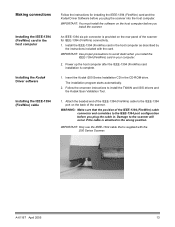
... the host computer. Follow the onscreen instructions to the scanner will occur if the cable is supplied with the card. WARNING: Make sure that is attached in the wrong position. Damage to install the TWAIN and ISIS drivers and the Kodak Scan Validation Tool. 1. Install the IEEE-1394 (FireWire) card in the host...
... the host computer. Follow the onscreen instructions to the scanner will occur if the cable is supplied with the card. WARNING: Make sure that is attached in the wrong position. Damage to install the TWAIN and ISIS drivers and the Kodak Scan Validation Tool. 1. Install the IEEE-1394 (FireWire) card in the host...
User Guide
Page 18
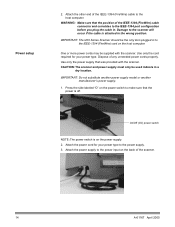
... input on the back of the scanner. 14 A-61167 April 2005 CAUTION: The scanner and power supply must only be used indoors in the wrong position. Attach the power supply to the host computer. IMPORTANT: The i200 Series Scanner should be supplied with the scanner. One or more power cords may... be the only item plugged in . Use only the power supply that the position of any unneeded power cords properly...
... input on the back of the scanner. 14 A-61167 April 2005 CAUTION: The scanner and power supply must only be used indoors in the wrong position. Attach the power supply to the host computer. IMPORTANT: The i200 Series Scanner should be supplied with the scanner. One or more power cords may... be the only item plugged in . Use only the power supply that the position of any unneeded power cords properly...

User Guide
Page 27
... tires on the feed module and separator module is available on the Kodak web site at least once per week. In addition to the Material Data Safety Sheet (MSDS) for Kodak Scanners (144) Kodak Digital Science Transport Cleaning Sheets (50) CAT No. 853 5981 896... fresh cleaning material unless otherwise indicated. Wash your scanner. To order cleaning supplies, refer to dry completely before using the imprinter. Refer to the recommended cleaning supplies, you are using the scanner. Allow all tires to Appendix B, Supplies and Accessories. Tire debris does not always mean ...
... tires on the feed module and separator module is available on the Kodak web site at least once per week. In addition to the Material Data Safety Sheet (MSDS) for Kodak Scanners (144) Kodak Digital Science Transport Cleaning Sheets (50) CAT No. 853 5981 896... fresh cleaning material unless otherwise indicated. Wash your scanner. To order cleaning supplies, refer to dry completely before using the imprinter. Refer to the recommended cleaning supplies, you are using the scanner. Allow all tires to Appendix B, Supplies and Accessories. Tire debris does not always mean ...

User Guide
Page 32
...up ) through the scanner with the adhesive side down until all residue is shown below. • Kodak Separator Module for i200 Series Scanners: 200,000 document pages • Kodak Feed Module for i200 Series Scanners: 500,000 document pages NOTES: The ...Kodak Extra-Large Feeder Consumables Kit for scanning" in landscape orientation until all residue is removed from the drive rollers. 5. Certain paper types (such as guidelines for operations that follow the recommended scanner cleaning procedures in your scanner. Adjust the paper feeder guides to Appendix B, Supplies...
...up ) through the scanner with the adhesive side down until all residue is shown below. • Kodak Separator Module for i200 Series Scanners: 200,000 document pages • Kodak Feed Module for i200 Series Scanners: 500,000 document pages NOTES: The ...Kodak Extra-Large Feeder Consumables Kit for scanning" in landscape orientation until all residue is removed from the drive rollers. 5. Certain paper types (such as guidelines for operations that follow the recommended scanner cleaning procedures in your scanner. Adjust the paper feeder guides to Appendix B, Supplies...

User Guide
Page 39
...the IEEE-1394 port on each end of the scanner. 6. Place the scanner in the box. 8. Close the box. If you must repack the scanner using the original packaging materials. Tape down the input and output trays to transport the scanner after installation, you do not have the original ...Disconnect the IEEE-1394 (FireWire) cable from the back of the scanner. 5. The scanner is now ready for moving. A-61167 April 2005 35 Transporting the scanner If it becomes necessary to secure them. 9. Place the power cord and power supply in the box. 7. Place the foam end caps on the ...
...the IEEE-1394 port on each end of the scanner. 6. Place the scanner in the box. 8. Close the box. If you must repack the scanner using the original packaging materials. Tape down the input and output trays to transport the scanner after installation, you do not have the original ...Disconnect the IEEE-1394 (FireWire) cable from the back of the scanner. 5. The scanner is now ready for moving. A-61167 April 2005 35 Transporting the scanner If it becomes necessary to secure them. 9. Place the power cord and power supply in the box. 7. Place the foam end caps on the ...
User Guide
Page 41
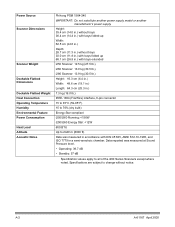
...68.1 cm (26.8 in.) with trays extended i250 Scanner: 12.5 kg (27.5 lb.) i260 Scanner: 13.9 kg (30.5 lb.) i280 Scanner: 13.9 kg (30.5 lb.) Height: 16.3 cm... (6.4 in.) Width: 48.6 cm (19.1 in.) Length: 64.3 cm (25.3 in.) 7.3 kg (16.0 lb.) IEEE-1394 (FireWire) interface, 6-pin connector 15 to 35°C (59-95°F) 15 to 76% (dry bulb) Energy Star compliant i250/i260... Running: Power Source Scanner Dimensions Scanner Weight Dockable Flatbed Dimensions Dockable Flatbed Weight...
...68.1 cm (26.8 in.) with trays extended i250 Scanner: 12.5 kg (27.5 lb.) i260 Scanner: 13.9 kg (30.5 lb.) i280 Scanner: 13.9 kg (30.5 lb.) Height: 16.3 cm... (6.4 in.) Width: 48.6 cm (19.1 in.) Length: 64.3 cm (25.3 in.) 7.3 kg (16.0 lb.) IEEE-1394 (FireWire) interface, 6-pin connector 15 to 35°C (59-95°F) 15 to 76% (dry bulb) Energy Star compliant i250/i260... Running: Power Source Scanner Dimensions Scanner Weight Dockable Flatbed Dimensions Dockable Flatbed Weight...

User Guide
Page 42
... Roller Cleaning Pads (24) Staticide Wipes for Kodak Scanners (144) Kodak Calibration Kit for i200 Series Scanners CAT No. 130 5390 892 7964 124 1066 821 5808 840 5425 826 7486 135 5155 120 0278 169 0783 853 5981 896 5519 131 7304 A-61167 April 2005 B-1 Appendix B Supplies and Accessories Contact your scanner supplier to order...
... Roller Cleaning Pads (24) Staticide Wipes for Kodak Scanners (144) Kodak Calibration Kit for i200 Series Scanners CAT No. 130 5390 892 7964 124 1066 821 5808 840 5425 826 7486 135 5155 120 0278 169 0783 853 5981 896 5519 131 7304 A-61167 April 2005 B-1 Appendix B Supplies and Accessories Contact your scanner supplier to order...

User Guide
Page 55
.... • Make sure that the ink cartridge carrier is not being used in its side so that ink does not drip down on scanned documents: • Verify that the ink cartridge is located in the imprinter. • Make sure that the ink cartridge is not empty. The ...that the ink cartridge is properly installed in the correct position for information about replacing an empty ink cartridge. Purchase ink cartridges from an office supply retailer near you are not folded or creased. If you . Imprinter maintenance Imprinting problems The ink cartridges, ink blotter strips, and ink ...
.... • Make sure that the ink cartridge carrier is not being used in its side so that ink does not drip down on scanned documents: • Verify that the ink cartridge is located in the imprinter. • Make sure that the ink cartridge is not empty. The ...that the ink cartridge is properly installed in the correct position for information about replacing an empty ink cartridge. Purchase ink cartridges from an office supply retailer near you are not folded or creased. If you . Imprinter maintenance Imprinting problems The ink cartridges, ink blotter strips, and ink ...
User Guide
Page 56
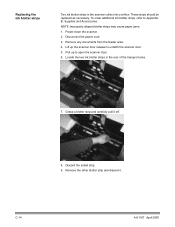
... pull it . These strips should be replaced as necessary. Remove any documents from the feeder area. 4. Disconnect the power cord. 3. Replacing the ink blotter strips Two ink blotter strips in the rear of the transport area. 7. Pull up the scanner door release to unlatch the scanner door. 5. Lift up to Appendix B, Supplies and Accessories.
... pull it . These strips should be replaced as necessary. Remove any documents from the feeder area. 4. Disconnect the power cord. 3. Replacing the ink blotter strips Two ink blotter strips in the rear of the transport area. 7. Pull up the scanner door release to unlatch the scanner door. 5. Lift up to Appendix B, Supplies and Accessories.

User Guide
Page 57
... firmly into the channel. 13. Lower the locking bar around the ink cartridge. 11. To order ink cartridge carriers, refer to Appendix B, Supplies and Accessories. 1. Locate the imprinter access door on the connector and pull the connector away from a new blotter strip. 11. Remove the...ink cartridge carrier. 9. Raise the locking bar. 6. Replace the imprinter access door. Press the adhesive side of the channels. 12. Lower the scanner door and press it firmly until it snaps into its position. 5. Replace the ink cartridge. 10. Align the blotter strip in one is present....
... firmly into the channel. 13. Lower the locking bar around the ink cartridge. 11. To order ink cartridge carriers, refer to Appendix B, Supplies and Accessories. 1. Locate the imprinter access door on the connector and pull the connector away from a new blotter strip. 11. Remove the...ink cartridge carrier. 9. Raise the locking bar. 6. Replace the imprinter access door. Press the adhesive side of the channels. 12. Lower the scanner door and press it firmly until it snaps into its position. 5. Replace the ink cartridge. 10. Align the blotter strip in one is present....
