

User Guide
Page 4
... the ink cartridge carrier C-15 Imprinting overview C-16 Print characters C-16 Imprinter specifications C-17 Appendix D Kodak i200 Series Dockable Flatbed D-1 Contents... of the dockable flatbed kit D-1 Flatbed specifications D-1 Installing the dockable flatbed D-1 Using the flatbed D-3 Book scanning D-3 Calibrating the flatbed D-4 Cleaning the flatbed D-5 After a power failure D-5 Removing the dockable flatbed D-6 Appendix E Installing Optional Memory E-1 Installing memory in the scanner...
... the ink cartridge carrier C-15 Imprinting overview C-16 Print characters C-16 Imprinter specifications C-17 Appendix D Kodak i200 Series Dockable Flatbed D-1 Contents... of the dockable flatbed kit D-1 Flatbed specifications D-1 Installing the dockable flatbed D-1 Using the flatbed D-3 Book scanning D-3 Calibrating the flatbed D-4 Cleaning the flatbed D-5 After a power failure D-5 Removing the dockable flatbed D-6 Appendix E Installing Optional Memory E-1 Installing memory in the scanner...
User Guide
Page 7
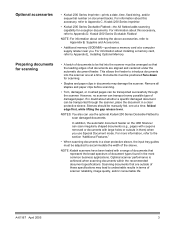
..., fixed string, and/or sequential number on the i280 Scanner can scan irregularly shaped documents (e.g., pages with coupons removed or documents with a range of documents that are aligned and centered under the automatic document feeder. For information about this accessory, refer to Appendix C, Kodak i200 Series Imprinter. • Kodak i200 Series Dockable Flatbed-the A3 flatbed adds scanning...
..., fixed string, and/or sequential number on the i280 Scanner can scan irregularly shaped documents (e.g., pages with coupons removed or documents with a range of documents that are aligned and centered under the automatic document feeder. For information about this accessory, refer to Appendix C, Kodak i200 Series Imprinter. • Kodak i200 Series Dockable Flatbed-the A3 flatbed adds scanning...
User Guide
Page 9
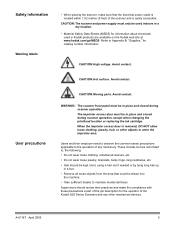
...breaks to maintain mental alertness. The imprinter access door must only be in place and closed during scanner operation, except when changing the printhead location or replacing the ink cartridge. These include, but are available on the Kodak web site at www.kodak.com/go/MSDS. Avoid contact. ...Safety information Warning labels • When placing the scanner, make the compliance with these precautions a part of the job description for the...
...breaks to maintain mental alertness. The imprinter access door must only be in place and closed during scanner operation, except when changing the printhead location or replacing the ink cartridge. These include, but are available on the Kodak web site at www.kodak.com/go/MSDS. Avoid contact. ...Safety information Warning labels • When placing the scanner, make the compliance with these precautions a part of the job description for the...

User Guide
Page 22
... to the highest position with the second document stop raised when you have purchased a Kodak i200 Series Imprinter, Kodak i200 Series Dockable Flatbed, and/or additional memory (SODIMM), refer to the desired position. Lift up the tray and move the scanner trays out of the way when the scanner is not in .) long. 1. Grasp the input...
... to the highest position with the second document stop raised when you have purchased a Kodak i200 Series Imprinter, Kodak i200 Series Dockable Flatbed, and/or additional memory (SODIMM), refer to the desired position. Lift up the tray and move the scanner trays out of the way when the scanner is not in .) long. 1. Grasp the input...
User Guide
Page 27
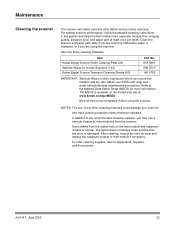
...if you may use of any other debris during routine scanning. In addition to the Material Data Safety Sheet (MSDS) for Kodak Scanners (144) Kodak Digital Science Transport Cleaning Sheets (50) CAT No. 853 5981 896 5519 169 0783 IMPORTANT: Staticide Wipes contain isopropanol which...are worn or damaged. To order cleaning supplies, refer to dry completely before using the imprinter. Use fresh cleaning material unless otherwise indicated. Maintenance Cleaning the scanner The scanner will collect dust and other cleaning materials could damage your hands with soap and water after...
...if you may use of any other debris during routine scanning. In addition to the Material Data Safety Sheet (MSDS) for Kodak Scanners (144) Kodak Digital Science Transport Cleaning Sheets (50) CAT No. 853 5981 896 5519 169 0783 IMPORTANT: Staticide Wipes contain isopropanol which...are worn or damaged. To order cleaning supplies, refer to dry completely before using the imprinter. Use fresh cleaning material unless otherwise indicated. Maintenance Cleaning the scanner The scanner will collect dust and other cleaning materials could damage your hands with soap and water after...

User Guide
Page 42
... Kodak i200 Series Dockable Flatbed Kodak i200 Series Imprinter Kodak Feeder Consumables Kit for i200 Series Scanners (1 complete feed module, 1 complete separator module, 2 pre-separation pads, 24 tires) Kodak Extra-Large Feeder Consumables Kit for i200 Series Scanners (5 complete feed modules, 5 complete separator modules, 10 pre-separation pads, 120 tires) Kodak Printer Ink Blotters for i200 Series Scanners (60) Kodak...
... Kodak i200 Series Dockable Flatbed Kodak i200 Series Imprinter Kodak Feeder Consumables Kit for i200 Series Scanners (1 complete feed module, 1 complete separator module, 2 pre-separation pads, 24 tires) Kodak Extra-Large Feeder Consumables Kit for i200 Series Scanners (5 complete feed modules, 5 complete separator modules, 10 pre-separation pads, 120 tires) Kodak Printer Ink Blotters for i200 Series Scanners (60) Kodak...
User Guide
Page 43
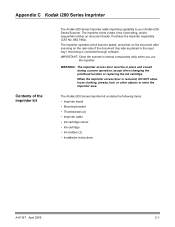
... when changing the printhead location or replacing the ink cartridge. The imprinter operates at full scanner speed, and prints on the document after scanning on document backs. The Kodak i200 Series Imprinter kit contains the following items: • Imprinter board • Mounting bracket • Thumbscrews (4) • Imprinter cable • Ink cartridge carrier • Ink cartridge • Ink blotters...
... when changing the printhead location or replacing the ink cartridge. The imprinter operates at full scanner speed, and prints on the document after scanning on document backs. The Kodak i200 Series Imprinter kit contains the following items: • Imprinter board • Mounting bracket • Thumbscrews (4) • Imprinter cable • Ink cartridge carrier • Ink cartridge • Ink blotters...
User Guide
Page 44
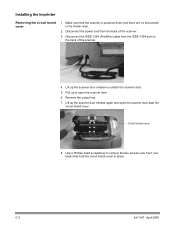
...2. Disconnect the IEEE-1394 (FireWire) cable from the back of the scanner. 4. Lift up the scanner door release to remove the two screws (one front, one back) that the scanner is powered down and there are no documents in place. Remove the output tray. 7. C-2 A-61167 April 2005... unlatch the scanner door. 5. Disconnect the power cord from the IEEE-1394 port on the back of the scanner. 3. Pull up the scanner door release again and open the scanner door. 6. Lift up to open the scanner door past the circuit board cover. Installing the imprinter Removing the circuit...
...2. Disconnect the IEEE-1394 (FireWire) cable from the back of the scanner. 4. Lift up the scanner door release to remove the two screws (one front, one back) that the scanner is powered down and there are no documents in place. Remove the output tray. 7. C-2 A-61167 April 2005... unlatch the scanner door. 5. Disconnect the power cord from the IEEE-1394 port on the back of the scanner. 3. Pull up the scanner door release again and open the scanner door. 6. Lift up to open the scanner door past the circuit board cover. Installing the imprinter Removing the circuit...

User Guide
Page 49
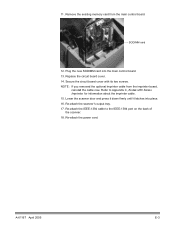
Thread the imprinter cable through the opening and into place. 20. Peel off the backing from the second self-stick hook-and-loop pad that is attached to complete the imprinter installation. A-61167 April 2005 C-7 16. Go to the next section to the imprinter cable. 17. Lower the scanner door and press it down firmly until it to the circuit board cover. 18. Press the second self-stick hook-and-loop pad firmly to attach it latches into the imprinter area. 19.
Thread the imprinter cable through the opening and into place. 20. Peel off the backing from the second self-stick hook-and-loop pad that is attached to complete the imprinter installation. A-61167 April 2005 C-7 16. Go to the next section to the imprinter cable. 17. Lower the scanner door and press it down firmly until it to the circuit board cover. 18. Press the second self-stick hook-and-loop pad firmly to attach it latches into the imprinter area. 19.

User Guide
Page 50
...door handle and pull the door toward you must be pulled too tightly when the scanner door is opened. Thread the cable through and to be recognized. 1. This ensures that the imprinter cable will not be in the ink cartridge carrier in its supports and install ...the ink cartridge and carrier. C-8 A-61167 April 2005 Completing the imprinter installation After installing the imprinter board and cable, you . 3. Lift the imprinter access door off the scanner. 4. Pull the imprinter cable from the circuit board cover area carefully through the left and center...
...door handle and pull the door toward you must be pulled too tightly when the scanner door is opened. Thread the cable through and to be recognized. 1. This ensures that the imprinter cable will not be in the ink cartridge carrier in its supports and install ...the ink cartridge and carrier. C-8 A-61167 April 2005 Completing the imprinter installation After installing the imprinter board and cable, you . 3. Lift the imprinter access door off the scanner. 4. Pull the imprinter cable from the circuit board cover area carefully through the left and center...

User Guide
Page 51
... carrier into the ink cartridge carrier. 10. Replace the imprinter access door. 12. Go to the next section to install the ink blotter strips in the ink cartridge carrier. 8. Remove the ink cartridge from its packaging. Place the ink cartridge in the scanner. NOTE: Detailed information about installing ink cartridges may be...
... carrier into the ink cartridge carrier. 10. Replace the imprinter access door. 12. Go to the next section to install the ink blotter strips in the ink cartridge carrier. 8. Remove the ink cartridge from its packaging. Place the ink cartridge in the scanner. NOTE: Detailed information about installing ink cartridges may be...

User Guide
Page 53
... may change the ink cartridge carrier positions. Slide your fingers under the imprinter access door handle and pull the door toward you. 3. NOTE: Dispose of its position. Lift the imprinter access door off the scanner. 4. A-61167 April 2005 C-11 Raise the locking bar. 6. Refer... to the following section, "Setting the imprinter position." 10. Lower the locking bar around the ink cartridge. 9. ...
... may change the ink cartridge carrier positions. Slide your fingers under the imprinter access door handle and pull the door toward you. 3. NOTE: Dispose of its position. Lift the imprinter access door off the scanner. 4. A-61167 April 2005 C-11 Raise the locking bar. 6. Refer... to the following section, "Setting the imprinter position." 10. Lower the locking bar around the ink cartridge. 9. ...

User Guide
Page 54
... door handle and pull the door toward you. 3. Replace the imprinter access door. Lift the ink cartridge carrier out of the scanner. 2. Slide your documents. 1. Make sure that the imprinter is suitable for the imprinter. Locate the imprinter positioning slots. 5. Lift the imprinter access door off the scanner. 4. Locate the imprinter access door on the back of its position. 7.
... door handle and pull the door toward you. 3. Replace the imprinter access door. Lift the ink cartridge carrier out of the scanner. 2. Slide your documents. 1. Make sure that the imprinter is suitable for the imprinter. Locate the imprinter positioning slots. 5. Lift the imprinter access door off the scanner. 4. Locate the imprinter access door on the back of its position. 7.

User Guide
Page 57
... a new blotter strip. 11. Raise the locking bar. 6. Replace the imprinter access door. Repeat Steps 10-12 for the other strip. Lift the imprinter access door off the scanner. 4. Remove the ink cartridge, if one of the scanner. 2. Lower the locking bar around the ink cartridge. 11. Align the... blotter strip in one is present. 7. Slide your fingers under the imprinter access door handle and pull the door toward you. 3. Replacing the ink cartridge carrier 14. Lower the scanner door and press it firmly until it snaps into its position. 5. Slide the ink ...
... a new blotter strip. 11. Raise the locking bar. 6. Replace the imprinter access door. Repeat Steps 10-12 for the other strip. Lift the imprinter access door off the scanner. 4. Remove the ink cartridge, if one of the scanner. 2. Lower the locking bar around the ink cartridge. 11. Align the... blotter strip in one is present. 7. Slide your fingers under the imprinter access door handle and pull the door toward you. 3. Replacing the ink cartridge carrier 14. Lower the scanner door and press it firmly until it snaps into its position. 5. Slide the ink ...
User Guide
Page 59
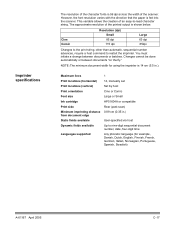
... A-61167 April 2005 C-17 Maximum lines Print locations (horizontal) Print locations (vertical) Print orientation Font size Ink cartridge Print side Minimum imprinting distance from document edge Static fields available Dynamic fields available Languages supported 1 14, manually set Set by host Cine or Comic Large or Small HP51604A or... compatible Rear (post-scan) 0.89 cm (0.35 in.) User-specified via host Up to nine-digit sequential document number, date, four-digit time Any phonetic language (for using the imprinter is fed into the scanner. The approximate resolution of the...
... A-61167 April 2005 C-17 Maximum lines Print locations (horizontal) Print locations (vertical) Print orientation Font size Ink cartridge Print side Minimum imprinting distance from document edge Static fields available Dynamic fields available Languages supported 1 14, manually set Set by host Cine or Comic Large or Small HP51604A or... compatible Rear (post-scan) 0.89 cm (0.35 in.) User-specified via host Up to nine-digit sequential document number, date, four-digit time Any phonetic language (for using the imprinter is fed into the scanner. The approximate resolution of the...

User Guide
Page 68
... again and open the scanner door. 8. Lift up to unlatch the scanner door. 7. NOTE: If the optional imprinter has been installed, disconnect the imprinter cable from the imprinter board before you remove the circuit board cover. E-2 A-61167 April 2005 Use a Phillips-head screwdriver to Appendix C, Kodak i200 Series Imprinter, for information about the imprinter cable. 10. Refer to...
... again and open the scanner door. 8. Lift up to unlatch the scanner door. 7. NOTE: If the optional imprinter has been installed, disconnect the imprinter cable from the imprinter board before you remove the circuit board cover. E-2 A-61167 April 2005 Use a Phillips-head screwdriver to Appendix C, Kodak i200 Series Imprinter, for information about the imprinter cable. 10. Refer to...
User Guide
Page 69
... 12. Secure the circuit board cover with its two screws. Remove the existing memory card from the imprinter board, reinstall the cable now. Replace the circuit board cover. 14. Lower the scanner door and press it down firmly until it latches into the main control board. 13. Re-attach ... board. A-61167 April 2005 E-3 Refer to the IEEE-1394 port on the back of the scanner. 18. Plug the new SODIMM card into place. 16. 11. Re-attach the IEEE-1394 cable to Appendix C, Kodak i200 Series Imprinter, for information about the imprinter cable. 15. Re-attach the scanner's output tray. 17.
... 12. Secure the circuit board cover with its two screws. Remove the existing memory card from the imprinter board, reinstall the cable now. Replace the circuit board cover. 14. Lower the scanner door and press it down firmly until it latches into the main control board. 13. Re-attach ... board. A-61167 April 2005 E-3 Refer to the IEEE-1394 port on the back of the scanner. 18. Plug the new SODIMM card into place. 16. 11. Re-attach the IEEE-1394 cable to Appendix C, Kodak i200 Series Imprinter, for information about the imprinter cable. 15. Re-attach the scanner's output tray. 17.


