

User Guide
Page 2
Contents Using the High-Resolution Printer Accessory 1 Printed Information 1 Configuring your print string 3 Changing the horizontal print position 5 Changing the vertical print position 7 Omit printing on more than one document 8 Performing a Print test 9 Installing a new printer cartridge 10 Storing the printer cartridge when not in use 12 Scanner maintenance guidelines when using the High-Resolution Printer . . . . 14 Replacement procedures 14 Replacing ink trays 14 Scanner auto purging 16 Printer cartridge care 16 Cleaning the print head 17 Troubleshooting 18 A-61597...
Contents Using the High-Resolution Printer Accessory 1 Printed Information 1 Configuring your print string 3 Changing the horizontal print position 5 Changing the vertical print position 7 Omit printing on more than one document 8 Performing a Print test 9 Installing a new printer cartridge 10 Storing the printer cartridge when not in use 12 Scanner maintenance guidelines when using the High-Resolution Printer . . . . 14 Replacement procedures 14 Replacing ink trays 14 Scanner auto purging 16 Printer cartridge care 16 Cleaning the print head 17 Troubleshooting 18 A-61597...

User Guide
Page 3
... the application software. you can select Normal (50%) or Bold/Large (100%). Using the High-Resolution Printer Accessory / A-61591 for Kodak i1800 Series Scanners Part No. 9E8651 January 2008 This guide provides instructions for using the High-Resolution Printer Accessory / for the Kodak i1800 Series Scanners. You can select the orientation of red or black printer cartridges • Auto purge • Adjustable print contrast (via the ISIS Driver and TWAIN Datasource. Orientation...
... the application software. you can select Normal (50%) or Bold/Large (100%). Using the High-Resolution Printer Accessory / A-61591 for Kodak i1800 Series Scanners Part No. 9E8651 January 2008 This guide provides instructions for using the High-Resolution Printer Accessory / for the Kodak i1800 Series Scanners. You can select the orientation of red or black printer cartridges • Auto purge • Adjustable print contrast (via the ISIS Driver and TWAIN Datasource. Orientation...

User Guide
Page 4
Following are examples of characters using multi-character printing. Rotation: 0 Up to 36 characters using 6 rows of 6 characters and 1 row of 12 characters 2 A-61591 / Part #9E8651 January 2008 Format - or multi-character printing. • Single: prints a single vertical line of characters (one character per horizontal line). 0 rotation 90 rotation 180 rotation 270 rotation • Multi-character: prints a block of multi-character format. select either...
Following are examples of characters using multi-character printing. Rotation: 0 Up to 36 characters using 6 rows of 6 characters and 1 row of 12 characters 2 A-61591 / Part #9E8651 January 2008 Format - or multi-character printing. • Single: prints a single vertical line of characters (one character per horizontal line). 0 rotation 90 rotation 180 rotation 270 rotation • Multi-character: prints a block of multi-character format. select either...

User Guide
Page 5
... 2008 3 If your High-Resolution Printer is done via the TWAIN Datasource or ISIS Driver. Detailed procedures for Kodak i1800 Series Scanners, A-61580. select either Normal (single-character) or Block (multicharacter) format. Configuring your print string Configuring your application software uses the TWAIN Datasource, access the Printer tab to use single- Format - When using the High-Resolution Printer in the Image Processing Guide for configuring print strings can be within 2.5 inches...
... 2008 3 If your High-Resolution Printer is done via the TWAIN Datasource or ISIS Driver. Detailed procedures for Kodak i1800 Series Scanners, A-61580. select either Normal (single-character) or Block (multicharacter) format. Configuring your print string Configuring your application software uses the TWAIN Datasource, access the Printer tab to use single- Format - When using the High-Resolution Printer in the Image Processing Guide for configuring print strings can be within 2.5 inches...
User Guide
Page 6
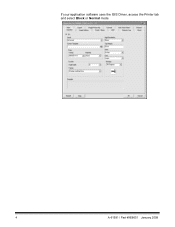
If your application software uses the ISIS Driver, access the Printer tab and select Block or Normal mode. 4 A-61591 / Part #9E8651 January 2008
If your application software uses the ISIS Driver, access the Printer tab and select Block or Normal mode. 4 A-61591 / Part #9E8651 January 2008

User Guide
Page 7
Changing the horizontal print position The location of the information you want to print on a document is determined by the print position of the High-Resolution Printer Accessory within the scanner and the pre-defined print position. Open the print access cover. A-61591 / Part#9E8651 January 2008 5 Remove the output tray. 2. To change the horizontal print position: 1.
Changing the horizontal print position The location of the information you want to print on a document is determined by the print position of the High-Resolution Printer Accessory within the scanner and the pre-defined print position. Open the print access cover. A-61591 / Part#9E8651 January 2008 5 Remove the output tray. 2. To change the horizontal print position: 1.

User Guide
Page 8
Print Positions 3. The arrow on the printer rail. These positions are 6 horizontal print positions. When finished, close the print access cover and reinstall the output tray. 6 A-61591 / Part #9E8651 January 2008 Slide the printer along the print rail until it is in the desired position. There are visible on the printer cartridge carrier should be aligned with the desired print position. 4.
Print Positions 3. The arrow on the printer rail. These positions are 6 horizontal print positions. When finished, close the print access cover and reinstall the output tray. 6 A-61591 / Part #9E8651 January 2008 Slide the printer along the print rail until it is in the desired position. There are visible on the printer cartridge carrier should be aligned with the desired print position. 4.

User Guide
Page 9
... you need to rescan a document(s) and want to eliminate printing on the same document, use the Omit Print option. You must select Omit Print before feeding any document that the application software has defined the Omit Print function. A-61591 / Part#9E8651 January 2008 7 If a line is missing, one of the jets is printed by selecting the Omit Print option on the scanner touchscreen. Omit printing on next document...
... you need to rescan a document(s) and want to eliminate printing on the same document, use the Omit Print option. You must select Omit Print before feeding any document that the application software has defined the Omit Print function. A-61591 / Part#9E8651 January 2008 7 If a line is missing, one of the jets is printed by selecting the Omit Print option on the scanner touchscreen. Omit printing on next document...

User Guide
Page 10
... Disable Print button is enabled (scanning started from the host PC). Omit printing on more documents to scan (End Job) or a multifeed occurs and the scanner is set up via the Stop Scanning option on until one document The Disable Print function allows you want to NOT automatically start scanning. The Disable Print function is only available after the scanner is only available if printing has been enabled by the scanning application. Once Disable Print is turned...
... Disable Print button is enabled (scanning started from the host PC). Omit printing on more documents to scan (End Job) or a multifeed occurs and the scanner is set up via the Stop Scanning option on until one document The Disable Print function allows you want to NOT automatically start scanning. The Disable Print function is only available after the scanner is only available if printing has been enabled by the scanning application. Once Disable Print is turned...
User Guide
Page 11
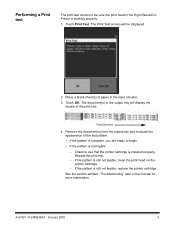
... print test. The document(s) in the output tray will be sure the print head in the High-Resolution Printer is working properly. 1. Repeat the print test. − If the pattern is still not legible, clean the print head on the printer cartridge. − If the pattern is installed properly. Feed Direction 4. See the section entitled, "Troubleshooting" later in the input elevator. 3. Touch Print Test. Place a blank sheet...
... print test. The document(s) in the output tray will be sure the print head in the High-Resolution Printer is working properly. 1. Repeat the print test. − If the pattern is still not legible, clean the print head on the printer cartridge. − If the pattern is installed properly. Feed Direction 4. See the section entitled, "Troubleshooting" later in the input elevator. 3. Touch Print Test. Place a blank sheet...
User Guide
Page 12
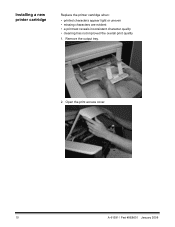
Remove the output tray. 2. Installing a new printer cartridge Replace the printer cartridge when: • printed characters appear light or uneven • missing characters are evident • a print test reveals inconsistent character quality • cleaning has not improved the overall print quality 1. Open the print access cover. 10 A-61591 / Part #9E8651 January 2008
Remove the output tray. 2. Installing a new printer cartridge Replace the printer cartridge when: • printed characters appear light or uneven • missing characters are evident • a print test reveals inconsistent character quality • cleaning has not improved the overall print quality 1. Open the print access cover. 10 A-61591 / Part #9E8651 January 2008

User Guide
Page 13
Lift the blue tab up to release the printer cartridge. 4. IMPORTANT: Dispose the empty printer cartridge in accordance with all federal, state and local laws. 5. Lift the printer cartridge out from the package. 3. A-61591 / Part#9E8651 January 2008 11 Open the new printer cartridge package and remove it from the printer carrier.
Lift the blue tab up to release the printer cartridge. 4. IMPORTANT: Dispose the empty printer cartridge in accordance with all federal, state and local laws. 5. Lift the printer cartridge out from the package. 3. A-61591 / Part#9E8651 January 2008 11 Open the new printer cartridge package and remove it from the printer carrier.
User Guide
Page 14
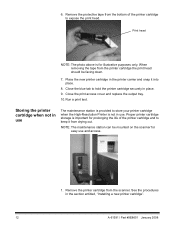
... life of the printer cartridge to store your printer cartridge when the High-Resolution Printer is provided to expose the print head. Print head NOTE: The photo above is for easy use The maintenance station is not in use. Remove the protective tape from the scanner. Place the new printer cartridge in the section entitled, "Installing a new printer cartridge". 12 A-61591 / Part #9E8651 January 2008...
... life of the printer cartridge to store your printer cartridge when the High-Resolution Printer is provided to expose the print head. Print head NOTE: The photo above is for easy use The maintenance station is not in use. Remove the protective tape from the scanner. Place the new printer cartridge in the section entitled, "Installing a new printer cartridge". 12 A-61591 / Part #9E8651 January 2008...
User Guide
Page 15
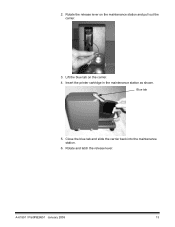
Lift the blue tab on the maintenance station and pull out the carrier. 3. Blue tab 5. Rotate and latch the release lever. A-61591 / Part#9E8651 January 2008 13 2. Insert the printer cartridge in the maintenance station as shown. Rotate the release lever on the carrier. 4. Close the blue tab and slide the carrier back into the maintenance station. 6.
Lift the blue tab on the maintenance station and pull out the carrier. 3. Blue tab 5. Rotate and latch the release lever. A-61591 / Part#9E8651 January 2008 13 2. Insert the printer cartridge in the maintenance station as shown. Rotate the release lever on the carrier. 4. Close the blue tab and slide the carrier back into the maintenance station. 6.
User Guide
Page 16
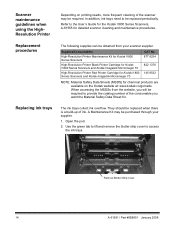
.... Supplies/Consumables High-Resolution Printer Maintenance Kit for Kodak i1800 Series Scanners High-Resolution Printer Black Printer Cartridge for Kodak i1800 Series Scanners and Kodak Imagelink Microimager 70 High-Resolution Printer Red Printer Cartridge for Kodak i1800 Series Scanners and Kodak Imagelink Microimager 70 CAT No. 877 6254 822 1376 145 6532 NOTE: Material Safety Data Sheets (MSDS) for chemical products are available on printing needs, more frequent cleaning of the scanner may be required to the User's Guide...
.... Supplies/Consumables High-Resolution Printer Maintenance Kit for Kodak i1800 Series Scanners High-Resolution Printer Black Printer Cartridge for Kodak i1800 Series Scanners and Kodak Imagelink Microimager 70 High-Resolution Printer Red Printer Cartridge for Kodak i1800 Series Scanners and Kodak Imagelink Microimager 70 CAT No. 877 6254 822 1376 145 6532 NOTE: Material Safety Data Sheets (MSDS) for chemical products are available on printing needs, more frequent cleaning of the scanner may be required to the User's Guide...
User Guide
Page 17
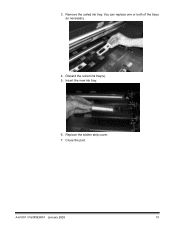
Discard the soiled ink tray(s). 5. Insert the new ink tray. 6. Replace the blotter strip cover. 7. You can replace one or both of the trays as necessary. 4. Close the pod. A-61591 / Part#9E8651 January 2008 15 3. Remove the soiled ink tray.
Discard the soiled ink tray(s). 5. Insert the new ink tray. 6. Replace the blotter strip cover. 7. You can replace one or both of the trays as necessary. 4. Close the pod. A-61591 / Part#9E8651 January 2008 15 3. Remove the soiled ink tray.
User Guide
Page 18
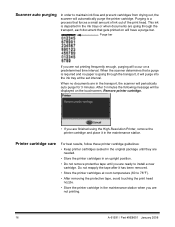
... the printer cartridge in the maintenance station when you are in an upright position. • Do not remove protective tape until you are not printing frequently enough, purging will occur on will automatically purge the printer cartridge. When no paper is a process that gets printed on a predetermined time interval. When the scanner determines that a purge is required and no documents are...
... the printer cartridge in the maintenance station when you are in an upright position. • Do not remove protective tape until you are not printing frequently enough, purging will occur on will automatically purge the printer cartridge. When no paper is a process that gets printed on a predetermined time interval. When the scanner determines that a purge is required and no documents are...

User Guide
Page 19
..., ink can dry on your hands and clothing, use the recommended printing supplies. Using a damp swab, dab (do not wipe) the print head. Remove the printer cartridge from the carrier. 2. Continue to the swab, replace the printer cartridge. A-61591 / Part#9E8651 January 2008 17 Hold the printer cartridge with the print head facing down. 3. Cleaning the print head may remove the dried ink and improve...
..., ink can dry on your hands and clothing, use the recommended printing supplies. Using a damp swab, dab (do not wipe) the print head. Remove the printer cartridge from the carrier. 2. Continue to the swab, replace the printer cartridge. A-61591 / Part#9E8651 January 2008 17 Hold the printer cartridge with the print head facing down. 3. Cleaning the print head may remove the dried ink and improve...
User Guide
Page 20
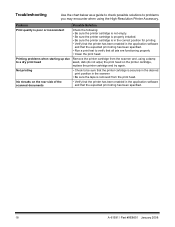
... Printer Accessory. Printing problems when starting up due Remove the printer cartridge from the print head. Not printing • Check to verify that all jets are functioning properly • Clean the print head. Troubleshooting Use the chart below as a guide to check possible solutions to problems you may encounter when using a damp to a dry print head swab, dab (do not wipe) the print head on the rear side of the scanned documents...
... Printer Accessory. Printing problems when starting up due Remove the printer cartridge from the print head. Not printing • Check to verify that all jets are functioning properly • Clean the print head. Troubleshooting Use the chart below as a guide to check possible solutions to problems you may encounter when using a damp to a dry print head swab, dab (do not wipe) the print head on the rear side of the scanned documents...

User Guide
Page 21
... the printer cartridge is properly installed. • Be sure the printer cartridge is removed from the scanner and, using the High Resolution Printer Accessory. Troubleshooting Use the chart below as a guide to check possible solutions to problems you may encounter when using a damp to a dry print head swab, dab (do not wipe) the print head on the rear side of the scanned documents • Verify that the printer has...
... the printer cartridge is properly installed. • Be sure the printer cartridge is removed from the scanner and, using the High Resolution Printer Accessory. Troubleshooting Use the chart below as a guide to check possible solutions to problems you may encounter when using a damp to a dry print head swab, dab (do not wipe) the print head on the rear side of the scanned documents • Verify that the printer has...


