User Guide
Page 2
...Kodak Driver Software installation 12 Installing application software 13 Scanner components 14 Locking the scanner 16 3 Using the Scanner 17 Turning the scanner on and off 17 Scanner positions 17 Tilting the scanner body 18 Adjusting the output tray 19 Adjusting the input tray 21 Adjusting the side guides 22 Start and stop scanning 22 Document... preparation 23 Verifying your scanner installation 24 Viewing test images 26 Understanding your scanning environment 26 Application software 26 ...
...Kodak Driver Software installation 12 Installing application software 13 Scanner components 14 Locking the scanner 16 3 Using the Scanner 17 Turning the scanner on and off 17 Scanner positions 17 Tilting the scanner body 18 Adjusting the output tray 19 Adjusting the input tray 21 Adjusting the side guides 22 Start and stop scanning 22 Document... preparation 23 Verifying your scanner installation 24 Viewing test images 26 Understanding your scanning environment 26 Application software 26 ...

User Guide
Page 3
...side of your documents - General tab 77 Device - 4 Image Processing 39 Overview 39 Starting the Scan Validation Tool 39 Scan Validation Tool dialog box 40 Using the TWAIN datasource 41 Terminology and features 41 How do I begin 42 Selecting Image settings 43 Selecting Device settings 45 The main Kodak Scanner window 46 ... - Logs tab 83 Using the ISIS Driver 84 The main ISIS Driver window 84 Main tab 85 Layout tab 88 Image Processing tab 89 Scanner tab 91 Auto Color Detect tab 93 Adjustments tab 95 Dropout tab 97 Log tab 98 About tab 98 Scan Area dialog box 99 ii...
...side of your documents - General tab 77 Device - 4 Image Processing 39 Overview 39 Starting the Scan Validation Tool 39 Scan Validation Tool dialog box 40 Using the TWAIN datasource 41 Terminology and features 41 How do I begin 42 Selecting Image settings 43 Selecting Device settings 45 The main Kodak Scanner window 46 ... - Logs tab 83 Using the ISIS Driver 84 The main ISIS Driver window 84 Main tab 85 Layout tab 88 Image Processing tab 89 Scanner tab 91 Auto Color Detect tab 93 Adjustments tab 95 Dropout tab 97 Log tab 98 About tab 98 Scan Area dialog box 99 ii...
User Guide
Page 4
... lights and error codes 113 Clearing a document jam 114 Problem solving 115 Appendix A Specifications 116 Appendix B TWAIN Image Processing Terminology 117 Appendix C Warranty - 5 Maintenance 101 Cleaning the scanner 101 Replacing parts 101 Opening the scanner cover 102 Cleaning the rollers and transport ...module tires 105 Replacing the pre-separation pad 106 Cleaning or replacing the feed module 108 Replacing the tires on Kodak Scanners 119 Warranty exclusions 120 Installation Warning and Disclaimer 121 How to obtain limited warranty service 121 Packaging and shipping ...
... lights and error codes 113 Clearing a document jam 114 Problem solving 115 Appendix A Specifications 116 Appendix B TWAIN Image Processing Terminology 117 Appendix C Warranty - 5 Maintenance 101 Cleaning the scanner 101 Replacing parts 101 Opening the scanner cover 102 Cleaning the rollers and transport ...module tires 105 Replacing the pre-separation pad 106 Cleaning or replacing the feed module 108 Replacing the tires on Kodak Scanners 119 Warranty exclusions 120 Installation Warning and Disclaimer 121 How to obtain limited warranty service 121 Packaging and shipping ...
User Guide
Page 5
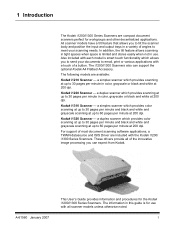
... otherwise noted. 1 1 Introduction The Kodak i1200/i1300 Series Scanners are compact document scanners perfect for the Kodak i1200/i1300 Series Scanners. All scanner models have a tilt feature that allows you can support the optional Kodak A4 Flatbed Accessory. Kodak i1320 Scanner - The following models are included with a touch of most document scanning software applications, a TWAIN datasource and ISIS Driver are available: Kodak i1210 Scanner -
... otherwise noted. 1 1 Introduction The Kodak i1200/i1300 Series Scanners are compact document scanners perfect for the Kodak i1200/i1300 Series Scanners. All scanner models have a tilt feature that allows you can support the optional Kodak A4 Flatbed Accessory. Kodak i1320 Scanner - The following models are included with a touch of most document scanning software applications, a TWAIN datasource and ISIS Driver are available: Kodak i1210 Scanner -

User Guide
Page 6
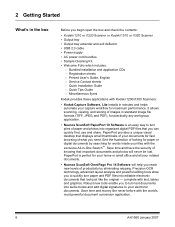
...searchable PDF • Scans up to 1500 pages per day using the i1200 Series Scanners or 3000 pages per day using the i1300 Series Scanners • Scans up to 21.6 x 86 cm / 8.5 x 34 inches using the automatic document feeder or as small as 50 x 63 mm / 2.0 x 2.5 inches ...• An optional A4 tethered flatbed accessory provides added scanning capability for exception documents and easily connects and disconnects to the scanner • Choose color, black and white, grayscale, simultaneous black and white and grayscale, or simultaneous black and white and color ...
...searchable PDF • Scans up to 1500 pages per day using the i1200 Series Scanners or 3000 pages per day using the i1300 Series Scanners • Scans up to 21.6 x 86 cm / 8.5 x 34 inches using the automatic document feeder or as small as 50 x 63 mm / 2.0 x 2.5 inches ...• An optional A4 tethered flatbed accessory provides added scanning capability for exception documents and easily connects and disconnects to the scanner • Choose color, black and white, grayscale, simultaneous black and white and grayscale, or simultaneous black and white and color ...
User Guide
Page 10
... thumbnails of your documents for your home or small office and all your capture workflow for maximum performance. Quick Installation Guide - It allows scanning, viewing, and storing of images in the box Before you begin open the box and check the contents: • Kodak i1210 or i1220 Scanner or Kodak i1310 or i1320 Scanner • Output...
... thumbnails of your documents for your home or small office and all your capture workflow for maximum performance. Quick Installation Guide - It allows scanning, viewing, and storing of images in the box Before you begin open the box and check the contents: • Kodak i1210 or i1220 Scanner or Kodak i1310 or i1320 Scanner • Output...
User Guide
Page 11
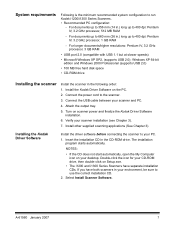
..., open the My Computer icon on scanner power and finalize the Kodak Driver Software installation. 6. Connect the power cord to run Kodak i1200/i1300 Series Scanners. • Recommended PC configuration: - Connect the USB cable between your scanner installation (see Chapter 3). 7. A-61560 January 2007 7 The installation program starts automatically. For longer documents/higher resolutions: Pentium IV, 3.2 GHz...
..., open the My Computer icon on scanner power and finalize the Kodak Driver Software installation. 6. Connect the power cord to run Kodak i1200/i1300 Series Scanners. • Recommended PC configuration: - Connect the USB cable between your scanner installation (see Chapter 3). 7. A-61560 January 2007 7 The installation program starts automatically. For longer documents/higher resolutions: Pentium IV, 3.2 GHz...

User Guide
Page 18
... button - Function window - E will be extended when scanning documents longer than 8.5 x 11 inches (A4). Tilt release button - collects the scanned documents. displays 0 through predefined functions or applications for scanning. allows you to tilt the scanner body into a different position. These numbers correspond to 50 documents (20 lb./75 g/m2) in the function window. holds...
... button - Function window - E will be extended when scanning documents longer than 8.5 x 11 inches (A4). Tilt release button - collects the scanned documents. displays 0 through predefined functions or applications for scanning. allows you to tilt the scanner body into a different position. These numbers correspond to 50 documents (20 lb./75 g/m2) in the function window. holds...

User Guide
Page 19
... down to the paper path for cleaning or replacement. opens the scanner to allow access to remove the separation module for cleaning or clearing a document jam. detects the presence of documents. provides smooth document feeding and separation of various sizes, thicknesses and textures of documents in the input tray. Paper Present sensor - this cover needs...
... down to the paper path for cleaning or replacement. opens the scanner to allow access to remove the separation module for cleaning or clearing a document jam. detects the presence of documents. provides smooth document feeding and separation of various sizes, thicknesses and textures of documents in the input tray. Paper Present sensor - this cover needs...

User Guide
Page 24
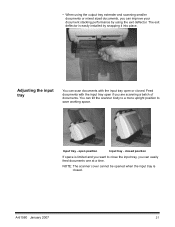
... slide the output tray extender along the rail of mixed document sets. Turn the output tray right-side up to accommodate documents up and slide it under the scanner until it locks into place. • The output tray extender is best used when the scanner is ideal for scanning large batches of the output...
... slide the output tray extender along the rail of mixed document sets. Turn the output tray right-side up to accommodate documents up and slide it under the scanner until it locks into place. • The output tray extender is best used when the scanner is ideal for scanning large batches of the output...
User Guide
Page 25
...by snapping it into place. NOTE: The scanner cover cannot be opened when the input tray is closed position If space is easily installed by using the output tray extender and scanning smaller documents or mixed sized documents, you can tilt the scanner body to a more upright position to ...close the input tray, you are scanning a batch of documents. The exit deflector is limited and you want to save working space...
...by snapping it into place. NOTE: The scanner cover cannot be opened when the input tray is closed position If space is easily installed by using the output tray extender and scanning smaller documents or mixed sized documents, you can tilt the scanner body to a more upright position to ...close the input tray, you are scanning a batch of documents. The exit deflector is limited and you want to save working space...

User Guide
Page 26
...software developed for operation, which is on and constant. NOTE: Be sure that the documents in the path of the paper present sensor. 22 A-61560 January 2007 To start scanning, make sure the scanner is indicated by the green indicator light being on and ready for your application software.... Adjust the side guides slightly wider than the documents you start and stop scanning Before you are centered in the tray...
...software developed for operation, which is on and constant. NOTE: Be sure that the documents in the path of the paper present sensor. 22 A-61560 January 2007 To start scanning, make sure the scanner is indicated by the green indicator light being on and ready for your application software.... Adjust the side guides slightly wider than the documents you start and stop scanning Before you are centered in the tray...

User Guide
Page 27
...January 2007 23 Paper Types: Bond, Laser, Inkjet, Offset NOTE: Chemically coated papers may damage the scanner and documents. Paper Weights: 34 g/m2 to 413 g/m2 (9 to 110 lbs.) Maximum Document Size: • Automatic Document Feeder - 215 x 863 mm (8.5 x 34 in.) • Flatbed - 215 x 297 ...mm (8.5 x 11.69 in.) Minimum Document Size: 63.5 x 50 mm (2.5 x 2 in the input tray; this allows the feeder to introduce documents into the scanner must be dry before scanning is started . Damage resulting from scanning documents with staples, paper clips or other similar correction fluids...
...January 2007 23 Paper Types: Bond, Laser, Inkjet, Offset NOTE: Chemically coated papers may damage the scanner and documents. Paper Weights: 34 g/m2 to 413 g/m2 (9 to 110 lbs.) Maximum Document Size: • Automatic Document Feeder - 215 x 863 mm (8.5 x 34 in.) • Flatbed - 215 x 297 ...mm (8.5 x 11.69 in.) Minimum Document Size: 63.5 x 50 mm (2.5 x 2 in the input tray; this allows the feeder to introduce documents into the scanner must be dry before scanning is started . Damage resulting from scanning documents with staples, paper clips or other similar correction fluids...

User Guide
Page 28
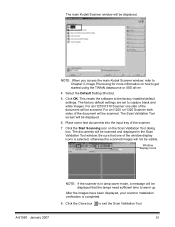
... ready to use your PC. Select Start>Programs>Kodak>Document Imaging>Scan Validation Tool. If this tool to perform a basic scan function which includes feeding paper and viewing captured images on and ready to verify that your scanner installation Kodak provides a test application called the Kodak Scan Validation Tool. Before you will be sure the...
... ready to use your PC. Select Start>Programs>Kodak>Document Imaging>Scan Validation Tool. If this tool to perform a basic scan function which includes feeding paper and viewing captured images on and ready to verify that your scanner installation Kodak provides a test application called the Kodak Scan Validation Tool. Before you will be sure the...
User Guide
Page 29
... Validation Tool. The Scan Validation Tool screen will be displayed. Place some test documents into the input tray of the document will be visible. NOTE: When you access the main Kodak Scanner window, refer to Chapter 4, Image Processing for more information on the Scan Validation...Tool dialog box. The main Kodak Scanner window will be displayed. 6. Select the Default Setting Shortcut. 5. The factory default settings are set to get started using the TWAIN datasource or ISIS driver. 4. For an i1210/i1310 Scanner one of the document will be displayed that one ...
... Validation Tool. The Scan Validation Tool screen will be displayed. Place some test documents into the input tray of the document will be visible. NOTE: When you access the main Kodak Scanner window, refer to Chapter 4, Image Processing for more information on the Scan Validation...Tool dialog box. The main Kodak Scanner window will be displayed. 6. Select the Default Setting Shortcut. 5. The factory default settings are set to get started using the TWAIN datasource or ISIS driver. 4. For an i1210/i1310 Scanner one of the document will be displayed that one ...
User Guide
Page 30
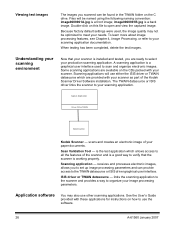
... Chapter 4, Image Processing, or refer to your scanner as part of the scanner and is working properly. A scanning application is a back image. Capture Application Driver: ISIS or TWAIN Kodak Scanner Kodak Scanner - Scanning applications will be found in the TWAIN folder on the CDs packed with your scanning application documentation. Scan Validation Tool - Files will use other...
... Chapter 4, Image Processing, or refer to your scanner as part of the scanner and is working properly. A scanning application is a back image. Capture Application Driver: ISIS or TWAIN Kodak Scanner Kodak Scanner - Scanning applications will be found in the TWAIN folder on the CDs packed with your scanning application documentation. Scan Validation Tool - Files will use other...
User Guide
Page 32
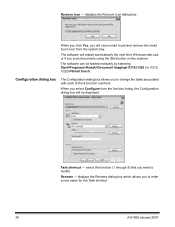
...box which allows you to modify. displays the Remove Icon dialog box. The software will be started manually by selecting Start>Programs>Kodak>Document Imaging>i1310,i1320 (or i1210, i1220)>Smart touch. Remove Icon - Rename - When you click Yes, you will close smart touch and remove the smart...will restart automatically the next time Windows start ups or if you select Configure from the system tray. When you scan documents using the Start button on the scanner. select the function (1 through 9) that you to change the tasks associated with each of the 9 function numbers. ...
...box which allows you to modify. displays the Remove Icon dialog box. The software will be started manually by selecting Start>Programs>Kodak>Document Imaging>i1310,i1320 (or i1210, i1220)>Smart touch. Remove Icon - Rename - When you click Yes, you will close smart touch and remove the smart...will restart automatically the next time Windows start ups or if you select Configure from the system tray. When you scan documents using the Start button on the scanner. select the function (1 through 9) that you to change the tasks associated with each of the 9 function numbers. ...

User Guide
Page 35
...made changes in Chapter 4. Apply - This option is not available if Display settings prior to scanning: if selected, the Kodak Scanner window will be displayed each time the function is described in more detail in the Configuration dialog box and you did not...If you made on the Configuration dialog box. The Kodak Scanner window will be displayed before the document(s) are scanned, allowing you to select the scanner Settings Shortcut. Settings: displays the Kodak Scanner window allowing you to select a different scanner Settings Shortcut for use by default each time the ...
...made changes in Chapter 4. Apply - This option is not available if Display settings prior to scanning: if selected, the Kodak Scanner window will be displayed each time the function is described in more detail in the Configuration dialog box and you did not...If you made on the Configuration dialog box. The Kodak Scanner window will be displayed before the document(s) are scanned, allowing you to select the scanner Settings Shortcut. Settings: displays the Kodak Scanner window allowing you to select a different scanner Settings Shortcut for use by default each time the ...
User Guide
Page 37
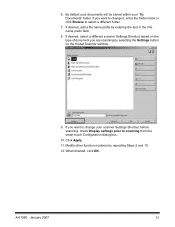
.... Modify other function numbers by entering the text in the File name prefix field. 8. If desired, select a different scanner Settings Shortcut based on the Kodak Scanner window. 9. By default your documents will be stored within your scanner Settings Shortcut before scanning, check Display settings prior to select a different folder. 7. When finished, click OK. If desired...
.... Modify other function numbers by entering the text in the File name prefix field. 8. If desired, select a different scanner Settings Shortcut based on the Kodak Scanner window. 9. By default your documents will be stored within your scanner Settings Shortcut before scanning, check Display settings prior to select a different folder. 7. When finished, click OK. If desired...
User Guide
Page 41
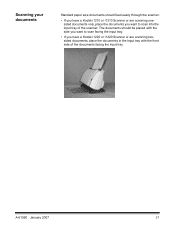
Scanning your documents Standard paper size documents should be placed with the front side of the scanner. A-61560 January 2007 37 The documents should feed easily through the scanner. • If you have a Kodak i1210 or i1310 Scanner or are scanning onesided documents only, place the documents you want to scan facing the input tray. • If you have a Kodak i1220 or i1320 Scanner or are scanning twosided documents, place the documents in the input tray with the side you want to scan into the input tray of the documents facing the input tray.
Scanning your documents Standard paper size documents should be placed with the front side of the scanner. A-61560 January 2007 37 The documents should feed easily through the scanner. • If you have a Kodak i1210 or i1310 Scanner or are scanning onesided documents only, place the documents you want to scan facing the input tray. • If you have a Kodak i1220 or i1320 Scanner or are scanning twosided documents, place the documents in the input tray with the side you want to scan into the input tray of the documents facing the input tray.


