
User Manual
Page 3
... network settings ...5 Configuring a wireless network connection ...5 Setting up an IP address...9 Verifying the network configuration...9 Printing the network configuration ...10 Installing your printer on additional computers on the network 10 Connecting to another KODAK All-in-One Printer 10 Adding a network connection to a USB-connected computer 11 For WINDOWS OS-based computers...11 For MACINTOSH...
... network settings ...5 Configuring a wireless network connection ...5 Setting up an IP address...9 Verifying the network configuration...9 Printing the network configuration ...10 Installing your printer on additional computers on the network 10 Connecting to another KODAK All-in-One Printer 10 Adding a network connection to a USB-connected computer 11 For WINDOWS OS-based computers...11 For MACINTOSH...
User Manual
Page 4
...Scanning multiple pictures with a MACINTOSH Computer 28 7 Maintaining Your Printer General care and cleaning...29 Cleaning the scanner glass ...30... ink cartridges...32 Replacing the printhead ...35 Upgrading the printer software and firmware ...39 Upgrading software and firmware on ... and firmware on a MACINTOSH Computer 39 Monitoring and adjusting printer performance ...40 Checking ink levels...40 Resetting factory defaults ...9 Product and Safety Specifications Specifications and features ...44 Print performance ...44 Photo printing features ...44 Copy document features ...45 Copy photo features...
...Scanning multiple pictures with a MACINTOSH Computer 28 7 Maintaining Your Printer General care and cleaning...29 Cleaning the scanner glass ...30... ink cartridges...32 Replacing the printhead ...35 Upgrading the printer software and firmware ...39 Upgrading software and firmware on ... and firmware on a MACINTOSH Computer 39 Monitoring and adjusting printer performance ...40 Checking ink levels...40 Resetting factory defaults ...9 Product and Safety Specifications Specifications and features ...44 Print performance ...44 Photo printing features ...44 Copy document features ...45 Copy photo features...

User Manual
Page 6
1 Printer Overview This printer lets you access the printer over a wireless (Wi-Fi) network. Components 1 2 34 56 7 Rotate Back Home MS SD/HC MMC 15 14 13 Rotate Back Home MS SD/HC MMC 8 ...12 11 10 9 1 Wi-Fi connectivity LED 2 Memory card slot 3 Control panel 4 LCD 5 USB port 6 Power cord connection port 7 Rear-access cleanout area 8 Printer access door 9 Printhead with ink cartridges installed 10 Right paper-edge guide 11 Paper tray 12 Paper tray extender / paper stop 13 Left paper-edge...
1 Printer Overview This printer lets you access the printer over a wireless (Wi-Fi) network. Components 1 2 34 56 7 Rotate Back Home MS SD/HC MMC 15 14 13 Rotate Back Home MS SD/HC MMC 8 ...12 11 10 9 1 Wi-Fi connectivity LED 2 Memory card slot 3 Control panel 4 LCD 5 USB port 6 Power cord connection port 7 Rear-access cleanout area 8 Printer access door 9 Printhead with ink cartridges installed 10 Right paper-edge guide 11 Paper tray 12 Paper tray extender / paper stop 13 Left paper-edge...
User Manual
Page 7
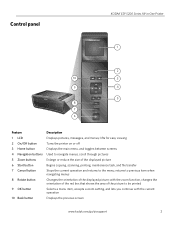
...when navigating menus Changes the orientation of the displayed picture; Control panel KODAK ESP 5200 Series All-in-One Printer ESP 5250 1 All-in-One-Printer 2 Back Home 10 3 9 OK 4 Rotate Back Home MS SD.../HC MMC 8 Zoom Rotate 5 Cancel 7 Start 6 Feature 1 LCD 2 On/Off button 3 Home button 4 Navigation buttons 5 Zoom buttons 6 Start button 7 Cancel button 8 Rotate button 9 OK button 10 Back button Description Displays pictures, messages, and menus; returns to be printed...
...when navigating menus Changes the orientation of the displayed picture; Control panel KODAK ESP 5200 Series All-in-One Printer ESP 5250 1 All-in-One-Printer 2 Back Home 10 3 9 OK 4 Rotate Back Home MS SD.../HC MMC 8 Zoom Rotate 5 Cancel 7 Start 6 Feature 1 LCD 2 On/Off button 3 Home button 4 Navigation buttons 5 Zoom buttons 6 Start button 7 Cancel button 8 Rotate button 9 OK button 10 Back button Description Displays pictures, messages, and menus; returns to be printed...
User Manual
Page 8
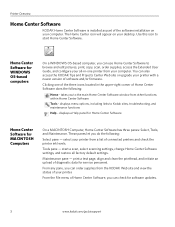
...Home Center Software. From the File menu of Home Center Software, you do the following : Home - Clicking one printer from your printer. takes you can also access the KODAK Tips and Projects Center Web site or upgrade your computer. These panes let you can use Home Center Software to... within Home Center Software Tools - You can order supplies from the KODAK Web site and view the status of your computer. select your desktop. Maintenance pane - From any pane, you to browse and edit pictures, print, copy, scan, order supplies, access the Extended User Guide, and...
...Home Center Software. From the File menu of Home Center Software, you do the following : Home - Clicking one printer from your printer. takes you can also access the KODAK Tips and Projects Center Web site or upgrade your computer. These panes let you can use Home Center Software to... within Home Center Software Tools - You can order supplies from the KODAK Web site and view the status of your computer. select your desktop. Maintenance pane - From any pane, you to browse and edit pictures, print, copy, scan, order supplies, access the Extended User Guide, and...
User Manual
Page 9
... hour increments). Press to 4 hours in Home Center Software. Press Back. * You can also synchronize the printer's date and time to your network settings. Press or to select one of selecting the Language and Country/Region. If you select On, when you are done. • Time to...from 1 to select On or Off. Press to Low Power - press OK when you are printing pictures, the printer LCD prompts you to verify that you want to configure or change basic printer settings: 1. KODAK Digital Cameras use different terminology; After the Time to select a language, then press OK. &#...
... hour increments). Press to 4 hours in Home Center Software. Press Back. * You can also synchronize the printer's date and time to your network settings. Press or to select one of selecting the Language and Country/Region. If you select On, when you are done. • Time to...from 1 to select On or Off. Press to Low Power - press OK when you are printing pictures, the printer LCD prompts you to verify that you want to configure or change basic printer settings: 1. KODAK Digital Cameras use different terminology; After the Time to select a language, then press OK. &#...
User Manual
Page 10
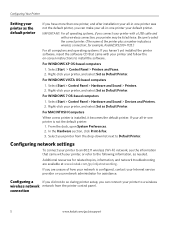
...Select Start > Control Panel > Hardware and Sound > Devices and Printers. 2. If your all-in-one printer your default printer. If you are available at www.kodak.com/go /aiosupport Be sure to select the correct printer. (The name of how your network is configured, contact your ... with a wireless connection, your printer may be listed twice. connection 5 www.kodak.com/go /inkjetnetworking. for assistance. Right-click your printer, and select Set as needed. Right-click your printer, and select Set as Default Printer. In the Hardware section, click Print & Fax. 3. Additional resources for...
...Select Start > Control Panel > Hardware and Sound > Devices and Printers. 2. If your all-in-one printer your default printer. If you are available at www.kodak.com/go /aiosupport Be sure to select the correct printer. (The name of how your network is configured, contact your ... with a wireless connection, your printer may be listed twice. connection 5 www.kodak.com/go /inkjetnetworking. for assistance. Right-click your printer, and select Set as needed. Right-click your printer, and select Set as Default Printer. In the Hardware section, click Print & Fax. 3. Additional resources for...
User Manual
Page 15
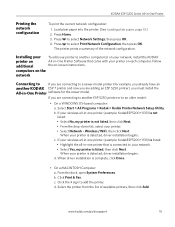
... model. From the dock, open System Preferences. KODAK ESP 5200 Series All-in -One Printer software for example, you already have an another KODAK ESP 7 printer and now you must install the All-in -One Printer Printing the network configuration To print the current network configuration: 1. Installing your To add your wireless all -in-one printer (example: KodakESP5200+1133) is not listed: •...
... model. From the dock, open System Preferences. KODAK ESP 5200 Series All-in -One Printer software for example, you already have an another KODAK ESP 7 printer and now you must install the All-in -One Printer Printing the network configuration To print the current network configuration: 1. Installing your To add your wireless all -in-one printer (example: KodakESP5200+1133) is not listed: •...
User Manual
Page 16
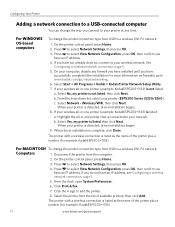
... OK. 3. Click Print & Fax. 7. b. Select Network - b. When your wireless all-in-one printer (example: KodakESP5200+1133) is listed: a. The printer with a wireless connection is complete, click Done. Configuring Your Printer Adding a network connection...Kodak > Kodak Printer Network Setup Utility. 7. If your network. Select No, my printer is listed as the name of the printer plus a number (for example, KodakESP5200+1133). c. Wireless/WiFi, then click Next. When your printer is connected to your printer (ESP5200 Series (5250/5260). Highlight the all -in -one printer...
... OK. 3. Click Print & Fax. 7. b. Select Network - b. When your wireless all-in-one printer (example: KodakESP5200+1133) is listed: a. The printer with a wireless connection is complete, click Done. Configuring Your Printer Adding a network connection...Kodak > Kodak Printer Network Setup Utility. 7. If your network. Select No, my printer is listed as the name of the printer plus a number (for example, KodakESP5200+1133). c. Wireless/WiFi, then click Next. When your printer is connected to your printer (ESP5200 Series (5250/5260). Highlight the all -in -one printer...
User Manual
Page 17
... B5 (6.93 x 9.48 in. / 176 x 250 mm) NOTE: Do not load paper smaller than 4 x 6 in . all inkjet varieties on 8.5 x 11-in -One Printers. For the best document printing results, use : • Plain paper - 20 to 24 lb / 75 to 90 gsm • Photo paper - most standard types • Transparencies - When handling...; all inkjet varieties on 8.5 x 11-in . / 101 x 152 mm or A6. 3 Handling Paper Paper types Paper sizes For the best photo printing results, use KODAK Photo Papers, which are optimized to work with white stripe • Labels - Use only paper that is designed for inkjet...
... B5 (6.93 x 9.48 in. / 176 x 250 mm) NOTE: Do not load paper smaller than 4 x 6 in . all inkjet varieties on 8.5 x 11-in -One Printers. For the best document printing results, use : • Plain paper - 20 to 24 lb / 75 to 90 gsm • Photo paper - most standard types • Transparencies - When handling...; all inkjet varieties on 8.5 x 11-in . / 101 x 152 mm or A6. 3 Handling Paper Paper types Paper sizes For the best photo printing results, use KODAK Photo Papers, which are optimized to work with white stripe • Labels - Use only paper that is designed for inkjet...

User Manual
Page 21
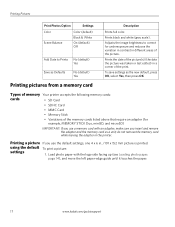
... card inserted into the printer. Press Home. 2. To change print photos options: 1. The fastest print speed. 4 Printing Pictures The quickest way to change the settings below. prints faster than the paper in the paper tray, the printer automatically arranges the pictures to PC -- The highest quality. Press or as the default. www.kodak.com/go/aiosupport 16...
... card inserted into the printer. Press Home. 2. To change print photos options: 1. The fastest print speed. 4 Printing Pictures The quickest way to change the settings below. prints faster than the paper in the paper tray, the printer automatically arranges the pictures to PC -- The highest quality. Press or as the default. www.kodak.com/go/aiosupport 16...
User Manual
Page 22
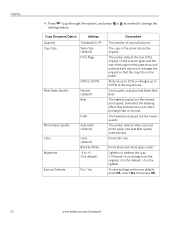
...logo side facing up (see Loading photo paper, page 14), and move the left paper-edge guide until it touches the paper. 17 www.kodak.com/go/aiosupport Prints the date of the picture(s) (the date the picture was taken or last edited) in different areas of the... color. Load photo paper with an adapter, make sure you use the default settings, one 4 x 6 in the printer. Prints black and white (gray scale). Printing Pictures Print Photos Option Settings Color Scene Balance Color (default) Black & White On (default) Off Add Date to correct for example, MEMORY STICK Duo, miniSD, and ...
...logo side facing up (see Loading photo paper, page 14), and move the left paper-edge guide until it touches the paper. 17 www.kodak.com/go/aiosupport Prints the date of the picture(s) (the date the picture was taken or last edited) in different areas of the... color. Load photo paper with an adapter, make sure you use the default settings, one 4 x 6 in the printer. Prints black and white (gray scale). Printing Pictures Print Photos Option Settings Color Scene Balance Color (default) Black & White On (default) Off Add Date to correct for example, MEMORY STICK Duo, miniSD, and ...
User Manual
Page 23
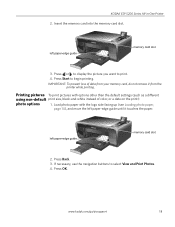
Press OK. KODAK ESP 5200 Series All-in-One Printer 2. Press or to display the picture you want to select View and Print Photos. 4. Printing pictures To print pictures with the logo side facing up (see Loading photo paper, page 14), and move the left paper-edge guide Rotate ...Back Home MS SD/HC MMC memory card slot 2. If necessary, use the navigation buttons to print. 4. www.kodak.com/go/aiosupport 18 Press Back. 3. left paper-edge guide until it from the printer while printing. Insert the memory card into the memory card slot. Press Start to begin...
Press OK. KODAK ESP 5200 Series All-in-One Printer 2. Press or to display the picture you want to select View and Print Photos. 4. Printing pictures To print pictures with the logo side facing up (see Loading photo paper, page 14), and move the left paper-edge guide Rotate ...Back Home MS SD/HC MMC memory card slot 2. If necessary, use the navigation buttons to print. 4. www.kodak.com/go/aiosupport 18 Press Back. 3. left paper-edge guide until it from the printer while printing. Insert the memory card into the memory card slot. Press Start to begin...

User Manual
Page 24
... do not remove it touches the paper. 19 www.kodak.com/go/aiosupport Insert the memory card into the memory card slot. 10. A check mark on the LCD indicates the picture is recognized by the tag from the printer while printing. NOTE: To deselect the picture, press OK again. ...or "mark") pictures on your camera user guide to change . 8. Press or to print, then press OK. NOTE: Refer to your printer (unless otherwise specified by the printer. Some digital cameras let you want to begin printing. If you are done selecting pictures, press Start to change the selection. 7. Load...
... do not remove it touches the paper. 19 www.kodak.com/go/aiosupport Insert the memory card into the memory card slot. 10. A check mark on the LCD indicates the picture is recognized by the tag from the printer while printing. NOTE: To deselect the picture, press OK again. ...or "mark") pictures on your camera user guide to change . 8. Press or to print, then press OK. NOTE: Refer to your printer (unless otherwise specified by the printer. Some digital cameras let you want to begin printing. If you are done selecting pictures, press Start to change the selection. 7. Load...
User Manual
Page 25
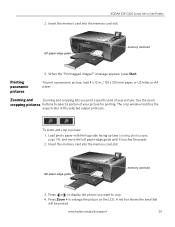
...Print tagged images?" Printing panoramic pictures To print a panoramic picture, load 4 x 12 in -One Printer 2. To zoom and crop a picture: 1. Press or to display the picture you print a specific part of the selected output print size. message appears, press Start. Zooming and Zooming and cropping lets you want to enlarge the picture on the LCD. www.kodak...-edge guide until it touches the paper. 2. KODAK ESP 5200 Series All-in . / 101 x 305 mm paper, or US letter or A4 paper. A red box shows the area that will be printed. Insert the memory card into the memory card ...
...Print tagged images?" Printing panoramic pictures To print a panoramic picture, load 4 x 12 in -One Printer 2. To zoom and crop a picture: 1. Press or to display the picture you print a specific part of the selected output print size. message appears, press Start. Zooming and Zooming and cropping lets you want to enlarge the picture on the LCD. www.kodak...-edge guide until it touches the paper. 2. KODAK ESP 5200 Series All-in . / 101 x 305 mm paper, or US letter or A4 paper. A red box shows the area that will be printed. Insert the memory card into the memory card ...
User Manual
Page 26
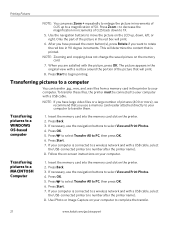
... 1. Press OK. 5. Follow the on-screen instructions on your computer to complete the transfer. 21 www.kodak.com/go/aiosupport If necessary, use the navigation buttons to select View and Print Photos. 4. Press Start. 7. When you have large video files or a large number of the picture ... the picture in the red box will determine the content that is connected to begin printing. If your computer with a USB cable, select the USB-connected printer (no number after the printer name). 8. This will print. 6. Press Zoom - Only the part of 5X. Press to select Transfer All to...
... 1. Press OK. 5. Follow the on-screen instructions on your computer to complete the transfer. 21 www.kodak.com/go/aiosupport If necessary, use the navigation buttons to select View and Print Photos. 4. Press Start. 7. When you have large video files or a large number of the picture ... the picture in the red box will determine the content that is connected to begin printing. If your computer with a USB cable, select the USB-connected printer (no number after the printer name). 8. This will print. 6. Press Zoom - Only the part of 5X. Press to select Transfer All to...
User Manual
Page 28
...copy fits on the paper. The printer detects the size of the original on the scanner glass and the size of the paper in the paper tray, and automatically reduces or enlarges the original so that sometimes occurs when printing Draft or Normal. Prints black and white (gray scale)....to +3 (0 is default) Save as the new default: press OK, select Yes, then press OK. 23 www.kodak.com/go/aiosupport The printer detects when you load photo paper and sets Best quality automatically. Copying 4. The fastest print speed, but the slowest print speed; The highest quality, but the lowest quality...
...copy fits on the paper. The printer detects the size of the original on the scanner glass and the size of the paper in the paper tray, and automatically reduces or enlarges the original so that sometimes occurs when printing Draft or Normal. Prints black and white (gray scale)....to +3 (0 is default) Save as the new default: press OK, select Yes, then press OK. 23 www.kodak.com/go/aiosupport The printer detects when you load photo paper and sets Best quality automatically. Copying 4. The fastest print speed, but the slowest print speed; The highest quality, but the lowest quality...
User Manual
Page 29
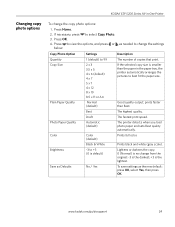
...darkest; +3 is smaller than Best. If necessary, press 3. to +3 (0 is default) No / Yes Prints black and white (gray scale). prints faster than the paper in -One Printer Changing copy photo options To change the settings Copy Photo Option Settings Description Quantity Copy Size Plain Paper Quality ...Best The number of copies that print. Brightness Save as Defaults Black & White -3 to select Copy Photo. 4. To save settings as needed to change the copy photo options: 1. KODAK ESP 5200 Series All-in the paper tray, the printer automatically arranges the pictures to best...
...darkest; +3 is smaller than Best. If necessary, press 3. to +3 (0 is default) No / Yes Prints black and white (gray scale). prints faster than the paper in -One Printer Changing copy photo options To change the settings Copy Photo Option Settings Description Quantity Copy Size Plain Paper Quality ...Best The number of copies that print. Brightness Save as Defaults Black & White -3 to select Copy Photo. 4. To save settings as needed to change the copy photo options: 1. KODAK ESP 5200 Series All-in the paper tray, the printer automatically arranges the pictures to best...
User Manual
Page 47
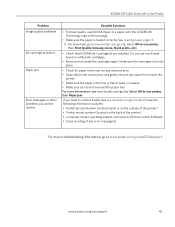
...kodak.com/go /esp5250support. www.kodak.com/go /itg. If you need to www.kodak.com/go /contact), have the following information available: • Kodak Service Number (located inside the printer. • Make sure the paper in the tray is loaded correctly. KODAK ESP 5200 Series All-in-One Printer...not overload the paper tray. Select All-in-one printer, then Print Quality (missing colors, blank prints, etc). • Check that KODAK Ink Cartridge(s) are installed. For more troubleshooting information, go to contact Kodak (see www.kodak.com/go /aiosupport 42 See Loading paper,...
...kodak.com/go /esp5250support. www.kodak.com/go /itg. If you need to www.kodak.com/go /contact), have the following information available: • Kodak Service Number (located inside the printer. • Make sure the paper in the tray is loaded correctly. KODAK ESP 5200 Series All-in-One Printer...not overload the paper tray. Select All-in-one printer, then Print Quality (missing colors, blank prints, etc). • Check that KODAK Ink Cartridge(s) are installed. For more troubleshooting information, go to contact Kodak (see www.kodak.com/go /aiosupport 42 See Loading paper,...
User Manual
Page 49
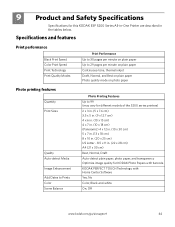
9 Product and Safety Specifications Specifications for this KODAK ESP 5200 Series All-in-One Printer are described in . (22 x 28 cm) A4 (21 x 30 cm) Best, Normal, Draft Auto-detect plain paper, photo paper, and transparency Optimize image quality for different models of the 5200 series printers) 2 x 3 in. (5 x 7.6 cm) 3.5 x 5 ... on photo paper Photo printing features Quantity Print Sizes Quality Auto-detect Media Image Enhancement Add Dates to Prints Color Scene Balance Photo Printing Features Up to 99 (may vary for KODAK Photo Papers with barcode KODAK PERFECT TOUCH Technology with Home...
9 Product and Safety Specifications Specifications for this KODAK ESP 5200 Series All-in-One Printer are described in . (22 x 28 cm) A4 (21 x 30 cm) Best, Normal, Draft Auto-detect plain paper, photo paper, and transparency Optimize image quality for different models of the 5200 series printers) 2 x 3 in. (5 x 7.6 cm) 3.5 x 5 ... on photo paper Photo printing features Quantity Print Sizes Quality Auto-detect Media Image Enhancement Add Dates to Prints Color Scene Balance Photo Printing Features Up to 99 (may vary for KODAK Photo Papers with barcode KODAK PERFECT TOUCH Technology with Home...


