User Manual
Page 18
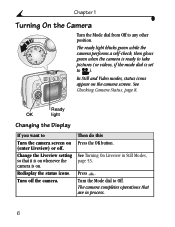
... to ). See Turning On Liveview in process. 6 Chapter 1 Turning On the Camera Turn the Mode dial from Off to Off. The ready light blinks green while the camera performs a self-check, then glows green when the camera is ready to take pictures (or videos, if the mode dial is on the... camera screen. The camera completes operations that it is on whenever the camera is set to Turn the camera screen on (enter ...
... to ). See Turning On Liveview in process. 6 Chapter 1 Turning On the Camera Turn the Mode dial from Off to Off. The ready light blinks green while the camera performs a self-check, then glows green when the camera is ready to take pictures (or videos, if the mode dial is on the... camera screen. The camera completes operations that it is on whenever the camera is set to Turn the camera screen on (enter ...

User Manual
Page 22
... . Do not insert or remove a card when the green ready light is partially ejected, pull it clicks. 3 Orient the card as shown on the card door. 4 Push the card into the slot to seat the connector. 5 Close the door. doing so may damage the camera or card. To remove the card, push it...SD cards at a dealer of internal memory. Chapter 1 Inserting an MMC/SD Card Your camera has 16 MB of Kodak products or www.kodak.com/go/cx6330accessories. 10 Notched corner To insert an MMC/SD card: 1 Turn off the camera. 2 Open the card door until it out. See page 95 for pictures and videos...
... . Do not insert or remove a card when the green ready light is partially ejected, pull it clicks. 3 Orient the card as shown on the card door. 4 Push the card into the slot to seat the connector. 5 Close the door. doing so may damage the camera or card. To remove the card, push it...SD cards at a dealer of internal memory. Chapter 1 Inserting an MMC/SD Card Your camera has 16 MB of Kodak products or www.kodak.com/go/cx6330accessories. 10 Notched corner To insert an MMC/SD card: 1 Turn off the camera. 2 Open the card door until it out. See page 95 for pictures and videos...
User Manual
Page 25
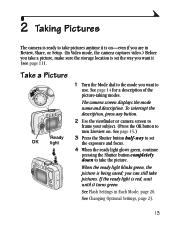
...Flash Settings in Review, Share, or Setup. (In Video mode, the camera captures video.) Before you take the picture. See page 15.) 3 Press the Shutter button half-way to set the exposure and focus. 4 When the ready light glows green, continue pressing the Shutter button completely down to take a picture, make .... 2 Use the viewfinder or camera screen to frame your subject. (Press the OK button to turn Liveview on -even if you are in Each Mode, page 20. 2 Taking Pictures The camera is ready to take pictures anytime it is on . When the ready light blinks green, the picture is red, wait...
...Flash Settings in Review, Share, or Setup. (In Video mode, the camera captures video.) Before you take the picture. See page 15.) 3 Press the Shutter button half-way to set the exposure and focus. 4 When the ready light glows green, continue pressing the Shutter button completely down to take a picture, make .... 2 Use the viewfinder or camera screen to frame your subject. (Press the OK button to turn Liveview on -even if you are in Each Mode, page 20. 2 Taking Pictures The camera is ready to take pictures anytime it is on . When the ready light blinks green, the picture is red, wait...
User Manual
Page 43
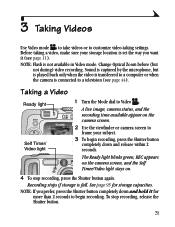
... when the video is transferred to a computer or when the camera is captured by the microphone, but not during) video recording. The Ready light blinks green, REC appears on the camera screen, and the Self Timer/Video light stays on the camera screen. 2 Use the viewfinder or camera screen to Video . Before taking settings. NOTE: If you...
... when the video is transferred to a computer or when the camera is captured by the microphone, but not during) video recording. The Ready light blinks green, REC appears on the camera screen, and the Self Timer/Video light stays on the camera screen. 2 Use the viewfinder or camera screen to Video . Before taking settings. NOTE: If you...
User Manual
Page 79
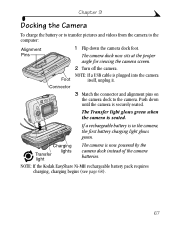
.... If a rechargeable battery is seated. Foot Connector 2 Turn off the camera. The Transfer light glows green when the camera is in the camera, the first battery charging light glows green. NOTE: If a USB cable is securely seated. Push down the camera dock foot. NOTE: If the Kodak EasyShare Ni-MH rechargeable battery pack requires charging, charging begins (see page 68...
.... If a rechargeable battery is seated. Foot Connector 2 Turn off the camera. The Transfer light glows green when the camera is in the camera, the first battery charging light glows green. NOTE: If a USB cable is securely seated. Push down the camera dock foot. NOTE: If the Kodak EasyShare Ni-MH rechargeable battery pack requires charging, charging begins (see page 68...
User Manual
Page 80
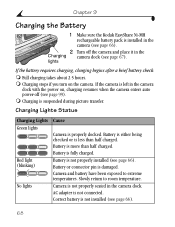
... not connected. AC adapter is damaged. Correct battery is installed in the camera (see page 66). 2 Turn off (see page 66). Chapter 9 Charging the Battery 1 Make sure the Kodak EasyShare Ni-MH rechargeable battery pack is not installed (see page 66). 68 ...than half charged. Charging Lights Status Charging Lights Green lights Red light (blinking) No lights Cause Camera is not properly installed (see page 99). If the camera is not properly seated in the camera dock with the power on the camera. Slowly return to extreme temperatures. lights If the battery requires ...
... not connected. AC adapter is damaged. Correct battery is installed in the camera (see page 66). 2 Turn off (see page 66). Chapter 9 Charging the Battery 1 Make sure the Kodak EasyShare Ni-MH rechargeable battery pack is not installed (see page 66). 68 ...than half charged. Charging Lights Status Charging Lights Green lights Red light (blinking) No lights Cause Camera is not properly installed (see page 99). If the camera is not properly seated in the camera dock with the power on the camera. Slowly return to extreme temperatures. lights If the battery requires ...

User Manual
Page 81
... resumes charging as necessary. Pictures are transferring. Kodak EasyShare software automatically opens on your computer (see page 57), you can transfer pictures and videos from your camera to your computer. 1 Turn off the camera and place it in the camera dock (page 67). The Transfer light blinks green while the pictures and videos are being transferred to...
... resumes charging as necessary. Pictures are transferring. Kodak EasyShare software automatically opens on your computer (see page 57), you can transfer pictures and videos from your camera to your computer. 1 Turn off the camera and place it in the camera dock (page 67). The Transfer light blinks green while the pictures and videos are being transferred to...
User Manual
Page 86
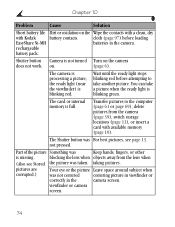
...camera does not work. The camera is blinking green. You can take another picture. not pressed. blocking the lens when objects away from the camera (page 39), switch storage locations (page 11), or insert a card with Kodak battery contacts. rechargeable battery pack. Transfer pictures to take a picture when the ready light...clean, dry with available memory (page 10). Wait until the ready light stops blinking red before loading EasyShare Ni-MH batteries in the camera screen. Shutter button Camera is blinking red. cloth (page 97) before attempting to the ...
...camera does not work. The camera is blinking green. You can take another picture. not pressed. blocking the lens when objects away from the camera (page 39), switch storage locations (page 11), or insert a card with Kodak battery contacts. rechargeable battery pack. Transfer pictures to take a picture when the ready light...clean, dry with available memory (page 10). Wait until the ready light stops blinking red before loading EasyShare Ni-MH batteries in the camera screen. Shutter button Camera is blinking red. cloth (page 97) before attempting to the ...

User Manual
Page 87
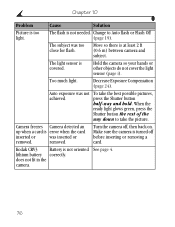
In Review mode, The picture has no more than 11.8 ft (3.6 m) between the camera and the subject; 6.9 ft (2.1 m) in front Use Fill flash (page 19) or change of a bright light your position so light is too far away for the flash to the computer (page 61 or page 69...delete the picture (page 39). Transfer the picture to have an effect. Turn on the camera screen. the subject. Not enough light. thumbnail. Increase Exposure Compensation (page 24). 75 When the ready light glows green, press the Shutter button the rest of a picture. The subject is thumbnail or an ...
In Review mode, The picture has no more than 11.8 ft (3.6 m) between the camera and the subject; 6.9 ft (2.1 m) in front Use Fill flash (page 19) or change of a bright light your position so light is too far away for the flash to the computer (page 61 or page 69...delete the picture (page 39). Transfer the picture to have an effect. Turn on the camera screen. the subject. Not enough light. thumbnail. Increase Exposure Compensation (page 24). 75 When the ready light glows green, press the Shutter button the rest of a picture. The subject is thumbnail or an ...
User Manual
Page 88
...Kodak CRV3 Battery is covered. The light sensor is not oriented See page 4. When the ready light glows green, press the Shutter button the rest of the way down to Auto flash or Flash Off light. (page 19). removed. does not fit in the camera. 76 Auto exposure was too close for flash. Turn the camera... pictures, achieved. The subject was not To take the picture. Too much light. Hold the camera so your hands or other objects do not cover the light sensor (page i). Make sure the camera is error when the card inserted or was inserted or removed. Move so ...
...Kodak CRV3 Battery is covered. The light sensor is not oriented See page 4. When the ready light glows green, press the Shutter button the rest of the way down to Auto flash or Flash Off light. (page 19). removed. does not fit in the camera. 76 Auto exposure was too close for flash. Turn the camera... pictures, achieved. The subject was not To take the picture. Too much light. Hold the camera so your hands or other objects do not cover the light sensor (page i). Make sure the camera is error when the card inserted or was inserted or removed. Move so ...

User Manual
Page 89
...subject mode. is dirty. The subject is too far Move so there is not clear. camera and the subject; 6.9 ft (2.1 m) in . Adjust the camera Video Out setting (NTSC or PAL, page 55). When the ready light glows green, press the Shutter button the rest of the way down to be 11.8 ft (3.6... m) between the camera and the subject, or at least 5.1 in. (13 cm) at least 23.6 in Telephoto. Subject or the camera Place the camera on external video device. To ...
...subject mode. is dirty. The subject is too far Move so there is not clear. camera and the subject; 6.9 ft (2.1 m) in . Adjust the camera Video Out setting (NTSC or PAL, page 55). When the ready light glows green, press the Shutter button the rest of the way down to be 11.8 ft (3.6... m) between the camera and the subject, or at least 5.1 in. (13 cm) at least 23.6 in Telephoto. Subject or the camera Place the camera on external video device. To ...
User Manual
Page 96
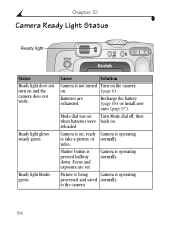
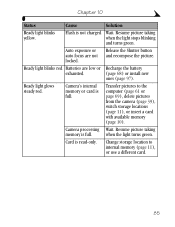
Cause Solution Camera is on . (page 6). Camera is not turned Turn on the camera on ; Shutter button is operating normally. Camera is pressed halfway down. Ready light blinks green. Picture is being Camera is operating to the camera. 84 Batteries are set. Focus and exposure are exhausted. Chapter 10 Camera Ready Light Status Ready light Status Ready light does not turn on . to...
Cause Solution Camera is on . (page 6). Camera is not turned Turn on the camera on ; Shutter button is operating normally. Camera is pressed halfway down. Ready light blinks green. Picture is being Camera is operating to the camera. 84 Batteries are set. Focus and exposure are exhausted. Chapter 10 Camera Ready Light Status Ready light Status Ready light does not turn on . to...
User Manual
Page 97
... recompose the picture. locked. Transfer pictures to internal memory (page 11), or use a different card. 85 when the light turns green. Flash is read-only. Wait. Chapter 10 Status Cause Solution Ready light blinks yellow. Camera's internal memory or card is full. Change storage location to the computer (page 61 or page 69), delete...
... recompose the picture. locked. Transfer pictures to internal memory (page 11), or use a different card. 85 when the light turns green. Flash is read-only. Wait. Chapter 10 Status Cause Solution Ready light blinks yellow. Camera's internal memory or card is full. Change storage location to the computer (page 61 or page 69), delete...


