User's Guide
Page 13
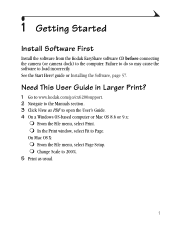
...in Larger Print? 1 Go to www.kodak.com/go/cx6200support. 2 Navigate to the Manuals section. 3 Click View as PDF to 200%. 5 Print as usual. 1 From the File menu, select Page Setup. ! On Mac OS X: ! guide or Installing the Software, page 57. Change Scale to open ... the Start Here! In the Print window, select Fit to load incorrectly. Failure to do so may cause the software to Page. 1 Getting Started Install Software First Install the software from the Kodak EasyShare software CD before connecting the camera (or camera dock) to the computer. From the File menu, select Print. !
...in Larger Print? 1 Go to www.kodak.com/go/cx6200support. 2 Navigate to the Manuals section. 3 Click View as PDF to 200%. 5 Print as usual. 1 From the File menu, select Page Setup. ! On Mac OS X: ! guide or Installing the Software, page 57. Change Scale to open ... the Start Here! In the Print window, select Fit to load incorrectly. Failure to do so may cause the software to Page. 1 Getting Started Install Software First Install the software from the Kodak EasyShare software CD before connecting the camera (or camera dock) to the computer. From the File menu, select Print. !

User's Guide
Page 14
.... (www.ofoto.com), or purchase an optional Kodak secure digital (SD) card or a Kodak multimedia card (MMC) and: ! Edit-Add special effects to enjoy point-and-shoot operation. Order prints online from the Kodak EasyShare software CD, then: Transfer-Transfer pictures and videos to any printer with an SD/MMC slot ! Automatically print to your camera functions.
.... (www.ofoto.com), or purchase an optional Kodak secure digital (SD) card or a Kodak multimedia card (MMC) and: ! Edit-Add special effects to enjoy point-and-shoot operation. Order prints online from the Kodak EasyShare software CD, then: Transfer-Transfer pictures and videos to any printer with an SD/MMC slot ! Automatically print to your camera functions.
User's Guide
Page 15
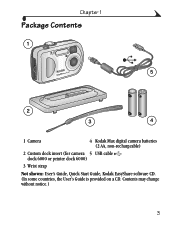
Contents may change without notice.) 3 Chapter 1 Package Contents 1 5 2 3 4 1 Camera 4 Kodak Max digital camera batteries (2 AA, non-rechargeable) 2 Custom dock insert (for camera 5 USB cable dock 6000 or printer dock 6000) 3 Wrist strap Not shown: User's Guide, Quick Start Guide, Kodak EasyShare software CD. (In some countries, the User's Guide is provided on a CD.
Contents may change without notice.) 3 Chapter 1 Package Contents 1 5 2 3 4 1 Camera 4 Kodak Max digital camera batteries (2 AA, non-rechargeable) 2 Custom dock insert (for camera 5 USB cable dock 6000 or printer dock 6000) 3 Wrist strap Not shown: User's Guide, Quick Start Guide, Kodak EasyShare software CD. (In some countries, the User's Guide is provided on a CD.
User's Guide
Page 20
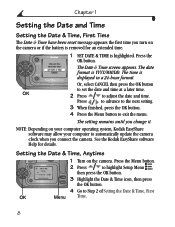
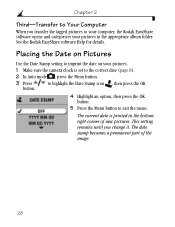
The setting remains until you connect the camera. NOTE: Depending on your computer operating system, Kodak EasyShare software may allow your computer to automatically update the camera clock when you change it. See the Kodak EasyShare software Help for an extended time. 1 SET DATE & TIME is highlighted. The Date & Time screen appears...Time Setting the Date & Time, First Time The Date & Time have been reset message appears the first time you turn on the camera or if the battery is removed for details. Press the OK button. OK 2 Press to Step 2 of Setting the Date & ...
The setting remains until you connect the camera. NOTE: Depending on your computer operating system, Kodak EasyShare software may allow your computer to automatically update the camera clock when you change it. See the Kodak EasyShare software Help for an extended time. 1 SET DATE & TIME is highlighted. The Date & Time screen appears...Time Setting the Date & Time, First Time The Date & Time have been reset message appears the first time you turn on the camera or if the battery is removed for details. Press the OK button. OK 2 Press to Step 2 of Setting the Date & ...

User's Guide
Page 39
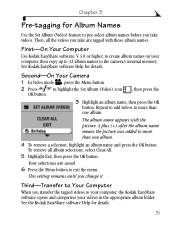
First-On Your Computer Use Kodak EasyShare software, V 3.0 or higher, to create album names on the screen. See Kodak EasyShare software Help for Album Names Use the Set Album (Still) feature to pre-select album names before you take are saved. A plus (+) after the album name means more than one album. Second-On Your Camera 1 In Auto mode...
First-On Your Computer Use Kodak EasyShare software, V 3.0 or higher, to create album names on the screen. See Kodak EasyShare software Help for Album Names Use the Set Album (Still) feature to pre-select album names before you take are saved. A plus (+) after the album name means more than one album. Second-On Your Camera 1 In Auto mode...
User's Guide
Page 40
... for details. This setting remains until you transfer the tagged pictures to your computer, the Kodak EasyShare software opens and categorizes your pictures. 1 Make sure the camera clock is printed in the appropriate album folder. The current date is set to the correct date (page 8). 2 In Auto mode , press the Menu button. 3 ...
... for details. This setting remains until you transfer the tagged pictures to your computer, the Kodak EasyShare software opens and categorizes your pictures. 1 Make sure the camera clock is printed in the appropriate album folder. The current date is set to the correct date (page 8). 2 In Auto mode , press the Menu button. 3 ...
User's Guide
Page 43
... button to exit the menu. The album name appears with those album names. See the Kodak EasyShare software Help for details. A plus (+) after the album name means the picture was added to the camera's internal memory. Third-Transfer to Your Computer When you transfer the tagged videos to your... computer, the Kodak EasyShare software opens and categorizes your computer, then copy up to 32 album names to more ...
... button to exit the menu. The album name appears with those album names. See the Kodak EasyShare software Help for details. A plus (+) after the album name means the picture was added to the camera's internal memory. Third-Transfer to Your Computer When you transfer the tagged videos to your... computer, the Kodak EasyShare software opens and categorizes your computer, then copy up to 32 album names to more ...
User's Guide
Page 52
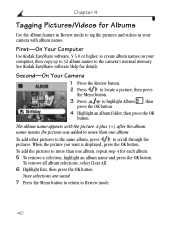
... feature in Review mode to tag the pictures and videos in your computer, then copy up to 32 album names to the camera's internal memory. See Kodak EasyShare software Help for each album. 5 To remove a selection, highlight an album name and press the OK button. To add other ...Clear All. 6 Highlight Exit, then press the OK button. Second-On Your Camera 1 Press the Review button. 2 Press to locate a picture, then press the Menu button. 3 Press to more than one album. First-On Your Computer Use Kodak EasyShare software, V 3.0 or higher, to more than one album, repeat step 4 for...
... feature in Review mode to tag the pictures and videos in your computer, then copy up to 32 album names to the camera's internal memory. See Kodak EasyShare software Help for each album. 5 To remove a selection, highlight an album name and press the OK button. To add other ...Clear All. 6 Highlight Exit, then press the OK button. Second-On Your Camera 1 Press the Review button. 2 Press to locate a picture, then press the Menu button. 3 Press to more than one album. First-On Your Computer Use Kodak EasyShare software, V 3.0 or higher, to more than one album, repeat step 4 for...

User's Guide
Page 53
...Transfer to Your Computer When you transfer the tagged pictures and videos to your computer, the Kodak EasyShare software opens and categorizes your pictures and videos on any external device, see page 43. See Kodak EasyShare software Help for 5 seconds. You can increase the display interval to up to 60 seconds. ...1 On the Slide Show menu, press to highlight Slide Show , then press the OK button. 3 Highlight Begin Show, then press the OK button. Then the camera returns to ...
...Transfer to Your Computer When you transfer the tagged pictures and videos to your computer, the Kodak EasyShare software opens and categorizes your pictures and videos on any external device, see page 43. See Kodak EasyShare software Help for 5 seconds. You can increase the display interval to up to 60 seconds. ...1 On the Slide Show menu, press to highlight Slide Show , then press the OK button. 3 Highlight Begin Show, then press the OK button. Then the camera returns to ...

User's Guide
Page 60
...The default quantity is applied to locate a picture. Then press the Share button to exit the menu. * To tag all pictures in the Kodak EasyShare software. Press to locate a picture. 2 Press to highlight Print , then press the OK button.* 3 Press to your computer or card, see ... quantity as described above. You cannot cancel prints in the status area. For more information on printing from your computer, the Kodak EasyShare software print screen opens. OK, , Share The Print icon appears in Quickview. To remove the print tagging for all pictures in Quickview...
...The default quantity is applied to locate a picture. Then press the Share button to exit the menu. * To tag all pictures in the Kodak EasyShare software. Press to locate a picture. 2 Press to highlight Print , then press the OK button.* 3 Press to your computer or card, see ... quantity as described above. You cannot cancel prints in the status area. For more information on printing from your computer, the Kodak EasyShare software print screen opens. OK, , Share The Print icon appears in Quickview. To remove the print tagging for all pictures in Quickview...

User's Guide
Page 61
...the OK button. Your selections are checked. 4 To remove a selection, highlight a checked address, then press the OK button. appears in the Kodak EasyShare software. 49 Third-Transfer and Email When you specified. To remove all email selections, highlight Clear All. 5 Highlight Exit, then press the OK button.... When the picture you send the pictures and videos to exit the menu. Second-Tag On Your Camera 1 Press the Share button. Selected addresses are saved. For details, click the Help button in the status 6 Press the Share button ...
...the OK button. Your selections are checked. 4 To remove a selection, highlight a checked address, then press the OK button. appears in the Kodak EasyShare software. 49 Third-Transfer and Email When you specified. To remove all email selections, highlight Clear All. 5 Highlight Exit, then press the OK button.... When the picture you send the pictures and videos to exit the menu. Second-Tag On Your Camera 1 Press the Share button. Selected addresses are saved. For details, click the Help button in the status 6 Press the Share button ...

User's Guide
Page 62
.... Using Favorites On Your Computer When you choose. For details, click the Help button in the Kodak EasyShare software for details on creating address books, and printing, emailing, and organizing tagged pictures on your computer, you can use Kodak EasyShare software to retrieve, organize, and label them by subject, date, event, or any category you transfer...
.... Using Favorites On Your Computer When you choose. For details, click the Help button in the Kodak EasyShare software for details on creating address books, and printing, emailing, and organizing tagged pictures on your computer, you can use Kodak EasyShare software to retrieve, organize, and label them by subject, date, event, or any category you transfer...

User's Guide
Page 71
... install window does not appear, choose Run from the Start menu and type d:\setup.exe where d is the drive letter that are open on the Kodak EasyShare software CD, click the Help button in the Kodak EasyShare software. CAUTION: Install Kodak EasyShare software before connecting the camera or optional camera dock to load incorrectly. 1 Before you begin, close all...
... install window does not appear, choose Run from the Start menu and type d:\setup.exe where d is the drive letter that are open on the Kodak EasyShare software CD, click the Help button in the Kodak EasyShare software. CAUTION: Install Kodak EasyShare software before connecting the camera or optional camera dock to load incorrectly. 1 Before you begin, close all...
User's Guide
Page 73
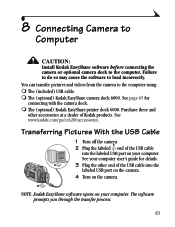
... USB port on your computer user's guide for connecting with the camera dock. ! 8 Connecting Camera to Computer CAUTION: Install Kodak EasyShare software before connecting the camera or optional camera dock to load incorrectly. The (optional) Kodak EasyShare printer dock 6000. Purchase these and other end of Kodak products. NOTE: Kodak EasyShare software opens on the camera. You can transfer pictures and videos from the...
... USB port on your computer user's guide for connecting with the camera dock. ! 8 Connecting Camera to Computer CAUTION: Install Kodak EasyShare software before connecting the camera or optional camera dock to load incorrectly. The (optional) Kodak EasyShare printer dock 6000. Purchase these and other end of Kodak products. NOTE: Kodak EasyShare software opens on the camera. You can transfer pictures and videos from the...
User's Guide
Page 74
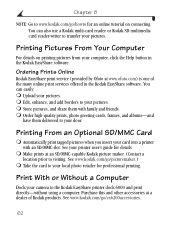
... With or Without a Computer Dock your camera to transfer your pictures. ! Automatically print tagged pictures when you insert your pictures. ! Store pictures, and share them delivered to your pictures. Make prints at a dealer of the many online print services offered in the Kodak EasyShare software. Printing From an Optional SD/MMC Card...-and have them with an SD/MMC slot. See your door. Purchase this and other accessories at an SD/MMC-capable Kodak picture maker. (Contact a location prior to your computer, click the Help button in the Kodak EasyShare software.
... With or Without a Computer Dock your camera to transfer your pictures. ! Automatically print tagged pictures when you insert your pictures. ! Store pictures, and share them delivered to your pictures. Make prints at a dealer of the many online print services offered in the Kodak EasyShare software. Printing From an Optional SD/MMC Card...-and have them with an SD/MMC slot. See your door. Purchase this and other accessories at an SD/MMC-capable Kodak picture maker. (Contact a location prior to your computer, click the Help button in the Kodak EasyShare software.

User's Guide
Page 77
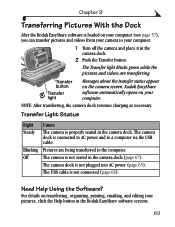
... power outlet. Your AC adapter may differ from the one pictured or may cause damage to your computer. Chapter 9 Connecting the Camera Dock 6000 After the Kodak EasyShare software is NOT in the camera dock when you are connecting to transfer pictures and videos. 65 IMPORTANT: Use only the AC adapter, 5-volt included with the...
... power outlet. Your AC adapter may differ from the one pictured or may cause damage to your computer. Chapter 9 Connecting the Camera Dock 6000 After the Kodak EasyShare software is NOT in the camera dock when you are connecting to transfer pictures and videos. 65 IMPORTANT: Use only the AC adapter, 5-volt included with the...
User's Guide
Page 81
Transfer Light Status Light Steady Blinking Off Cause The camera is properly seated in the Kodak EasyShare software screens. 69 The camera dock is not plugged into AC power (page 65). Pictures are transferring. Need Help Using the Software? Kodak EasyShare software automatically opens on the camera screen. For details on transferring, organizing, printing, emailing, and editing your pictures, click the...
Transfer Light Status Light Steady Blinking Off Cause The camera is properly seated in the Kodak EasyShare software screens. 69 The camera dock is not plugged into AC power (page 65). Pictures are transferring. Need Help Using the Software? Kodak EasyShare software automatically opens on the camera screen. For details on transferring, organizing, printing, emailing, and editing your pictures, click the...

User's Guide
Page 85
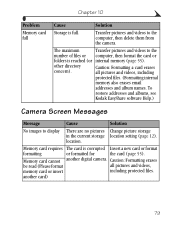
... is not charged. Battery is not properly Reinstall the battery (page 4). Camera does not A non-approved battery Use the battery that came with turn on the Kodak EasyShare software CD. You did not take up enough space to Troubleshooting information, see www.kodak.com/go/cx6200support. installed. decrease after taking number does not decrease the...
... is not charged. Battery is not properly Reinstall the battery (page 4). Camera does not A non-approved battery Use the battery that came with turn on the Kodak EasyShare software CD. You did not take up enough space to Troubleshooting information, see www.kodak.com/go/cx6200support. installed. decrease after taking number does not decrease the...
User's Guide
Page 90
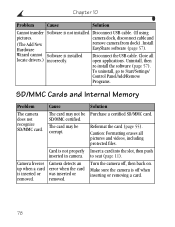
... inserted or was inserted or removed. Caution: Formatting erases all locate drivers.) incorrectly. Install EasyShare software (page 57). removed. open applications. Cause The card may be SD/MMC certified. Camera freezes Camera detects an up when a card error when the card is installed Disconnect the USB cable. Chapter 10 Problem Cause Solution Cannot transfer...
... inserted or was inserted or removed. Caution: Formatting erases all locate drivers.) incorrectly. Install EasyShare software (page 57). removed. open applications. Cause The card may be SD/MMC certified. Camera freezes Camera detects an up when a card error when the card is installed Disconnect the USB cable. Chapter 10 Problem Cause Solution Cannot transfer...
User's Guide
Page 91
... location setting (page 12). Memory card requires The card is full. To restore addresses and albums, see Kodak EasyShare software Help.) Camera Screen Messages Message Cause Solution No images to the computer, then delete them from the camera. another digital camera. Caution: Formatting erases be read (Please format all pictures and videos, including protected files. (Formatting internal...
... location setting (page 12). Memory card requires The card is full. To restore addresses and albums, see Kodak EasyShare software Help.) Camera Screen Messages Message Cause Solution No images to the computer, then delete them from the camera. another digital camera. Caution: Formatting erases be read (Please format all pictures and videos, including protected files. (Formatting internal...


