User Manual
Page 2
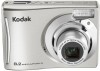
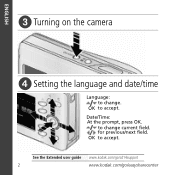
OK to accept. for previous/next field. Date/Time: At the prompt, press OK. to change . OK to accept. See the Extended user guide www.kodak.com/go/cd14support 2 www.kodak.com/go/easysharecenter ENGLISH ᕣ Turning on the camera ᕤ Setting the language and date/time Language: to change current field.
OK to accept. for previous/next field. Date/Time: At the prompt, press OK. to change . OK to accept. See the Extended user guide www.kodak.com/go/cd14support 2 www.kodak.com/go/easysharecenter ENGLISH ᕣ Turning on the camera ᕤ Setting the language and date/time Language: to change current field.

User Manual
Page 5
See the Extended user guide Purchase accessories www.kodak.com/go/cd14support www.kodak.com/go/cd14accessories www.kodak.com/go/cd14support 5 ENGLISH ᕧ Transferring pictures/videos 1 Turn off the camera. 2 Connect the KODAK USB Cable, Model U-8 (may be included). 3 Turn on the camera.
See the Extended user guide Purchase accessories www.kodak.com/go/cd14support www.kodak.com/go/cd14accessories www.kodak.com/go/cd14support 5 ENGLISH ᕧ Transferring pictures/videos 1 Turn off the camera. 2 Connect the KODAK USB Cable, Model U-8 (may be included). 3 Turn on the camera.

User Manual
Page 6
... best possible pictures and videos Great news! Your camera offers a built-in Help system. It describes every setting for you ■ And how to understand: ■ What it can do for every menu choice. See the Extended user guide www.kodak.com/go/cd14support 6 www.kodak.com/go/easysharecenter If you become. 1 Press...
... best possible pictures and videos Great news! Your camera offers a built-in Help system. It describes every setting for you ■ And how to understand: ■ What it can do for every menu choice. See the Extended user guide www.kodak.com/go/cd14support 6 www.kodak.com/go/easysharecenter If you become. 1 Press...
User Manual
Page 7
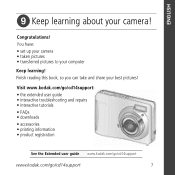
... • accessories • printing information • product registration See the Extended user guide www.kodak.com/go/cd14support www.kodak.com/go/cd14support 7 Congratulations! Finish reading this book, so you can take and share your camera! You have: • set up your camera • taken pictures • transferred pictures to your computer Keep learning!
... • accessories • printing information • product registration See the Extended user guide www.kodak.com/go/cd14support www.kodak.com/go/cd14support 7 Congratulations! Finish reading this book, so you can take and share your camera! You have: • set up your camera • taken pictures • transferred pictures to your computer Keep learning!
User Manual
Page 10
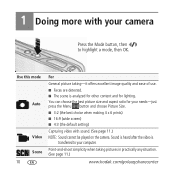
.... ■ 3:2 (the best choice when making 4 x 6 prints) ■ 16:9 (wide screen) ■ 4:3 (the default setting) Capturing video with your camera Press the Mode button, then to your computer. Use this mode Auto Video Scene 10 For General picture taking pictures in practically any situation. (See... page 11.) www.kodak.com/go/easysharecenter Point-and-shoot simplicity when taking -it offers excellent image quality and ease of use. ■ Faces are detected. ...
.... ■ 3:2 (the best choice when making 4 x 6 prints) ■ 16:9 (wide screen) ■ 4:3 (the default setting) Capturing video with your camera Press the Mode button, then to your computer. Use this mode Auto Video Scene 10 For General picture taking pictures in practically any situation. (See... page 11.) www.kodak.com/go/easysharecenter Point-and-shoot simplicity when taking -it offers excellent image quality and ease of use. ■ Faces are detected. ...

User Manual
Page 11
...light instead of people. Doing more with videos, see page 4. NOTE: Sound cannot be played on the camera. Using Scene (SCN) modes Choose a Scene mode-for great pictures in bright light. If the mode description...situation. 1 Press the Mode button, then to highlight SCN. 2 Press to view Scene mode descriptions, then press OK. to your camera Taking a video 1 Press the Mode button, then , then press OK. To stop recording, press and release the Shutter button ...of flash, if possible. Distant scenes. To review and work with your computer. www.kodak.com/go/cd14support 11
...light instead of people. Doing more with videos, see page 4. NOTE: Sound cannot be played on the camera. Using Scene (SCN) modes Choose a Scene mode-for great pictures in bright light. If the mode description...situation. 1 Press the Mode button, then to highlight SCN. 2 Press to view Scene mode descriptions, then press OK. to your camera Taking a video 1 Press the Mode button, then , then press OK. To stop recording, press and release the Shutter button ...of flash, if possible. Distant scenes. To review and work with your computer. www.kodak.com/go/cd14support 11
User Manual
Page 12
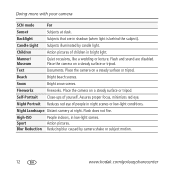
...-light conditions. Text Documents. Beach Bright beach scenes. Snow Bright snow scenes. Doing more with your camera SCN mode For Sunset Subjects at night. Candle Light Subjects illuminated by camera shake or subject motion. 12 www.kodak.com/go/easysharecenter Night Portrait Reduces red eye of yourself. Action pictures. Backlight Subjects that are...
...-light conditions. Text Documents. Beach Bright beach scenes. Snow Bright snow scenes. Doing more with your camera SCN mode For Sunset Subjects at night. Candle Light Subjects illuminated by camera shake or subject motion. 12 www.kodak.com/go/easysharecenter Night Portrait Reduces red eye of yourself. Action pictures. Backlight Subjects that are...
User Manual
Page 13
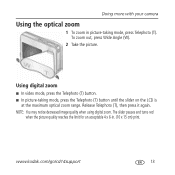
Release Telephoto (T), then press it again. www.kodak.com/go/cd14support 13 Using digital zoom ■ In video mode, press the Telephoto (T) button. ■ In picture-taking mode, press Telephoto (T). NOTE: You may notice decreased image quality when using digital zoom. To zoom out, press Wide Angle (W). 2 Take the picture. The slider pauses and... 4 x 6-in picture-taking mode, press the Telephoto (T) button until the slider on the LCD is at the maximum optical zoom range. Doing more with your camera Using the optical zoom 1 To zoom in . (10 x 15 cm) print.
Release Telephoto (T), then press it again. www.kodak.com/go/cd14support 13 Using digital zoom ■ In video mode, press the Telephoto (T) button. ■ In picture-taking mode, press Telephoto (T). NOTE: You may notice decreased image quality when using digital zoom. To zoom out, press Wide Angle (W). 2 Take the picture. The slider pauses and... 4 x 6-in picture-taking mode, press the Telephoto (T) button until the slider on the LCD is at the maximum optical zoom range. Doing more with your camera Using the optical zoom 1 To zoom in . (10 x 15 cm) print.
User Manual
Page 14
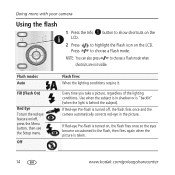
Flash modes Auto Fill (Flash On) Red Eye To turn the red eye feature on/off , the flash fires once and the camera automatically corrects red-eye in shadow or is "backlit" (when the light is behind the subject). NOTE: You can also press to choose a Flash mode. ... Setup menu. Off Flash fires When the lighting conditions require it. If Red-eye Pre-flash is turned on the LCD. Doing more with your camera Using the flash 1 Press the Info button to show shortcuts on the LCD. 2 Press Press to highlight the Flash icon on , the flash fires once...
Flash modes Auto Fill (Flash On) Red Eye To turn the red eye feature on/off , the flash fires once and the camera automatically corrects red-eye in shadow or is "backlit" (when the light is behind the subject). NOTE: You can also press to choose a Flash mode. ... Setup menu. Off Flash fires When the lighting conditions require it. If Red-eye Pre-flash is turned on the LCD. Doing more with your camera Using the flash 1 Press the Info button to show shortcuts on the LCD. 2 Press Press to highlight the Flash icon on , the flash fires once...
User Manual
Page 15
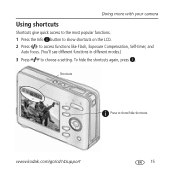
www.kodak.com/go/cd14support 15 Shortcuts Press to choose a setting. Doing more with your camera Using shortcuts Shortcuts give quick access to the most popular functions. 1 Press the Info button to show shortcuts on the LCD. 2 Press to access functions like Flash, Exposure Compensation, Self-timer, and Auto focus. (You'll see different functions in different modes.) 3 Press to show/hide shortcuts. To hide the shortcuts again, press .
www.kodak.com/go/cd14support 15 Shortcuts Press to choose a setting. Doing more with your camera Using shortcuts Shortcuts give quick access to the most popular functions. 1 Press the Info button to show shortcuts on the LCD. 2 Press to access functions like Flash, Exposure Compensation, Self-timer, and Auto focus. (You'll see different functions in different modes.) 3 Press to show/hide shortcuts. To hide the shortcuts again, press .
User Manual
Page 16
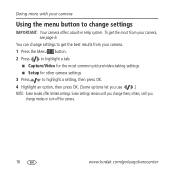
...; Some settings remain until you change modes or turn off the camera. 16 www.kodak.com/go/easysharecenter Doing more with your camera, see page 6. You can change settings IMPORTANT: Your camera offers a built-in Help system. To get the most from your camera. 1 Press the Menu button. 2 Press to highlight a tab: ■ Capture/Video...
...; Some settings remain until you change modes or turn off the camera. 16 www.kodak.com/go/easysharecenter Doing more with your camera, see page 6. You can change settings IMPORTANT: Your camera offers a built-in Help system. To get the most from your camera. 1 Press the Menu button. 2 Press to highlight a tab: ■ Capture/Video...
User Manual
Page 17
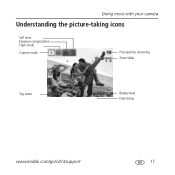
Doing more with your camera Understanding the picture-taking icons Self timer Exposure compensation Flash mode Capture mode Pictures/time remaining Zoom slider Tag name Battery level Date stamp www.kodak.com/go/cd14support 17
Doing more with your camera Understanding the picture-taking icons Self timer Exposure compensation Flash mode Capture mode Pictures/time remaining Zoom slider Tag name Battery level Date stamp www.kodak.com/go/cd14support 17
User Manual
Page 21
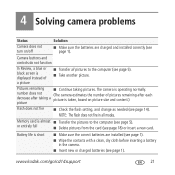
...or entirely full ■ Delete pictures from the card (see page 18) or insert a new card. www.kodak.com/go/cd14support 21 NOTE: The flash does not fire in the camera. ■ Insert new or charged batteries (see page 1). Battery life is short ■ Make sure the... to the computer (see page 5). ■ Take another picture. Pictures remaining ■ Continue taking a picture is operating normally. 4 Solving camera problems Status Camera does not turn on picture size and content.) picture Flash does not fire ■ Check the flash setting, and change as needed (see ...
...or entirely full ■ Delete pictures from the card (see page 18) or insert a new card. www.kodak.com/go/cd14support 21 NOTE: The flash does not fire in the camera. ■ Insert new or charged batteries (see page 1). Battery life is short ■ Make sure the... to the computer (see page 5). ■ Take another picture. Pictures remaining ■ Continue taking a picture is operating normally. 4 Solving camera problems Status Camera does not turn on picture size and content.) picture Flash does not fire ■ Check the flash setting, and change as needed (see ...


