

User Manual
Page 4
Product features Back view 1234 5 6 14 13 optional 7 8 9 10 11 12 1 LCD 2 Review button 3 Menu button 4 LCD/Info button 5 Delete button 6 Zoom button (Telephoto/Wide) 7 Strap post 8 9 OK button 10 Share button 11 Battery compartment 12 Slot for optional SD card 13 Dock connector 14 Tripod socket ii www.kodak.com/go/support
Product features Back view 1234 5 6 14 13 optional 7 8 9 10 11 12 1 LCD 2 Review button 3 Menu button 4 LCD/Info button 5 Delete button 6 Zoom button (Telephoto/Wide) 7 Strap post 8 9 OK button 10 Share button 11 Battery compartment 12 Slot for optional SD card 13 Dock connector 14 Tripod socket ii www.kodak.com/go/support
User Manual
Page 5
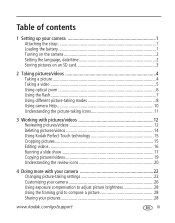
... 4 Taking a video 5 Using optical zoom 6 Using the flash 7 Using different picture-taking modes 8 Using camera Help 10 Understanding the picture-taking icons 11 3 Working with pictures/videos 12 Reviewing pictures/videos 12 Deleting pictures/videos 14 Using Kodak Perfect Touch technology 15 Cropping pictures 15 Editing videos 16 Running a slide show 17 Copying...
... 4 Taking a video 5 Using optical zoom 6 Using the flash 7 Using different picture-taking modes 8 Using camera Help 10 Understanding the picture-taking icons 11 3 Working with pictures/videos 12 Reviewing pictures/videos 12 Deleting pictures/videos 14 Using Kodak Perfect Touch technology 15 Cropping pictures 15 Editing videos 16 Running a slide show 17 Copying...
User Manual
Page 10
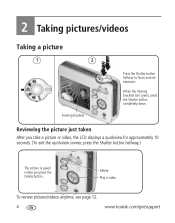
Reviewing the picture just taken After you take a picture or video, the LCD displays a quickview for approximately 10 seconds. (To exit the quickview sooner, press the Shutter button halfway.) The picture is saved unless you press the Delete button. 2 Taking pictures/videos Taking a picture 1 2 Framing brackets Press the Shutter button halfway to focus and set exposure. When the framing brackets turn green, press the Shutter button completely down. To review pictures/videos anytime, see page 12. 4 www.kodak.com/go/support Delete Play a video.
Reviewing the picture just taken After you take a picture or video, the LCD displays a quickview for approximately 10 seconds. (To exit the quickview sooner, press the Shutter button halfway.) The picture is saved unless you press the Delete button. 2 Taking pictures/videos Taking a picture 1 2 Framing brackets Press the Shutter button halfway to focus and set exposure. When the framing brackets turn green, press the Shutter button completely down. To review pictures/videos anytime, see page 12. 4 www.kodak.com/go/support Delete Play a video.
User Manual
Page 14
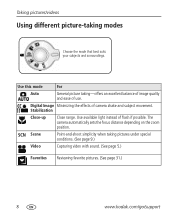
The camera automatically sets the focus distance depending on the zoom position. Use this mode For Auto General picture taking-offers an excellent balance of image quality ... Using different picture-taking pictures under special conditions. (See page 9.) Video Capturing video with sound. (See page 5.) Favorites Reviewing favorite pictures. (See page 31.) 8 www.kodak.com/go/support Digital Image Minimizing the effects of camera shake and subject movement. Stabilization Close-up Close range. SCN Scene Point-and-shoot simplicity when taking modes...
The camera automatically sets the focus distance depending on the zoom position. Use this mode For Auto General picture taking-offers an excellent balance of image quality ... Using different picture-taking pictures under special conditions. (See page 9.) Video Capturing video with sound. (See page 5.) Favorites Reviewing favorite pictures. (See page 31.) 8 www.kodak.com/go/support Digital Image Minimizing the effects of camera shake and subject movement. Stabilization Close-up Close range. SCN Scene Point-and-shoot simplicity when taking modes...
User Manual
Page 18
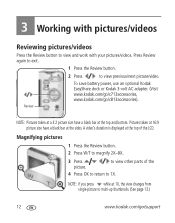
...bar at the top of the 4 Press OK to return to multi-up thumbnails. (See page 13.) 12 www.kodak.com/go /c813accessories). Magnifying pictures 1 Press the Review button. 2 Press W/T to view previous/next picture/video. to view and work with your pictures/videos. 3 Working ...with pictures/videos Reviewing pictures/videos Press the Review button to view other parts of the LCD. To save battery power, use an optional Kodak EasyShare dock or Kodak 3-volt AC adapter. (Visit www.kodak.com/go/c713accessories, www.kodak.com/go /support
...bar at the top of the 4 Press OK to return to multi-up thumbnails. (See page 13.) 12 www.kodak.com/go /c813accessories). Magnifying pictures 1 Press the Review button. 2 Press W/T to view previous/next picture/video. to view and work with your pictures/videos. 3 Working ...with pictures/videos Reviewing pictures/videos Press the Review button to view other parts of the LCD. To save battery power, use an optional Kodak EasyShare dock or Kodak 3-volt AC adapter. (Visit www.kodak.com/go/c713accessories, www.kodak.com/go /support
User Manual
Page 19
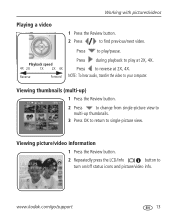
www.kodak.com/go/support 13 Viewing thumbnails (multi-up) 1 Press the Review button. 2 Press to change from single-picture view to multi-up ...1X 2X 4X Reverse Forward Press during playback to single-picture view. Viewing picture/video information 1 Press the Review button. 2 Repeatedly press the LCD/Info button to reverse at 2X, 4X. Press to turn on/off ...status icons and picture/video info. Working with pictures/videos Playing a video 1 Press the Review button. 2 Press to your computer. NOTE: To hear audio, transfer the video to find previous/next video. ...
www.kodak.com/go/support 13 Viewing thumbnails (multi-up) 1 Press the Review button. 2 Press to change from single-picture view to multi-up ...1X 2X 4X Reverse Forward Press during playback to single-picture view. Viewing picture/video information 1 Press the Review button. 2 Repeatedly press the LCD/Info button to reverse at 2X, 4X. Press to turn on/off ...status icons and picture/video info. Working with pictures/videos Playing a video 1 Press the Review button. 2 Press to your computer. NOTE: To hear audio, transfer the video to find previous/next video. ...
User Manual
Page 20
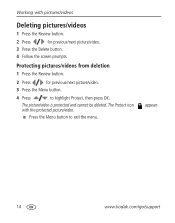
The Protect icon with pictures/videos Deleting pictures/videos 1 Press the Review button. 2 Press for previous/next picture/video. 3 Press the Menu button. 4 Press to exit the menu. appears 14 www.kodak.com/go/support Working with the protected picture/video. ■ Press the Menu button to highlight Protect, then press OK. The picture/video is protected and cannot be deleted. Protecting pictures/videos from deletion 1 Press the Review button. 2 Press for previous/next picture/video. 3 Press the Delete button. 4 Follow the screen prompts.
The Protect icon with pictures/videos Deleting pictures/videos 1 Press the Review button. 2 Press for previous/next picture/video. 3 Press the Menu button. 4 Press to exit the menu. appears 14 www.kodak.com/go/support Working with the protected picture/video. ■ Press the Menu button to highlight Protect, then press OK. The picture/video is protected and cannot be deleted. Protecting pictures/videos from deletion 1 Press the Review button. 2 Press for previous/next picture/video. 3 Press the Delete button. 4 Follow the screen prompts.
User Manual
Page 21
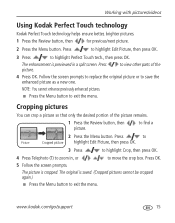
... to replace the original picture or to highlight Perfect Touch tech., then press OK. Working with pictures/videos Using Kodak Perfect Touch technology Kodak Perfect Touch technology helps ensure better, brighter pictures. 1 Press the Review button, then for previous/next picture. 2 Press the Menu button. Press to highlight Edit Picture, then press OK...
... to replace the original picture or to highlight Perfect Touch tech., then press OK. Working with pictures/videos Using Kodak Perfect Touch technology Kodak Perfect Touch technology helps ensure better, brighter pictures. 1 Press the Review button, then for previous/next picture. 2 Press the Menu button. Press to highlight Edit Picture, then press OK...
User Manual
Page 22
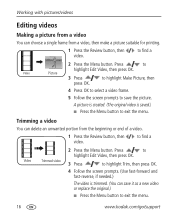
to exit the menu. 16 www.kodak.com/go/support Press to highlight Edit Video, then press ... button. Trimming a video You can choose a single frame from the beginning or end of a video. 1 Press the Review button, then video. Working with pictures/videos Editing videos Making a picture from a video You can delete an unwanted portion from... a video, then make a picture suitable for printing. 1 Press the Review button, then video. Video Trimmed video 3 Press to highlight Trim, then press OK. 4 Follow the screen prompts. (...
to exit the menu. 16 www.kodak.com/go/support Press to highlight Edit Video, then press ... button. Trimming a video You can choose a single frame from the beginning or end of a video. 1 Press the Review button, then video. Working with pictures/videos Editing videos Making a picture from a video You can delete an unwanted portion from... a video, then make a picture suitable for printing. 1 Press the Review button, then video. Video Trimmed video 3 Press to highlight Trim, then press OK. 4 Follow the screen prompts. (...

User Manual
Page 23
... choose the first and last frames; Starting the slide show Use Slide Show to display your pictures/videos on the LCD. www.kodak.com/go/support 17 the camera chooses 2, 7, or 14 equally spaced frames. ■ Press the Menu button to find a 2 Press the Menu button. Each... Edit Video, then press OK. 16-up picture, suitable for a 4 x 6-inch (10 x 15 cm) print. 1 Press the Review button, then video. Running a slide show 1 Press the Review button, then the Menu button. 2 Press to highlight Slide Show, then press OK. 3 Press to highlight Video Action Print, then press...
... choose the first and last frames; Starting the slide show Use Slide Show to display your pictures/videos on the LCD. www.kodak.com/go/support 17 the camera chooses 2, 7, or 14 equally spaced frames. ■ Press the Menu button to find a 2 Press the Menu button. Each... Edit Video, then press OK. 16-up picture, suitable for a 4 x 6-inch (10 x 15 cm) print. 1 Press the Review button, then video. Running a slide show 1 Press the Review button, then the Menu button. 2 Press to highlight Slide Show, then press OK. 3 Press to highlight Video Action Print, then press...
User Manual
Page 25
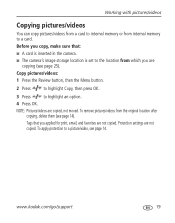
To remove pictures/videos from internal memory to a card. www.kodak.com/go/support 19 To apply protection to a picture/video, see page 25). Protection settings are copied, not moved. Copy pictures/videos: 1 Press the Review button, then the Menu button. 2 Press to highlight Copy, then press ...OK. 3 Press to the location from which you are not copied. Tags that you copy, make sure that: ■ A card is inserted in the camera. ■ The camera's image storage location is...
To remove pictures/videos from internal memory to a card. www.kodak.com/go/support 19 To apply protection to a picture/video, see page 25). Protection settings are copied, not moved. Copy pictures/videos: 1 Press the Review button, then the Menu button. 2 Press to highlight Copy, then press ...OK. 3 Press to the location from which you are not copied. Tags that you copy, make sure that: ■ A card is inserted in the camera. ■ The camera's image storage location is...
User Manual
Page 26
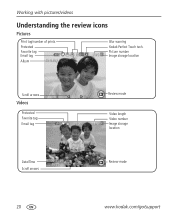
Working with pictures/videos Understanding the review icons Pictures Print tag/number of prints Protected Favorite tag Email tag Album Blur warning Kodak Perfect Touch tech. Picture number Image storage location Scroll arrows Videos Protected Favorite tag Email tag Review mode Video length Video number Image storage location Date/Time Scroll arrows Review mode 20 www.kodak.com/go/support
Working with pictures/videos Understanding the review icons Pictures Print tag/number of prints Protected Favorite tag Email tag Album Blur warning Kodak Perfect Touch tech. Picture number Image storage location Scroll arrows Videos Protected Favorite tag Email tag Review mode Video length Video number Image storage location Date/Time Scroll arrows Review mode 20 www.kodak.com/go/support
User Manual
Page 27
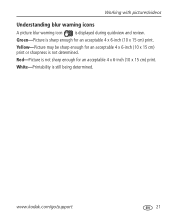
Green-Picture is sharp enough for an acceptable 4 x 6-inch (10 x 15 cm) print. Red-Picture is displayed during quickview and review. White-Printability is not determined. www.kodak.com/go/support 21 Yellow-Picture may be sharp enough for an acceptable 4 x 6-inch (10 x 15 cm) print or sharpness is still being determined. Working with pictures/videos Understanding blur warning icons A picture blur warning icon is not sharp enough for an acceptable 4 x 6-inch (10 x 15 cm) print.
Green-Picture is sharp enough for an acceptable 4 x 6-inch (10 x 15 cm) print. Red-Picture is displayed during quickview and review. White-Printability is not determined. www.kodak.com/go/support 21 Yellow-Picture may be sharp enough for an acceptable 4 x 6-inch (10 x 15 cm) print or sharpness is still being determined. Working with pictures/videos Understanding blur warning icons A picture blur warning icon is not sharp enough for an acceptable 4 x 6-inch (10 x 15 cm) print.
User Manual
Page 34
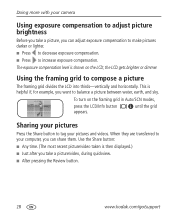
... they are transferred to your computer, you can share them. Doing more with your camera Using exposure compensation to adjust picture brightness Before you take a picture/video, during quickview. ■ After pressing the Review button. 28 www.kodak.com/go/support The exposure compensation level is shown on the framing grid in Auto...
... they are transferred to your computer, you can share them. Doing more with your camera Using exposure compensation to adjust picture brightness Before you take a picture/video, during quickview. ■ After pressing the Review button. 28 www.kodak.com/go/support The exposure compensation level is shown on the framing grid in Auto...
User Manual
Page 39
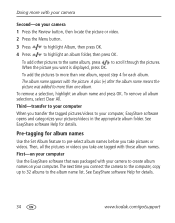
... the Album feature in Review mode to locate a picture. 2 Press the Share button. 3 Highlight Print or Email, then press OK. To turn on the sync feature, select Yes, synchronize with EasyShare software. Press to tag the pictures/videos in your camera with album names. www.kodak.com/go/support 33 Camera favorites will no longer...
... the Album feature in Review mode to locate a picture. 2 Press the Share button. 3 Highlight Print or Email, then press OK. To turn on the sync feature, select Yes, synchronize with EasyShare software. Press to tag the pictures/videos in your camera with album names. www.kodak.com/go/support 33 Camera favorites will no longer...
User Manual
Page 40
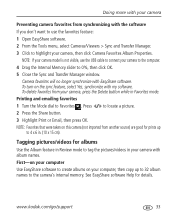
...with the picture. Third-transfer to your computer When you want is displayed, press OK. See EasyShare software Help for details. Doing more with your camera Second-on your camera 1 Press the Review button, then locate the picture or video. 2 Press the Menu button. 3 Press to highlight ...Album, then press OK. 4 Press to scroll through the pictures. See EasyShare software Help for details. 34 www.kodak.com/go/support To...
...with the picture. Third-transfer to your computer When you want is displayed, press OK. See EasyShare software Help for details. Doing more with your camera Second-on your camera 1 Press the Review button, then locate the picture or video. 2 Press the Menu button. 3 Press to highlight ...Album, then press OK. 4 Press to scroll through the pictures. See EasyShare software Help for details. 34 www.kodak.com/go/support To...
User Manual
Page 47
... ■ Wipe the contacts with Kodak Ni-MH batteries in the camera. batteries. ■ If you own an EasyShare camera dock series 3 or EasyShare printer dock series 3, use of the following activities that quickly deplete battery power: reviewing pictures/videos on . ■ Charge rechargeable batteries. Stored pictures are ■ Retake pictures. rechargeable digital camera ■ Limit the following...
... ■ Wipe the contacts with Kodak Ni-MH batteries in the camera. batteries. ■ If you own an EasyShare camera dock series 3 or EasyShare printer dock series 3, use of the following activities that quickly deplete battery power: reviewing pictures/videos on . ■ Charge rechargeable batteries. Stored pictures are ■ Retake pictures. rechargeable digital camera ■ Limit the following...

User Manual
Page 48
...Review mode, a ■ Transfer the picture to seat (see page 3). 42 www.kodak.com/go/support Picture is too light. ■ Move so there is at least 2 ft (0.6 m) between the camera and the subject. ■ Use Fill flash (see page 3). blue or black ■ Take another memory card. Camera...image storage locations (see page 25), or insert a card with available memory (see page 7) or change your camera is displayed another picture. instead of the following In Review mode, ■ Check the image storage location setting (see page 7). ■ Move so there is no ...
...Review mode, a ■ Transfer the picture to seat (see page 3). 42 www.kodak.com/go/support Picture is too light. ■ Move so there is at least 2 ft (0.6 m) between the camera and the subject. ■ Use Fill flash (see page 3). blue or black ■ Take another memory card. Camera...image storage locations (see page 25), or insert a card with available memory (see page 7) or change your camera is displayed another picture. instead of the following In Review mode, ■ Check the image storage location setting (see page 7). ■ Move so there is no ...
User Manual
Page 60
.... When using your pictures on the battery contacts can affect battery life. You may be required with proof of the purchase price are 54 www.kodak.com/go/support Appendix Extending battery life ■ See Auto Power Off (see page 12) - Repair, replacement, or refund of the purchase ...unable to repair or replace a Product, Kodak will repair or replace Products if they may be free from the date of the flash ■ Dirt on the LCD (see page 26). ■ Limit the following activities that do not work; Reviewing your camera in both materials and workmanship for the ...
.... When using your pictures on the battery contacts can affect battery life. You may be required with proof of the purchase price are 54 www.kodak.com/go/support Appendix Extending battery life ■ See Auto Power Off (see page 12) - Repair, replacement, or refund of the purchase ...unable to repair or replace a Product, Kodak will repair or replace Products if they may be free from the date of the flash ■ Dirt on the LCD (see page 26). ■ Limit the following activities that do not work; Reviewing your camera in both materials and workmanship for the ...
User Manual
Page 65
... blur warning, 26 button delete, ii, 4 flash/status, 7 LCD/info, ii menu, ii www.kodak.com/go/support 1 ok, ii on/off, i review, ii, 12 share, ii shutter, i zoom, ii, 6 C cable, USB, 37 camera sounds, 26 caring for your camera, 51 children, 9 clock, setting, 2 color mode, 24 compatibility, dock, 40 copy pictures card to...
... blur warning, 26 button delete, ii, 4 flash/status, 7 LCD/info, ii menu, ii www.kodak.com/go/support 1 ok, ii on/off, i review, ii, 12 share, ii shutter, i zoom, ii, 6 C cable, USB, 37 camera sounds, 26 caring for your camera, 51 children, 9 clock, setting, 2 color mode, 24 compatibility, dock, 40 copy pictures card to...


