
User Manual
Page 5
...the battery 1 Turning on the camera 2 Setting the language, date/time 2 Storing pictures on an SD or MMC card 3 2 Taking pictures/videos 4 Picture-taking modes 4 Taking a picture 7 Taking a video 8 Reviewing the picture/video just taken 8 Using optical zoom 10 Using the digital zoom 10 ... to adjust picture brightness 14 Using camera Help 14 Taking panoramic pictures 15 Understanding the picture-taking icons 16 3 Working with pictures/videos 17 Reviewing pictures/videos 17 Deleting pictures/videos 19 Cropping pictures 21 Using Kodak Perfect Touch technology 21 Editing videos ...
...the battery 1 Turning on the camera 2 Setting the language, date/time 2 Storing pictures on an SD or MMC card 3 2 Taking pictures/videos 4 Picture-taking modes 4 Taking a picture 7 Taking a video 8 Reviewing the picture/video just taken 8 Using optical zoom 10 Using the digital zoom 10 ... to adjust picture brightness 14 Using camera Help 14 Taking panoramic pictures 15 Understanding the picture-taking icons 16 3 Working with pictures/videos 17 Reviewing pictures/videos 17 Deleting pictures/videos 19 Cropping pictures 21 Using Kodak Perfect Touch technology 21 Editing videos ...

User Manual
Page 8
for previous/next field. to change. Setting up your camera Turning on the camera Setting the language, date/time OK (press) 1 2 OK to accept. 2 www.kodak.com/go/support
for previous/next field. to change. Setting up your camera Turning on the camera Setting the language, date/time OK (press) 1 2 OK to accept. 2 www.kodak.com/go/support

User Manual
Page 11
...page 35). Use this For SCN mode Hi-ISO Portrait Panorama Left-Right Panorama Right-Left Low-light conditions using a higher ISO. The camera uses infinity auto-focus. Quiet occasions, like a wedding or lecture. Bright snow scenes. Flash and sound are not available in bright light. www....kodak.com/go/support 5 Focus is set to display Scene mode descriptions. NOTE: If the Help text turns off, press the OK button. 3 Press the OK button to left to Auto Focus (see page...
...page 35). Use this For SCN mode Hi-ISO Portrait Panorama Left-Right Panorama Right-Left Low-light conditions using a higher ISO. The camera uses infinity auto-focus. Quiet occasions, like a wedding or lecture. Bright snow scenes. Flash and sound are not available in bright light. www....kodak.com/go/support 5 Focus is set to display Scene mode descriptions. NOTE: If the Help text turns off, press the OK button. 3 Press the OK button to left to Auto Focus (see page...

User Manual
Page 13
.../videos 3 LCD/Info Use the LCD or viewfinder. When the framing marks turn on foreground subjects, even if the subjects are fixed at Center Wide. NOTE: Framing marks do not appear in the scene. www.kodak.com/go/support 7 Using the framing marks to take the picture. Framing... Fireworks, or Video mode. Press to take pictures Framing marks indicate the camera focus area. When the Ready light turns green, press the Shutter button completely down to turn green, focus is accomplished. 2 If the camera is not focusing on the desired subject (or if the framing marks disappear...
.../videos 3 LCD/Info Use the LCD or viewfinder. When the framing marks turn on foreground subjects, even if the subjects are fixed at Center Wide. NOTE: Framing marks do not appear in the scene. www.kodak.com/go/support 7 Using the framing marks to take the picture. Framing... Fireworks, or Video mode. Press to take pictures Framing marks indicate the camera focus area. When the Ready light turns green, press the Shutter button completely down to turn green, focus is accomplished. 2 If the camera is not focusing on the desired subject (or if the framing marks disappear...

User Manual
Page 17
... screen. Use when the subject is in shadow or is "backlit" (when the light is turned on /off : If Red-eye Pre-flash is behind the subject). Off Never. www.kodak.com/go/support 11 The current flash mode appears in heavy shadows. Flash-to the picture is...ft (0.6-3.5 m) @ ISO 200 2-6.6 ft (0.6-2.0 m) @ ISO 200 Flash modes Flash fires Auto When the lighting conditions require it. To turn the Red-eye Pre-flash feature on : eye I The camera then automatically corrects red-eye in low-light conditions; flash; I The flash fires twice (to scroll through flash modes (see page...
... screen. Use when the subject is in shadow or is "backlit" (when the light is turned on /off : If Red-eye Pre-flash is behind the subject). Off Never. www.kodak.com/go/support 11 The current flash mode appears in heavy shadows. Flash-to the picture is...ft (0.6-3.5 m) @ ISO 200 2-6.6 ft (0.6-2.0 m) @ ISO 200 Flash modes Flash fires Auto When the lighting conditions require it. To turn the Red-eye Pre-flash feature on : eye I The camera then automatically corrects red-eye in low-light conditions; flash; I The flash fires twice (to scroll through flash modes (see page...

User Manual
Page 18
I Turn the Mode dial to get into the scene) • Again for a 2-second delay (for a steady, auto-shutter release ...-timer Use the self-timer when you want to be included in a picture, or to ensure a steady Shutter button press. 1 Place camera on a tripod) • Again for a 10-second delay (so you have time to Video . Use the same procedure to use... the self-timer in video mode. 12 www.kodak.com/go/support and 10-second options are available in Video mode, but: I Press the Shutter button completely down . To cancel...
I Turn the Mode dial to get into the scene) • Again for a 2-second delay (for a steady, auto-shutter release ...-timer Use the self-timer when you want to be included in a picture, or to ensure a steady Shutter button press. 1 Place camera on a tripod) • Again for a 10-second delay (so you have time to Video . Use the same procedure to use... the self-timer in video mode. 12 www.kodak.com/go/support and 10-second options are available in Video mode, but: I Press the Shutter button completely down . To cancel...

User Manual
Page 19
... a picture The framing grid divides the LCD into thirds-vertically and horizontally. NOTE: Burst is no more storage space. button until the grid www.kodak.com/go/support 13 NOTE: During quickview, you can delete all pictures in Anti-Blur, Hi-ISO, and Panorama modes. 2 Press the Shutter ... want to balance a picture between water, earth, and sky. event. To turn on the framing grid in Review (see page 11). To delete selectively, do so in Capture mode, press the LCD/Info appears. The camera stops taking pictures when you release the Shutter button, when the pictures are saved...
... a picture The framing grid divides the LCD into thirds-vertically and horizontally. NOTE: Burst is no more storage space. button until the grid www.kodak.com/go/support 13 NOTE: During quickview, you can delete all pictures in Anti-Blur, Hi-ISO, and Panorama modes. 2 Press the Shutter ... want to balance a picture between water, earth, and sky. event. To turn on the framing grid in Review (see page 11). To delete selectively, do so in Capture mode, press the LCD/Info appears. The camera stops taking pictures when you release the Shutter button, when the pictures are saved...

User Manual
Page 34
... you turned off anti-virus software, turn it back on the EasyShare software CD, click the Help button in EasyShare software. 28 www.kodak.com/go /register. 5 If prompted, restart the computer. See the anti-virus software manual for details. To register later, see www.kodak.com/...go /support NOTE: When prompted, take few minutes to load incorrectly. 1 Close all software applications that contains the CD. 4 Transferring and printing pictures Installing the software CAUTION: Install EasyShare software before connecting the camera to install the software...
... you turned off anti-virus software, turn it back on the EasyShare software CD, click the Help button in EasyShare software. 28 www.kodak.com/go /register. 5 If prompted, restart the computer. See the anti-virus software manual for details. To register later, see www.kodak.com/...go /support NOTE: When prompted, take few minutes to load incorrectly. 1 Close all software applications that contains the CD. 4 Transferring and printing pictures Installing the software CAUTION: Install EasyShare software before connecting the camera to install the software...

User Manual
Page 35
I Kodak EasyShare camera dock, Kodak EasyShare printer dock (see page 30) I Kodak multi-card reader, Kodak SD multimedia card reader-writer Purchase these Kodak products to transfer your computer and prompts you through the transfer process. Kodak EasyShare software opens on your pictures and videos. NOTE: Visit www.kodak.com/go/howto for transferring You can also use these and other accessories...
I Kodak EasyShare camera dock, Kodak EasyShare printer dock (see page 30) I Kodak multi-card reader, Kodak SD multimedia card reader-writer Purchase these Kodak products to transfer your computer and prompts you through the transfer process. Kodak EasyShare software opens on your pictures and videos. NOTE: Visit www.kodak.com/go/howto for transferring You can also use these and other accessories...

User Manual
Page 36
... separately) Connecting the camera to a PictBridge enabled printer 1 Turn off the camera and printer. 2 Connect the appropriate USB cable from the camera to the printer. (See your camera to PictBridge enabled printers. Direct printing with a PictBridge enabled printer Your camera is compatible with PictBridge technology, so you can print directly to the Kodak EasyShare printer dock and print...
... separately) Connecting the camera to a PictBridge enabled printer 1 Turn off the camera and printer. 2 Connect the appropriate USB cable from the camera to the printer. (See your camera to PictBridge enabled printers. Direct printing with a PictBridge enabled printer Your camera is compatible with PictBridge technology, so you can print directly to the Kodak EasyShare printer dock and print...
User Manual
Page 37
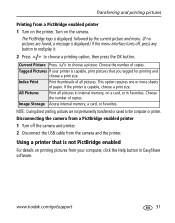
... Transferring and printing pictures Printing from a PictBridge enabled printer 1 Turn on a card, or in Favorites. If the printer is not PictBridge enabled For details on the camera. Choose the number of all pictures in EasyShare software. The PictBridge logo is displayed, followed by the current picture... menu interface turns off, press any button to redisplay it. 2 Press to choose a printing option, then press the OK button. NOTE: During direct printing, pictures are found, a message is capable, print pictures that is capable, choose a print size. www.kodak.com/go/...
... Transferring and printing pictures Printing from a PictBridge enabled printer 1 Turn on a card, or in Favorites. If the printer is not PictBridge enabled For details on the camera. Choose the number of all pictures in EasyShare software. The PictBridge logo is displayed, followed by the current picture... menu interface turns off, press any button to redisplay it. 2 Press to choose a printing option, then press the OK button. NOTE: During direct printing, pictures are found, a message is capable, print pictures that is capable, choose a print size. www.kodak.com/go/...

User Manual
Page 39
...Doing more with your camera: 1 Press the Menu... to exit. for printing up to 11 x 14 in some modes. www.kodak.com/go/support 33 pictures are unavailable in . (28 x 36 cm); pictures are ...medium resolution with smaller file size. 3.1 MP-for information about camera settings and options. Also for printing up to 20 x 30 in . (10 x 15 ... NOTE: Some settings remain until you change settings to get the best results from your camera Changing picture-taking settings You can change them; pictures are medium resolution with smaller file size...
...Doing more with your camera: 1 Press the Menu... to exit. for printing up to 11 x 14 in some modes. www.kodak.com/go/support 33 pictures are unavailable in . (28 x 36 cm); pictures are ...medium resolution with smaller file size. 3.1 MP-for information about camera settings and options. Also for printing up to 20 x 30 in . (10 x 15 ... NOTE: Some settings remain until you change settings to get the best results from your camera Changing picture-taking settings You can change them; pictures are medium resolution with smaller file size...

User Manual
Page 41
... pictures or videos you take pictures or videos. Center-zone-evaluates the small area centered in Video mode. NOTE: For the best pictures, the camera is needed. High Color Natural Color (default) Low Color Black & White Sepia-pictures have a reddish-brown, antique look. Ideal for general picture...when in Auto and Close-up modes. Color mode Exposure Metering Focus Zone www.kodak.com/go/support 35 NOTE: EasyShare software also lets you take are Flash saved, even after the camera is White Balance turned off. Doing more with those album names. On or Off Pre-select album ...
... pictures or videos you take pictures or videos. Center-zone-evaluates the small area centered in Video mode. NOTE: For the best pictures, the camera is needed. High Color Natural Color (default) Low Color Black & White Sepia-pictures have a reddish-brown, antique look. Ideal for general picture...when in Auto and Close-up modes. Color mode Exposure Metering Focus Zone www.kodak.com/go/support 35 NOTE: EasyShare software also lets you take are Flash saved, even after the camera is White Balance turned off. Doing more with those album names. On or Off Pre-select album ...
User Manual
Page 43
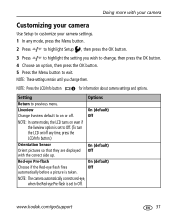
... to on or off any time, press the LCD/Info button.) Orientation Sensor Orient pictures so that they are displayed with your camera Customizing your camera Use Setup to customize your camera settings. 1 In any mode, press the Menu button. 2 Press to highlight Setup , then press the OK button. 3 Press to...NOTE: These settings remain until you wish to change them. Off NOTE: In some modes, the LCD turns on /off . www.kodak.com/go/support 37 Setting Options Return to Off. (To turn the LCD on even if the liveview option is set to exit. Doing more with the correct side up...
... to on or off any time, press the LCD/Info button.) Orientation Sensor Orient pictures so that they are displayed with your camera Customizing your camera Use Setup to customize your camera settings. 1 In any mode, press the Menu button. 2 Press to highlight Setup , then press the OK button. 3 Press to...NOTE: These settings remain until you wish to change them. Off NOTE: In some modes, the LCD turns on /off . www.kodak.com/go/support 37 Setting Options Return to Off. (To turn the LCD on even if the liveview option is set to exit. Doing more with the correct side up...

User Manual
Page 44
...-choose a sound effect for each function. Choose a date option, or turn off the feature. (Default is off . 5 minutes 3 minutes (default) 1 minute Video Out Choose the regional setting that lets you connect the camera to all functions. Off See page 2. 38 www.kodak.com/go/support Video Date Display Display Date/Time at the...
...-choose a sound effect for each function. Choose a date option, or turn off the feature. (Default is off . 5 minutes 3 minutes (default) 1 minute Video Out Choose the regional setting that lets you connect the camera to all functions. Off See page 2. 38 www.kodak.com/go/support Video Date Display Display Date/Time at the...

User Manual
Page 46
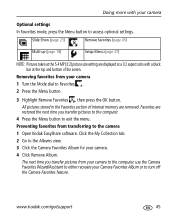
The next time you turn on the LCD, your album selection is selected. 6 Press the Menu button to exit the menu. See EasyShare software Help for details. 40 www.kodak.com/go/support To remove all the pictures or videos you take pictures or videos. Your selections are tagged ...with those album names. Repeat to mark pictures or videos for albums. Selected albums are noted with your camera to ...
The next time you turn on the LCD, your album selection is selected. 6 Press the Menu button to exit the menu. See EasyShare software Help for details. 40 www.kodak.com/go/support To remove all the pictures or videos you take pictures or videos. Your selections are tagged ...with those album names. Repeat to mark pictures or videos for albums. Selected albums are noted with your camera to ...
User Manual
Page 50
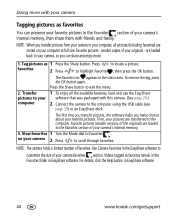
... the available features, load and use the EasyShare software that was packaged with this camera. (See page 28.) 2 Connect the camera to highlight Favorite , then press the OK button. The Favorite icon appears in EasyShare software. 44 www.kodak.com/go/support For details, click the Help... in the Favorites section of your camera Favorites section. NOTE: The camera holds a limited number of your camera 2 Press to Favorites . favorites 2 Press to the computer using the USB cable (see page 29) or an EasyShare dock. View favorites 1 Turn the Mode dial to scroll through favorites...
... the available features, load and use the EasyShare software that was packaged with this camera. (See page 28.) 2 Connect the camera to highlight Favorite , then press the OK button. The Favorite icon appears in EasyShare software. 44 www.kodak.com/go/support For details, click the Help... in the Favorites section of your camera Favorites section. NOTE: The camera holds a limited number of your camera 2 Press to Favorites . favorites 2 Press to the computer using the USB cable (see page 29) or an EasyShare dock. View favorites 1 Turn the Mode dial to scroll through favorites...
User Manual
Page 51
... at the top and bottom of internal memory are restored the next time you transfer pictures from your Camera Favorites Album or to turn off the Camera Favorites feature. Preventing favorites from transferring to the camera 1 Open Kodak EasyShare software. Slide Show (page 23) Remove favorites (page 45) Multi-up (page 18) Setup Menu (page 37...
... at the top and bottom of internal memory are restored the next time you transfer pictures from your Camera Favorites Album or to turn off the Camera Favorites feature. Preventing favorites from transferring to the camera 1 Open Kodak EasyShare software. Slide Show (page 23) Remove favorites (page 45) Multi-up (page 18) Setup Menu (page 37...
User Manual
Page 53
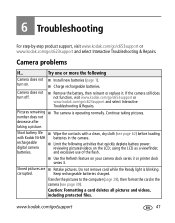
... Ready light is operating normally. turn off. I Retake pictures. corrupted. rechargeable digital camera I Limit the following Camera does not I Wipe the contacts with a clean, dry cloth (see page 62) before loading with Kodak Ni-MH batteries in the camera (see page 39). Keep rechargeable...activities that quickly deplete battery power: reviewing pictures/videos on . Camera does not turn on the LCD; If the camera still does not function, visit www.kodak.com/go/c653support or www.kodak.com/go /c623support and select Interactive Troubleshooting & Repairs. using the...
... Ready light is operating normally. turn off. I Retake pictures. corrupted. rechargeable digital camera I Limit the following Camera does not I Wipe the contacts with a clean, dry cloth (see page 62) before loading with Kodak Ni-MH batteries in the camera (see page 39). Keep rechargeable...activities that quickly deplete battery power: reviewing pictures/videos on . Camera does not turn on the LCD; If the camera still does not function, visit www.kodak.com/go/c653support or www.kodak.com/go /c623support and select Interactive Troubleshooting & Repairs. using the...
User Manual
Page 59
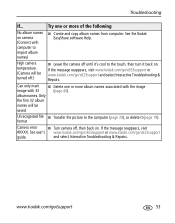
... names on . High camera temperature. (Camera will be turned off until it's cool to the touch, then turn it (page 19). Can only mark image with 32 I Leave the camera off .) I Delete one or more album names associated with computer to the computer (page 29), or delete it back on. See the Kodak EasyShare software Help. album...
... names on . High camera temperature. (Camera will be turned off until it's cool to the touch, then turn it (page 19). Can only mark image with 32 I Leave the camera off .) I Delete one or more album names associated with computer to the computer (page 29), or delete it back on. See the Kodak EasyShare software Help. album...


