Operation Manual
Page 5
...-In Viewer 19 Using a Dissolve Control 20 Shutdown 20 Maintenance 21 Changing the Projection Lamp 22 Cleaning the Condenser, Heat-Absorbing Glass, and Mirror 23 Troubleshooting 27 Warranty 29 How to Obtain Service 30 Appendix A 31 Serial Number The serial number of your projector is printed on the label affixed to the power cord retainer on the base of purchase, for future reference. KODAK EKTAGRAPHIC III Slide Projector 1
...-In Viewer 19 Using a Dissolve Control 20 Shutdown 20 Maintenance 21 Changing the Projection Lamp 22 Cleaning the Condenser, Heat-Absorbing Glass, and Mirror 23 Troubleshooting 27 Warranty 29 How to Obtain Service 30 Appendix A 31 Serial Number The serial number of your projector is printed on the label affixed to the power cord retainer on the base of purchase, for future reference. KODAK EKTAGRAPHIC III Slide Projector 1
Operation Manual
Page 6
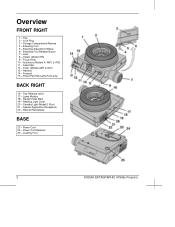
... BASE 23 - Tray 2 - Elevating Foot Release Button 7 - Storage Compartment/Remote 4 - Focus Knob 10 - Select Bar 12 - Forward 15 - Reading Light Cover 20 - Elevating Adjustment Wheel 6 - Autofocus (Models A, AMT, & ATS) 11 - Timer (Models AMT & ATS) 13 - Leveling Foot 2 KODAK EKTAGRAPHIC III Slide Projector Lock Ring 3 - Reverse 14 - Special-Application Receptacle 22 - Lens 8 - Power Cord Retainer 25 - Lamp Module 18 - Elevating Foot 5 - Power Cord 24 - Tray Release Latch 17 - Standby Light (Model E Plus) 21 - Overview FRONT RIGHT 1 -
... BASE 23 - Tray 2 - Elevating Foot Release Button 7 - Storage Compartment/Remote 4 - Focus Knob 10 - Select Bar 12 - Forward 15 - Reading Light Cover 20 - Elevating Adjustment Wheel 6 - Autofocus (Models A, AMT, & ATS) 11 - Timer (Models AMT & ATS) 13 - Leveling Foot 2 KODAK EKTAGRAPHIC III Slide Projector Lock Ring 3 - Reverse 14 - Special-Application Receptacle 22 - Lens 8 - Power Cord Retainer 25 - Lamp Module 18 - Elevating Foot 5 - Power Cord 24 - Tray Release Latch 17 - Standby Light (Model E Plus) 21 - Overview FRONT RIGHT 1 -
Operation Manual
Page 7
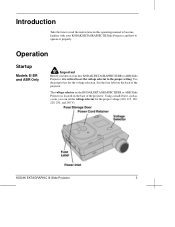
.... Using a small object, such as a coin, you turn on your KODAK EKTAGRAPHIC III Slide Projector and how to operate it is located on the back of the projector. Operation Startup Models III BR and ABR Only Important Before you can set the voltage selector to the proper setting. See the fuse label on the base of the projector. Introduction Take the time to read the instructions in this operating manual...
.... Using a small object, such as a coin, you turn on your KODAK EKTAGRAPHIC III Slide Projector and how to operate it is located on the back of the projector. Operation Startup Models III BR and ABR Only Important Before you can set the voltage selector to the proper setting. See the fuse label on the base of the projector. Introduction Take the time to read the instructions in this operating manual...

Operation Manual
Page 8
... standards. When used outside the United States of power for this projector. These projectors are supplied with a detachable power cord that ensures grounding and polarization. Important The EKTAGRAPHIC III BR and ABR Slide Projectors are shipped with a 3-wire grounding power cord to provide a permanent, properly installed 3-wire receptacle as the source of America, please use a proper adapter that is packaged separately (not wound on models manufactured before November...
... standards. When used outside the United States of power for this projector. These projectors are supplied with a detachable power cord that ensures grounding and polarization. Important The EKTAGRAPHIC III BR and ABR Slide Projectors are shipped with a 3-wire grounding power cord to provide a permanent, properly installed 3-wire receptacle as the source of America, please use a proper adapter that is packaged separately (not wound on models manufactured before November...

Operation Manual
Page 9
Models A, AMT and ATS Operation Open the storage compartment and remove the remote control. Plug the 5-pin cable remote connector into a grounded outlet with the metallic rivet head. KODAK EKTAGRAPHIC III Slide Projector 5 This receptacle also accepts plugs for accessories, such as Kodak dissolve controls. Plug the power cord into the remote-control receptacle, aligning the raised dot with 110- to 125-volt 60 Hz current only.
Models A, AMT and ATS Operation Open the storage compartment and remove the remote control. Plug the 5-pin cable remote connector into a grounded outlet with the metallic rivet head. KODAK EKTAGRAPHIC III Slide Projector 5 This receptacle also accepts plugs for accessories, such as Kodak dissolve controls. Plug the power cord into the remote-control receptacle, aligning the raised dot with 110- to 125-volt 60 Hz current only.
Operation Manual
Page 10
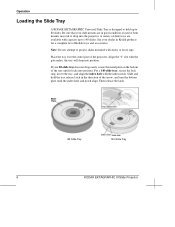
... attempt to project slides mounted with capacity up to 80 slides. frayed or bent mounts may fail to 140 slides. If your dealer in the direction of Kodak trays and accessories. Then release the latch. 80-Slide Tray 140-Slide Tray 6 KODAK EKTAGRAPHIC III Slide Projector See your 80-slide tray does not drop easily, rotate the metal plate on the bottom of the projector. Slide and hold...
... attempt to project slides mounted with capacity up to 80 slides. frayed or bent mounts may fail to 140 slides. If your dealer in the direction of Kodak trays and accessories. Then release the latch. 80-Slide Tray 140-Slide Tray 6 KODAK EKTAGRAPHIC III Slide Projector See your 80-slide tray does not drop easily, rotate the metal plate on the bottom of the projector. Slide and hold...
Operation Manual
Page 11
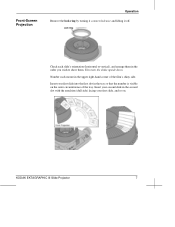
KODAK EKTAGRAPHIC III Slide Projector 7 Front-Screen Projection Operation Remove the lock ring by turning it counterclockwise and lifting it off. Check each mount in the upper right-hand corner of the tray. Number each slide's orientation (horizontal or vertical), and arrange them in the tray so that the number is visible on . Insert your first slide, and so on the outer circumference of the film's shiny...
KODAK EKTAGRAPHIC III Slide Projector 7 Front-Screen Projection Operation Remove the lock ring by turning it counterclockwise and lifting it off. Check each mount in the upper right-hand corner of the tray. Number each slide's orientation (horizontal or vertical), and arrange them in the tray so that the number is visible on . Insert your first slide, and so on the outer circumference of the film's shiny...
Operation Manual
Page 12
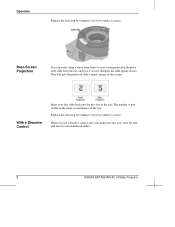
... trays (one for oddand one for even-numbered slides). 8 KODAK EKTAGRAPHIC III Slide Projector The number is secure. With a Dissolve Control Insert your slides into the first slot in the inner circumference of the tray. to rear-screen projection. Operation Replace the lock ring by turning it clockwise until it is secure Rear-Screen Projection You can easily adapt a show from the tray and turn it around (keeping the slide upside down).
... trays (one for oddand one for even-numbered slides). 8 KODAK EKTAGRAPHIC III Slide Projector The number is secure. With a Dissolve Control Insert your slides into the first slot in the inner circumference of the tray. to rear-screen projection. Operation Replace the lock ring by turning it clockwise until it is secure Rear-Screen Projection You can easily adapt a show from the tray and turn it around (keeping the slide upside down).

Operation Manual
Page 14
... the lens gear teeth on the lens barrel with the notch on changing the lamp module.) See your dealer in case the lamp burns out during a presentation. You may want to half lamp (for longer lamp life) or lamp (for instructions on the projector. Lamp Slide the power switch to keep a spare KODAK EC Lamp Module (CAT 831 3587) handy in Kodak products to order this module. 10 KODAK EKTAGRAPHIC III Slide Projector Replacing the...
... the lens gear teeth on the lens barrel with the notch on changing the lamp module.) See your dealer in case the lamp burns out during a presentation. You may want to half lamp (for longer lamp life) or lamp (for instructions on the projector. Lamp Slide the power switch to keep a spare KODAK EC Lamp Module (CAT 831 3587) handy in Kodak products to order this module. 10 KODAK EKTAGRAPHIC III Slide Projector Replacing the...
Operation Manual
Page 15
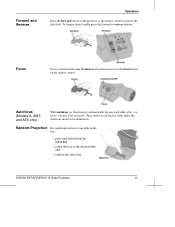
... the remote control. Focus Focus your first slide using the focus knob on the projector or the focus button on , the projector automatically focuses each slide, after you focus your first slide manually. Forward and Reverse Operation Press the forward button on the projector or the remote control to the desired slide, and • release the select bar. KODAK EKTAGRAPHIC III Slide Projector 11 Turn autofocus off if glass slides make the autofocus motor run continuously. To change slides...
... the remote control. Focus Focus your first slide using the focus knob on the projector or the focus button on , the projector automatically focuses each slide, after you focus your first slide manually. Forward and Reverse Operation Press the forward button on the projector or the remote control to the desired slide, and • release the select bar. KODAK EKTAGRAPHIC III Slide Projector 11 Turn autofocus off if glass slides make the autofocus motor run continuously. To change slides...
Operation Manual
Page 16
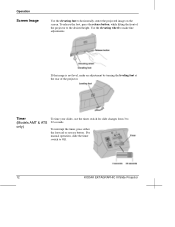
Use the elevating wheel to horizontally center the projected image on the screen. To interrupt the timer, press either the forward or reverse button. Operation Screen Image Use the elevating foot to make an adjustment by turning the leveling foot at the rear of the projector to the desired height. Timer (Models AMT & ATS only) To time your slides, use the timer switch for slide changes from 3 to Off. 12 KODAK EKTAGRAPHIC III Slide Projector For manual operation, slide the timer switch to 22...
Use the elevating wheel to horizontally center the projected image on the screen. To interrupt the timer, press either the forward or reverse button. Operation Screen Image Use the elevating foot to make an adjustment by turning the leveling foot at the rear of the projector to the desired height. Timer (Models AMT & ATS only) To time your slides, use the timer switch for slide changes from 3 to Off. 12 KODAK EKTAGRAPHIC III Slide Projector For manual operation, slide the timer switch to 22...

Operation Manual
Page 17
... control and Receptacle programming capability. Reading Light Operation To illuminate a small area for contact identification descriptions.) KODAK EKTAGRAPHIC III Slide Projector 13 It provides 22.5 V low-voltage power isolated from the main power line. In a dissolve program, it indicates that • both projectors are receiving power • both power switches are set at 180˚. (See "Appendix A" for reading, lift the reading light cover while the projector lamp...
... control and Receptacle programming capability. Reading Light Operation To illuminate a small area for contact identification descriptions.) KODAK EKTAGRAPHIC III Slide Projector 13 It provides 22.5 V low-voltage power isolated from the main power line. In a dissolve program, it indicates that • both projectors are receiving power • both power switches are set at 180˚. (See "Appendix A" for reading, lift the reading light cover while the projector lamp...

Operation Manual
Page 18
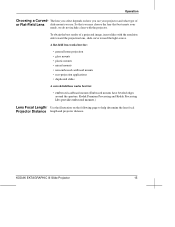
... cardboard open face mounts from an automated mounting process, provide superior projection quality. When selecting a lens, remember that the shorter the focal length (i.e., the smaller the f/number), the brighter the projected image. A flat ). or full-lamp position. CSA Specification C222, Number 118-1959 (R1965), Picture Machines Appliances, CSA, 178 Rexdale Boulevard, Rexdale, Ontario M9W 1R3 Canada. 14 KODAK EKTAGRAPHIC III Slide Projector Selecting Slide Projection...
... cardboard open face mounts from an automated mounting process, provide superior projection quality. When selecting a lens, remember that the shorter the focal length (i.e., the smaller the f/number), the brighter the projected image. A flat ). or full-lamp position. CSA Specification C222, Number 118-1959 (R1965), Picture Machines Appliances, CSA, 178 Rexdale Boulevard, Rexdale, Ontario M9W 1R3 Canada. 14 KODAK EKTAGRAPHIC III Slide Projector Selecting Slide Projection...
Operation Manual
Page 19
... mounts (Embossed mounts have beveled edges around the aperture. KODAK EKTAGRAPHIC III Slide Projector 15 To obtain the best results of or Flat-Field Lens slide mount you may choose the lens that best meets your needs, we do not include a lens with the emulsion side toward the projection lens, slide curve toward the light source. So that you use your projector and what type of a projected image, insert slides with the projector. Operation...
... mounts (Embossed mounts have beveled edges around the aperture. KODAK EKTAGRAPHIC III Slide Projector 15 To obtain the best results of or Flat-Field Lens slide mount you may choose the lens that best meets your needs, we do not include a lens with the emulsion side toward the projection lens, slide curve toward the light source. So that you use your projector and what type of a projected image, insert slides with the projector. Operation...
Operation Manual
Page 21
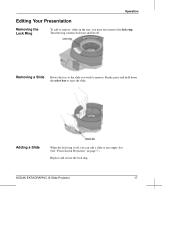
Operation Editing Your Presentation Removing the Lock Ring To add or remove slides in the tray, you wish to remove. Firmly press and hold down the select bar to any empty slot. (See "Front-Screen Projection" on page 7.) Replace and secure the lock ring. Turn the ring counterclockwise and lift off , you can add a slide to eject the slide. Adding a Slide When the lock ring is off . KODAK EKTAGRAPHIC III Slide Projector 17 Removing a Slide Rotate the tray to the slide you must first remove the lock ring.
Operation Editing Your Presentation Removing the Lock Ring To add or remove slides in the tray, you wish to remove. Firmly press and hold down the select bar to any empty slot. (See "Front-Screen Projection" on page 7.) Replace and secure the lock ring. Turn the ring counterclockwise and lift off , you can add a slide to eject the slide. Adding a Slide When the lock ring is off . KODAK EKTAGRAPHIC III Slide Projector 17 Removing a Slide Rotate the tray to the slide you must first remove the lock ring.

Operation Manual
Page 24
.... 20 KODAK EKTAGRAPHIC III Slide Projector Shutdown To shut down the light beam in one projector, while changing the image and fading up and position the lens gear teeth on the lens barrel with the notch on Kodak dissolve controls. When using a dissolve control, you need to divide your dissolve-control operating manual for a dissolve control is a simple two-projector fade. This eliminates a dark-screen interval. This feature fades down , • remove and...
.... 20 KODAK EKTAGRAPHIC III Slide Projector Shutdown To shut down the light beam in one projector, while changing the image and fading up and position the lens gear teeth on the lens barrel with the notch on Kodak dissolve controls. When using a dissolve control, you need to divide your dissolve-control operating manual for a dissolve control is a simple two-projector fade. This eliminates a dark-screen interval. This feature fades down , • remove and...

Operation Manual
Page 25
...-lamp settings to approximate image brightness in multi-projector presentations. Lamp Tips Desired Brightness Maximum High Medium Low EKTAGRPAHIC III Projector Lamp EXW EXR FHS EXY • Projector operation on line voltages above 125 volts greatly reduces the lamp life. • Unplug the projector before operating. Projection Lamps Quartz-halogen 82 V projection lamps- KODAK EKTAGRAPHIC III Slide Projector 21 Maintenance To ensure a long life and trouble-free operation for your projector: • Allow the air to flow freely around the projector...
...-lamp settings to approximate image brightness in multi-projector presentations. Lamp Tips Desired Brightness Maximum High Medium Low EKTAGRPAHIC III Projector Lamp EXW EXR FHS EXY • Projector operation on line voltages above 125 volts greatly reduces the lamp life. • Unplug the projector before operating. Projection Lamps Quartz-halogen 82 V projection lamps- KODAK EKTAGRAPHIC III Slide Projector 21 Maintenance To ensure a long life and trouble-free operation for your projector: • Allow the air to flow freely around the projector...
Operation Manual
Page 31
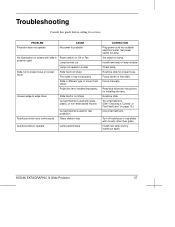
.... Set switch to Lamp. or Flat-Field Lens" on screen focus. Examine slide for installing the lens. Turn off autofocus or use slides with glass, plastic, or non-embosssed mounts Autofocus motor runs continuously Curved field lens used for service. Try a flat field lens. Troubleshooting Consult this guide before calling for rear projection Glass slides in tray Autofocus fails to operate Lamp performance CORRECTION Plug power cord into suitable electrical outlet. Set power switch to Lamp. KODAK EKTAGRAPHIC III Slide Projector...
.... Set switch to Lamp. or Flat-Field Lens" on screen focus. Examine slide for installing the lens. Turn off autofocus or use slides with glass, plastic, or non-embosssed mounts Autofocus motor runs continuously Curved field lens used for service. Try a flat field lens. Troubleshooting Consult this guide before calling for rear projection Glass slides in tray Autofocus fails to operate Lamp performance CORRECTION Plug power cord into suitable electrical outlet. Set power switch to Lamp. KODAK EKTAGRAPHIC III Slide Projector...

Operation Manual
Page 33
... warranty does not cover circumstances beyond Kodak's control, projector lamps, or problems caused by failure to follow the care and operating instructions in your country for worn-out projector lamps. Kodak makes no other rights that vary from state to repair the projector, the option of replacement or refund of the purchase price will repair it without dated proof of such damages. Repair or replacement is unable to...
... warranty does not cover circumstances beyond Kodak's control, projector lamps, or problems caused by failure to follow the care and operating instructions in your country for worn-out projector lamps. Kodak makes no other rights that vary from state to repair the projector, the option of replacement or refund of the purchase price will repair it without dated proof of such damages. Repair or replacement is unable to...
Quick Reference Guide
Page 13
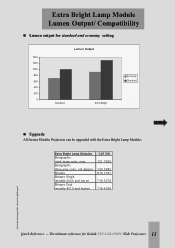
.../ Compatibility n Lumen output for Kodak EKTAGRAPHIC Slide Projectors 13 The ultimate reference for standard and economy setting 1400 1200 1000 800 600 400 200 0 /XPHQ 2XWSXW Standard Extra Bright Economy Standard n Upgrade All former Ektalite Projectors can be upgraded with the Extra Bright Lamp Module: Extra Bright Lamp Modules Ekt agraphic (dark beige color, new Ekt agraphic (blue gray color, old design) Ekt alit...
.../ Compatibility n Lumen output for Kodak EKTAGRAPHIC Slide Projectors 13 The ultimate reference for standard and economy setting 1400 1200 1000 800 600 400 200 0 /XPHQ 2XWSXW Standard Extra Bright Economy Standard n Upgrade All former Ektalite Projectors can be upgraded with the Extra Bright Lamp Module: Extra Bright Lamp Modules Ekt agraphic (dark beige color, new Ekt agraphic (blue gray color, old design) Ekt alit...


