User Guide
Page 2
... Connecting the power cord to the scanner 12 Connecting the USB cable 13 Turning on the scanner and finalizing Kodak Driver Software installation 13 Installing application software 15 Scanner components 16 3 Using the Scanner 18 Turning the scanner on and off 18 Adjusting the input and output trays 18 Start and stop scanning 19 Document preparation 19 Verifying your scanner installation 20 Viewing test images 23 Application software 23 Kodak Button Manager 24 Configuring functions 24 Installing and configuring Readiris 26 Assigning function numbers 29 Using function numbers...
... Connecting the power cord to the scanner 12 Connecting the USB cable 13 Turning on the scanner and finalizing Kodak Driver Software installation 13 Installing application software 15 Scanner components 16 3 Using the Scanner 18 Turning the scanner on and off 18 Adjusting the input and output trays 18 Start and stop scanning 19 Document preparation 19 Verifying your scanner installation 20 Viewing test images 23 Application software 23 Kodak Button Manager 24 Configuring functions 24 Installing and configuring Readiris 26 Assigning function numbers 29 Using function numbers...

User Guide
Page 3
... Image Control options 61 Color Dropout options 62 Scanner Control dialog box 63 Multi-Feed Detection options 63 Energy Saving features of the scanner 64 Transport timeout 64 Blank image detection 64 Defining the Scan area 64 Scan Area dialog box 65 5 Maintenance 66 Cleaning the scanner 66 Replacing the feed module 69 Supplies and consumables 70 6 Troubleshooting 71 Indicator lights and error codes 71 Clearing a document jam 71 Problem solving 72 Scanner not working 74 Testing for a USB connection 77 USB connection issues 78 Appendix A Specifications...
... Image Control options 61 Color Dropout options 62 Scanner Control dialog box 63 Multi-Feed Detection options 63 Energy Saving features of the scanner 64 Transport timeout 64 Blank image detection 64 Defining the Scan area 64 Scan Area dialog box 65 5 Maintenance 66 Cleaning the scanner 66 Replacing the feed module 69 Supplies and consumables 70 6 Troubleshooting 71 Indicator lights and error codes 71 Clearing a document jam 71 Problem solving 72 Scanner not working 74 Testing for a USB connection 77 USB connection issues 78 Appendix A Specifications...
User Guide
Page 4
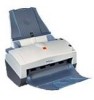
... the TWAIN Datasource and ISIS Driver. A-61512 May 2006 1 1 Introduction The Kodak i30 and i40 Scanners are included with the Kodak i30/i40 Scanners. • Kodak i30 Scanner - The Kodak i40 Scanner also has an optional special document feeder which allows you to scan documents such as credit cards, checks, identifications card, prescription forms, etc. This User's Guide provides information and procedures for use with special document feeder • Kodak i40 Scanner - desktop simplex color scanner Kodak i40 Scanner with output tray Kodak i40 Scanner with both scanner models...
... the TWAIN Datasource and ISIS Driver. A-61512 May 2006 1 1 Introduction The Kodak i30 and i40 Scanners are included with the Kodak i30/i40 Scanners. • Kodak i30 Scanner - The Kodak i40 Scanner also has an optional special document feeder which allows you to scan documents such as credit cards, checks, identifications card, prescription forms, etc. This User's Guide provides information and procedures for use with special document feeder • Kodak i40 Scanner - desktop simplex color scanner Kodak i40 Scanner with output tray Kodak i40 Scanner with both scanner models...

User Guide
Page 7
... for a Class B digital device pursuant to Part 15 of the product, they must be used in order to ensure compliance with FCC regulation. Reorient or relocate the receiving antenna. - Any changes or modifications not expressly approved by turning the equipment off and on, the user is used near a radio or television receiver in accordance with the installation of the...
... for a Class B digital device pursuant to Part 15 of the product, they must be used in order to ensure compliance with FCC regulation. Reorient or relocate the receiving antenna. - Any changes or modifications not expressly approved by turning the equipment off and on, the user is used near a radio or television receiver in accordance with the installation of the...
User Guide
Page 9
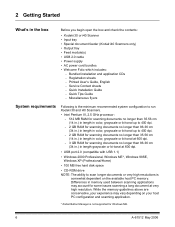
... tray • Special document feeder (Kodak i40 Scanners only) • Output tray • Feed module(s) • USB 2.0 cable • Power supply • AC power cord bundles • Welcome Folio which includes: - 2 Getting Started What's in length grayscale or bi-tonal at very high resolution. Differences in memory used between scanning applications may vary depending on your host PC configuration and scanning application. * Kodak Button Manager is somewhat dependent on the available host PC memory. Printed User's Guide, English - Quick Installation Guide...
... tray • Special document feeder (Kodak i40 Scanners only) • Output tray • Feed module(s) • USB 2.0 cable • Power supply • AC power cord bundles • Welcome Folio which includes: - 2 Getting Started What's in length grayscale or bi-tonal at very high resolution. Differences in memory used between scanning applications may vary depending on your host PC configuration and scanning application. * Kodak Button Manager is somewhat dependent on the available host PC memory. Printed User's Guide, English - Quick Installation Guide...
User Guide
Page 10
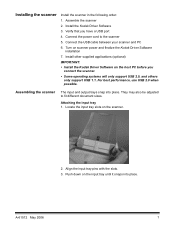
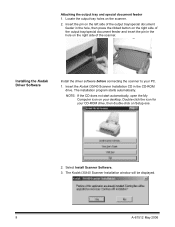
... scanner. • Some operating systems will only support USB 2.0, and others only support USB 1.1. They may also be adjusted to the scanner 5. Connect the USB cable between your scanner and PC 6. Assembling the scanner The input and output trays snap into place. Locate the input tray slots on scanner power and finalize the Kodak Driver Software installation 7. Align the input tray pins with the slots. 3. Connect the power cord to fit different document sizes. For best performance, use USB...
... scanner. • Some operating systems will only support USB 2.0, and others only support USB 1.1. They may also be adjusted to the scanner 5. Connect the USB cable between your scanner and PC 6. Assembling the scanner The input and output trays snap into place. Locate the input tray slots on scanner power and finalize the Kodak Driver Software installation 7. Align the input tray pins with the slots. 3. Connect the power cord to fit different document sizes. For best performance, use USB...
User Guide
Page 11
Locate the output tray holes on Setup.exe. 2. Insert the Kodak i30/i40 Scanner Installation CD in the hole on the right side of the scanner. The installation program starts automatically. Double-click the icon for your CD-ROM drive, then double-click on the scanner. 2. NOTE: If the CD does not start automatically, open the My Computer icon on the right side of the output tray/special document feeder in the hole, then press...
Locate the output tray holes on Setup.exe. 2. Insert the Kodak i30/i40 Scanner Installation CD in the hole on the right side of the scanner. The installation program starts automatically. Double-click the icon for your CD-ROM drive, then double-click on the scanner. 2. NOTE: If the CD does not start automatically, open the My Computer icon on the right side of the output tray/special document feeder in the hole, then press...
User Guide
Page 17
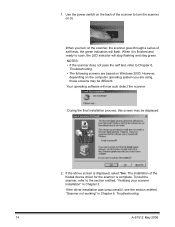
... screen may be displayed: 2. The installation of the scanner to the section entitled, "Verifying your scanner installation" in Chapter 6, Troubleshooting. 14 A-61512 May 2006 1. However, depending on the computer operating system you turn the scanner on the scanner, the scanner goes through a series of self tests, the green indicators will flash. When you are based on Windows 2000. Use the power switch on the back of the Kodak device driver...
... screen may be displayed: 2. The installation of the scanner to the section entitled, "Verifying your scanner installation" in Chapter 6, Troubleshooting. 14 A-61512 May 2006 1. However, depending on the computer operating system you turn the scanner on the scanner, the scanner goes through a series of self tests, the green indicators will flash. When you are based on Windows 2000. Use the power switch on the back of the Kodak device driver...

User Guide
Page 19
... window displaying an "E". Output tray - opens the cover on the automatic document feeder for scanning small-sized documents one at a time. Adjusts to a predefined function of an associated application of these error codes. Arrow button - for Kodak i40 Scanners only, this extension when scanning documents longer than 8.5 x 11 inches (A4). unfold this shelf provides a flat work surface for clearing documents. displays 1 through 9. The function window will also display error codes. allows you to scan • Flashing red: error...
... window displaying an "E". Output tray - opens the cover on the automatic document feeder for scanning small-sized documents one at a time. Adjusts to a predefined function of an associated application of these error codes. Arrow button - for Kodak i40 Scanners only, this extension when scanning documents longer than 8.5 x 11 inches (A4). unfold this shelf provides a flat work surface for clearing documents. displays 1 through 9. The function window will also display error codes. allows you to scan • Flashing red: error...

User Guide
Page 26
... C drive. To learn more about image processing features, go to open and view the captured image. When testing has been completed, delete the test images. See the User's Guide provided with your needs. Files will be optimized to use other capture applications. image0000001B.jpg is a front image; Viewing test images Application software The images you scanned can be found in the TWAIN folder on this file to Chapter 4, Image Processing.
... C drive. To learn more about image processing features, go to open and view the captured image. When testing has been completed, delete the test images. See the User's Guide provided with your needs. Files will be optimized to use other capture applications. image0000001B.jpg is a front image; Viewing test images Application software The images you scanned can be found in the TWAIN folder on this file to Chapter 4, Image Processing.
User Guide
Page 27
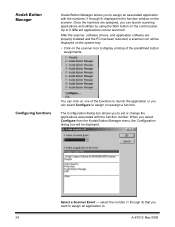
... assign an application to set or change the applications associated with the numbers (1 through 9) displayed in the function window on the control panel. Configuring functions You can click on one of the predefined button assignments. Up to assign or reassign a function. After the scanner, software drivers, and application software are assigned, you can be displayed. Kodak Button Manager Kodak Button Manager allows you to display a listing of the functions...
... assign an application to set or change the applications associated with the numbers (1 through 9) displayed in the function window on the control panel. Configuring functions You can click on one of the predefined button assignments. Up to assign or reassign a function. After the scanner, software drivers, and application software are assigned, you can be displayed. Kodak Button Manager Kodak Button Manager allows you to display a listing of the functions...

User Guide
Page 32
... Kodak Button Manager and select Configure. IMPORTANT: • Readiris Pro 9 Corporate Edition is installed on the system tray to 9) by selecting the Other... If this software is included with a particular application. 3. If you want Readiris: Create PDF to be your primary scanning application, you want to that application. Select the desired application from the Select a Scanner Event dropdown box you must install and configure...
... Kodak Button Manager and select Configure. IMPORTANT: • Readiris Pro 9 Corporate Edition is installed on the system tray to 9) by selecting the Other... If this software is included with a particular application. 3. If you want Readiris: Create PDF to be your primary scanning application, you want to that application. Select the desired application from the Select a Scanner Event dropdown box you must install and configure...

User Guide
Page 33
... you are scanning one-sided documents or if you have assigned the function numbers, they can be easily launched by using the Start button on the side should be fed into the input tray of the scanner. Use the arrow button to scan into the scanner with holes on the control panel. 1. Scanning your documents Standard paper size documents should be placed upside down in the input tray. The documents should feed easily through...
... you are scanning one-sided documents or if you have assigned the function numbers, they can be easily launched by using the Start button on the side should be fed into the input tray of the scanner. Use the arrow button to scan into the scanner with holes on the control panel. 1. Scanning your documents Standard paper size documents should be placed upside down in the input tray. The documents should feed easily through...
User Guide
Page 35
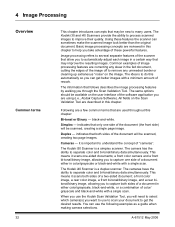
... to process scanned images to remove any skew in this chapter to capture one side of the software application you want to use the following examples as a guide when making camera selections. Image processing refers to automatically adjust each image in color/grayscale or black-and-white with a single scan. it scans one side of the document (the front side) will be scanned, creating a single page image. The Kodak i40 Scanner is a simplex scanner. The idea...
... to process scanned images to remove any skew in this chapter to capture one side of the software application you want to use the following examples as a guide when making camera selections. Image processing refers to automatically adjust each image in color/grayscale or black-and-white with a single scan. it scans one side of the document (the front side) will be scanned, creating a single page image. The Kodak i40 Scanner is a simplex scanner. The idea...
User Guide
Page 56
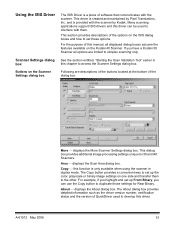
... About dialog box. For the purpose of the options on the Kodak i40 Scanner. Scanner Settings dialog See the section entitled, "Starting the Scan Validation Tool" earlier in duplex mode. The About dialog box provides detailed information such as the driver version number, certification status and the version of software that communicates with them to simplex scanning only. and is a piece of QuickDriver used to i30 and i40 Scanners.
... About dialog box. For the purpose of the options on the Kodak i40 Scanner. Scanner Settings dialog See the section entitled, "Starting the Scan Validation Tool" earlier in duplex mode. The About dialog box provides detailed information such as the driver version number, certification status and the version of software that communicates with them to simplex scanning only. and is a piece of QuickDriver used to i30 and i40 Scanners.

User Guide
Page 57
... Camera area list the available sides (front and back) of the document being scanned. Some settings apply only to binary (black-and-white) images, others apply to capture (Enable camera settings). 2. Check the images you wish to color/grayscale images. Enable camera settings select the desired checkbox to capture only rear images.) Enable your selection by putting a checkmark in the desired box. On the Kodak i40 Scanner there is...
... Camera area list the available sides (front and back) of the document being scanned. Some settings apply only to binary (black-and-white) images, others apply to capture (Enable camera settings). 2. Check the images you wish to color/grayscale images. Enable camera settings select the desired checkbox to capture only rear images.) Enable your selection by putting a checkmark in the desired box. On the Kodak i40 Scanner there is...

User Guide
Page 75
... documents will be feed, but no images will not scan/feed documents Make sure that : • the input tray and side guides are adjusted for the width of the documents you are scanning. • the output tray is installed properly and securely in Chapter 5, Maintenance. Documents are jamming or multiple documents are feeding Make sure that : • the power cord is plugged securely into the output tray when the next page or last page is scanned. Problem solving Use...
... documents will be feed, but no images will not scan/feed documents Make sure that : • the input tray and side guides are adjusted for the width of the documents you are scanning. • the output tray is installed properly and securely in Chapter 5, Maintenance. Documents are jamming or multiple documents are feeding Make sure that : • the power cord is plugged securely into the output tray when the next page or last page is scanned. Problem solving Use...

User Guide
Page 80
... to the end of the "Target:" path (to the right of the quotes), then when it is actually communicating. Testing for a USB connection When the Kodak device drivers for the Kodak i30 and i40 Scanners are installed, a copy of the USB test software will also be valid with the Kodak Scan Validation Tool software: C:\program files\Kodak\Document Imaging\usbtst.exe If you run the Scan Validation Tool software, and select the Info tab.
... to the end of the "Target:" path (to the right of the quotes), then when it is actually communicating. Testing for a USB connection When the Kodak device drivers for the Kodak i30 and i40 Scanners are installed, a copy of the USB test software will also be valid with the Kodak Scan Validation Tool software: C:\program files\Kodak\Document Imaging\usbtst.exe If you run the Scan Validation Tool software, and select the Info tab.
User Guide
Page 81
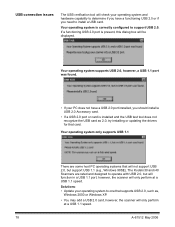
... a USB 2.0 card, however, the scanner will only perform at a USB 1.1 speed. Solutions: • Update your operating system to one that card. USB connection issues The USB verification tool will check your operating system and hardware capability to determine if you have a USB 2.0 port installed, you need to install a USB card. Your operating system only supports USB 1.1 There are rated and designed to support USB 2.0. If a functioning USB 2.0 port is correctly configured to operate with USB 2.0, but support USB 1.1 (e.g., Windows 98SE). Your operating system...
... a USB 2.0 card, however, the scanner will only perform at a USB 1.1 speed. Solutions: • Update your operating system to one that card. USB connection issues The USB verification tool will check your operating system and hardware capability to determine if you have a USB 2.0 port installed, you need to install a USB card. Your operating system only supports USB 1.1 There are rated and designed to support USB 2.0. If a functioning USB 2.0 port is correctly configured to operate with USB 2.0, but support USB 1.1 (e.g., Windows 98SE). Your operating system...
User Guide
Page 83
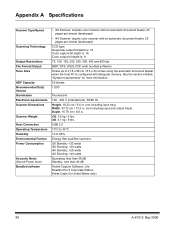
... cm / 6.6 in. Appendix A Specifications Scanner Type/Speed Scanning Technology Output Resolutions File Format Output Scan Area ADF Capacity Recommended Daily Volume Illumination Electrical requirements Scanner Dimensions Scanner Weight Host Connection Operating Temperature Humidity Environmental Factors Power Consumption Acoustic Noise (Sound Power level) Bundled software • i30 Scanner: simplex color scanner with an automatic document feeder, 25 pages per minute (landscape) • i40 Scanner: duplex color scanner with an automatic document feeder, 25 pages per minute (landscape) CCD...
... cm / 6.6 in. Appendix A Specifications Scanner Type/Speed Scanning Technology Output Resolutions File Format Output Scan Area ADF Capacity Recommended Daily Volume Illumination Electrical requirements Scanner Dimensions Scanner Weight Host Connection Operating Temperature Humidity Environmental Factors Power Consumption Acoustic Noise (Sound Power level) Bundled software • i30 Scanner: simplex color scanner with an automatic document feeder, 25 pages per minute (landscape) • i40 Scanner: duplex color scanner with an automatic document feeder, 25 pages per minute (landscape) CCD...


