
User Guide
Page 2
Read and understand all instructions before touching the lamp and the surrounding area. to Obtain Service" on heat-sensitive surfaces. 5. Do not operate your projector, always follow basic safety precautions: 1. Always unplug the projector from the electrical outlet before storing. 10. Use only safety electrical low-voltage (SELV) devices. 13. Keep the air-flow vents unobstructed. Close supervision is necessary...
Read and understand all instructions before touching the lamp and the surrounding area. to Obtain Service" on heat-sensitive surfaces. 5. Do not operate your projector, always follow basic safety precautions: 1. Always unplug the projector from the electrical outlet before storing. 10. Use only safety electrical low-voltage (SELV) devices. 13. Keep the air-flow vents unobstructed. Close supervision is necessary...
User Guide
Page 5
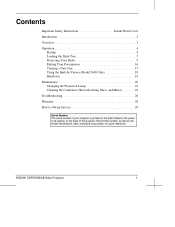
... projector. KODAK CAROUSEL® Slide Projector 1 Contents Important Safety Instructions Inside Front Cover Introduction 2 Overview 3 Operation 4 Startup 4 Loading the Slide Tray 5 Projecting Your Slides 9 Editing Your Presentation 16 Clearing a Gate Jam 17 Using the Built-In Viewer (Model 5600 Only 18 Shutdown 19 Maintenance 20 Changing the Projection Lamp 21 Cleaning the Condenser, Heat-Absorbing Glass, and Mirror 22 Troubleshooting 26 Warranty 28 How to Obtain Service...
... projector. KODAK CAROUSEL® Slide Projector 1 Contents Important Safety Instructions Inside Front Cover Introduction 2 Overview 3 Operation 4 Startup 4 Loading the Slide Tray 5 Projecting Your Slides 9 Editing Your Presentation 16 Clearing a Gate Jam 17 Using the Built-In Viewer (Model 5600 Only 18 Shutdown 19 Maintenance 20 Changing the Projection Lamp 21 Cleaning the Condenser, Heat-Absorbing Glass, and Mirror 22 Troubleshooting 26 Warranty 28 How to Obtain Service...
User Guide
Page 7
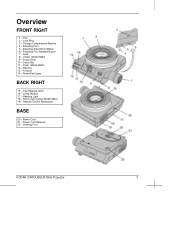
Viewer (Model 5600) 9 - Room Light Outlet (Model 5600) 19 - Elevating Foot 5 - Elevating Foot Release Button 7 - Remote Control Receptacle BASE 20 - Focus Knob 10 - Select Bar 11 - Reverse 13 - Power Cord Retainer 22 - Elevating Adjustment Wheel 6 - Timer (Model 5600) 12 - Tray 2 - Tray Release Latch 16 - Lamp Module 17 - Leveling Foot KODAK CAROUSEL® Slide Projector 3 Forward 14 - Storage Compartment/Remote 4 - Lens 8 - Overview FRONT RIGHT 1 - Lock Ring 3 - Power/Fan/Lamp BACK RIGHT 15 - Power Cord 21 - Reading Light 18 -
Viewer (Model 5600) 9 - Room Light Outlet (Model 5600) 19 - Elevating Foot 5 - Elevating Foot Release Button 7 - Remote Control Receptacle BASE 20 - Focus Knob 10 - Select Bar 11 - Reverse 13 - Power Cord Retainer 22 - Elevating Adjustment Wheel 6 - Timer (Model 5600) 12 - Tray 2 - Tray Release Latch 16 - Lamp Module 17 - Leveling Foot KODAK CAROUSEL® Slide Projector 3 Forward 14 - Storage Compartment/Remote 4 - Lens 8 - Overview FRONT RIGHT 1 - Lock Ring 3 - Power/Fan/Lamp BACK RIGHT 15 - Power Cord 21 - Reading Light 18 -
User Guide
Page 8
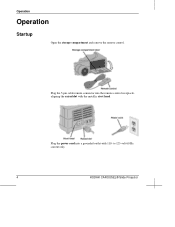
to 125-volt 60 Hz current only. 4 KODAK CAROUSEL® Slide Projector Plug the power cord into the remote-control receptacle, aligning the raised dot with 110- Plug the 5-pin cable remote connector into a grounded outlet with the metallic rivet head. Operation Operation Startup Open the storage compartment and remove the remote control.
to 125-volt 60 Hz current only. 4 KODAK CAROUSEL® Slide Projector Plug the power cord into the remote-control receptacle, aligning the raised dot with 110- Plug the 5-pin cable remote connector into a grounded outlet with the metallic rivet head. Operation Operation Startup Open the storage compartment and remove the remote control.
User Guide
Page 9
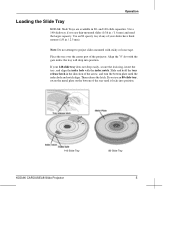
..., secure the lock ring, invert the tray, and align the index hole with the index notch. Slide and hold the tray release latch in . / 2.5 mm). Then release the latch. the tray will drop into position. 140-Slide Tray KODAK CAROUSEL® Slide Projector 80-Slide Tray 5 If you use an 80-slide tray, rotate the metal plate...
..., secure the lock ring, invert the tray, and align the index hole with the index notch. Slide and hold the tray release latch in . / 2.5 mm). Then release the latch. the tray will drop into position. 140-Slide Tray KODAK CAROUSEL® Slide Projector 80-Slide Tray 5 If you use an 80-slide tray, rotate the metal plate...

User Guide
Page 10
... . 6 KODAK CAROUSEL® Slide Projector Check each mount in the order you wish to show them in the upper right-hand corner of the tray. Number each slide's orientation (horizontal or vertical), and arrange them . Insert your first slide, and so on the outer circumference of the film's shiny side. Then turn the slides upside down. Operation Adding...
... . 6 KODAK CAROUSEL® Slide Projector Check each mount in the order you wish to show them in the upper right-hand corner of the tray. Number each slide's orientation (horizontal or vertical), and arrange them . Insert your first slide, and so on the outer circumference of the film's shiny side. Then turn the slides upside down. Operation Adding...
User Guide
Page 11
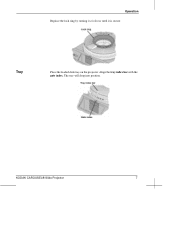
The tray will drop into position. Align the tray index bar with the gate index. Operation Replace the lock ring by turning it clockwise until it is secure Tray Place the loaded slide tray on the projector. KODAK CAROUSEL® Slide Projector 7
The tray will drop into position. Align the tray index bar with the gate index. Operation Replace the lock ring by turning it clockwise until it is secure Tray Place the loaded slide tray on the projector. KODAK CAROUSEL® Slide Projector 7
User Guide
Page 13
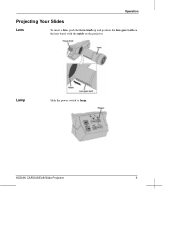
Lamp Slide the power switch to lamp. KODAK CAROUSEL® Slide Projector 9 Operation Projecting Your Slides Lens To insert a lens, push the focus knob up and position the lens gear teeth on the lens barrel with the notch on the projector.
Lamp Slide the power switch to lamp. KODAK CAROUSEL® Slide Projector 9 Operation Projecting Your Slides Lens To insert a lens, push the focus knob up and position the lens gear teeth on the lens barrel with the notch on the projector.

User Guide
Page 14
... desired slide, and • release the select bar. 10 KODAK CAROUSEL® Slide Projector Random Projection For random projection of slide mounts in the tray: • press and hold down the select bar, • rotate the tray to project the first slide. Operation Forward and Reverse Press the forward button on the remote control (Models 4400 and 5600 only). Focus Focus your first slide manually.
... desired slide, and • release the select bar. 10 KODAK CAROUSEL® Slide Projector Random Projection For random projection of slide mounts in the tray: • press and hold down the select bar, • rotate the tray to project the first slide. Operation Forward and Reverse Press the forward button on the remote control (Models 4400 and 5600 only). Focus Focus your first slide manually.
User Guide
Page 15
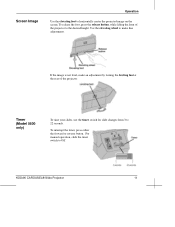
... adjustment by turning the leveling foot at the rear of the projector to the desired height. Use the elevating wheel to 22 seconds. To interrupt the timer, press either the forward or reverse button. Screen Image Operation Use the elevating foot to Off. If the image is not level, make fine adjustments. KODAK CAROUSEL® Slide Projector 11 For manual operation, slide the timer switch to horizontally center the projected image...
... adjustment by turning the leveling foot at the rear of the projector to the desired height. Use the elevating wheel to 22 seconds. To interrupt the timer, press either the forward or reverse button. Screen Image Operation Use the elevating foot to Off. If the image is not level, make fine adjustments. KODAK CAROUSEL® Slide Projector 11 For manual operation, slide the timer switch to horizontally center the projected image...
User Guide
Page 16
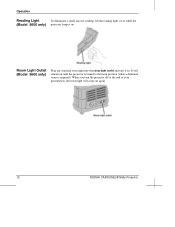
It will come on . Operation Reading Light To illuminate a small area for reading, lift the reading light cover while the (Model 5600 only) projector lamp is on until the projector is turned to the lamp position (when a darkened room is required). Room Light Outlet (Model 5600 only) Plug any standard room light into the room light outlet and turn the projector off at the end of your presentation, the room light will remain on . When you turn it on again. 12 KODAK CAROUSEL® Slide Projector
It will come on . Operation Reading Light To illuminate a small area for reading, lift the reading light cover while the (Model 5600 only) projector lamp is on until the projector is turned to the lamp position (when a darkened room is required). Room Light Outlet (Model 5600 only) Plug any standard room light into the room light outlet and turn the projector off at the end of your presentation, the room light will remain on . When you turn it on again. 12 KODAK CAROUSEL® Slide Projector
User Guide
Page 17
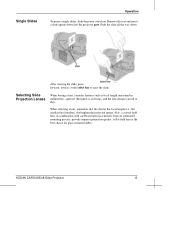
... open face mounts from an automated mounting process, provide superior projection quality. Single Slides Operation To project single slides, slide the power switch on. Push the slide all the way down into the projector gate. A flat ). After viewing the slide, press forward, reverse, or the select bar to eject the slide. KODAK CAROUSEL® Slide Projector 13 Remove the tray and insert a slide upside...
... open face mounts from an automated mounting process, provide superior projection quality. Single Slides Operation To project single slides, slide the power switch on. Push the slide all the way down into the projector gate. A flat ). After viewing the slide, press forward, reverse, or the select bar to eject the slide. KODAK CAROUSEL® Slide Projector 13 Remove the tray and insert a slide upside...
User Guide
Page 18
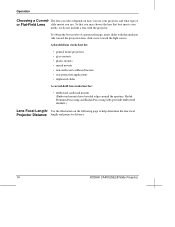
... lens works best for: • general home projection • glass mounts • plastic mounts • mixed mounts • non-embossed cardboard mounts • rear-projection applications • duplicated slides A curved-field lens works best for: • embossed cardboard mounts (Embossed mounts have beveled edges around the aperture. The lens you select depends on the following page to help determine the lens focal Projector Distance length and projector distance. 14 KODAK CAROUSEL...
... lens works best for: • general home projection • glass mounts • plastic mounts • mixed mounts • non-embossed cardboard mounts • rear-projection applications • duplicated slides A curved-field lens works best for: • embossed cardboard mounts (Embossed mounts have beveled edges around the aperture. The lens you select depends on the following page to help determine the lens focal Projector Distance length and projector distance. 14 KODAK CAROUSEL...
User Guide
Page 20
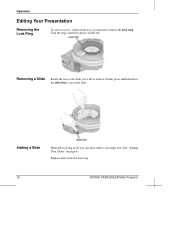
Firmly press and hold down the select bar to any empty slot. (See "Adding Your Slides" on page 6.) Replace and secure the lock ring. 16 KODAK CAROUSEL® Slide Projector Adding a Slide When the lock ring is off . Removing a Slide Rotate the tray to the slide you must first remove the lock ring. Operation Editing Your Presentation Removing the Lock Ring To add or remove slides in the tray, you wish to remove. Turn the ring counterclockwise and lift off , you can add a slide to eject the slide.
Firmly press and hold down the select bar to any empty slot. (See "Adding Your Slides" on page 6.) Replace and secure the lock ring. 16 KODAK CAROUSEL® Slide Projector Adding a Slide When the lock ring is off . Removing a Slide Rotate the tray to the slide you must first remove the lock ring. Operation Editing Your Presentation Removing the Lock Ring To add or remove slides in the tray, you wish to remove. Turn the ring counterclockwise and lift off , you can add a slide to eject the slide.
User Guide
Page 22
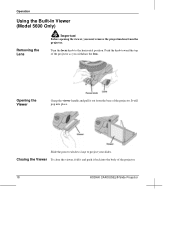
Operation Using the Built-In Viewer (Model 5600 Only) Removing the Lens Important Before opening the viewer, you must remove the projection lens from the base of the projector as you withdraw the lens. Push the knob toward the top of the projector. It will pop into the body of the projector. 18 KODAK CAROUSEL® Slide Projector Turn the focus knob to project your slides. Opening the Viewer Grasp the viewer...
Operation Using the Built-In Viewer (Model 5600 Only) Removing the Lens Important Before opening the viewer, you must remove the projection lens from the base of the projector as you withdraw the lens. Push the knob toward the top of the projector. It will pop into the body of the projector. 18 KODAK CAROUSEL® Slide Projector Turn the focus knob to project your slides. Opening the Viewer Grasp the viewer...

User Guide
Page 23
KODAK CAROUSEL® Slide Projector 19 Shutdown To shut down, • remove and store the tray • slide the power switch to off Your projector will remain warm for several minutes. Reinserting the Lens Operation To reinsert the lens, push the focus knob up and position the lens gear teeth on the lens barrel with the notch on the projector.
KODAK CAROUSEL® Slide Projector 19 Shutdown To shut down, • remove and store the tray • slide the power switch to off Your projector will remain warm for several minutes. Reinserting the Lens Operation To reinsert the lens, push the focus knob up and position the lens gear teeth on the lens barrel with the notch on the projector.
User Guide
Page 24
... projector before changing the lamp. 20 KODAK CAROUSEL® Slide Projector Projection Lamps Included: FHS lamp, 70-hour lamp life (medium-brightness) Sampling of CAROUSEL Projectors. Contact the Kodak Information Center at 1-800-242-2424 in Canada if you need help identifying your projector: • Allow the air to flow freely around the projector. • Do not recirculate warm air. • Keep the projector dust free. Maintenance To ensure a long life and trouble-free operation for older models...
... projector before changing the lamp. 20 KODAK CAROUSEL® Slide Projector Projection Lamps Included: FHS lamp, 70-hour lamp life (medium-brightness) Sampling of CAROUSEL Projectors. Contact the Kodak Information Center at 1-800-242-2424 in Canada if you need help identifying your projector: • Allow the air to flow freely around the projector. • Do not recirculate warm air. • Keep the projector dust free. Maintenance To ensure a long life and trouble-free operation for older models...
User Guide
Page 30
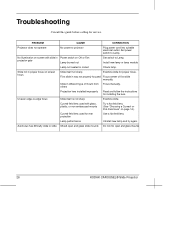
Install new lamp or lamp module Lamp not seated in tray not properly focused Focus center of mount from Focus manually. others Projection lens installed improperly Read and follow the instructions for proper focus. Curved field lens used for service. or Flat-Field Lens" on page 14.) Curved field lens used with slide in Power switch on Off or Fan projector gate Lamp burned out Set switch to slide Mixed open and glass slide mounts Do not mix open and...
Install new lamp or lamp module Lamp not seated in tray not properly focused Focus center of mount from Focus manually. others Projection lens installed improperly Read and follow the instructions for proper focus. Curved field lens used for service. or Flat-Field Lens" on page 14.) Curved field lens used with slide in Power switch on Off or Fan projector gate Lamp burned out Set switch to slide Mixed open and glass slide mounts Do not mix open and...

User Guide
Page 31
... projector. Reposition tray on projector Slide mount warped or frayed at corners slide. Check condenser lens. See "Clearing a Gate Jam" on a stand equal with center of screen. Check lamp. Check slide position and slidemount condition. Reposition tray. Set projector on page 17. 27 KODAK CAROUSEL® Slide Projector Projector not level or tilted too high Projection lamp not fully seated Condenser lens not installed or not positioned properly in mount Slide mount...
... projector. Reposition tray on projector Slide mount warped or frayed at corners slide. Check condenser lens. See "Clearing a Gate Jam" on a stand equal with center of screen. Check lamp. Check slide position and slidemount condition. Reposition tray. Set projector on page 17. 27 KODAK CAROUSEL® Slide Projector Projector not level or tilted too high Projection lamp not fully seated Condenser lens not installed or not positioned properly in mount Slide mount...
User Guide
Page 32
... may not apply to state. 28 KODAK CAROUSEL® Slide Projector Limitations This warranty does not cover circumstances beyond Kodak's control, projector lamps, or problems caused by failure to repair the projector, the option of replacement or refund of purchase, Kodak will not be responsible for worn-out projector lamps. Repair or replacement is unable to follow the care and operating instructions in the manual. Any modification to the original design...
... may not apply to state. 28 KODAK CAROUSEL® Slide Projector Limitations This warranty does not cover circumstances beyond Kodak's control, projector lamps, or problems caused by failure to repair the projector, the option of replacement or refund of purchase, Kodak will not be responsible for worn-out projector lamps. Repair or replacement is unable to follow the care and operating instructions in the manual. Any modification to the original design...


