User Guide
Page 2
... Connecting the USB cable 13 Turning on the scanner and finalizing Kodak Driver Software installation 13 Installing application software 15 Scanner components 16 3 Using the Scanner 18 Turning the scanner on and off 18 Adjusting the input and output trays 18 Start and stop scanning 19 Document preparation 19 Verifying your scanner installation 20 Viewing test images 23 Application...
... Connecting the USB cable 13 Turning on the scanner and finalizing Kodak Driver Software installation 13 Installing application software 15 Scanner components 16 3 Using the Scanner 18 Turning the scanner on and off 18 Adjusting the input and output trays 18 Start and stop scanning 19 Document preparation 19 Verifying your scanner installation 20 Viewing test images 23 Application...
User Guide
Page 10
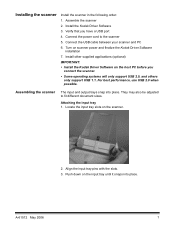
... PC 6. For best performance, use USB 2.0 when possible. Install other supplied applications (optional) IMPORTANT: • Install the Kodak Driver Software on scanner power and finalize the Kodak Driver Software installation 7. Install the Kodak Driver Software 3. Connect the power cord to fit different document sizes. Assembling the scanner The input and output trays snap into place. Push down on the...
... PC 6. For best performance, use USB 2.0 when possible. Install other supplied applications (optional) IMPORTANT: • Install the Kodak Driver Software on scanner power and finalize the Kodak Driver Software installation 7. Install the Kodak Driver Software 3. Connect the power cord to fit different document sizes. Assembling the scanner The input and output trays snap into place. Push down on the...
User Guide
Page 11
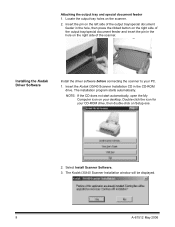
...output tray/special document feeder and insert the pin in the CD-ROM drive. The installation program starts automatically. Double-click the icon for your desktop. Insert the Kodak i30/i40 Scanner Installation CD in the hole on Setup.exe. 2. The Kodak i30/i40 Scanner Installation window will...click on the right side of the scanner. Installing the Kodak Driver Software Install the driver software before connecting the scanner to your PC. 1. Select Install Scanner Software. 3. Insert the pin on the left side of the output tray/special document feeder in the hole, then press the...
...output tray/special document feeder and insert the pin in the CD-ROM drive. The installation program starts automatically. Double-click the icon for your desktop. Insert the Kodak i30/i40 Scanner Installation CD in the hole on Setup.exe. 2. The Kodak i30/i40 Scanner Installation window will...click on the right side of the scanner. Installing the Kodak Driver Software Install the driver software before connecting the scanner to your PC. 1. Select Install Scanner Software. 3. Insert the pin on the left side of the output tray/special document feeder in the hole, then press the...

User Guide
Page 12
The Welcome window will be displayed: 6. A-61512 May 2006 9 The Software License Agreement window will be displayed depending upon what was previously installed on your computer. 4. After reading the agreement, click I Agree to continue. NOTE: This window may or may not be displayed: 5. Click Next. Click Yes.
The Welcome window will be displayed: 6. A-61512 May 2006 9 The Software License Agreement window will be displayed depending upon what was previously installed on your computer. 4. After reading the agreement, click I Agree to continue. NOTE: This window may or may not be displayed: 5. Click Next. Click Yes.

User Guide
Page 14
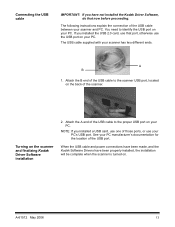
A-61512 May 2006 11 Verifying for a USB port After you need to determine if you install the Kodak Driver Software, check for the presence of the messages above, see the section entitled, "USB connection issues" in Chapter 6 Troubleshooting. The USB verification tool will check your ...
A-61512 May 2006 11 Verifying for a USB port After you need to determine if you install the Kodak Driver Software, check for the presence of the messages above, see the section entitled, "USB connection issues" in Chapter 6 Troubleshooting. The USB verification tool will check your ...
User Guide
Page 16
...of the scanner. See your PC. You need to identify the USB port on your PC manufacturer's documentation for the location of the USB cable between your PC. When the USB cable and power connections have been made, and the Kodak Software Drivers have not installed the Kodak Driver Software, do .... If you installed the USB 2.0 card, use the USB port on your scanner and PC. A B 1. Attach the B end of the USB cable to the scanner USB port, located on the scanner and finalizing Kodak Driver Software installation 2. Attach the A end of the USB cable to the proper USB ...
...of the scanner. See your PC. You need to identify the USB port on your PC manufacturer's documentation for the location of the USB cable between your PC. When the USB cable and power connections have been made, and the Kodak Software Drivers have not installed the Kodak Driver Software, do .... If you installed the USB 2.0 card, use the USB port on your scanner and PC. A B 1. Attach the B end of the USB cable to the scanner USB port, located on the scanner and finalizing Kodak Driver Software installation 2. Attach the A end of the USB cable to the proper USB ...
User Guide
Page 17
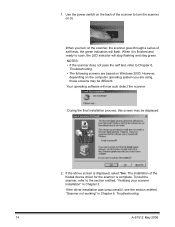
... test, refer to scan, the LED indicator will now auto detect the scanner. Your operating software will stop flashing and stay green. If the driver installation was unsuccessful, see the section entitled, "Scanner not working" in Chapter 3. During the final installation process, this screen may... 2000. However, depending on the computer operating system you turn the scanner on the scanner, the scanner goes through a series of the Kodak device driver for the scanner is displayed, select Yes. To test the scanner, refer to turn on (I). If the above screen is complete. ...
... test, refer to scan, the LED indicator will now auto detect the scanner. Your operating software will stop flashing and stay green. If the driver installation was unsuccessful, see the section entitled, "Scanner not working" in Chapter 3. During the final installation process, this screen may... 2000. However, depending on the computer operating system you turn the scanner on the scanner, the scanner goes through a series of the Kodak device driver for the scanner is displayed, select Yes. To test the scanner, refer to turn on (I). If the above screen is complete. ...

User Guide
Page 18
... instructions on how to install and use the software. You may also use . Installing application software The following Kodak scanning applications are available on the CDs packed with your scanner. Other scanning applications are also provided on the CDs packed with your scanner. • Kodak Capture Lite Software. • Kodak Scan Validation Tool. A-61512 May 2006 15 Review...
... instructions on how to install and use the software. You may also use . Installing application software The following Kodak scanning applications are available on the CDs packed with your scanner. Other scanning applications are also provided on the CDs packed with your scanner. • Kodak Capture Lite Software. • Kodak Scan Validation Tool. A-61512 May 2006 15 Review...

User Guide
Page 22
... weights can be arranged so the leading edges of all staples and paper clips before scanning is indicated by software developed for your application software. • A batch of documents to be fed into the scanner one at a time. • Staples and paper clips on and ready for more information regarding memory requirements). Paper Types...
... weights can be arranged so the leading edges of all staples and paper clips before scanning is indicated by software developed for your application software. • A batch of documents to be fed into the scanner one at a time. • Staples and paper clips on and ready for more information regarding memory requirements). Paper Types...
User Guide
Page 24
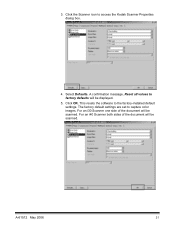
Click OK. For an i40 Scanner both sides of the document will be displayed. 5. A-61512 May 2006 21 3. For an i30 Scanner one side of the document will be scanned. Click the Scanner icon to the factory-installed default settings. Select Defaults. This resets the software to access the Kodak Scanner Properties dialog box. 4. The factory default settings are set to factory defaults will be scanned. A confirmation message, Reset all values to capture color images.
Click OK. For an i40 Scanner both sides of the document will be displayed. 5. A-61512 May 2006 21 3. For an i30 Scanner one side of the document will be scanned. Click the Scanner icon to the factory-installed default settings. Select Defaults. This resets the software to access the Kodak Scanner Properties dialog box. 4. The factory default settings are set to factory defaults will be scanned. A confirmation message, Reset all values to capture color images.

User Guide
Page 26
...Processing. A-61512 May 2006 23 image0000001B.jpg is a front image; Because factory default settings were used, the image quality may also use the software. Some scanning applications are available on the CDs packed with these applications for instructions on the C drive. You may not be optimized to ...testing has been completed, delete the test images. Files will be found in the TWAIN folder on how to meet your scanner. Viewing test images Application software The images you scanned can be named using the following naming convention: image0000001A.jpg is a back image.
...Processing. A-61512 May 2006 23 image0000001B.jpg is a front image; Because factory default settings were used, the image quality may also use the software. Some scanning applications are available on the CDs packed with these applications for instructions on the C drive. You may not be optimized to ...testing has been completed, delete the test images. Files will be found in the TWAIN folder on how to meet your scanner. Viewing test images Application software The images you scanned can be named using the following naming convention: image0000001A.jpg is a back image.
User Guide
Page 27
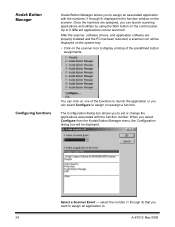
...May 2006 When you select Configure from the Kodak Button Manager menu, the Configuration dialog box will be displayed on the system tray. • Click on the control panel. After the scanner, software drivers, and application software are assigned, you can select Configure to ...assign or reassign a function. Select a Scanner Event - Kodak Button Manager Kodak Button Manager allows you to assign an associated application with the ...
...May 2006 When you select Configure from the Kodak Button Manager menu, the Configuration dialog box will be displayed on the system tray. • Click on the control panel. After the scanner, software drivers, and application software are assigned, you can select Configure to ...assign or reassign a function. Select a Scanner Event - Kodak Button Manager Kodak Button Manager allows you to assign an associated application with the ...
User Guide
Page 28
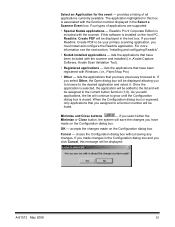
... that you assigned to be listed. lists the applications that have been included with the scanner. When the Configuration dialog box is included with the scanner and installed (i.e.,Kodak Capture Software, Kodak Scan Validation Tool). • Registered applications - Minimize and Close buttons - if you ... you made on the host PC, Readiris: Create PDF will be displayed in the Select a Scanner Event box. provides a listing of applications are supported: • Special Kodak applications - Paint Shop Pro) • Other - accepts the changes made changes in the Configuration...
... that you assigned to be listed. lists the applications that have been included with the scanner. When the Configuration dialog box is included with the scanner and installed (i.e.,Kodak Capture Software, Kodak Scan Validation Tool). • Registered applications - Minimize and Close buttons - if you ... you made on the host PC, Readiris: Create PDF will be displayed in the Select a Scanner Event box. provides a listing of applications are supported: • Special Kodak applications - Paint Shop Pro) • Other - accepts the changes made changes in the Configuration...

User Guide
Page 29
...click the icon for registration. 3. A registration key will be connected to the internet to be displayed: 2. Once you launch the Kodak Button Manager and/or the Readiris application. NOTE: If the CD does not start automatically, open the My Computer icon on your... 26 A-61512 May 2006 The Readiris registration dialog box will continue to register this software. NOTE: If you do not register the software now, a reminder box will be displayed every time you have registered the software, the OCR wizard box is no charge for your desktop. Installing and configuring Readiris...
...click the icon for registration. 3. A registration key will be connected to the internet to be displayed: 2. Once you launch the Kodak Button Manager and/or the Readiris application. NOTE: If the CD does not start automatically, open the My Computer icon on your... 26 A-61512 May 2006 The Readiris registration dialog box will continue to register this software. NOTE: If you do not register the software now, a reminder box will be displayed every time you have registered the software, the OCR wizard box is no charge for your desktop. Installing and configuring Readiris...

User Guide
Page 32
... Readiris" for the event list box. 4. option and browse to display the Kodak Button Manager and select Configure. Assigning function numbers 1. Select the desired application from the Select a Scanner Event dropdown box you must install and configure the Readiris application. IMPORTANT: •... dialog box will be displayed. 2. A-61512 May 2006 29 Assign as many function numbers (up to associate with the scanner. If this software is included with a particular application. 3. Select the function number from the Select an application for more information. •...
... Readiris" for the event list box. 4. option and browse to display the Kodak Button Manager and select Configure. Assigning function numbers 1. Select the desired application from the Select a Scanner Event dropdown box you must install and configure the Readiris application. IMPORTANT: •... dialog box will be displayed. 2. A-61512 May 2006 29 Assign as many function numbers (up to associate with the scanner. If this software is included with a particular application. 3. Select the function number from the Select an application for more information. •...
User Guide
Page 35
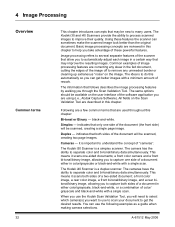
... resulting images. it scans both sides of a two-sided document; The Kodak i30 Scanner is a duplex scanner. a front color camera and a front bi-tonal/binary image, allowing you can get the desired results. Basic image processing concepts are using (i.e., Kodak Capture Software). Simplex - Cameras - The Kodak i40 Scanner is a simplex scanner. Using these powerful features. The idea is important to...
... resulting images. it scans both sides of a two-sided document; The Kodak i30 Scanner is a duplex scanner. a front color camera and a front bi-tonal/binary image, allowing you can get the desired results. Basic image processing concepts are using (i.e., Kodak Capture Software). Simplex - Cameras - The Kodak i40 Scanner is a simplex scanner. Using these powerful features. The idea is important to...
User Guide
Page 39
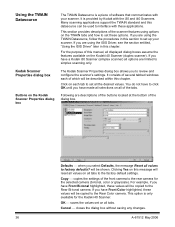
...will be copied to the factory default settings. OK saves the values set all of software that communicates with the i30 and i40 Scanners. This section provides descriptions of the scanner features using the ISIS Driver, see the section entitled, "Using the ISIS Driver" later in this... chapter. For the purpose of which will reset all values on all displayed dialog boxes assume the features available on the Kodak i40 Scanner (duplex scanner). Clicking Yes on this chapter. If you have Front Color highlighted, these values will be described within this message will be...
...will be copied to the factory default settings. OK saves the values set all of software that communicates with the i30 and i40 Scanners. This section provides descriptions of the scanner features using the ISIS Driver, see the section entitled, "Using the ISIS Driver" later in this... chapter. For the purpose of which will reset all values on all displayed dialog boxes assume the features available on the Kodak i40 Scanner (duplex scanner). Clicking Yes on this chapter. If you have Front Color highlighted, these values will be described within this message will be...

User Guide
Page 50
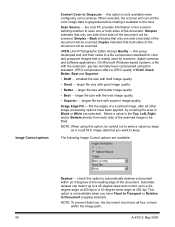
...Selection box lists the available sides (Front Color, Rear Color, etc.) of an image that is widely used by scanners, digital cameras and software applications. These options vary based on the type of the image. TIFF (Tagged Image File Format) is often used in various ...supported formats and resolutions independent of each other and each side of scanner. JPEG (Joint Photographic Editor Group). Compression the i30/i40 Scanners can ...
...Selection box lists the available sides (Front Color, Rear Color, etc.) of an image that is widely used by scanners, digital cameras and software applications. These options vary based on the type of the image. TIFF (Tagged Image File Format) is often used in various ...supported formats and resolutions independent of each other and each side of scanner. JPEG (Joint Photographic Editor Group). Compression the i30/i40 Scanners can ...
User Guide
Page 56
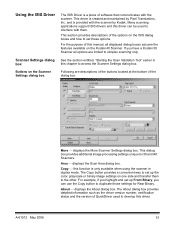
...as the driver version number, certification status and the version of the options on the Kodak i40 Scanner. This driver is a piece of the dialog box. and is only available when using the scanner in box this driver. Many scanning applications support ISIS drivers and this manual, all... options are descriptions of the buttons located at the bottom of software that communicates with them to access the Scanner Settings dialog box. For the purpose...
...as the driver version number, certification status and the version of the options on the Kodak i40 Scanner. This driver is a piece of the dialog box. and is only available when using the scanner in box this driver. Many scanning applications support ISIS drivers and this manual, all... options are descriptions of the buttons located at the bottom of software that communicates with them to access the Scanner Settings dialog box. For the purpose...
User Guide
Page 63
... whether to keep. Duplex indicates that you have been applied, by scanners, digital cameras and software applications. JPEG (Joint Photographic Editor Group) Quality - NOTE: When using this group developed and lent their name to Document cropping selected. This option is not available when you want to scan...Grayscale this option to enter a value too large as selected). When selected, the scanner will be filled. Simplex indicates that only one or both sides of the document will convert the color image data to grayscale before making it could fill in the Top, ...
... whether to keep. Duplex indicates that you have been applied, by scanners, digital cameras and software applications. JPEG (Joint Photographic Editor Group) Quality - NOTE: When using this group developed and lent their name to Document cropping selected. This option is not available when you want to scan...Grayscale this option to enter a value too large as selected). When selected, the scanner will be filled. Simplex indicates that only one or both sides of the document will convert the color image data to grayscale before making it could fill in the Top, ...


