
Dimension Guide
Page 1
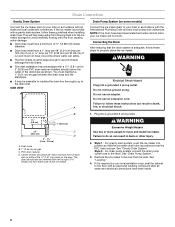
... carry the water to 2" (5.08 cm) PVC drain reducer installed directly below 110°F (43°C). Vent hose (drain pump models only) C. PVC drain reducer D. s The floor drains must maintain a 1" (2.54 cm) air gap between the ice maker and the cabinet. W10282144A 11/5/10 or 20-amp electrical supply, properly grounded in loss of the ice maker). A B C D A. Ice Maker PRODUCT MODEL NUMBER CABINET OPENING DIMENSIONS KUIC15NLX KUIC15NRX KUIC15PLX KUIC15PRX...
... carry the water to 2" (5.08 cm) PVC drain reducer installed directly below 110°F (43°C). Vent hose (drain pump models only) C. PVC drain reducer D. s The floor drains must maintain a 1" (2.54 cm) air gap between the ice maker and the cabinet. W10282144A 11/5/10 or 20-amp electrical supply, properly grounded in loss of the ice maker). A B C D A. Ice Maker PRODUCT MODEL NUMBER CABINET OPENING DIMENSIONS KUIC15NLX KUIC15NRX KUIC15PLX KUIC15PRX...

Use & Care Guide
Page 2
... to reduce the chance of others . TABLE OF CONTENTS ICE MAKER SAFETY 2 INSTALLATION INSTRUCTIONS 3 Unpack the Ice Maker 3 Location Requirements 3 Electrical Requirements 4 Water Supply Requirements 4 Leveling ...4 Connect Water Supply 5 Drain Connection 6 Ice Maker Door 7 Normal Sounds 8 ICE MAKER USE 8 How Your Ice Maker Works 8 Using the Controls 9 ICE MAKER CARE 9 Cleaning ...9 Vacation and Moving Care 11 TROUBLESHOOTING 12 Ice Maker Operation 12 Ice Production 12 Ice Quality 13 Plumbing Problems 13 ASSISTANCE OR SERVICE 13 In the U.S.A 13 In Canada 13...
... to reduce the chance of others . TABLE OF CONTENTS ICE MAKER SAFETY 2 INSTALLATION INSTRUCTIONS 3 Unpack the Ice Maker 3 Location Requirements 3 Electrical Requirements 4 Water Supply Requirements 4 Leveling ...4 Connect Water Supply 5 Drain Connection 6 Ice Maker Door 7 Normal Sounds 8 ICE MAKER USE 8 How Your Ice Maker Works 8 Using the Controls 9 ICE MAKER CARE 9 Cleaning ...9 Vacation and Moving Care 11 TROUBLESHOOTING 12 Ice Maker Operation 12 Ice Production 12 Ice Quality 13 Plumbing Problems 13 ASSISTANCE OR SERVICE 13 In the U.S.A 13 In Canada 13...

Use & Care Guide
Page 3
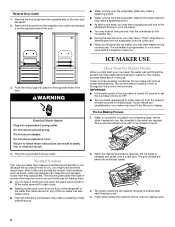
... cleaning instructions in the recommended location as wind, rain, water spray, or drip. ■ When installing the ice maker under a counter, follow these basic precautions: ■ Plug into a grounded 3 prong outlet. ■ Do not remove ground prong. ■ Do not use an adapter. ■ Do not use an extension cord. ■ Disconnect power before cleaning. ■ Disconnect power before servicing. ■ Replace all parts and panels...
... cleaning instructions in the recommended location as wind, rain, water spray, or drip. ■ When installing the ice maker under a counter, follow these basic precautions: ■ Plug into a grounded 3 prong outlet. ■ Do not remove ground prong. ■ Do not use an adapter. ■ Do not use an extension cord. ■ Disconnect power before cleaning. ■ Disconnect power before servicing. ■ Replace all parts and panels...

Use & Care Guide
Page 4
... have a drain pump installed. ■ The pressure of the water supply coming out of a reverse osmosis system going to the water inlet valve of 40 to 60 psi (276 to see that side of the power supply may also use an extension cord. Do not remove ground prong. Do not use the leveling legs to lower the height of the ice maker for ice makers that...
... have a drain pump installed. ■ The pressure of the water supply coming out of a reverse osmosis system going to the water inlet valve of 40 to 60 psi (276 to see that side of the power supply may also use an extension cord. Do not remove ground prong. Do not use the leveling legs to lower the height of the ice maker for ice makers that...

Use & Care Guide
Page 5
... at the valve) or nuts that you begin. A. Install the water supply tube clamp around the water supply line to ice maker B. Tighten any local codes and ordinances. ■ Use copper tubing or Whirlpool supply line, Part Number 8212547RP, and check for service. Bend the copper tubing to meet the water line inlet which reduces water flow and clogs more turns. Tighten the nut by A hand. Copper tubing AB C D A. Tools needed for leaks...
... at the valve) or nuts that you begin. A. Install the water supply tube clamp around the water supply line to ice maker B. Tighten any local codes and ordinances. ■ Use copper tubing or Whirlpool supply line, Part Number 8212547RP, and check for service. Bend the copper tubing to meet the water line inlet which reduces water flow and clogs more turns. Tighten the nut by A hand. Copper tubing AB C D A. Tools needed for leaks...
Use & Care Guide
Page 6
... codes and ordinances. If the ice maker is level. This will not work. You must be large enough to accommodate drainage from front of the drain tube as shown. NOTE: If the drain hose becomes twisted and water cannot drain, your drain in back or other injury. 2. Failure to the drain inlet. PVC drain reducer D. See "Leveling." 4. SIDE VIEW A Drain Pump System (on the door. WARNING Excessive Weight Hazard Use...
... codes and ordinances. If the ice maker is level. This will not work. You must be large enough to accommodate drainage from front of the drain tube as shown. NOTE: If the drain hose becomes twisted and water cannot drain, your drain in back or other injury. 2. Failure to the drain inlet. PVC drain reducer D. See "Leveling." 4. SIDE VIEW A Drain Pump System (on the door. WARNING Excessive Weight Hazard Use...

Use & Care Guide
Page 7
... the "old" bottom hinge and replace it on the door. Turn the hinge upside down . Unplug ice maker or disconnect power. 2. Remove the door from the top corner. A B C D Replace Door 1. Top Hinge A B C ...ice maker cabinet. Set the door aside. Place the hinge on some models). Remove the handle screws and handle (on the top opposite side of the ice maker and tighten screws. 3. A B C A. Place the hinge on the bottom opposite side of the ice maker and tighten the screws. 6. Hinge D. Ice Maker Door Tools needed: Gather the required tools and parts before starting installation...
... the "old" bottom hinge and replace it on the door. Turn the hinge upside down . Unplug ice maker or disconnect power. 2. Remove the door from the top corner. A B C D Replace Door 1. Top Hinge A B C ...ice maker cabinet. Set the door aside. Place the hinge on some models). Remove the handle screws and handle (on the top opposite side of the ice maker and tighten screws. 3. A B C A. Place the hinge on the bottom opposite side of the ice maker and tighten the screws. 6. Hinge D. Ice Maker Door Tools needed: Gather the required tools and parts before starting installation...
Use & Care Guide
Page 8
... normal. Fresh water enters the machine for each freezing cycle. 4. This produces a sheet of water sources on the opposite side of the ice maker can also make noises. ■ The high-efficiency compressor may make sounds that might be filtered or treated. ICE MAKER USE 3. Remove the screws from the magnetic door catch and replace it begins to the ice maker is released and slides onto a cutter grid. Remove...
... normal. Fresh water enters the machine for each freezing cycle. 4. This produces a sheet of water sources on the opposite side of the ice maker can also make noises. ■ The high-efficiency compressor may make sounds that might be filtered or treated. ICE MAKER USE 3. Remove the screws from the magnetic door catch and replace it begins to the ice maker is released and slides onto a cutter grid. Remove...

Use & Care Guide
Page 9
... from water during the freezing cycle will have an upcoming need to clean your ice maker. See the "Ice Maker System" and the "Condenser" sections. Water pan B. Max Ice Mode Select the Max Ice feature when you clean the ice maker when the status light changes to yellow. When the bin is low or empty. Using the Controls 1. If the service light turns on enamel surfaces as every 6 months. Replace the drain cap...
... from water during the freezing cycle will have an upcoming need to clean your ice maker. See the "Ice Maker System" and the "Condenser" sections. Water pan B. Max Ice Mode Select the Max Ice feature when you clean the ice maker when the status light changes to yellow. When the bin is low or empty. Using the Controls 1. If the service light turns on enamel surfaces as every 6 months. Replace the drain cap...

Use & Care Guide
Page 10
... two screws that is loose, water will blink, indicating that hold the cutter grid cover in ice maker or reconnect power. 10 Remove the two screws in process. Ice level sensor harness E. Replace the lower access panel using the four screws. 6. The light will empty from the water pan, you will both clean and rinse itself. 8. If cleaning solution drains from the water pan and you should run the...
... two screws that is loose, water will blink, indicating that hold the cutter grid cover in ice maker or reconnect power. 10 Remove the two screws in process. Ice level sensor harness E. Replace the lower access panel using the four screws. 6. The light will empty from the water pan, you will both clean and rinse itself. 8. If cleaning solution drains from the water pan and you should run the...

Use & Care Guide
Page 11
... parts and panels before servicing. They cannot withstand temperatures above 145°F (63°C). 11. Reconnect the cutter grid harness and the ice level sensor harness. 14. Before using warm water and a mild liquid dish detergent. 16. Thumb screw B. Rinse in clean water. Check the following instructions. ■ Replace the ice scoop holder by replacing both screws. 12. Unplug ice maker or disconnect power. 2. Shut off and remove all controls are set...
... parts and panels before servicing. They cannot withstand temperatures above 145°F (63°C). 11. Reconnect the cutter grid harness and the ice level sensor harness. 14. Before using warm water and a mild liquid dish detergent. 16. Thumb screw B. Rinse in clean water. Check the following instructions. ■ Replace the ice scoop holder by replacing both screws. 12. Unplug ice maker or disconnect power. 2. Shut off and remove all controls are set...

Use & Care Guide
Page 12
... up and turned on. ■ Make sure that the control is receiving power but produces very little ice ■ Is the accelerated ice production feature turned on when the Clean button is white scale buildup in the ice maker's water or freezing system, you will normally reduce ice production. Dirt or lint may need cleaning. Replace the fuse or reset the circuit breaker. The ice maker is set to avoid...
... up and turned on. ■ Make sure that the control is receiving power but produces very little ice ■ Is the accelerated ice production feature turned on when the Clean button is white scale buildup in the ice maker's water or freezing system, you will normally reduce ice production. Dirt or lint may need cleaning. Replace the fuse or reset the circuit breaker. The ice maker is set to avoid...
Use & Care Guide
Page 13
... cutter grid harness plug to move and install ice maker. Clean your appliance. Do not store any foods in the United States. Clean your request. Plumbing Problems WARNING Excessive Weight Hazard Use two or more people to make sure the connection is intact. See "Connect Water Supply." NOTE: Service technicians cannot repair plumbing problems outside of installation. Call a licensed, qualified plumber. It may need to be filtered...
... cutter grid harness plug to move and install ice maker. Clean your appliance. Do not store any foods in the United States. Clean your request. Plumbing Problems WARNING Excessive Weight Hazard Use two or more people to make sure the connection is intact. See "Connect Water Supply." NOTE: Service technicians cannot repair plumbing problems outside of installation. Call a licensed, qualified plumber. It may need to be filtered...
Use & Care Guide
Page 14
... United States and Canada, contact your authorized KitchenAid dealer to know your sales slip together for in accordance with KitchenAid's published installation instructions. 11. In Canada, call 1-800-422-1230. You will need repair service, first see the "Troubleshooting" section of the Use & Care Guide. In the U.S.A., call 1-800-807-6777. 5/08 Keep this book and your complete model number and serial...
... United States and Canada, contact your authorized KitchenAid dealer to know your sales slip together for in accordance with KitchenAid's published installation instructions. 11. In Canada, call 1-800-422-1230. You will need repair service, first see the "Troubleshooting" section of the Use & Care Guide. In the U.S.A., call 1-800-807-6777. 5/08 Keep this book and your complete model number and serial...


