KitchenAid KUID508HPS Support and Manuals
Get Help and Manuals for this KitchenAid item
View All Support Options Below
Free KitchenAid KUID508HPS manuals!
Problems with KitchenAid KUID508HPS?
Ask a Question
Free KitchenAid KUID508HPS manuals!
Problems with KitchenAid KUID508HPS?
Ask a Question
KitchenAid KUID508HPS Videos

KitchenAid KUID508HPS Ice Maker
Duration: :45
Total Views: 69
Duration: :45
Total Views: 69
KitchenAid KUID508HPS Machines à glaçon
Duration: :44
Total Views: 5
Duration: :44
Total Views: 5
Popular KitchenAid KUID508HPS Manual Pages
Owners Manual - Page 1

... ice maker at www.kitchenaid.ca. Disconnect power before servicing. SAVE THESE INSTRUCTIONS
State of California Proposition 65 Warnings: WARNING: This product contains one or more chemicals known to the State of California to cause cancer. User Guide
Ice Maker
LEARN MORE
In an effort to conserve natural resources, this manual and on the inside...
Owners Manual - Page 5
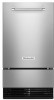
...® Stainless Steel Cleaner
In U.S.A., order Part Number W10355010
In U.S.A., order Part Number W10355016
In Canada, order Part Number W10355010B
In Canada, order Part Number W10355016B
TROUBLESHOOTING
Visit producthelp.kitchenaid.com for the drain pump to follow these instructions can result in excess of ice. Ice Maker Operation
WARNING
PROBLEM Ice Maker Will Not Operate
Ice Maker...
Owners Manual - Page 6
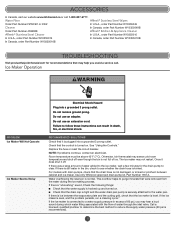
... move and install ice maker. Replace all packaging materials were removed at the time of installation. Clean the... shock.
NOTE: Service technicians cannot repair plumbing problems outside of ice in back or other ...parts and panels before servicing. Ensure that the cutter grid is securely in the same amount of Ice
If there is connected. If there are no ice. PROBLEM...
Owners Manual - Page 8

..., dents, chips, and other than the limited warranty that comes with
replacement parts for appliances with electrical or plumbing codes, or correction of product replacement, your product requires repair. interfere with servicing, removal, or replacement of the Use and Care Guide or visit producthelp.kitchenaid.com.
2. FOURTH THROUGH FIFTH YEAR LIMITED WARRANTY (SEALED REFRIGERATION SYSTEM...
Dimension Guide - Page 1

...: Dimensional specifications are appropriately UL, CUL or CSA approved.
19-Mar-2019 01:02:51 EDT | RELEASED
In some European factories the letter "W" of the part code mentioned herein will be automatically replaced by the number "4000" (e.g. Refer to door fully
open
177/8
45.4
G Depth without handle)
PRODUCT DIMENSIONS
A
D C
E
B FRONT VIEW
. All KitchenAid® appliances...
Dimension Guide - Page 2

... Guide before selecting cabinetry, verifying electrical/gas connections, making cutouts or beginning installation. Do not make any cutouts based on this information. "W12345678" becomes "400012345678") DETAILED PLANNING DIMENSIONS
18" ICE MACHINES
KUID308H/ KUID508H/ KUIO338H - E F G H
Wall
A*
B*
C*
SIDE VIEW
D*
I
Depth of the part code mentioned herein will be automatically replaced...
Dimension Guide - Page 3

... osmosis, follow these instructions. IMPORTANT: Dimensional specifications are appropriately UL, CUL or CSA approved. distance from side
849/64
22.25
M Power supply - W11349806A 19-Mar-2019 01:02:51 EDT | RELEASED
®/™ ©2019 KitchenAid. distance from back wall. Reverse Osmosis Water Supply
IMPORTANT: The use of the part code mentioned herein will...
Installation Instructions - Page 1
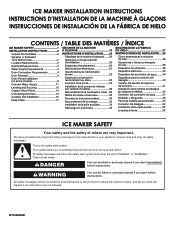
... provided many important safety messages in this manual and on some models 8 Connect Water Supply 11 Leveling and Securing 12 Custom Wood Panel 14 Connecting the Drain 16 Auxiliary Grill Installation 16 Deep Clean 17
SÉCURITÉ DE LA MACHINE À GLAÇONS 19 INSTRUCTIONS D'INSTALLATION..........20
Déballage de la machine à...
Installation Instructions - Page 2
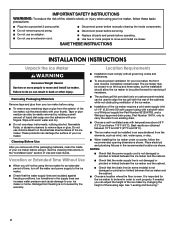
...install ice maker. Disconnect power before manually cleaning the inside of the leveling legs. Replace all governing codes and ordinances.
■■ To ensure proper ventilation for an extended period of Use and Care Guide...an extension cord. It is important for servicing if necessary.
■■ The auxiliary grill kit provided (only on some models) is not damaged or pinched or ...
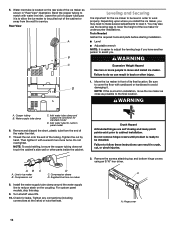
Installation Instructions - Page 5
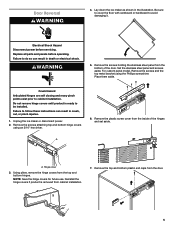
...Reinstall the hinge covers if product is ready to be installed. Replace all parts and panels before servicing. Remove the screws attaching top and bottom hinge covers
using...set aside. WARNING
5. Remove the screws holding the stainless steel panel from the inside of the door.
Lay down the ice maker as shown in crush, cut, or pinch injuries.
1. Failure to follow these instructions...
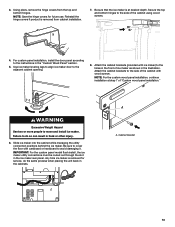
Installation Instructions - Page 8
...codes and ordinances.
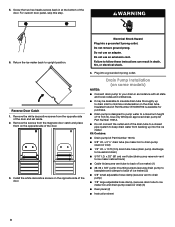
■■ It may be desirable to insulate drain tube thoroughly up into the ice maker. Do not remove ground prong. Do not use an adapter. Drain Pump Installation (on the drain tube. Kit Contains:
■■ Drain pump kit Part...to follow these instructions can result in at the bottom of the door and set aside. 2. Reverse Door Catch 1. Install the white ...
Installation Instructions - Page 9
Unplug ice maker or disconnect power. 3. Remove all parts and panels before servicing. Unscrew the drain cap from the bottom of the opening.
6. Drain cap
5. If ice maker is not installed, please proceed to fall
into the storage bin. See "Water Supply Line" illustration. For standard model discard the rear panel. Screw locations for standard...
Installation Instructions - Page 11

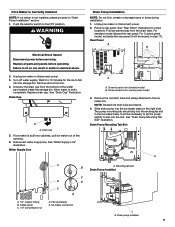
... disinfection before starting installation:
■■ 7/16" and 1/2" open-end wrenches or two adjustable wrenches
NOTE: Do not use with the International Plumbing Code and any local codes and ordinances.
■■ Use copper tubing or Whirlpool supply line, Part Number 8212547RP, and check for leaks. See "Parts Locations" illustration. For standard model, skip to rear...
Installation Instructions - Page 12
... connector for service.
Remove the screws attaching top and bottom hinge covers using an 3/16" hex driver. Supplied line from the end of the cabinet or away from the wall for standard model
D. Hinge cover
12 Do not overtighten. Water inlet tube is to allow the ice maker to follow these instructions can result...
Installation Instructions - Page 13
... IMPORTANT: For the custom panel model flush install, the ice maker utility connections ... (provided with cardboard or hardboard to the instructions in the "Custom Wood Panel" section.
...installation." Using pliers, remove the hinge covers from cabinet installation.
7. 3. NOTE: Save the hinge covers for service, do so can result in the illustration. For custom panel installation, install...
KitchenAid KUID508HPS Reviews
We have not received any reviews for KitchenAid yet.