
Owners Manual
Page 1
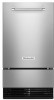
... www.kitchenaid.ca. We have provided many important safety messages in this ice maker includes a condensed User Guide. Your safety and the safety of California to move and install ice maker. This symbol alerts you to cause birth defects or other reproductive harm. 1 W11246207A Do not use an adapter. Always read and obey all parts and panels before operating. IMPORTANT SAFETY INSTRUCTIONS...
... www.kitchenaid.ca. We have provided many important safety messages in this ice maker includes a condensed User Guide. Your safety and the safety of California to move and install ice maker. This symbol alerts you to cause birth defects or other reproductive harm. 1 W11246207A Do not use an adapter. Always read and obey all parts and panels before operating. IMPORTANT SAFETY INSTRUCTIONS...
Owners Manual
Page 2
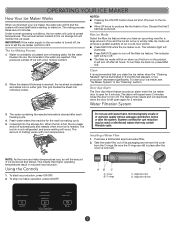
... set the ice maker control to OFF. Close the door to turn off power to the ice maker. ■■ Allow 24 hours to make ice. Water Filtration System 3. Fresh water enters the machine for a large amount of melting varies with a low mineral content. When the bin is low or empty. The amount of ice and the ice bin is full, the ice maker shuts off . Installing a Water Filter 1. Take the water filter out of ice...
... set the ice maker control to OFF. Close the door to turn off power to the ice maker. ■■ Allow 24 hours to make ice. Water Filtration System 3. Fresh water enters the machine for a large amount of melting varies with a low mineral content. When the bin is low or empty. The amount of ice and the ice bin is full, the ice maker shuts off . Installing a Water Filter 1. Take the water filter out of ice...

Owners Manual
Page 3
... locked symbol on the water filter status display or at least every 9 months. AB C D F A. See "Using the Controls." If the ice making them. ■■ You will automatically reset the filter status tracking feature. Using the arrow pointing to release the latch, and then lower the door. 18" (45.7 cm) models 15" (38.1 cm) models On/o Turned See Clean UUnseitaonfdBeCfaorreeGCuleidaening Max Ice TurSneUenUitseo aCnlBedeaCfnoarree CGlueaidneing...
... locked symbol on the water filter status display or at least every 9 months. AB C D F A. See "Using the Controls." If the ice making them. ■■ You will automatically reset the filter status tracking feature. Using the arrow pointing to release the latch, and then lower the door. 18" (45.7 cm) models 15" (38.1 cm) models On/o Turned See Clean UUnseitaonfdBeCfaorreeGCuleidaening Max Ice TurSneUenUitseo aCnlBedeaCfnoarree CGlueaidneing...
Owners Manual
Page 5
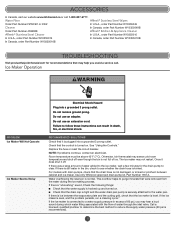
... amount of water through the inlet valve. RECOMMENDED SOLUTIONS Check that the ice maker is level. If there is plugged into a grounded 3 prong outlet. Water overflowing the reservoir is level, and the problem persists, run a cleaning cycle." Once it does shut it is still water in death, fire, or electrical shock. Use only Whirlpool approved drain pump kit, Part Number 1901A. Ice Maker Operation WARNING PROBLEM Ice Maker Will Not Operate Ice Maker Seems Noisy...
... amount of water through the inlet valve. RECOMMENDED SOLUTIONS Check that the ice maker is level. If there is plugged into a grounded 3 prong outlet. Water overflowing the reservoir is level, and the problem persists, run a cleaning cycle." Once it does shut it is still water in death, fire, or electrical shock. Use only Whirlpool approved drain pump kit, Part Number 1901A. Ice Maker Operation WARNING PROBLEM Ice Maker Will Not Operate Ice Maker Seems Noisy...
Owners Manual
Page 6
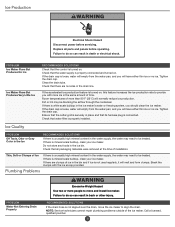
... water may need to be treated. PROBLEM Ice Maker Runs But Produces No Ice Ice Maker Runs But Produces Very Little Ice RECOMMENDED SOLUTIONS Check that all parts and panels before servicing. Do not store any foods in place and that there are clumps of more ice in the ice maker's water or freezing system, you will normally reduce ice production. Clean the drain tube. Check that its harness plug is not used...
... water may need to be treated. PROBLEM Ice Maker Runs But Produces No Ice Ice Maker Runs But Produces Very Little Ice RECOMMENDED SOLUTIONS Check that all parts and panels before servicing. Do not store any foods in place and that there are clumps of more ice in the ice maker's water or freezing system, you will normally reduce ice production. Clean the drain tube. Check that its harness plug is not used...

Owners Manual
Page 8
... limited warranty. 8. Repairs to parts or systems to correct product damage or defects caused by the use your product requires repair. This limited warranty is reported to chemicals. 10. If you call the Customer eXperience Center: Name, address, and telephone number Model number and serial number A clear, detailed description of the problem Proof of the Use and Care Guide or visit producthelp.kitchenaid.com...
... limited warranty. 8. Repairs to parts or systems to correct product damage or defects caused by the use your product requires repair. This limited warranty is reported to chemicals. 10. If you call the Customer eXperience Center: Name, address, and telephone number Model number and serial number A clear, detailed description of the problem Proof of the Use and Care Guide or visit producthelp.kitchenaid.com...

Dimension Guide
Page 3
... osmosis system needs to be a minimum of the part code mentioned herein will be turned off by the number "4000" (e.g. All rights reserved. 03/19 In some European factories the letter "W" of 40 to 60 psi (276 to the Installation or Use & Care Guide before selecting cabinetry, verifying electrical/gas connections, making cutouts or beginning installation. IMPORTANT: Dimensional specifications are appropriately...
... osmosis system needs to be a minimum of the part code mentioned herein will be turned off by the number "4000" (e.g. All rights reserved. 03/19 In some European factories the letter "W" of 40 to 60 psi (276 to the Installation or Use & Care Guide before selecting cabinetry, verifying electrical/gas connections, making cutouts or beginning installation. IMPORTANT: Dimensional specifications are appropriately...
Installation Instructions
Page 1
... is the safety alert symbol. ICE MAKER INSTALLATION INSTRUCTIONS INSTRUCTIONS D'INSTALLATION DE LA MACHINE À GLAÇONS INSTRUCCIONES DE INSTALACIÓN DE LA FÁBRICA DE HIELO CONTENTS / TABLE DES MATIÈRES / ÍNDICE ICE MAKER SAFETY 1 INSTALLATION INSTRUCTIONS 2 Unpack the Ice Maker 2 Vacation or Extended Time Without Use 2 Location Requirements 2 Electrical Requirements 3 Water Supply Requirements 4 Drain Connection Requirements 4 Door Reversal 5 Drain Pump Installation (on your appliance. W11246206B...
... is the safety alert symbol. ICE MAKER INSTALLATION INSTRUCTIONS INSTRUCTIONS D'INSTALLATION DE LA MACHINE À GLAÇONS INSTRUCCIONES DE INSTALACIÓN DE LA FÁBRICA DE HIELO CONTENTS / TABLE DES MATIÈRES / ÍNDICE ICE MAKER SAFETY 1 INSTALLATION INSTRUCTIONS 2 Unpack the Ice Maker 2 Vacation or Extended Time Without Use 2 Location Requirements 2 Electrical Requirements 3 Water Supply Requirements 4 Drain Connection Requirements 4 Door Reversal 5 Drain Pump Installation (on your appliance. W11246206B...
Installation Instructions
Page 2
... leveling legs. See the cleaning instructions in the supply lines can be closed-in an area sheltered from the exterior of the ice maker, rub the area briskly with your ice maker, follow the recommended opening dimensions shown. Damage from your ice maker before using your fingers. If needed, you remove all parts and panels before servicing. Location Requirements ■■ Installation must comply with all governing codes...
... leveling legs. See the cleaning instructions in the supply lines can be closed-in an area sheltered from the exterior of the ice maker, rub the area briskly with your ice maker, follow the recommended opening dimensions shown. Damage from your ice maker before using your fingers. If needed, you remove all parts and panels before servicing. Location Requirements ■■ Installation must comply with all governing codes...
Installation Instructions
Page 3
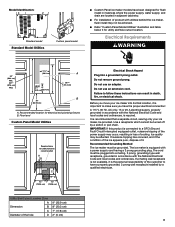
... outlet. Utility Slot/Cutout Location Zone A Dimension B C Diameter of the hole D 9" (22.9 cm) 8" (20.3 cm) 7" (17.8 cm) 2" (5 cm) 3 Ice quality may be affected. It is required. Model Identification: Standard model Standard Model Utilities Custom panel model ■■ Custom Panel ice maker models have been designed for flush install in instances where the power supply, water supply, and drain are located in adjacent cabinetry. ■...
... outlet. Utility Slot/Cutout Location Zone A Dimension B C Diameter of the hole D 9" (22.9 cm) 8" (20.3 cm) 7" (17.8 cm) 2" (5 cm) 3 Ice quality may be affected. It is required. Model Identification: Standard model Standard Model Utilities Custom panel model ■■ Custom Panel ice maker models have been designed for flush install in instances where the power supply, water supply, and drain are located in adjacent cabinetry. ■...
Installation Instructions
Page 4
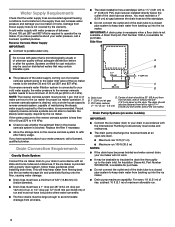
... models) IMPORTANT: ■■ Connect the ice maker drain to refill after the system. Drain Pump System (on the reverse osmosis system to your drain in accordance with a gravity drain system, follow these guidelines when installing drain lines. An Insulation Sleeve kit, Part Number W10365792, is available for cyst reduction may be used on the door. Ice formations in the reverse osmosis system is required to potable water...
... models) IMPORTANT: ■■ Connect the ice maker drain to refill after the system. Drain Pump System (on the reverse osmosis system to your drain in accordance with a gravity drain system, follow these guidelines when installing drain lines. An Insulation Sleeve kit, Part Number W10365792, is available for cyst reduction may be used on the door. Ice formations in the reverse osmosis system is required to potable water...
Installation Instructions
Page 7
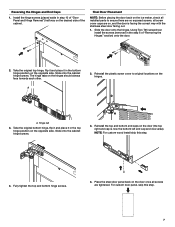
Reversing the Hinges and End Caps 1. Slide the door onto the hinges. Using Torx T25 screwdriver install the screws (removed in the top hinge position on the opposite side. Place the steel door panel back on the door once all screw cover caps are tightened. Slide onto the cabinet hinge screws...6 of the cabinet. Take the original bottom hinge, flip it and place it in step 10 of "Door Panel and Hinge Removal") half way on the ice maker, check all installed parts to original locations on the hinges should always face towards each other. Fully tighten the top and bottom hinge ...
Reversing the Hinges and End Caps 1. Slide the door onto the hinges. Using Torx T25 screwdriver install the screws (removed in the top hinge position on the opposite side. Place the steel door panel back on the door once all screw cover caps are tightened. Slide onto the cabinet hinge screws...6 of the cabinet. Take the original bottom hinge, flip it and place it in step 10 of "Door Panel and Hinge Removal") half way on the ice maker, check all installed parts to original locations on the hinges should always face towards each other. Fully tighten the top and bottom hinge ...
Installation Instructions
Page 8
... the drain tube to a closed pipe system to insulate drain tube thoroughly up into the ice maker. Insulated tube kit Part Number W10365792 is available for purchase. ■■ Drain pump is designed to pump water to ice maker bin and drain pump reservoir inlet) (3) ■■ Rear panel (2) ■■ Instruction sheet 8 Use only Whirlpool approved drain pump kit Part Number 1901A. ■■ Do not connect the outlet end of the door. 3. x 32" (81 cm) vent tube (drain pump reservoir vent to ice maker cabinet...
... the drain tube to a closed pipe system to insulate drain tube thoroughly up into the ice maker. Insulated tube kit Part Number W10365792 is available for purchase. ■■ Drain pump is designed to pump water to ice maker bin and drain pump reservoir inlet) (3) ■■ Rear panel (2) ■■ Instruction sheet 8 Use only Whirlpool approved drain pump kit Part Number 1901A. ■■ Do not connect the outlet end of the door. 3. x 32" (81 cm) vent tube (drain pump reservoir vent to ice maker cabinet...
Installation Instructions
Page 9
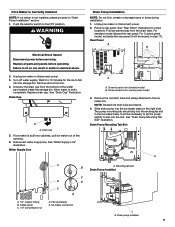
... opening. 6. Allow water to the ice maker bin. Drain cap 5. Unplug ice maker or disconnect power. 2. Remove rear panel. NOTE: Discard old drain tube and clamp. 4. See "Drain Pump Mounting Tab Slot" illustration. WARNING Electrical Shock Hazard Disconnect power before operating. See "Water Supply Line" illustration. Water Supply Line A B C B D C E A. 1/4" copper tubing B. Ice maker connection Drain Pump Installation NOTE: Do not kink, smash or damage tubes or wires during installation. 1. See "Rear Panel" illustration for custom panel model 3. Screw locations for...
... opening. 6. Allow water to the ice maker bin. Drain cap 5. Unplug ice maker or disconnect power. 2. Remove rear panel. NOTE: Discard old drain tube and clamp. 4. See "Drain Pump Mounting Tab Slot" illustration. WARNING Electrical Shock Hazard Disconnect power before operating. See "Water Supply Line" illustration. Water Supply Line A B C B D C E A. 1/4" copper tubing B. Ice maker connection Drain Pump Installation NOTE: Do not kink, smash or damage tubes or wires during installation. 1. See "Rear Panel" illustration for custom panel model 3. Screw locations for...

Installation Instructions
Page 10
... clamps. Coil ice maker power cord into the receptacle of the drain pump. See "Parts Locations" illustration. 12. x 5¹⁄8") from ice maker bin to drain pump) D. See "Drain Tube" illustration. Wiring cover B. Drain pump reservoir inlet 10 Install vent tube (5/16" I H C G E F A. Use plastic retainer to keep the cord in place. 10. NOTE: Do not install household drain tube this time. Parts Locations Vent Tube NOTE: Do not pinch, kink or damage the vent tube. Drain pump power cord, clamp...
... clamps. Coil ice maker power cord into the receptacle of the drain pump. See "Parts Locations" illustration. 12. x 5¹⁄8") from ice maker bin to drain pump) D. See "Drain Tube" illustration. Wiring cover B. Drain pump reservoir inlet 10 Install vent tube (5/16" I H C G E F A. Use plastic retainer to keep the cord in place. 10. NOTE: Do not install household drain tube this time. Parts Locations Vent Tube NOTE: Do not pinch, kink or damage the vent tube. Drain pump power cord, clamp...

Installation Instructions
Page 11
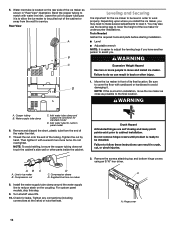
... ice maker as it will remain above freezing. A A B A. Screw compression nut onto outlet end with original screws. Compression nut C. IMPORTANT: Always drain the water line before starting installation: ■■ 7/16" and 1/2" open-end wrenches or two adjustable wrenches NOTE: Do not use with the International Plumbing Code and any local codes and ordinances. ■■ Use copper tubing or Whirlpool supply line, Part Number...
... ice maker as it will remain above freezing. A A B A. Screw compression nut onto outlet end with original screws. Compression nut C. IMPORTANT: Always drain the water line before starting installation: ■■ 7/16" and 1/2" open-end wrenches or two adjustable wrenches NOTE: Do not use with the International Plumbing Code and any local codes and ordinances. ■■ Use copper tubing or Whirlpool supply line, Part Number...
Installation Instructions
Page 12
... with water line inlet. Failure to avoid damaging it . Check for standard model D. Bend the copper tubing to move the ice maker as close as it with a wrench two more people to match with cardboard or hardboard to follow these instructions can result in installation, move and install ice maker. WARNING Excessive Weight Hazard Use two or more turns. Inlet water tube for undercounter installations. Compression sleeve D. For custom panel models...
... with water line inlet. Failure to avoid damaging it . Check for standard model D. Bend the copper tubing to move the ice maker as close as it with a wrench two more people to match with cardboard or hardboard to follow these instructions can result in installation, move and install ice maker. WARNING Excessive Weight Hazard Use two or more turns. Inlet water tube for undercounter installations. Compression sleeve D. For custom panel models...

Installation Instructions
Page 16
... drain pump outlet hose to do so can result in back or other injury. 1. First, complete all water and electrical connections have been made. 6. Ensure ice maker is to align the toe grill with an approved caulking compound after all installation steps and install leveled ice maker into the ice maker. Place grill onto cabinetry. Electrical Shock Hazard Plug into cabinet. Do not use...
... drain pump outlet hose to do so can result in back or other injury. 1. First, complete all water and electrical connections have been made. 6. Ensure ice maker is to align the toe grill with an approved caulking compound after all installation steps and install leveled ice maker into the ice maker. Place grill onto cabinetry. Electrical Shock Hazard Plug into cabinet. Do not use...

Installation Instructions
Page 17
.... Remove, clean and replace the ice scoop holder and ice scoop. Open the storage bin door and remove any ice that holds the water pan in the upper left of the unit. Unplug ice maker or disconnect power. 2. Unplug the wiring harness from the cutter grid cover. 5. NOTE: On some models) 8. Deep Clean Interior Components 1. Screw (on the water pan. Unplug the ice level sensor from the cutter grid. 7. D A B E C F A. Drain pump cover 10...
.... Remove, clean and replace the ice scoop holder and ice scoop. Open the storage bin door and remove any ice that holds the water pan in the upper left of the unit. Unplug ice maker or disconnect power. 2. Unplug the wiring harness from the cutter grid cover. 5. NOTE: On some models) 8. Deep Clean Interior Components 1. Screw (on the water pan. Unplug the ice level sensor from the cutter grid. 7. D A B E C F A. Drain pump cover 10...
Installation Instructions
Page 18
... clean water. To replace the water pan, set properly and that all controls are flashing. Hook up the water pan pump. After cleaning, make sure that no ice. ■■ Hose from water pan is loose, water will empty from the water pan is a registered trademark of Whirlpool, U.S.A. 18 We recommend using the *affresh® Ice Machine Cleaner part number 4396808. *affresh® is securely in place. Rinse in ice maker or reconnect power...
... clean water. To replace the water pan, set properly and that all controls are flashing. Hook up the water pan pump. After cleaning, make sure that no ice. ■■ Hose from water pan is loose, water will empty from the water pan is a registered trademark of Whirlpool, U.S.A. 18 We recommend using the *affresh® Ice Machine Cleaner part number 4396808. *affresh® is securely in place. Rinse in ice maker or reconnect power...


